Move contacts, messages, photos, videos, app data, and more between iOS and Android.

 100% Security Verified | No Subscription Required | No Malware

 :
: 
 ChatGPT
 Perplexity
 Gemini
 Claude
 Grok
Grok
Transferring messages from one iPhone to another is a common necessity in today's digital landscape. It often arises during device upgrades, hardware replacements, or when you simply need to share vital professional and personal information between daily driver devices. With the rapid evolution of iOS versions stretching into 2026, the underlying methods for migrating your communication history have significantly adapted and improved. Regardless of whether you are moving from an older generation or handling the latest flagship, properly migrating your SMS texts, iMessages, and multimedia attachments remains undeniably relevant.
This comprehensive guide will go through multiple techniques designed specifically for those asking how to transfer messages from iPhone to iPhone without iCloud. While cloud-based backups are common, they are often hindered by strict storage limits and Apple ID restrictions. Our primary goal is to provide you with the necessary knowledge and versatile solutions for directly migrating your conversations. We will ensure a smooth, risk-free transition process by offering clear step-by-step guidance and professional-level tips.




In this article
- Part 1. How To Sync Messages Between Two iOS Devices?
- Part 2. How To Transfer Messages From iPhone to iPhone Using iCloud Backup
- Part 3. How To Transfer Messages From iPhone to iPhone via iTunes/Finder
- Part 4. The Best Way To Transfer Messages From iPhone to iPhone Without Resetting
- Pro Tip. How To View and Export Messages of iPhone on Your Computer/MacBook
Part 1: How To Sync Messages Between Two iOS Devices?
Synchronizing messages directly between two iOS devices remains a highly convenient native route. It ensures that standard text conversations, iMessages, and high-resolution attachments migrate securely from one handset to another in real-time. Although Apple primarily leans on its proprietary server infrastructure to achieve this continuous synchronization, it serves as a baseline solution for users prioritizing official channels. By establishing this link, you empower your profile to maintain chat continuity across any hardware sharing the same credentials.
-
Step 1 Access Apple ID Settings
First, verify that you are fully signed into the required Apple ID on both your old and new devices. Proceed by navigating to the native "Settings" app on the source hardware and tapping directly on your "Apple ID" banner at the top of the menu list. On the ensuing profile screen, securely press "iCloud" to reveal your cloud storage components.

-
Step 2 Toggle Messages Synchronization
Next, selectively tap the "Show All" option located under the "Apps Using iCloud" parameter. Scroll down and press "Messages in iCloud." Once you transition to the following configuration interface, actively toggle on the switch labeled "Use on this iPhone," and immediately tap the manual "Sync Now" button to push your current inbox data outward.

-
Step 3 Finalize Configuration on Target Device
To conclude the setup, grab your secondary target iPhone and mimic the exact pathway: access "Settings," tap your Apple ID, select "iCloud," and drill down to "Messages in iCloud." On this newly configured screen, confidently enable "Use on this iPhone." Please allow the system several moments to thoroughly cross-reference and sync the inboxes across both active screens.

Part 2. How To Transfer Messages From iPhone to iPhone Using iCloud Backup
Relying on a comprehensive server backup offers a robust, all-in-one methodology for users upgrading to brand-new handsets. It formally guarantees the migration of nearly all localized conversations, incoming attachments, and broad chat histories. Nonetheless, a substantial operational limitation dictates that this specific maneuver can exclusively be triggered during the initial setup wizard of an empty, factory-reset iPhone. Furthermore, it operates as a blanket restoration; you lack the autonomy to isolate and migrate messages selectively without pulling over the entire archive.
-
Step 1 Initiate the Backup Parameter
Begin by strictly confirming that your older iPhone maintains a steady connection to a secure and reliable Wi-Fi network. Launch the "Settings" hub, tap on your profile name at the apex, and delve into "iCloud." From here, locate "iCloud Backup" and explicitly ensure the primary toggle switch assigned to "Back Up This iPhone" is illuminated green.

-
Step 2 Trigger Immediate Processing
Within this exact submenu, forcefully press "Back Up Now" to instantly instruct the device to package its current state. Wait patiently for the progress indicator to achieve total completion. Following a successful upload, power on the new destination iPhone and carefully follow the initial configuration prompts until you officially encounter the "Apps & Data" milestone screen.

-
Step 3 Complete Data Reintegration
At this crucial juncture, firmly opt for "Restore from iCloud Backup." Proceed to correctly authenticate your Apple ID account using the exact identical credentials invoked during the prior backup step. Identify and pick the most recently generated backup file containing your targeted texts. Once the overarching restoration protocol finalizes and the device reboots, promptly open the core Messages application to visually verify that your previous correspondence remains perfectly intact.

Part 3. How To Transfer Messages From iPhone to iPhone via iTunes/Finder
If you are extensively searching for how to transfer messages from iphone to iphone without icloud free, leveraging standard desktop environments like iTunes or Mac Finder provides a formidable, entirely offline alternate method. iTunes remains available for Windows operating systems and legacy macOS Mojave setups, whereas modern users running macOS Catalina and newer iterations intuitively rely on the native Finder application to orchestrate this heavy lifting. By completely bypassing web storage limitations, this local approach flawlessly bundles and restores your previous handset's localized data, which organically encompasses your full messaging database.
Before proceeding, strictly ensure that both connected iPhones are fully patched to relatively equivalent iOS versions and that your desktop host computer harbors the most recent build of either iTunes or Finder. Taking this preventative measure radically reduces the chances of encountering frustrating compatibility disruptions during the intricate restoration workflow.
-
Step 1 Generate an Offline Desktop Archive
Commence operations by linking your aging source iPhone directly to the Mac or PC via a certified data cable. Command iTunes or Finder to access the recognized hardware. Within the iTunes interface, click the small smartphone icon to reach the "Summary" tab; if utilizing Finder, organically click your device name and stay parked on the "General" tab. Scroll towards the "Backups" partition and deliberately command a "Back Up Now" sequence. Crucially, dictate that this archive is stored locally by toggling "This Computer" (iTunes) or checking "Backup all data from your iPhone to this Mac" (Finder).

-
Step 2 Funnel the Archive into the New Phone
The moment the localized package concludes compiling, detach the old unit and immediately initiate the setup sequence on the brand-new iPhone. The instant you hit the familiar "Apps & Data" page, intentionally select "Restore from Mac or PC."
For Finder/iTunes Handling: Connect this fresh iPhone to the same USB port and grant access by interacting with the upper-left “Device” icon. This triggers the "Welcome to Your New iPhone" prompt overlay, where the "Restore from this backup" function should be pre-highlighted. Deliberately select your newly created archive from the dropdown list and confidently click "Continue" to actively inject the text histories right back into the hardware environment.

Part 4. The Best Way To Transfer Messages From iPhone to iPhone Without Resetting
While native tools function decently for full backups, both fundamentally necessitate an overarching, destructive device reset to apply the packaged payload. Furthermore, attempting direct synchronization is heavily gated and strictly limited to hardware actively sharing the identical Apple ID configuration. Therefore, if you genuinely seek an advanced, non-destructive, and hassle-free method, Wondershare Dr.Fone consistently emerges as your optimal, professional-grade choice. It is heavily recognized as a reliable and wildly efficient desktop solution meticulously engineered to simplify migrating complex data clusters seamlessly between smartphones.
With this specialized utility deployed, individuals can accurately isolate and directly push their textual content from one operating device to another utilizing just one click, cleanly sidestepping any factory wipes. Because of its incredible flexibility, it serves as the ultimate answer for those needing to learn how to transfer text messages from iphone to iphone without icloud.
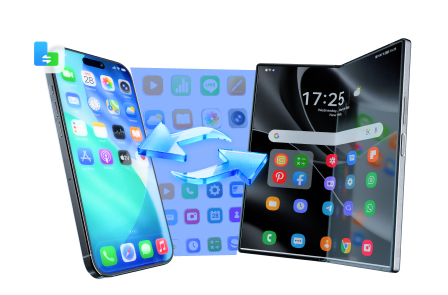
 Move data between iOS to Android and vice versa.
- Transfer contacts, SMS, photos, videos, music, and more types.
- Available with all phones with Android and iOS versions.
- Simple, click-through process.
Key Features of Wondershare Dr.Fone
- Fully optimized to remain entirely compatible with the latest firmware revisions, including iOS 17, as well as maintaining pristine support for modern hardware iterations up through 2026.
- This powerful Phone Transfer architecture fundamentally guarantees operations with a staggering list of over 8000 unique global devices, effortlessly encompassing major brands like Apple, Samsung, Google, and beyond.
- Wondershare Dr.Fone goes beyond basic messaging, actively facilitating the seamless cross-transfer of up to 15 different critical file categories spanning contacts, call logs, media, and calendar events.
Steps To Transfer Messages From iPhone to iPhone Without Backup via Dr.Fone
Even if you possess zero technical expertise, navigating the Wondershare Dr.Fone graphical interface is stunningly intuitive. Here is the definitive workflow explaining how to securely transfer conversations directly without touching cloud infrastructures:
-
Step 1 Bootstrapping the Primary Transfer Module
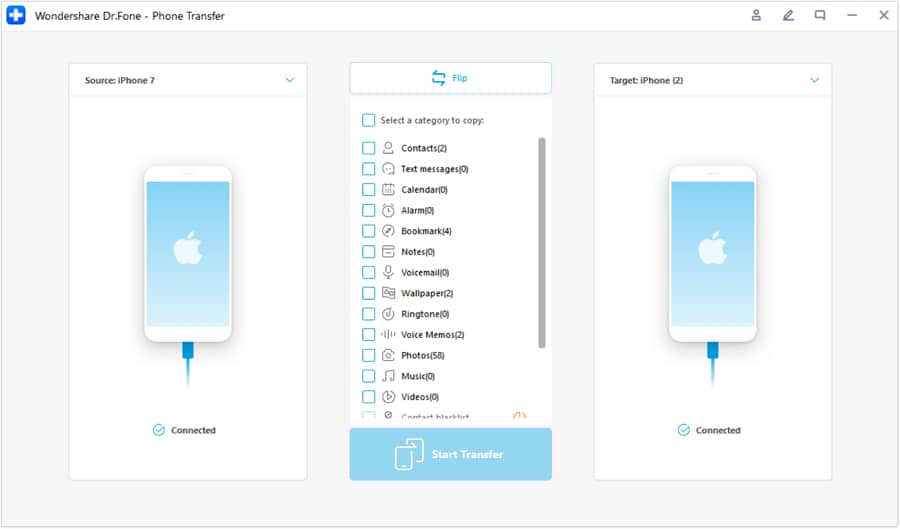
Begin by properly installing and subsequently launching the core Wondershare Dr.Fone application on your Windows or Mac host computer. Effortlessly navigate to the central "Toolbox" directory and purposefully click on the specialized "Phone Transfer" module to transition into the migration hub. Concurrently connect both respective iOS devices securely via high-speed USB cables, and allow the background drivers to briefly process and load them onto the following screen. In this crucial stage, you must explicitly designate the specific “Source” hardware and correct “Destination” target to dictate the one-way directional flow of your private texts. Should the visual arrangement appear inverted, rapidly tap the designated “Flip” icon residing at the top center.

-
Step 2 Pinpoint the Message Category and Ignite the Process
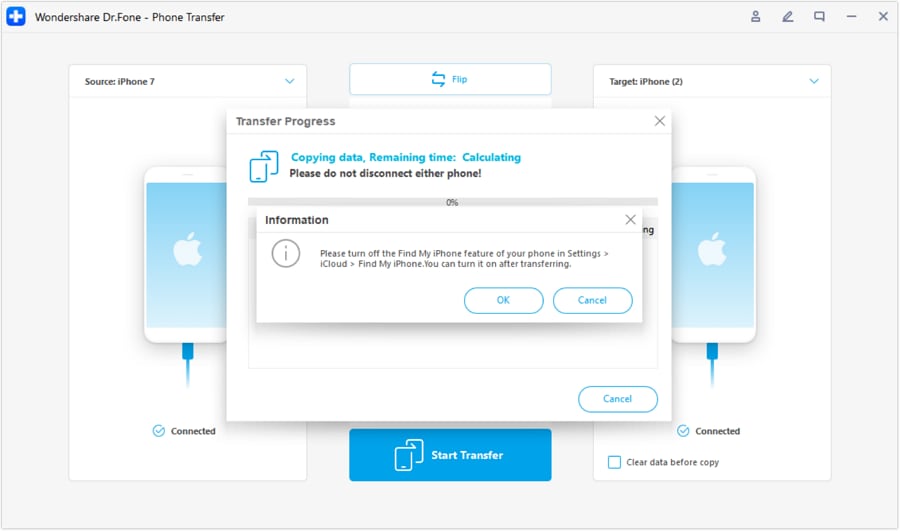
Following absolute confirmation that both source and destination pointers accurately reflect your intent, systematically review the granular center column detailing all readable internal data metrics. Deliberately isolate and ensure the checkbox corresponding strictly to "Messages" is emphatically marked. You retain full autonomy to tag any additional companion media, but once fully satisfied, aggressively click the bottom-right "Start Transfer" button. Immediately upon doing so, a localized warning notification may appear prompting you to temporarily override and disable the native Find My feature residing on the receiving iOS hardware to prevent security conflicts.
-
Step 3 Neutralize the Tracking Protocol and Await Completion
To comply with Apple's security handover, physically unlock the target iOS device, navigate deeply into its main settings, tap on your profile banner at the extreme top, and sequentially proceed through iCloud > Find My, forcefully deactivating the switch. The exact second this security feature successfully stands down, Dr.Fone will dynamically trigger the extraction and injection sequence, displaying a rapidly filling progress bar indicating real-time transmission blocks. Upon achieving 100% completion, the primary front application window prominently broadcasts a completion badge highlighting a successfully finished phone transfer. Firmly press "OK" to ultimately finalize this highly efficient operation and safely disconnect the devices.
Pro Tip. How To View and Export Messages of iPhone on Your Computer/MacBook
Are you simultaneously hunting for a practical, transparent avenue to distinctly view, audit, and systematically export your threaded messages straight from your mobile iPhone onto the sprawling screen of a desktop computer? If the answer is an absolute yes, utilizing Wondershare Dr.Fone has got you completely covered. The core Dr.Fone suite intrinsically offers an exceptionally robust, full-fledged iOS management ecosystem that empowers unprecedented control regarding granular data exportation directly originating from your tightly locked iOS partition.
This unparalleled internal functionality actively empowers power users and everyday consumers alike to manually formulate a deeply parsed, readable offline backup containing individual conversations onto their localized file system. Review exactly how easily you can actively view, parse, and securely export precious chat threads using this tool:
- Effortlessly manage data through preview, delete, export, etc.
- Transfer all data between devices.
- Robust backup solutions for reliable data protection.
- Mirror screens to PC for meetings, teaching, and control.

-
Step 1 Dive Into the Extracted Application Directory
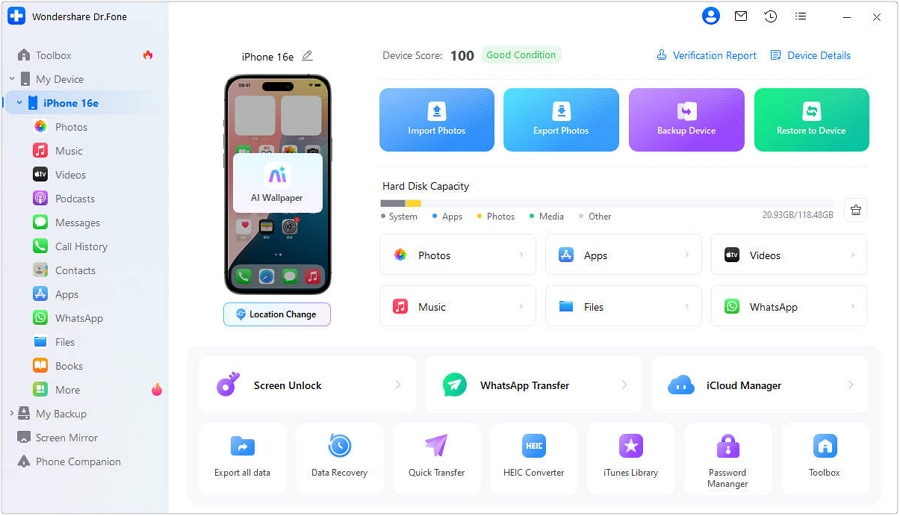
Start the comprehensive parsing workflow by establishing a secure, tethered link firmly connecting your active iOS hardware straight into the desktop computer utilizing a certified USB interface connection. Seconds after the physical device is reliably authenticated and actively detected by the software suite, its core identification metrics and hardware specifics will prominently display vividly on the application's central dashboard. Immediately proceed by deliberately clicking on the dedicated “Messages” categorical option neatly positioned under the device application sidebar resting vertically on the far-left perimeter of the screen.
-
Step 2 Siphon the Desired Text Threads Outward
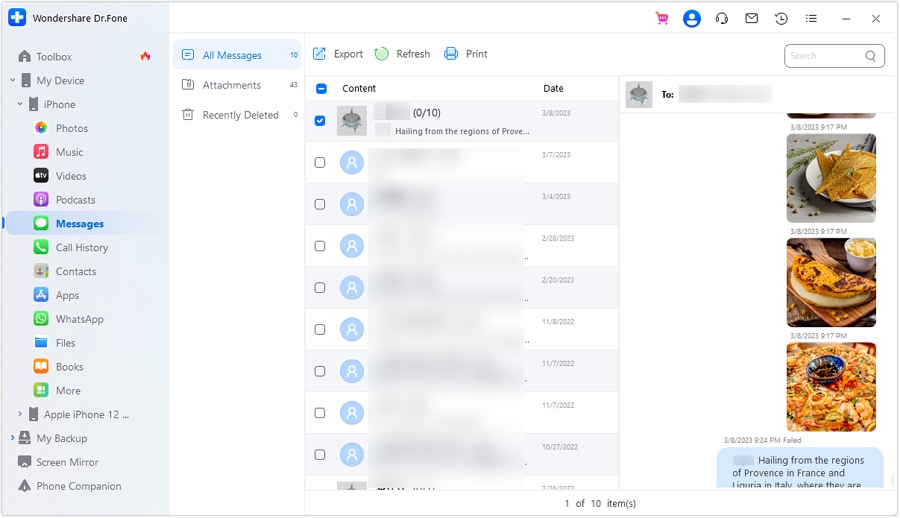
Within moments, the centralized viewing pane will meticulously populate, openly displaying all historical text snippets, expansive group chats, embedded emojis, and corresponding heavy file attachments previously trapped inside the iPhone interface. To officially capture them, deliberately select the particular conversational threads utilizing the integrated checkboxes, followed immediately by pressing the prominently displayed "Export" action button residing squarely at the top navigational ribbon. Dr.Fone affords the ultimate flexibility to cleanly extract and save these precious dialogues into widely readable, universal file formats such as formatted Excel sheets, standard CSV arrays, or heavily standardized PDF documents showcasing every minute detail.
Conclusion
In final reflection, grasping the detailed nuances of transferring messages from iPhone to iPhone stands as a crucially pivotal task necessary for preserving uninterrupted communication continuity in both professional and personal realms. Regardless of whether an individual chooses to patiently utilize native Apple infrastructure like iTunes/Finder, deeply rely on the cloud, or smartly leverage highly specialized third-party desktop bridging solutions, every singular method definitively offers highly distinctive situational advantages.
Yet, for fundamentally effortless, surgically precise data transfers entirely devoid of destructive device resets and strict account alignment requirements, Wondershare Dr.Fone predictably emerges as a critically acclaimed standout alternative. By blending an exceptionally intuitive user interface, uncompromising selective data tagging capabilities, and robust direct export tools, it swiftly transforms into a deeply versatile ideal solution. For maintaining totally flawless and remarkably efficient cross-device SMS and iMessage handling, Dr.Fone remains our premier recommended instrument moving forward.
FAQ
-
1. Can I transfer messages from iPhone to iPhone without iCloud or computer?
Yes. Various modern third-party migration apps natively built into iOS or available strictly via wireless pathways permit transferring certain data types directly over robust Wi-Fi channels, entirely sidestepping iCloud protocols and bypassing hardwired desktop computer connections. -
2. Will transferring messages forcefully overwrite existing data on my newer iPhone?
If you proceed down the path of implementing iCloud restoration or utilizing official iTunes/Finder packaged archives, it will absolutely overwrite any currently residing localized data, primarily because it mandates executing a complete factory wipe. Conversely, specialized third-party desktop bridging utilities such as Wondershare Dr.Fone permit surgically appending SMS threads safely without carelessly overwriting pre-existing files. -
3. What is the typical duration required to fully push messages via an iTunes archive?
The overarching time-frame inherently heavily fluctuates, strictly dictating that a smaller backup processed strictly over a modernized high-speed desktop processor may breeze through in 15 minutes, whereas immensely bloated archives harboring terabytes of media attachments funneled through outdated USB cables might demand upwards of an hour to properly compile and push. -
4. Are my deeply buried, previously deleted messages automatically transferred during data migration?
No. Mainstream foundational techniques like the core iCloud framework or the localized iTunes bridging platform strictly catalog and transport active texts that are directly visible within the operating device interface at the moment of packaging. Outright permanently deleted correspondence simply cannot leap across boundaries unless inadvertently secured inside a significantly older, entirely separate historical backup package.
 Add Wondershare Dr.Fone as a preferred source on Google