iOS 27 Update Failed? 9 Fixes for Download and Install Errors

Nov 04, 2026 • Filed to: Phone Repair Solutions • Proven solutions
 TL;DR:
- Download or check error: try another Wi-Fi network before resetting settings or deleting a VPN configuration.
- Downloaded but will not install: use Settings > General > iPhone Storage > [iOS update] > Delete Update, then download again.
- Apple logo with a progress bar: keep the iPhone powered and let installation finish. A slow bar alone is not a reason to force restart.
- Repeated failure: try Finder or Apple Devices Update. Restore, advanced repair, and downgrading can erase data; do not choose them as interchangeable update buttons.
Ask AI for a summary
 ChatGPT
 Perplexity
 Gemini
 Claude
 Grok
iOS 27 update failed? If your iPhone still opens Settings, connect it to power, check Wi-Fi and available storage, then delete the downloaded update and try again. If wireless updating keeps failing, use a computer's Update option before considering an erasing Restore. The right next step depends on whether the failure happens while downloading, installing, or restarting.
This guide covers iOS 27 first and also includes an iOS 26 troubleshooting branch. Install only a compatible version offered for your device. Back up your iPhone before updating or attempting system repair; no troubleshooting method guarantees a successful installation.
- Part 1. Why Did Your iOS 27 Update Fail to Install?
- Part 2. How to Fix the iOS 27 Software Update Failed Issue?
- Fix 1. Check Internet Connection for Stability
- Fix 2. Restart Your iPhone
- Fix 3. Turn On and Off Airplane Mode
- Fix 4. Temporarily Disconnect a Personal VPN
- Fix 5. Free Up Storage and Redownload the Update
- Fix 6. Reset Network Settings
- Fix 7. Review Restrictions Without Removing Device Management
- Fix 8. Update Using Finder, Apple Devices, or iTunes
- Fix 9. Verify Apple Server Status

- Part 3. Consider Dr.Fone for a Supported iOS Upgrade or Repair
- Part 4. Ways to Avoid iOS 27 Software Update Failure
Part 1. Why Did Your iOS 27 Update Fail to Install?
An iOS 27 software update failed message can result from a download connection problem, insufficient device storage, an incomplete update package, or device/version incompatibility. The alert alone does not identify the cause. An iPhone stuck during installation needs a different path from one that can still open Settings.
- Compatibility: check the model in Settings > General > About; a repair tool cannot add support for an incompatible iPhone.
- Storage: the iPhone needs room to download and install the update. The required space varies; use the amount requested onscreen rather than a universal GB target.
- Connection: a working webpage does not prove the update download or verification can reach its service. Test another network.
- Power: keep the phone connected to a power source during installation and follow its prompts.
- Update availability: network or service problems can affect a check or download, but a failed update is not proof of an Apple outage.
Can this iPhone install iOS 27 or iOS 26?
| Version | Supported iPhone groups | Practical boundary |
|---|---|---|
| iOS 27 | Apple lists the iPhone 11 through iPhone 17 families, iPhone 16e, iPhone 17e, iPhone Air, iPhone 18 Pro, iPhone 18 Pro Max, and iPhone SE (2nd and 3rd generation). | Use the update offered for your specific model. Not every feature is available on every compatible phone. |
| iOS 26 | Apple's iOS 26 guide lists the iPhone 11 through iPhone 17 families, iPhone 16e, iPhone 17e, iPhone Air, and iPhone SE (2nd and 3rd generation). | iPhone X, XR, XS, and iPhone SE (1st generation) are not in these supported lists. Do not try to force an incompatible update. |
Sources: Apple's iOS 27 compatibility list and Apple's iOS 26 compatibility list.
iPhone won't update to iOS 26? The network, storage, and downloaded-update checks below also apply to an iOS 26 update failed message. Start with another Wi-Fi network, then delete and redownload the update; if it still fails, follow the complete computer Update workflow. If iOS 26 is not offered, do not assume a tool can install that particular version: availability and device compatibility still apply. For a beta build, use the separate beta and public-release guidance.
Part 2. How to Fix the iOS 27 Software Update Failed Issue?
If you are dealing with iOS 27 upgrade issues or an iOS 27 failed update, match your current screen to a starting point. You do not need to try every fix in order.
| What you see | Start here | When to switch paths |
|---|---|---|
| Software Update Failed, Unable to Check for Update, or download error | Test another network and temporarily disconnect a personal VPN. | If repeated on multiple networks, redownload the package or use a computer. |
| Not enough storage or downloaded but unable to install iOS 27 | Review iPhone Storage and the downloaded update. | If no downloaded update appears, use computer Update. |
| Unable to verify update | Check service clues and retry on another network. | A green status page does not rule out a local connection issue. |
| Apple logo with a progress bar | Keep power connected and assess progress. | Only escalate if installation never completes or the phone is unresponsive. |
| Connect-to-computer screen or Apple logo without a progress bar for several minutes | Use the computer/recovery path. | Try Update before an erasing Restore; seek service if recovery fails. |
Fix 1. Check Internet Connection for Stability
For an iOS 27 unable to download error or Unable to Check for Update, start with Wi-Fi rather than deleting data. Apple recommends trying the same network again, then another network or a computer.
- Open a webpage to check basic internet access. Pause other large downloads and retry Settings > General > Software Update.
- If the alert repeats, try a different trusted Wi-Fi network. If another network works, focus on the original network rather than restoring the phone.
- To reconnect to your own saved network, first have its password ready. Open Settings > Wi-Fi, tap the information button beside the network, choose Forget This Network, confirm, then reconnect with the password.
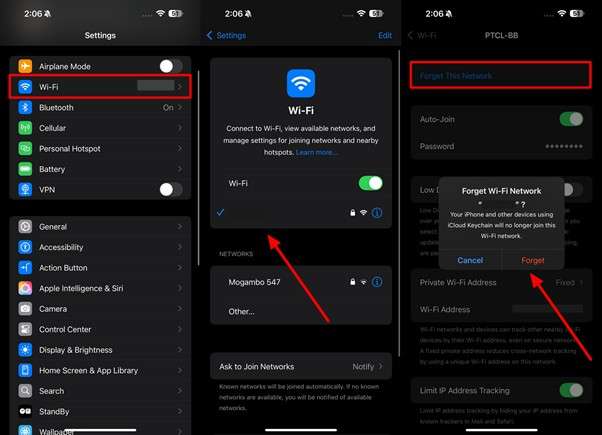
If the failure repeats across networks, continue to delete and download the update again. Screenshots in these manual fixes are examples from an earlier interface; wording and layout can differ on your iPhone.
Fix 2. Restart Your iPhone
If Settings still works: try a normal restart, reconnect to Wi-Fi, and retry the update. A restart can clear a temporary software problem, but it cannot fix an incompatible version or an outage.
If the phone is unresponsive: for iPhone 8 or later, including the iPhone SE (2nd and 3rd generation), press and quickly release Volume Up, then press and quickly release Volume Down. Next, hold the Side button until the Apple logo appears. These are successive actions, not simultaneous presses.
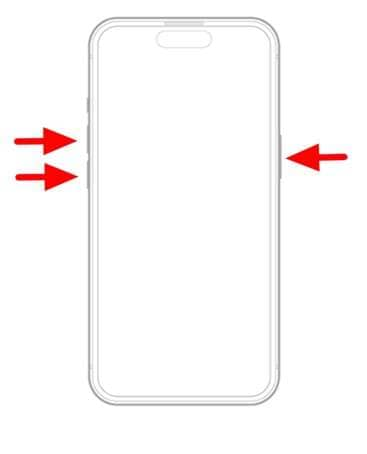
Apple logo with a progress bar: keep the phone connected to power and allow the process to complete. Apple says the bar can appear static or restart. If pressing a button shows an updating message, installation is still ongoing. Do not interrupt an active installation just because it seems slow. If the process never completes or the device is unresponsive, Apple advises a force restart; if the problem continues, use computer recovery or seek service.
See Apple's progress-bar guidance and force-restart instructions.
Fix 3. Turn On and Off Airplane Mode
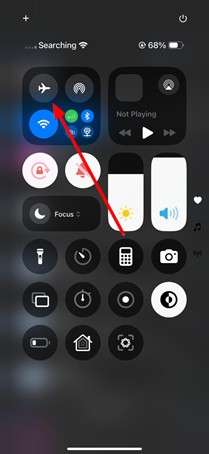
For a download-stage connection problem, toggling Airplane Mode is a reversible reconnect attempt. It does not erase saved networks or reset every network setting. Skip this while an update is actively installing.
Step 1. Open Control Center by swiping down from the top-right corner on a Face ID iPhone, or swiping up from the bottom on a Home button model. If Airplane Mode is off, tap the airplane icon to turn it on.
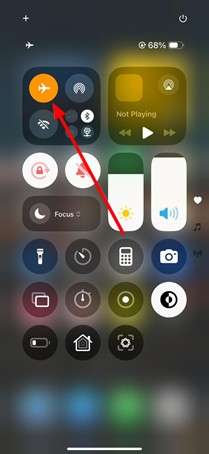
Step 2. Turn Airplane Mode off again, reconnect to your Wi-Fi network, and retry Software Update. Wi-Fi can remain enabled in Airplane Mode, so confirm the actual Wi-Fi connection rather than relying on the airplane icon alone. No particular wait time guarantees a fix.
Fix 4. Temporarily Disconnect a Personal VPN
Test a personal VPN connection before deleting its configuration. A VPN or filtered network can interfere with an update connection, but not every VPN is the cause. If this is a work or school iPhone, ask your administrator before changing managed network settings.
Step 1. Open Settings > General > VPN & Device Management and inspect the VPN connection. You can also disconnect your own VPN from its app.
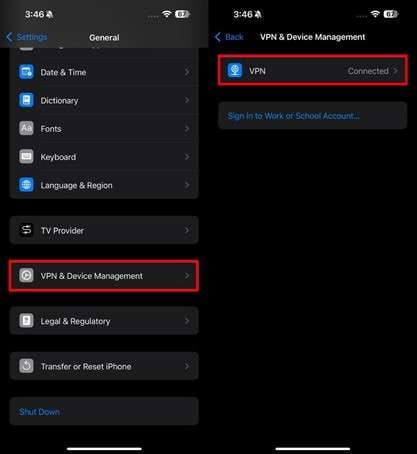
Step 2. Temporarily disconnect your personal VPN, reconnect to trusted Wi-Fi, and retry the update. If this helps, troubleshoot that VPN connection. Remove a personal VPN configuration only if you own it, have its setup details, and intend to remove it; Delete VPN is not required for every update error. Restore your preferred security setup after testing.
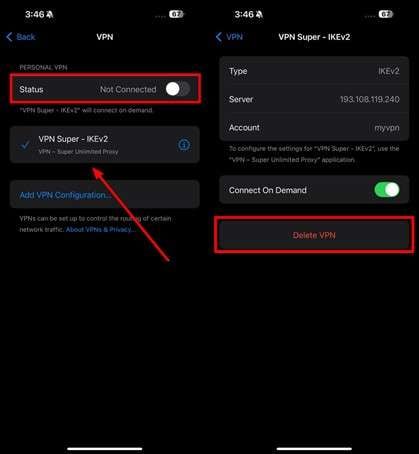
Do not remove a management or configuration profile as a generic fix. Apple notes that removing a profile can also remove its settings and accounts. Network Reset does not remove VPN settings installed by a profile or mobile device management (MDM).
Fix 5. Free Up Storage and Redownload the Update
Check Settings > General > iPhone Storage. Follow the space request shown by your phone; the download size alone is not a universal installation-space requirement. There is no single free-space number that guarantees an iOS 27 or iOS 26 installation.
Start with Offload Unused Apps where available, or review unused apps and locally stored videos. Do not delete irreplaceable photos just to follow a storage target. If you delete personal content, confirm that you have a usable copy first.
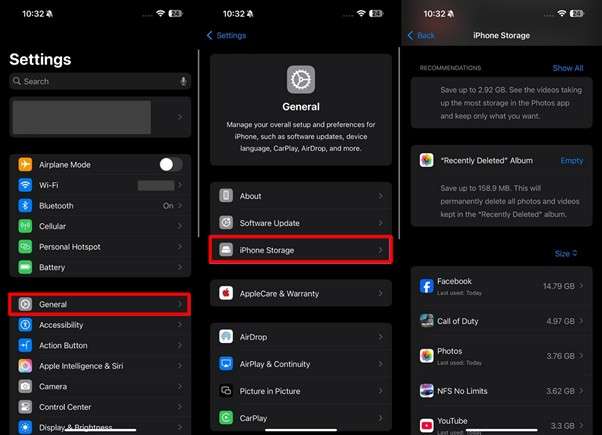
Downloaded but will not install? Delete the update package, not your personal content. When the phone is usable in Settings and not actively installing:
- Open Settings > General > iPhone Storage.
- Find the downloaded iOS update in the app list. Tap it, then tap Delete Update.
- Return to Settings > General > Software Update and download the available update again with power and Wi-Fi connected.
- If the update is not listed, or another download still fails, use the computer Update steps.
Apple's failed-update instructions include this delete-and-redownload path. Deleting the downloaded package does not uninstall your current iOS version.
Fix 6. Reset Network Settings
Use this only after a simpler reconnect or another-network test. Reset Network Settings does not erase your photos or media, but it removes previously used networks and VPN settings that were not installed by a configuration profile or MDM. It can also reset the device name, change manually trusted certificates to untrusted, and turn off cellular data roaming.
Have Wi-Fi passwords and personal VPN setup details ready. On a managed iPhone, consult IT rather than trying to remove management.
Step 1. Go to Settings > General > Transfer or Reset iPhone > Reset.
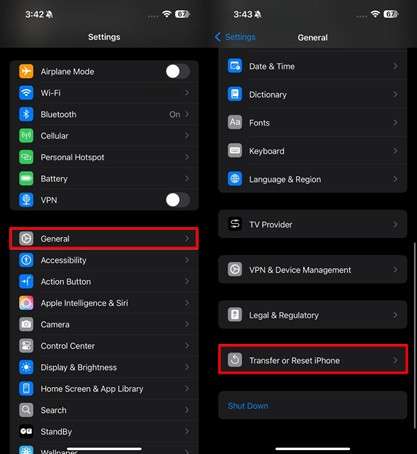
Step 2. Select Reset Network Settings, enter your device passcode if asked, and confirm. Reconnect to Wi-Fi, then try Software Update again. Do not select Erase All Content and Settings or Delete All eSIMs.
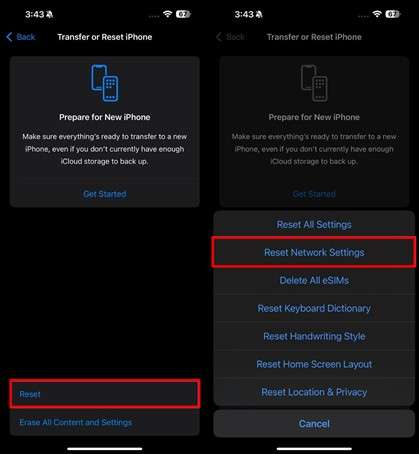
Source: Apple's reset-settings reference.
Fix 7. Review Restrictions Without Removing Device Management
Turning off Content & Privacy Restrictions is not a universal remedy for an iOS update failure. Keep parental and privacy protections enabled unless a specific restriction is preventing an action you need and the account owner authorizes a change.
- If you need to identify an active parental restriction, open Settings > Screen Time > Content & Privacy Restrictions. Have the owner review the relevant setting; do not disable the whole group just to retry a download.
- For a work or school device, inspect Settings > General > VPN & Device Management and contact the administrator if management is present. Do not choose Remove Management to bypass an update problem.
- If there is no specific restriction, return to the network test, fresh update download, or computer Update workflow instead.
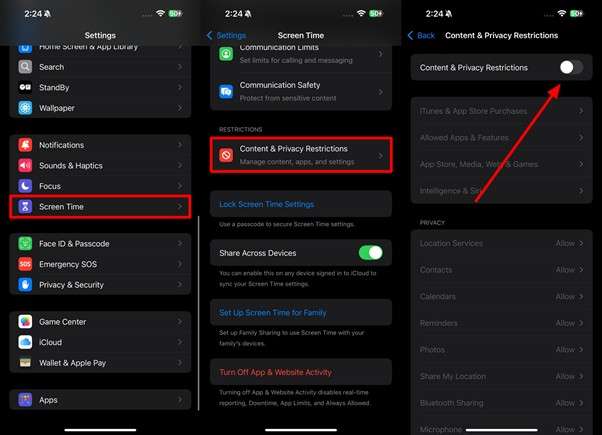
See the VPN and configuration-profile precautions and what Network Reset changes before modifying saved settings.
Fix 8. Update Using Finder, Apple Devices, or iTunes
A cable-based update is an alternative when wireless updating repeatedly fails. Back up first, use a trusted computer and a reliable USB cable, and connect the computer to its own internet connection rather than the iPhone's Personal Hotspot. A computer update still needs a compatible device and an available release.
| Computer app | Update steps | Choose the right action |
|---|---|---|
| Finder on macOS Catalina (10.15) or later | Connect the iPhone, approve Trust if asked, select it in the Finder sidebar, then General > Check for Update > Download and Update. Follow prompts and enter the passcode if requested. | Use Update, not Restore iPhone, for a normal update. |
| Apple Devices on a Windows PC | Connect the iPhone, open Apple Devices, select it in the sidebar, then General > Check for Update > Update. Follow the onscreen prompts. | Apple's recovery guidance recommends the latest Apple Devices app on PC. |
| iTunes on macOS Mojave (10.14) or earlier, or a PC using iTunes | Open iTunes, connect and trust the phone, select its device button, then Summary > Check for Update > Download and Update. Follow the prompts. | Do not select Restore as an equivalent way to keep personal data. |
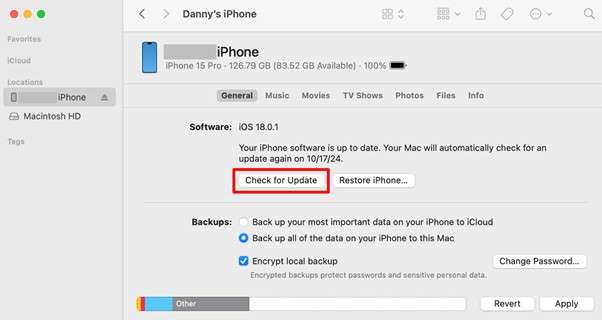
Apple references: Finder update, Apple Devices update, and iTunes update.
If the phone will not start or shows the recovery screen: when a normal computer update has not worked, follow this recovery path for the supported iPhone models in this article.
- Connect the phone to the computer. Open Finder on Mac or the latest Apple Devices app on PC.
- For iPhone 8 or later, including iPhone SE (2nd generation and later), press and quickly release Volume Up, press and quickly release Volume Down, then keep holding the Side button until the Connect to computer screen appears. Unlike a force restart, keep holding past the Apple logo.
- Locate the device. If you have not tried Update yet, try it before Restore. Update attempts to reinstall iOS while keeping personal data. Keep the phone connected and follow the prompts.
- If a software download takes more than 15 minutes and the phone leaves recovery mode, let the download finish, then repeat the button sequence to return to recovery mode.
- If Update cannot resolve the problem, consider Restore only after understanding that it reinstalls iOS and erases your data. Without a usable backup, that data may not be recoverable. If recovery fails or a button is broken, contact Apple for service.
Apple's recovery-mode guidance explains these escalation conditions. Entering recovery mode alone does not install or repair iOS.
Fix 9. Verify Apple Server Status
Open Apple System Status for reported service issues. If a relevant issue is listed, wait for service recovery before retrying. A green dashboard is not a complete test of every update or verification connection, and an error does not prove Apple's servers are overloaded.
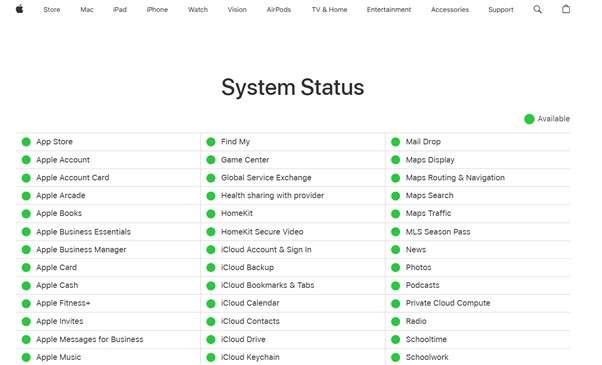
For Unable to Verify Update or a repeated checking error, try the same network again and then another network. If it persists across networks, remove and redownload the update, or update with a computer. Do not erase the phone just because a status page looks normal.
Part 3. Consider Dr.Fone for a Supported iOS Upgrade or Repair
Apple's free Update tools or Dr.Fone? Start with the Finder/Apple Devices Update path if you only need a normal supported update. Dr.Fone is an optional desktop alternative for a guided firmware workflow or a supported software-related system issue, not a way to fix Apple's outages or an incompatible iPhone.
| Option | What it does | Data and cost boundary |
|---|---|---|
| Finder / Apple Devices Update | Apple's update path for an available compatible release. | No separate repair-tool purchase. Update attempts to retain personal data; Restore is different and erases it. |
| Dr.Fone iOS Upgrade | Guides selection, download, verification, and installation of supported firmware without the normal wireless update route. | The upgrade Guide describes retaining data, but this is not a guarantee. Availability and the displayed mode matter; upgrade/repair actions may require a paid license. |
| Dr.Fone Standard / Advanced Repair | Separate repair modes for supported software-related issues. | Standard Repair is designed to preserve personal data. Advanced Repair resets the device and erases data; do not treat these as equivalent choices. |
The product page lists iOS 27 and iOS 26 support, Windows 7 through 11, and macOS 10.13 or later. The Guide notes that the Mac interface can look different; older generic Guide download labels do not override the more specific product requirements. A free download or free recovery-mode entry does not mean a full repair is free.
Before starting, make a usable iCloud or computer backup where possible. For a separate backup workflow, see Dr.Fone's iOS backup guide. Downgrading is not the procedure below: the downgrade Guide warns of data erasure, and a backup from a newer iOS or beta may not restore to an earlier version.

Dr.Fone - System Repair (iOS)
A Guided Option for Supported iPhone Software Problems.
- Standard Repair is designed to preserve personal data; back up before repair.
- Fix various iOS system issues stuck in recovery mode, white Apple logo, black screen, looping on start, etc.
- Upgrade supported iOS versions without relying on the normal wireless-update workflow.
- Supports iOS 27 and iOS 26 on compatible devices; firmware availability and mode restrictions apply.
Core iOS Upgrade steps: The following five steps combine the current Guide's smaller actions without skipping device connection, firmware verification, installation, or completion. Screenshots show the Guide's interface; available version labels and the Mac layout may differ.
Step 1. Open the desktop repair workflow
Install and launch Dr.Fone on the computer. In Toolbox, choose System Repair, select iPhone, then choose iOS Upgrade/Downgrade.
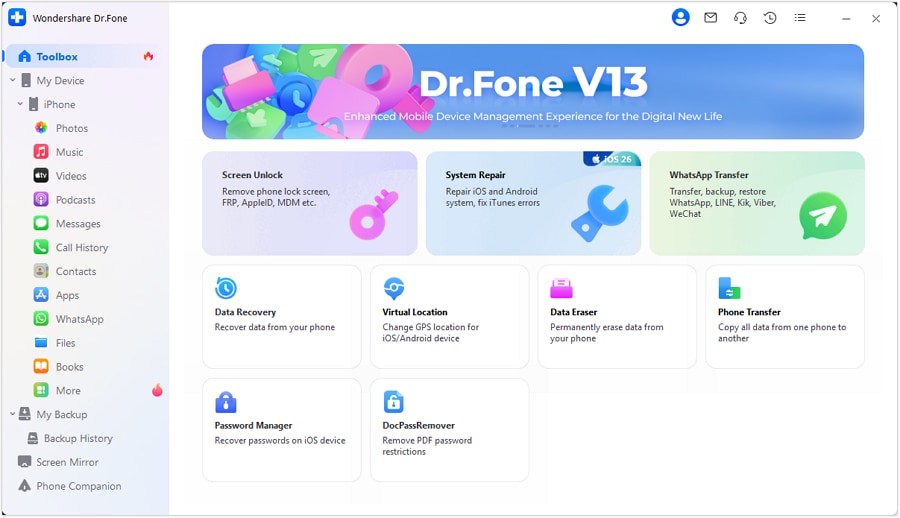
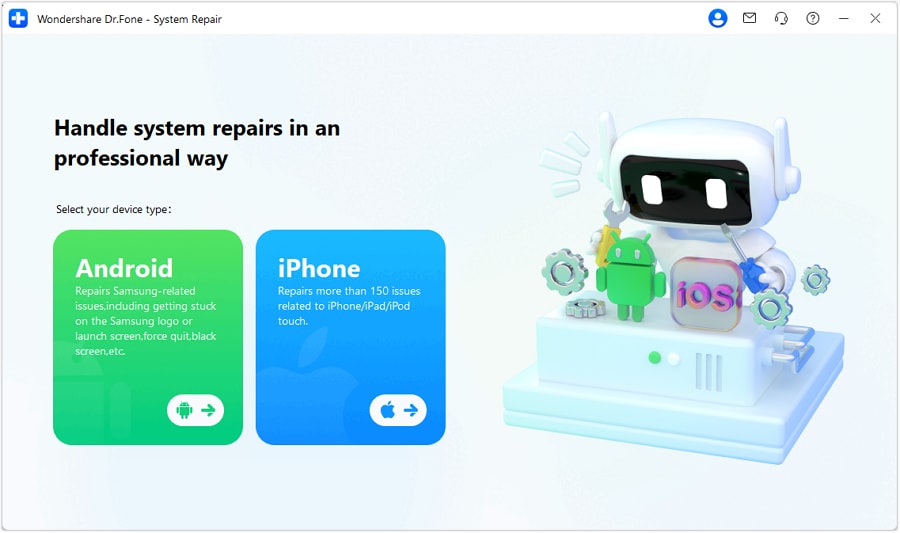
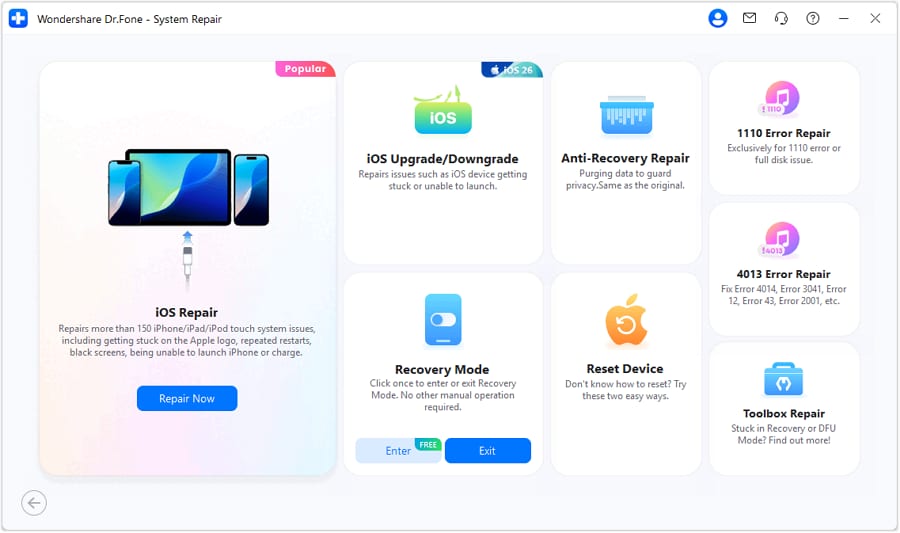
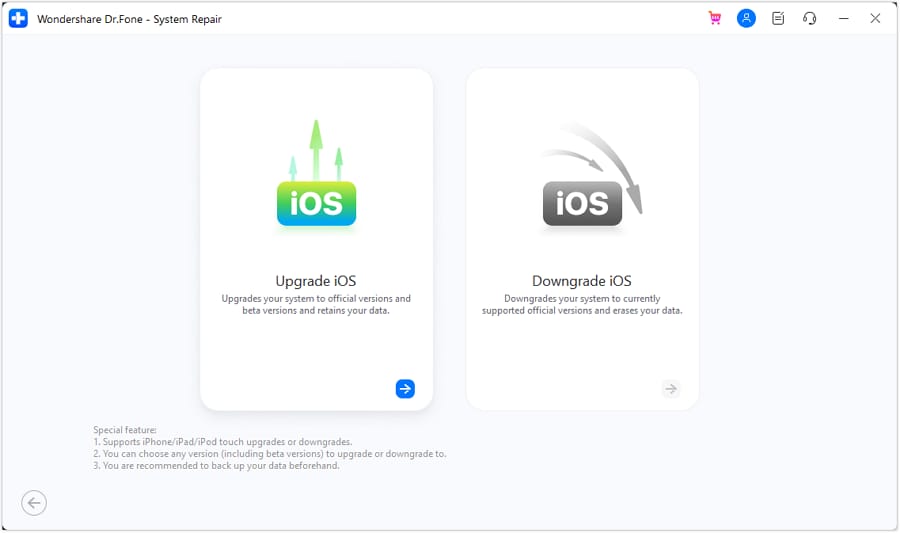
Step 2. Choose Upgrade iOS and connect the phone
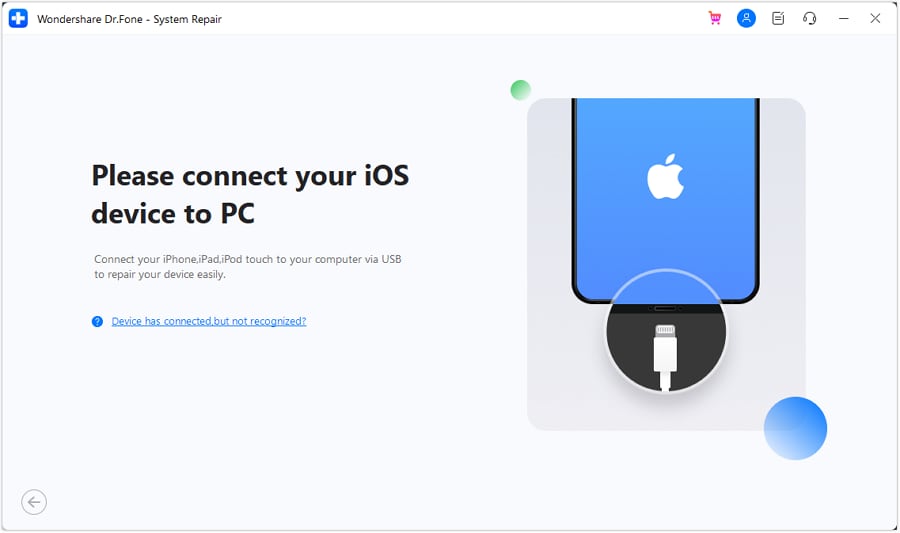
Select Upgrade iOS, then attach the iPhone with a USB cable. Wait for the software to detect the device before selecting firmware.
Step 3. Download an available compatible firmware
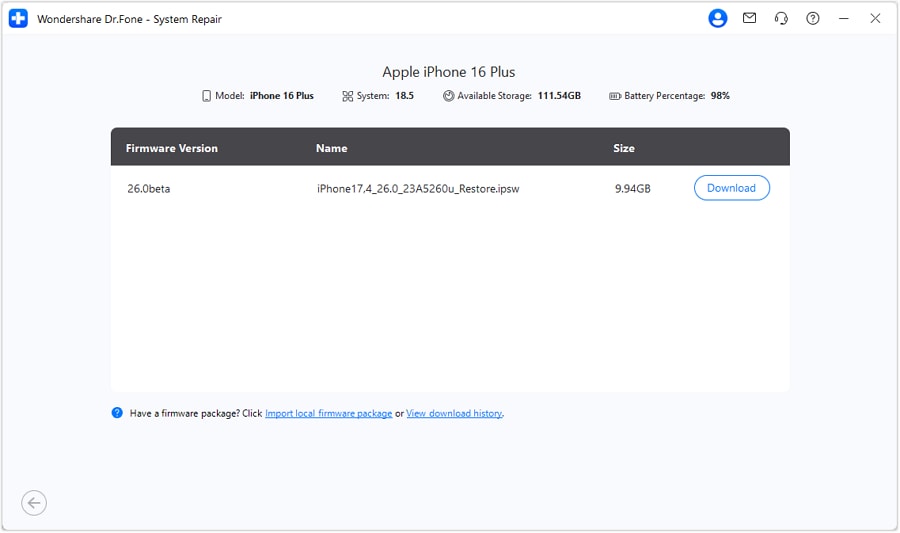
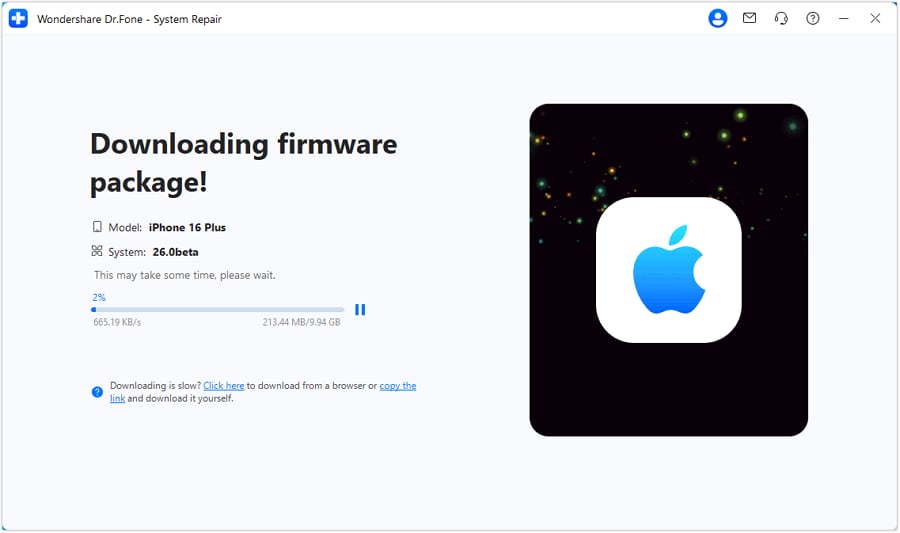
Review the versions offered for the connected model and click Download next to the intended supported release. The software downloads and verifies it. Do not assume an arbitrary older build, iOS 27 build, or beta will be offered; choose the intended official or beta track deliberately.
Step 4. Start the installation
Once verification finishes, click Repair Now. Keep the cable connected and follow the displayed instructions while the software installs the firmware. If an erasing-mode warning appears, stop unless you intend that action and have a backup.

Step 5. Finish and check the result
Wait for the completion screen, then click Done. After the iPhone starts, check Settings > General > About for the installed version. If the update did not complete, record the error rather than repeatedly switching to erasing modes.
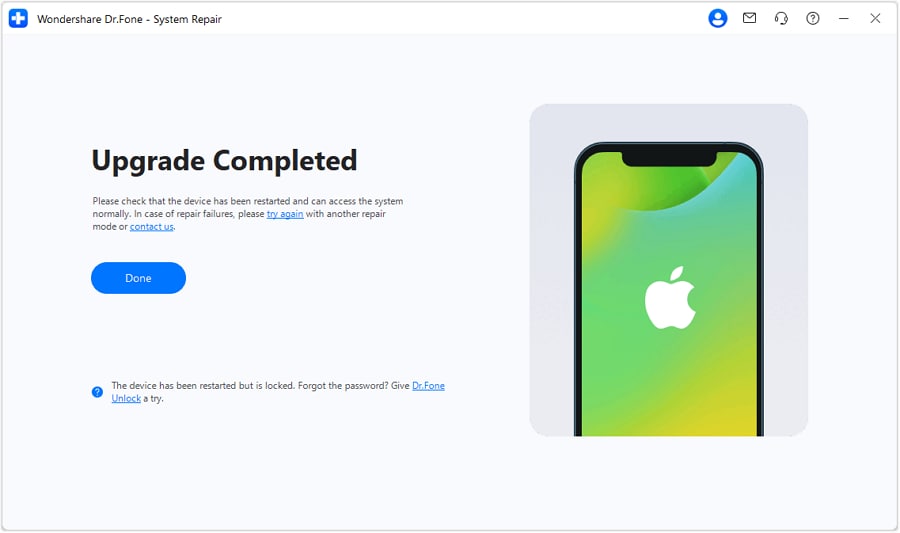
For the full interface walkthrough, see the official iOS Upgrade/Downgrade Guide. The Standard and Advanced Repair Guide covers the separate repair-mode path.
 safe & secure
4,624,541 people have downloaded it
Part 4. Ways to Avoid iOS 27 Software Update Failure
Prepare before the next update: keep a backup, a dependable power source, and a working internet connection. Prevention reduces avoidable interruptions; it cannot make every update succeed.
Charge Your iPhone Before Updating
Connect your iPhone to power during installation and follow the update's onscreen power prompts. Back up before updating rather than waiting until an install has already failed.
Avoid Using Proxies
Use a trusted connection that can reach the update service. If you temporarily disable a personal VPN or proxy for a connection test, restore your preferred security configuration afterward. On managed networks, ask the administrator; do not remove their profile or accounts.
Use Beta Updates Deliberately, Not as a Generic Fix
For an iOS 26 beta software update failed message, first use the same network and downloaded-update checks. A beta is a separate release track, not a guaranteed workaround for a failed public update.
- On iOS 16.4 or later, go to Settings > General > Software Update > Beta Updates. Use an eligible beta channel only if you intend to test it; do not install an unofficial configuration profile to force an update.
- To stop receiving future betas, select Off. This does not immediately remove the beta already installed or downgrade the phone.
- To remove the installed beta immediately, Apple's route is to erase and restore to the current public release. Read the Restore warning and recovery steps first. A backup made on a newer or beta iOS version may not work on an earlier version; use a compatible archived backup.
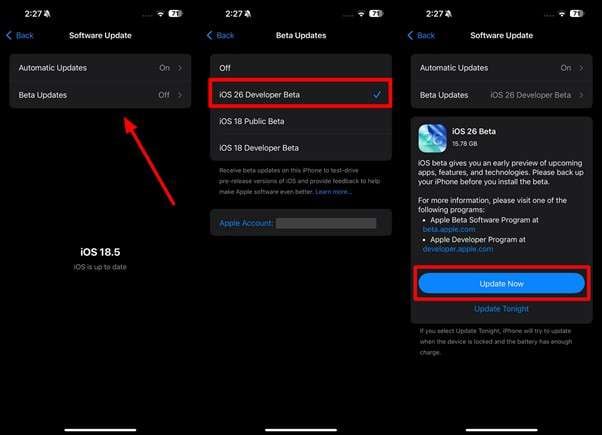
See Apple's beta-removal guidance. There is no reliable device-specific beta update failure percentage established by the instructions here.
Conclusion
For an iOS 27 update failed message, begin with the error stage: test the connection, review device storage, and redownload the update package if available. The same workflow supports an iOS 26 update failure. Repeated wireless failures are a reason to try a cable-based Update, not an automatic reason to erase the iPhone.
If you prefer a guided desktop alternative, Dr.Fone - System Repair (iOS) offers supported upgrade and repair workflows. Keep the mode's data and licensing limits in mind. If computer updating or recovery still fails, record the exact alert, iPhone model, installed and attempted versions, networks tried, and any computer error code for Apple Support or your device administrator.
safe & secure4,624,541 people have downloaded it
FAQs
 Q1. What should I do if my iOS update gets stuck?Q2. Can I downgrade iOS 27 to iOS 26 or return from an iOS beta without losing data?Q3. Which iPhones support iOS 27 and iOS 26?


iOS 26 Topics
- iOS 26 Downgrade/Upgrade
- iOS 26 Bugs/Issues
- 1. iOS 26 Beta Bugs List
- 2. Fix iOS 26 Glitches
- 3. Unable to Verify Update iOS 26
- 4. Hey Siri Not Responding on iOS 26
- 5. RCS Messaging Not Working in iOS 26
- 6. iOS 26 Beta Battery Drain
- 7. iOS 26 Stuck on Install Now
- 8. iOS 26 Update Not Showing Up
- 9. iOS 26 Unable to Check for Update
- 10. iOS 26 Update Failed
- 11. iOS26 Developer Mode Not Showing
- 12. iOS26 Beta Frozen
- 13. iOS 26 Camera Not Working
- 14. iOS 26 Beta Control Center Bugs
- 15. iOS 26 Stuck on Apple Logo
- 16. iOS 26 Widget Not Working
- 17. iOS 26 Face ID Not Working
- 18. Mail Notifications Not Working
- 19. Taking Forever to Update iOS 26
- 20. iOS 26 Beta Laggy
- iOS 26 Features
- ● Manage/transfer/recover data
- ● Unlock screen/activate/FRP lock
- ● Fix most iOS and Android issues
- Free Download Free Download


James Davis
staff Editor
Generally rated4.5(105participated)