 Effortlessly manage data through preview, delete, export, etc.

 100% Security Verified | No Subscription Required | No Malware

 :
: 
 ChatGPT
 Perplexity
 Gemini
 Claude
 Grok
Grok
I have a lot of downloaded videos on my PC, and I want to watch them offline while traveling. What's the best way to figure out how to put movies on the iPad without losing my existing data?
Recent User Inquiry

Want to learn how to put movies on the iPad quickly? Then you have definitely come to the right place. We all use an iPad to play immersive games, attend video chats, handle professional work, and watch our favorite movies on a high-resolution screen. By exporting your favorite movies directly onto your iPad, you can watch them anytime and anywhere without relying on an active internet connection. This offline capability is incredibly convenient during long flights or road trips.
If you don't like to subscribe to expensive streaming services, you can easily learn how to add movies to the iPad directly from your computer. In this way, you can simply download movies on your desktop or laptop first and later learn how to put videos on the iPad from it. Though there are numerous methods available today, we will teach you how to add videos to the iPad in 4 different, highly effective ways designed for 2026.
In this article
Part 1: Put movies on iPad with iTunes
Using official Apple software is usually the first thing that comes to the mind of every iOS user trying to solve how to put movies on the iPad. After all, iTunes has been developed by Apple and provides a freely available solution to manage our media across devices. It can also be used to back up your iOS device, restore it, and systematically manage your photos and data. If you want to learn how to add movies to the iPad using iTunes, you just need to follow these official steps:
Step 1 Launch iTunes and connect your iPad
Launch an updated iTunes version on your system and connect your iPad to it using a certified Lightning or USB-C cable. Select it from the devices icon at the top left and go to its Summary tab. Under its Options section, ensure that you enable "Manually manage music and video" so iTunes doesn't automatically overwrite your library.

Step 2 Add video files to iTunes library
Great! Now, you can manually add any supported video or audio format to your iTunes library. Simply go to its Files menu at the top left corner and choose to "Add File to Library" or "Add Folder to Library".
Step 3 Browse and select your movies
When a pop-up browser window opens, navigate through your local storage and select the videos that you wish to put on your iPad.

Step 4 Sync the movies to your iPad
After successfully adding these videos, you can go to the "Movies" tab on iTunes from its left panel. Turn on the option for "Sync Movies" to begin the transfer process.

Step 5 Apply and save changes
You can selectively choose the movies that you wish to transfer and click on the "Apply" button at the bottom right corner to save your changes and start copying files. In this way, you can learn how to put videos on the iPad from iTunes without much trouble.
- It is a free tool provided directly by Apple.
- Capable of handling music, TV shows, and books alongside movies.
- Allows wired connection which can be fast for small files.
- Risk of overwriting existing iPad media during the sync process.
- Extremely strict format requirements (only accepts MP4, M4V, MOV).
- Notoriously slow interface that frequently freezes on older PCs.
Part 2: Put movies on iPad without iTunes using Dr.Fone
Because of the stringent format limitations and data erasure risks, a lot of users find it hard to learn how to add videos to the iPad using iTunes. To experience a simpler, faster, and much more secure alternative to iTunes, you can try Dr.Fone - Phone Manager (iOS). Designed specifically as a part of the Dr.Fone toolkit, it is fully compatible with every iOS device and newer firmware versions. It can help you easily import and export your videos back and forth between your computer (PC or Mac) and your iOS device (iPhone, iPad, or iPod). You can comprehensively manage your apps, intelligently rebuild your iTunes library without data loss, transfer massive photo albums, and perform plenty of other media tasks with Dr.Fone - Phone Manager (iOS). You can simply follow these intuitive instructions to learn how to put movies on the iPad via this tool.
 Effortlessly manage data through preview, delete, export, etc.
- Transfer all data between devices.
- Robust backup solutions for reliable data protection.
- Mirror screens to PC for meetings, teaching, and control.

Follow these detailed steps to add your movies:
Step 1 Access the Phone Manager feature
Launch Dr.Fone on your Mac or Windows PC. From the welcome screen of the main Dr.Fone toolkit, you have to navigate and click on the "Phone Manager" module.

Step 2 Connect the iPad to the system
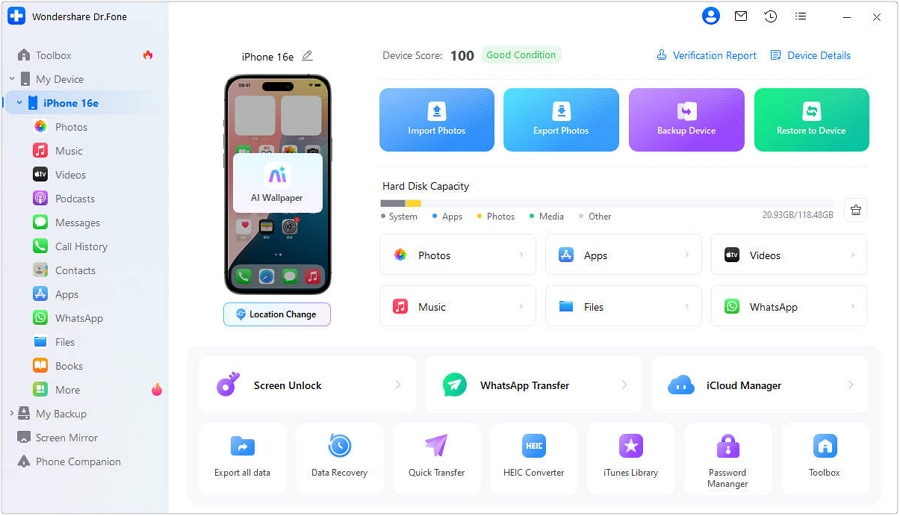
Using an authentic cable, physically connect your iPad to the system. The application will detect your device automatically and provide various operational options right beneath the visual snapshot of your device.
Step 3 Go to the Videos Tab
Now, go to the 'Videos' tab situated at the top menu bar on the interface. This particular section will logically display all the videos that are already saved natively on your iPad.
Step 4 Choose to Import Movies
To add a new movie, go to the 'Import' button and click its drop-down icon. This will let you uniquely choose between adding selected files or adding an entire video folder at once.

Step 5 Locate and Transfer Your Movies
Once you choose the respective option, a pop-up local browser window would be launched. Go to the storage location where your movies are saved locally, select them, and open them.
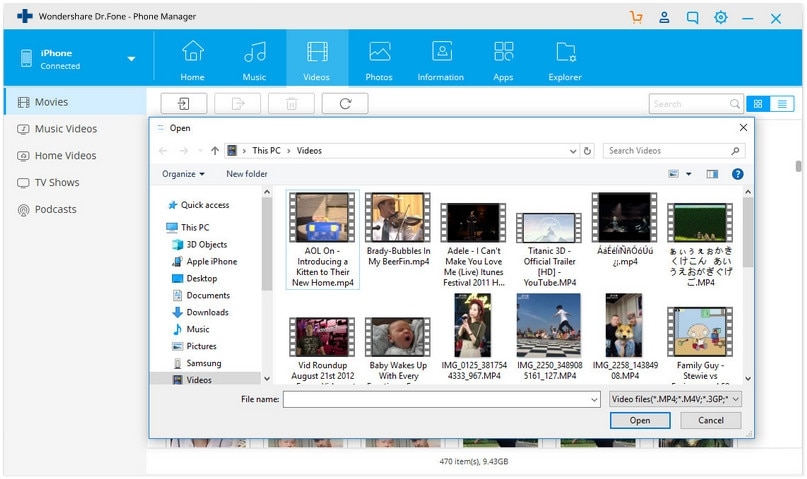
Just wait for a brief while as your newly loaded movies will automatically be processed and saved on your iPad. In this way, you can brilliantly learn how to add movies to the iPad from your computer directly within mere seconds without erasing previous files. You can try out the software for free from the buttons below.




Part 3: Put movies on iPad using cloud storage
With both iTunes and Dr.Fone - Phone Manager (iOS), you essentially have to physically connect your iPad to the computer system using a cable. However, if you wish to learn how to put videos on the iPad wirelessly, then you can strategically use any mainstream cloud storage service like Google Drive, Dropbox, iCloud, etc. Be aware, though, that this specific method would consume a lot of time depending on your WiFi connection, and it might max out your cloud storage allocation (which is mostly limited for free users). We have quickly discussed how to add videos to the iPad for major cloud services below.
3-1. Dropbox
Step 1. You can freely add videos to your Dropbox account by visiting its official website on your PC or Mac. Go to any designated folder and click on the "Upload File" option to securely add any kind of data.

Step 2. Once your HD videos are uploaded fully to the cloud, you can launch the Dropbox mobile app directly on your iPad and select the corresponding video. Tap on the prominent download icon and securely save the video directly on the iPad storage.

3-2. Google Drive
Step 1. Very similar to the Dropbox method, you can seamlessly go to your Google Drive account from a web browser and upload any video format. You can also simply drag and drop any media file straight from your computer system onto the Drive interface.

Step 2. Later, you can launch the Google Drive iOS app on your iPad device, open the video you want, and go to its More settings (by tapping on the three vertical dots located at the top right). From here, explicitly tap on "Send a copy" and choose to save the video physically on the iPad.

3-3. iCloud
The standard process to upload videos to iCloud is pretty similar and fully integrated into the Apple ecosystem. Once you have successfully uploaded a video from your computer system to iCloud Drive, you can easily go to your iPad Settings > iCloud and turn on the "iCloud Photo Library" feature. This will automatically sync the photos and videos associated with your iCloud account directly to your iPad.

Part 4: Purchase movies on iPad from the iTunes Store
If you don't necessarily have local video files and simply want to legitimately buy movies on your iPad, then you can effortlessly take the assistance of the built-in iTunes Store app. It possesses a wide range of blockbuster movies, indie music, tones, etc. that can readily be bought after logging in with your official Apple ID and iTunes account. Additionally, you can seamlessly sync other iOS devices to iTunes to ensure you have the purchased digital content universally on them as well. To learn how to add videos to the iPad straight from the iTunes Store, follow these steps:
- Step 1: Launch the native iTunes Store app on your iPad and go to the "Movies" section at the bottom. You can also actively tap on the "Search" option to simply look for a specific movie of your choice.

- Step 2: After finding the cinematic movie you wish to officially purchase, select it, and click on the displayed buy or rent option. Tap on the amount and safely log in to your iTunes account using FaceID or your password to confirm.
- Step 3: Once the payment is fully processed, the high-quality movie will be instantly downloaded to your iPad. After the download is 100% completed, you can easily find it nested under More > Purchased > Movies.

Conclusion
As you can clearly see, there are numerous practical ways to learn how to put movies on the iPad, depending on whether you want a wired transfer, a wireless cloud solution, or a direct storefront purchase. However, considering speed, safety, and lack of formatting issues, the best solution of them all is Dr.Fone - Phone Manager (iOS). It features a wonderfully user-friendly interface and actively provides a simple, direct click-through process to manage all your media data. Using this reliable third-party application, you can safely import and export your extensive data files between your iOS device and your computer pretty easily without deleting your old files. If you have found this complete 2026 guide highly informative, then be sure to share it with friends or family as well to teach them how to add movies to the iPad seamlessly.
FAQ
1. Can I put movies on my iPad without using iTunes?
Yes, you certainly can. Using powerful third-party media management tools like Dr.Fone allows you to seamlessly transfer videos from any computer to your iPad without triggering the iTunes synchronization process, which often erases existing files. Additionally, you can utilize wireless cloud services like Google Drive or Dropbox to fetch movies.2. What video file formats does the iPad naturally support?
The native Apple video player on the iPad specifically supports MP4, MOV, and M4V file formats. If you try syncing MKV or AVI files through iTunes, they will be rejected. However, using tools like Dr.Fone can sometimes circumvent these tight restrictions, or you can use third-party video players from the App Store like VLC.3. Why won't my local movies sync to my iPad via iTunes?
There are three common reasons: your iPad might be running extremely low on available physical storage space, the movie file might be in an incompatible format (such as MKV), or the "Manually manage music and video" setting is turned off inside your iTunes options.4. Does transferring movies via iCloud reduce the video quality?
No, uploading your original movies to iCloud Drive directly stores the full-resolution file. When you subsequently download the file back to your iPad through the Files app or iCloud Photo Library, it crucially retains its absolute original quality and size without unnecessary compression.
 Add Wondershare Dr.Fone as a preferred source on Google



