[2024 Guide] Install iOS 17 Developer/iOS 17 Beta/Official Version

Jul 12, 2024 • Filed to: Mobile Repair Solutions • Proven solutions
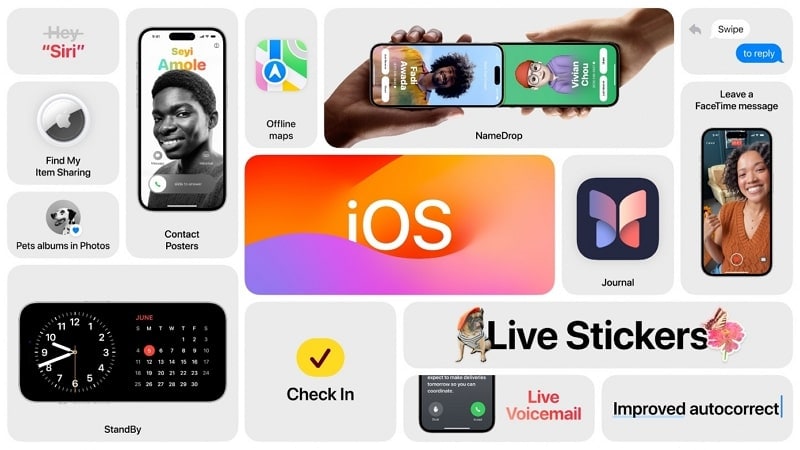
The year 2023 heralds another milestone in Apple's journey with the introduction of iOS 17. It is the latest iteration of its acclaimed operating system. The fan eagerly anticipates the enhancements and functionalities that iOS 17 promises. This means the need for a comprehensive iOS 17 install guide has become paramount.
This guide is your compass to successfully installing iOS 17 in its various forms – Developer, Beta, and Official versions. In this article, we'll walk you through the step-by-step process and highlight the prerequisites. It will also address potential challenges you can face while installing iOS 17.
Part 1. A Brief Overview of the Different Versions of iOS 17
As the curtains rise on iOS 17, Apple fans find themselves presented with three choices. These are the Developer, Public Beta, and Official versions. Each iteration caters to a distinct set of users. It offers a wide range of experiences that cater to different needs. Given below is a glimpse into the uniqueness of these versions, helping you make an informed choice:
1. iOS 17 Developer Version
The Developer Version stands as the cradle of innovation. It is tailored exclusively for the app creators who shape the future of the Apple ecosystem. This version was released at the outset of the iOS 17 journey on June 5, 2023. This version allows developers to dive into the features, APIs, and tools that iOS 17 brings to the table.
It empowers them to fine-tune their applications, optimizing them for the new environment. The developer beta is usually only available for users who are enrolled in the Apple Developer Program. However, Apple broke this tradition with iOS 17 as its developer version was released for all users.
2. iOS 17 Public Beta
For those who want to use new features but prefer a stable version, the Public Beta emerges as the middle ground. It was released sometime after the developer beta, and iOS 17 public beta was released on July 12, 2023. This version offers a sneak peek into iOS 17's remarkable capabilities.
However, it is still undergoing refinement based on feedback from developers and early testers. While it might have some bugs, it provides an opportunity to contribute to iOS development.
3. Official iOS 17 Release
The Official iOS 17 Release marks the culmination of the development journey. Tailored for the broader audience, this version boasts the highest level of stability. It also provides the best performance and compatibility for Apple users.
Moreover, it is a harmonious symphony of features, optimizations, and security enhancements. The official version is usually released with Apple's latest iPhone series in September. That's why the official version of iOS 17 is expected to be released in mid-September of this year.
4. Preparation for the Installation
Before starting the journey to use the power of iOS 17, it is always recommended to be fully prepared. Below are some crucial steps to ensure your installation experience is smooth and secure:
1. Check Device Compatibility
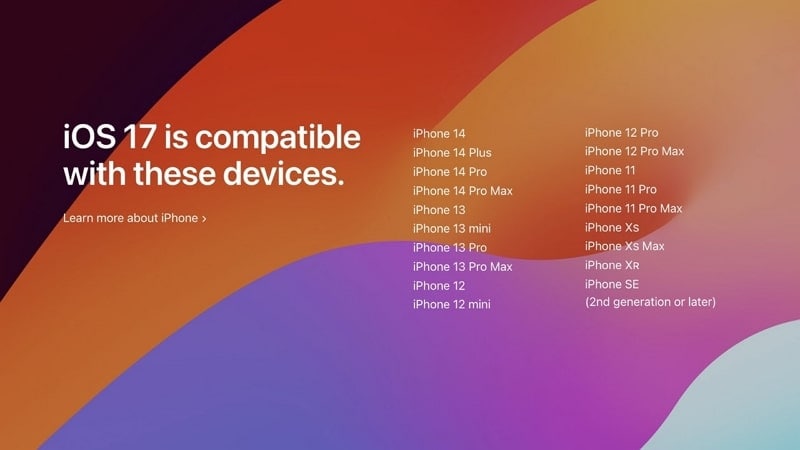
iOS 17 arrives as a testament to Apple's innovation, but not all devices are compatible. It's important to verify whether your device is on the list of compatible devices. Given below is the list of Apple devices compatible with the iOS 17 installer:
- iPhone 15 Series
- iPhone 14
- iPhone 14 Plus
- iPhone 14 Pro
- iPhone 14 Pro Max
- iPhone 13
- iPhone 13 Mini
- iPhone 13 Pro
- iPhone 13 Pro Max
- iPhone 12
- iPhone 12 Mini
- iPhone 12 Pro
- iPhone 12 Pro Max
- iPhone 11
- iPhone 11 Pro
- iPhone 11 Pro Max
- iPhone XS
- iPhone XS Max
- iPhone XR
- iPhone SE (2nd Generation)
2. Backup Your Data
Amidst the excitement of how to upgrade to iOS 17, the significance of safeguarding your existing data cannot be overstated. Backing up your device ensures that your vital data and settings remain intact throughout the installation process. This prudent measure mitigates the risk of data loss.
Apple offers iCloud and iTunes/Finder backup options, allowing you to choose the method that aligns best with your preferences. If you are looking for third-party tools for backing up your device, the best choice is Wondershare Dr.Fone. It allows you to create automatic backup wirelessly on your computer.
Part 2. How To Upgrade to iOS 17 Developer Version
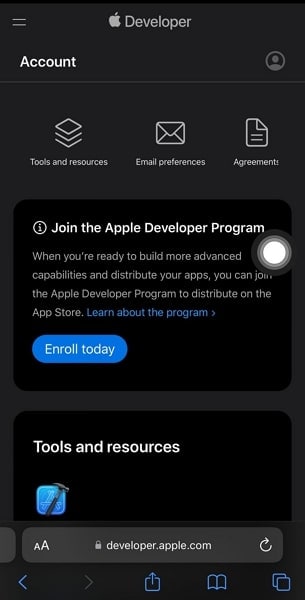
As a developer, your hunger for innovation leads you to the forefront of technological evolution. Before you can dive into the world of iOS 17 development, ensure that you are a part of the Apple Developer Program. This membership opens the door to a lot of resources, tools, and early-release software.
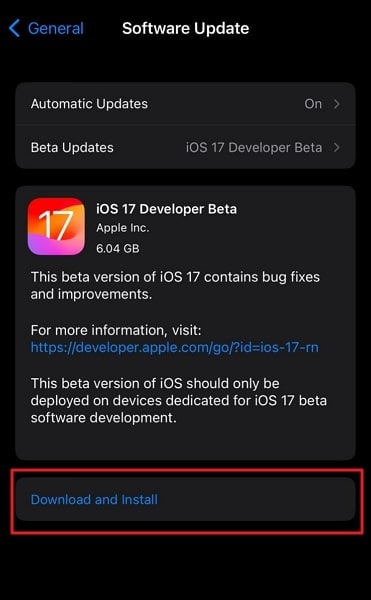
If you've not yet enrolled, follow the steps outlined in the previous section to enroll in this invaluable program. Another requirement to use iOS 17 developer beta is that your device must be running on iOS 16.4 or later. After enrolling in Apple Developer Program, use the following steps on how to upgrade to iOS 17:

Part 3. How To Install the iOS 17 Public Beta
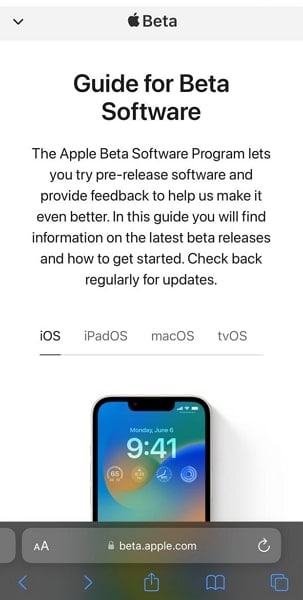
For those who are seeking a blend of cutting-edge features and relative stability, the iOS 17 Public Beta is the way to go. For iOS 17 Public Beta, you need to enroll in the Apple Beta Software Program. You will also need your device's iOS to be iOS 16.4 or later. Here is how you can enroll in Apple Beta Software Program to get iOS 17 installer:

Part 4. Installing the Official Version of iOS 17
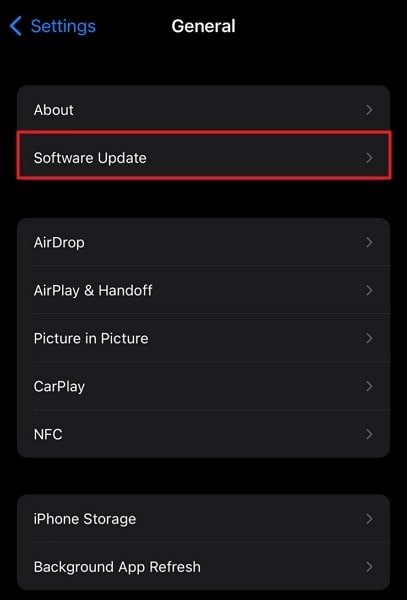
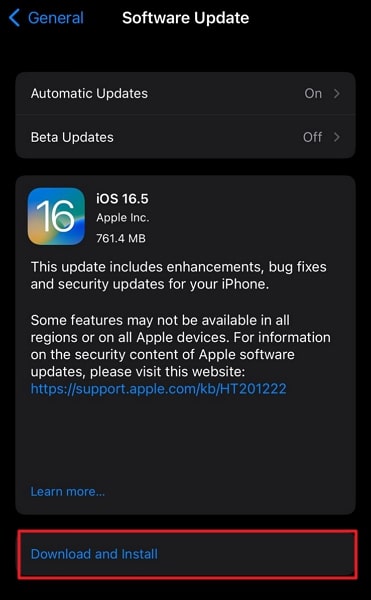
As the curtains rise on the official release of iOS 17, it's time to embark on the final leg of your journey. While the official version of the iOS 17 installer is still not released, the day of its release is growing closer. That's why it is essential that you keep an eye on software updates on your iOS device. Here is how you can check for the latest iOS updates:
Part 5. Troubleshooting Common Installation Issues
While the path to iOS 17 installation is paved with anticipation, occasionally, roadblocks may arise. Now we will discuss the potential issues you can face when dealing with iOS 17 updates.
1. Device Not Compatible: Seeking Alternative Avenues
For users with devices that are not compatible with iOS 17, the journey might not be at an end. While some older devices may not receive the latest iOS 17 installer, there are alternative options to ensure you continue to enjoy an optimal user experience and remain part of the Apple ecosystem.
1. Maximize Your Current Device: Optimize Performance
If your device is not compatible with iOS 17, you can still optimize its performance. Begin by deleting unused apps and files to free up storage space. Clear cache and browsing history to improve overall performance. Update your apps to their latest versions to ensure compatibility with your current iOS version.
2. Explore Software Updates: Stay Up-to-Date
Although your device might not receive the latest iOS version, it's crucial to keep your current operating system up-to-date. Regularly check for software updates specific to your device. Install available updates to benefit from security enhancements and bug fixes.
3. Consider a Device Upgrade: Embrace the Future
If you're determined to experience the latest iOS advancements, consider upgrading to a newer device. Research Apple's latest offerings to find a device that suits your needs and budget. Opt for a device that is compatible with iOS 17 or any subsequent versions.
4. Device Trade-In or Sale: Transitioning Gracefully
If you decide to upgrade to a newer device, consider trading in or selling your current device. Apple's Trade-In program allows you to receive credit toward a new device by trading in your old one. Selling your device to a reputable buyer can also help offset the cost of your new device.
2. Installation Errors: List Common Errors and Their Potential Solutions.
Encountering installation errors during the iOS 17 installation process can be frustrating, but they are often manageable. Here's a list of common installation errors and potential solutions to address them:
1. "Software Update Failed" Error
Solution: Verify that you have a stable and fast internet connection. If the issue persists, try restarting your device and attempting the update again. If you're using Wi-Fi, consider using a different network or restarting your router.
2. "An Error Occurred Installing iOS" Error
Solution: This error can sometimes occur due to server congestion. Wait for a while and try the installation again but ensure you have a stable Wi-Fi connection and sufficient battery life during the installation process.
3. "Insufficient Space" Error
Solution: If your device lacks sufficient storage space for the update, delete unused apps, photos, and files. You can also try updating through iTunes or Finder on a computer, as they might provide more flexibility with storage management.
4. "Unable to Verify Update" Error
Solution: This error can be due to high server traffic or a network issue. To fix this update error, make sure your Wi-Fi connection is fast and stable. You can also try restarting your device and attempting the update again after a while.
5. "Stuck on Apple Logo" or "Progress Bar" Error
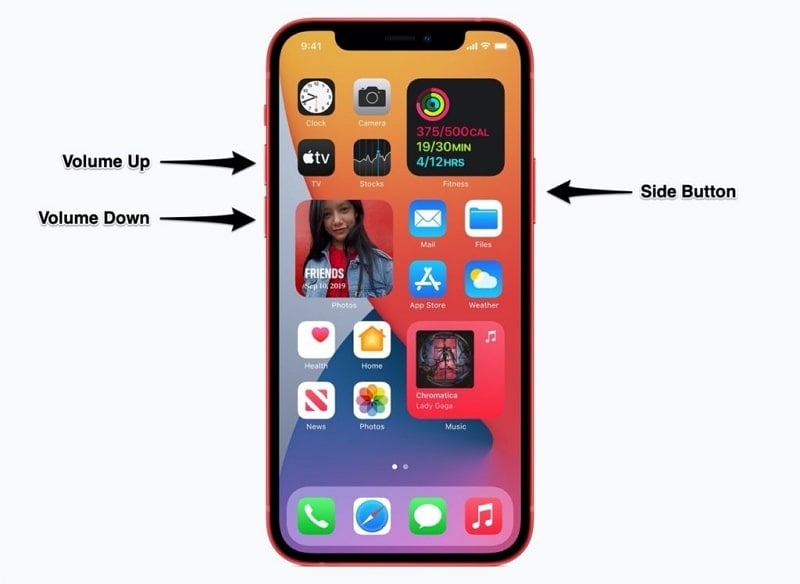
Solution: If your device gets stuck during installation, perform a force restart. For iOS 17-supported devices, quickly press and release the Volume Up button; next, quickly press and release the Volume Down button. Then immediately press and hold the Side/Power button until your iPhone gets into the recovery mode. Connect your device to a computer and use iTunes or Finder to restore or update your device.
3. Restoring From Backup: Reclaiming Your Digital Realm
You encounter challenges during the iOS 17 installation process or wish to revert to a familiar configuration. In this case, restoring your device from a previously created backup is a valuable solution.
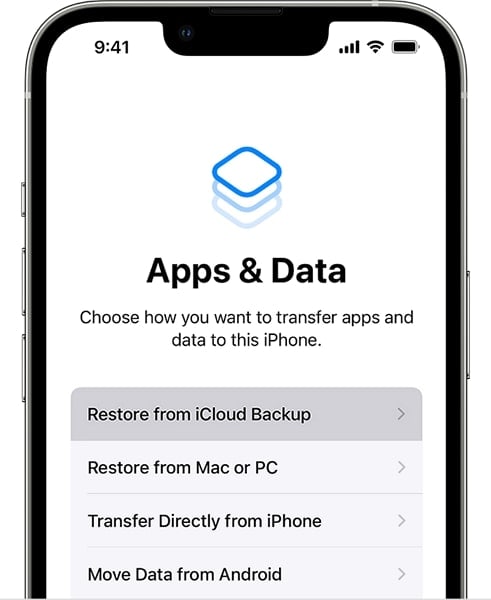
1. Restore From iCloud Backup: A Seamless Path
If you have an iCloud backup, you can restore your device wirelessly:
Instructions: After setting up your device post-installation, select "Restore from iCloud Backup" during the setup process. Sign in to your Apple ID and select the most recent backup that predates the iOS 17 installation. Allow the restoration process to proceed. Your device will restart as it reinstates your data.
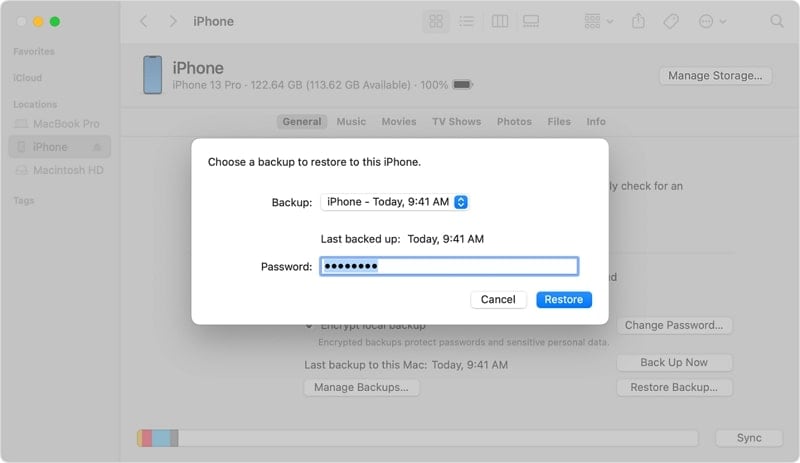
2. Restore From iTunes or Finder Backup: A Wired Approach
For users who prefer using a Windows PC or MacBook for old data restoration:
Instructions: Connect your device to your computer and open iTunes (macOS Mojave and earlier) or Finder (macOS Catalina and later). Select your device when it appears. Choose "Restore Backup" and select the most recent backup created before the iOS 17 installation.
4,624,541 people have downloaded it
Conclusion
As we draw the curtains on this comprehensive guide, your journey into the world of iOS 17 is now poised to commence. We've navigated through the intricate paths of installation, troubleshooting, and data restoration. The purpose was to ensure that you're well-equipped to embark on this exhilarating expedition.
Now that your iOS 17 installation using iOS 17 installer is complete, it's time to venture into this new digital landscape with curiosity and enthusiasm. Explore the redesigned interface, and discover new features like improved privacy settings, advanced multitasking, and enhanced performance optimizations.


iOS 17 Topics
- iOS 17 downgrade/upgrade
- 1. Downgrade ios 17 to 16
- 2.OTA Downgrader to downgrade device
- 3.Downgrade iPadOS 17 beta/16
- 4.Downgrade Apple WatchOS 10 beta
- 5.IPSW Beta Unsigned/Signed Version
- 6.Use SHSH Blobs to downgrade
- 7.Upgrade Devices with Firmware Files
- 8.iOS 17 Developer/Beta/Official
- iOS 17 New Features
- 1. Widget to Ios 17 Lock Screen
- 2.iOS 17 Wallpaper
- 3.iOS 17 Notification Center
- 4.iOS 17 Hidden Features
- 5.iOS 17 New Emoji
- 6.Live Activities iOS 17
- 7.Fix iOS 17 Keyboard Bug
- 8.iOS 17 Haptic Keyboard Issue
- 9.iOS 17 Tips and Tricks
- 10.New Car Play of iOS 17
- 11.Customize iOS 17 Standby Mode
- 12.iOS 17 Standby Mode Not Working
- 13.Create Live Stickers on iOS 17
- 14.New Feature of iOS 17 Facetime
- iOS 17 Problems
- 1. iOS 17 Bugs, Problems and Fixes
- 2.iOS 17 Update Won't Install Issue
- 3.Camera Black Screen iOS 17 Update
- 4.iOS 17 Apps Crashing
- 5.Charging Slow After iOS 17 Update
- 6.Stuck on Verifying Update to iOS 17
- 7.Overheating After iOS 17 Update
- 8.iPhone Freezing After iOS 17 Update
- 9.iOS 17 Battery Drain
- 10.iPhone Slow After iOS 17 Update
- 11.Stuck on Estimating Time Remaining
- 12.Recover Lost Data after Update
Daisy Raines
staff Editor
Generally rated4.5(105participated)