iPhone Stuck on Verifying Update for iOS 17/18/26 Solved
Feb 11, 2026 • Filed to: Phone Repair Solutions • Proven solutions
Excitement among iPhone users is unstoppable after the news about iOS 17/18/26 breaks. They eagerly anticipate exploring the new features. However, updating to the latest iOS version can sometimes lead to issues. One of the common problems is getting stuck in the "Verifying Update" for iOS 17/18/26.
To address this concern, I delved into finding practical solutions to resolve the "Verifying Update" problem. After thorough research, I discovered several methods that have proven to work well.
If you encounter this verifying issue while updating to iOS 17/18/26, don't fret. Read this article, and let me show you how to resolve it.
Part 1: Interesting Updates on iOS 17
iOS 17, the latest version of Apple's operating system for iPhone, is currently in beta testing. It is scheduled for release in September, alongside the launch of new iPhones. The update focuses on enhancing communication and introduces several exciting app features.
Cited from Apple, some of the exciting updates on iOS 17 include:
- Interactive widgets on the Home Screen enable users to control various functions without having to open respective apps.
- The TrueDepth camera now measures screen distance in Screen Time, encouraging healthy device usage.
- Passwords and passkeys can now be securely shared through Family Sharing.
- Signing into an iPhone with an Apple ID becomes easier with nearby devices or the email/phone number listed in the account.
Part 2: Why Stuck in Verifying the Update iOS 17/18/26
When updating your iOS, your iPhone often needs to verify the update before installing the new operating system. This verification ensures the update is legitimate, free from tampering, and comes directly from Apple's trusted servers.
The need for verification is essential to maintain the security and integrity of the device and its data. If you get stuck at the verifying update for iOS 17/18/26, there are several potential reasons:
- Network Issues
An active internet connection is necessary for updating your device. Slow or unstable internet connections can delay your iOS update.
- Insufficient Storage
Before installing the update, the device must have enough free storage space to download and apply the new software. If the device lacks sufficient space, the update process may not proceed.
- Software Compatibility
Certain apps or settings on the device might not be compatible with iOS 17/18/26, leading to verification errors and preventing the update from completing.
- Security Checks
The verification process involves thorough checks to ensure the update hasn't been tampered with or compromised. If any discrepancies are detected, the update may fail.
Otherwise, technical issues, such as system glitches or software bugs, can also happen and halt the update. Identifying the root cause of such issues can aid in resolving and mitigating the problem effectively.
Part 3: Troubleshooting Methods for "Verifying Update" Issues
Now that you've identified the reason behind being stuck in verifying update on iOS 17/18/26, time to explore some practical solutions to resolve this problem.
Method 1: Check Network Connection
- Check the signal strength of your Wi-Fi. If your Wi-Fi signal is weak, try moving your iPhone closer to the modem or router to improve connectivity.
- Verify the stability of your internet connection by checking other apps. Open applications like YouTube or any browsing app to see if you encounter any connectivity issues.
If you indeed experience instability in your internet connection, try the following solutions:
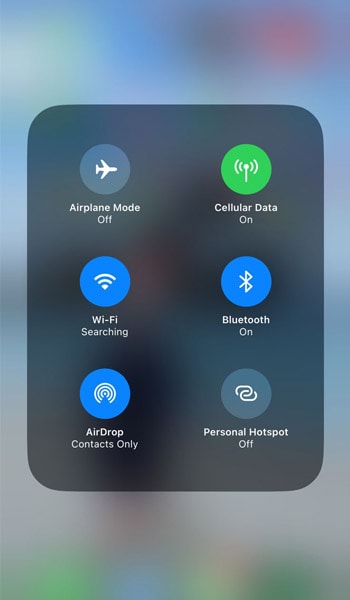
- Step 1: Turn Off and On Wi-Fi. Disable Wi-Fi from your device's settings and then enable it again to reset the connection.
- Step 2: Restart Router/Modem. Power off your home router or modem, wait for a few seconds and then power it back on to refresh the connection.
- Step 3: Try changing your network to mobile data. If you're experiencing difficulties with your Wi-Fi connection, consider switching to mobile data as an alternative.
- Step 4: Toggle Airplane Mode. Activate Airplane Mode on your device, wait, and turn it off again. This will reset your device's network connections.
Method 2: Free Up Storage Space
Low storage can impede the verification process during the iOS 17/18/26 update. To ensure a smooth update experience, it's crucial to manage your storage space on iOS devices. Here's how:
- Step 1: Check Storage Usage
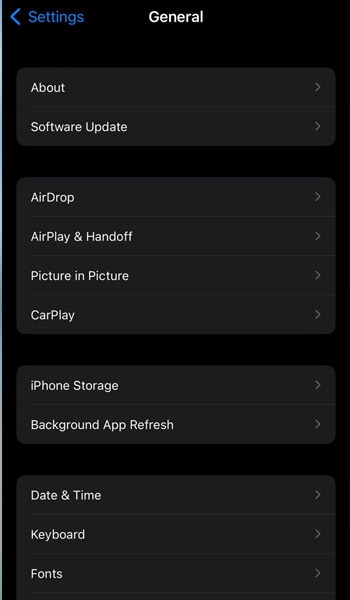
Go to Settings > General > [Device] Storage to view your device's storage usage. Check and see if you have enough storage for updating your iOS.
- Step 2: Delete apps that you no longer use or need.
Apps can take so much of your storage. Deleting apps you don’t use will free up storage space and streamline the update process.
- Step 3: Transfer Photos and Videos
Back up your photos and videos to a computer or cloud storage, then delete them from your device to create more room for the update.
- Step 4: Clear Cache
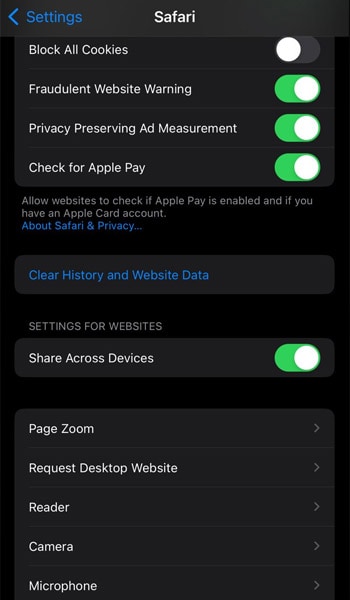
If you still need to use the apps, you can clear Safari or the browser’s cache. Safari on your iPhone keeps accumulating cache that are like residues. Clearing these files can reclaim storage space and improve overall device performance.
How to clear Safari’s cache on iPhone: Navigate to iPhone Settings > find Safari > "Clear History and Website Data."
Method 3: Force Restart the Device
A force restart is a simple yet powerful technique to resolve temporary glitches. It can help to overcome the "Verifying Update" issue on iOS 17/18/26. Here's how to force restart on iPhone:
- Step 1: Press Volume Up and release it quickly.
- Step 2: Repeat step 1, but with Volume Down.
- Step 3: Press the Power button; hold until you see the Apple logo appears.
- Step 4: Release the button.
There’s a slight difference for earlier iPhone models, such as iPhone 6 or 6S and below. You must press and hold both the Home and the Power (Sleep/Wake) buttons simultaneously until the Apple logo appears.

After restarting, try updating your iOS again and see if it solves the issue.
Method 4: Reset Network Settings
Certain network configurations, misconfigured settings, or conflicting network preferences can hinder the update process. Resetting network settings can clear these issues and restore your device's network connections to default settings.
So if network-related issues are contributing to the "Verifying Update" problem on iOS 17/18/26, here’s how to reset your iPhone’s network settings:
- Step 1: Open iPhone’s Settings app
- Step 2: Scroll down and tap "General” > “Transfer or Reset iPhone.” You may be prompted to enter your device passcode.
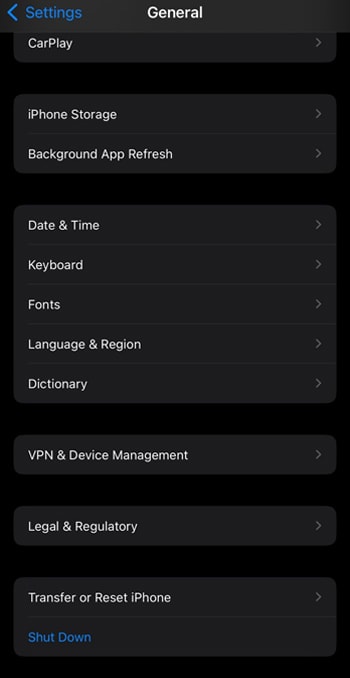
- Step 3: Confirm the action by tapping “Reset” > "Reset Network Settings" again when prompted.
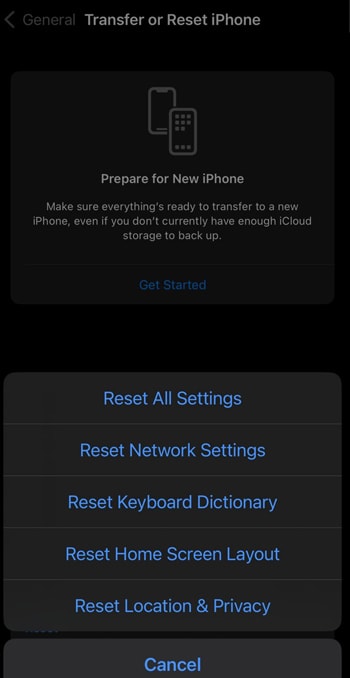
After the network settings are reset, your iPhone will automatically restart. Then, go to Wi-Fi settings and reconnect to your preferred Wi-Fi network.
Method 5: Update via Finder
Did you know that you can update iOS 17/18/26 through Finder on Mac? Many users might not be aware of this alternative method for updating their devices.
When updating via Finder, the update files are downloaded and installed from your computer, which usually has a more stable and reliable internet connection than a mobile device on Wi-Fi or cellular data. This minimizes the risk of interruptions during the update process.
How to update iPhone’s iOS 17/18/26 via Finder:
- Step 1: Connect your iPhone to your Mac.
- Step 2: Open your Mac’s Finder and select your device from the Finder sidebar.
- Step 3: Look for the "Check for Update" button next to the "Restore device" button and click on it. If an available update is found, click "Update" to begin the installation process.
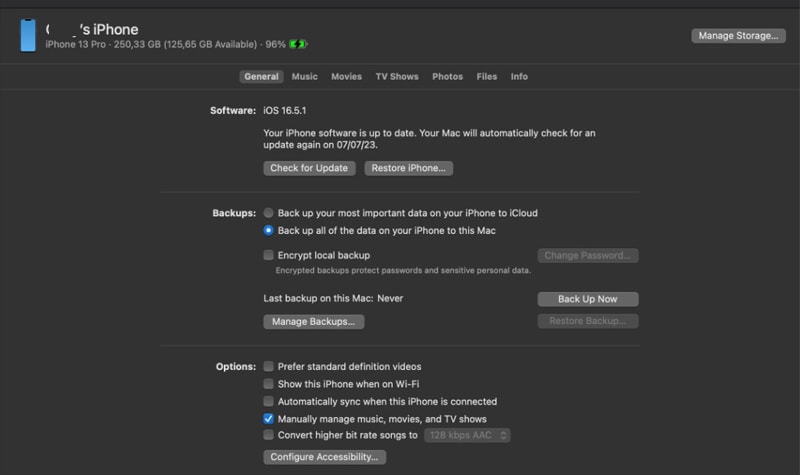
Part 4: Advanced Troubleshooting Technique with Easy Software
Suppose you have tried all the methods mentioned earlier and are still experiencing issues with the "Verifying Update" on iOS 17/18/26. In that case, there is an advanced solution that can help - Dr.Fone iOS System Repair.
Dr.Fone is a specialized software designed to resolve various iOS system-related problems. Dr.Fone iOS System Repair is specifically designed to address many iOS issues, including update failures, stuck on the "Verifying Update" stage, and other software glitches.

Dr.Fone - System Repair (iOS)
Repair iOS System Errors Without data loss.
- Only fix your iOS to normal, no data loss at all.
- Fix various iOS system issues stuck in recovery mode, white Apple logo, black screen, looping on start, etc.
- Downgrade iOS without iTunes at all.
- Work for all iPhone/iPad/iPod Touch, running on all iOS versions
To initiate the system repair process for your iOS device, start by launching the Wondershare Dr.Fone application on your computer. Locate and click on the "Toolbox" > "System Repair."

Now, follow the steps to fix the stuck on verifying update iOS issue:
- Step 1: Connect Your iPhone
Connect your iPhone to the computer. This action will lead you to a new window where you must choose the type of device you are working with. Since you are dealing with an iOS device, select the "iOS" option from the window.
In this new window, you will find a range of options for system repair. Choose "iOS Repair" to continue with the repair process for your iOS device.

- Step 2: Select Standard Repair
Dr.Fone will ask you to select a repair mode for your iOS device. Opt for "Standard Repair" from the two available options if you wish to preserve your data during the repair process.

- Step 3: Place iOS Device in Recovery Mode
For the next step, follow the instructions on your screen. Then, select "Enter Recovery Mode."

When your device is in Recovery Mode, the application will detect the suitable iOS firmware for installation. Click "Download" next to the iOS firmware version you want to install on your device.
- Step 4: Begin iOS Firmware Download
The application will now initiate the download of the selected iOS firmware for your device. After the download is complete, Dr.Fone will verify the firmware before making it available for the iOS device update.
Finally, click "Repair Now" to initiate the repair process for your iOS device. Once the repair is finished, you're all done!

Bonus: How to Avoid Future Verification Problems
Now that you've learned how to solve the problem when verifying update iOS 17/18/26, it's wise to take preventive measures to avoid this issue in the future.
Before initiating any software updates, make sure your device has access to a stable and reliable internet connection. Then, regularly monitoring your device's storage usage is just as important. Make sure there is sufficient free space before attempting any updates.
Keeping your iPhone updated is important. Software updates often include bug fixes, security enhancements, and improvements that can resolve existing issues and ensure a more seamless user experience.
Conclusion
Updating your iPhone’s OS is no longer a hassle. Throughout this article, we explored the interesting updates that iOS 17/18/26 brings and discussed the common issue of getting stuck in the "Verifying Update" on iOS 17/18/26. Fortunately, there are several effective troubleshooting methods available to address iOS system-related problems.
Remember to always keep your iPhone up-to-date with the latest iOS versions. This will not only enhance your device's performance but also provide access to new features and improvements. Happy updating!
iOS Repair Solutions
- iPhone Problems
- iPhone Keeps Freezing
- iPhone Got Bricked
- iPhone Stuck on Apple Logo
- iPhone Stuck On White Screen
- iPhone Black Screen of Death
- iPhone Red Screen of Death
- iPhone Stuck on Connect to iTunes
- iPhone Camera is black
- iPhone Front Camera Not Working
- iPhone Sim Not Supported
- iPhone Reboot Loop
- iPhone Cannot Get Mail
- iPhone Battery Draining Fast
- iPhone Overheating While Charging
- iPhone Apps Stuck on Loading
- iPhone Flashlight Greyed Out
- iPhone Plays Music by Itself
- iPhone Screen Won't Rotate
- iPhone Won't Play Music
- iPhone Silent Switch Not Working
- iPhone Stuck on Charging Screen
- iPhone Volume Button Is Stuck
- Airpods Won't Connect to iPhone
- Apple Pencil Keeps Disconnecting
- iPhone Proximity Sensor
- Find My iPhone Problems
- Save A Water Damaged iPhone
- SIM Failure on iPhone
- Yahoo Mail Not Working on iPhone
- iPhone Quick Start Not Working
- iPhone Recent Calls not Showing
- Can't Update/Restore iPhone
- iPhone Activation Error
- iPhone Error 35
- iPhone Error 75
- iPhone Error 78
- iPhone Error 2015
- iPhone Error 7005
- iPad/iPod Problems
- Common iPad Problems
- iPad Apps Freezing
- Apps Not Downloading on iPad
- Cannot Connect to App Store
- iPad Screen Flickering
- iPad Keeps Dropping Wi-Fi
- iPad Not Charging
- iPad Email Problems
- iPad Ghost Touch and Typing
- iPad Magic Keyboard Not Working
- iPad Power Button Not Working
- iPod Stuck on the Apple Logo
- iTunes Problems
- Cannot Connect to iTunes Store
- iTunes Won't Open on Windows
- iTunes Stopped Working on Windows
- iTunes Match Not Working
- iTunes Corrupt Backup
- Top iTunes Remote for Android
- Top iTunes Alternatives for Android
- Update iTunes On Computer
- iTunes Error 9
- iTunes Error 11
- iTunes Error 21
- iTunes error 54
- iTunes Error 2005/2003
- iTunes Error 2009
- iTunes Error 3014
- iTunes Error 9006
- iOS Upgrade & Downgrade
- Update iPhone with/without iTunes
- Download and Install iOS 16
- Top iOS Downgrade Tools
- Downgrade iOS without iTunes
- Downgrade From iOS 15 to iOS 14
- iPhone Stuck On Verifying
- iPhone Error 1110 While Updating
- AirPlay Not Working After Update
- iPhone Can't Make Calls afterUpdate
- Photos Disappeared iPhone after Update
- Downgrade iOS 16 to iOS 15
- Reset iDevice
- Reset iPhone with iTunes
- Reset iPhone without iTunes
- Hard Reset iPhone Without PC
- Reset iPod without iTunes
- iPhone Reset Tips
- Reset iPhone Password
- Reset iPhone Without Apple ID
- DFU Mode
- Top Tools to Enter DFU Mode
- Backup iOS in DFU Mode
- Restore iOS from DFU Mode
- Exit DFU Mode
- Recover Data from DFU Mode
- Put iPhone in DFU Mode
- Recovery Mode


Daisy Raines
staff Editor
Generally rated4.5(105participated)