
[2026] How To Use SHSH Blobs To Downgrade iOS Devices?

Jun 30, 2026 • Filed to: Phone Repair Solutions • Proven solutions
 TL;DR:
To bypass Apple's closed signing windows and downgrade an iOS device to an older firmware, you must proactively save your device's unique SHSH blobs and apply them using an unsigned IPSW file through FutureRestore.
● For blob extraction, use TSS Saver with your device's ECID, the shshd tweak for automatic saving on jailbroken devices, or iFaith if you are using a Windows PC and a device running iOS 5.0.1 or older.
● When executing the downgrade via FutureRestore, you must append specific hardware flags in your command terminal: use "--latest-sep --latest-baseband" for iPhones with SIM cards and "--latest-sep --latest-no-baseband" for devices without them.
● Users without saved SHSH blobs can utilize Dr.Fone - System Repair to revert from builds like iOS 26 Beta to stable releases like iOS 18.5 without jailbreaking, provided the target Apple firmware signing window is currently open.
Ask AI for a summary
 ChatGPT
 Perplexity
 Gemini
 Claude
 Grok
Grok
For iPhone users, Apple's iOS continues to evolve with new features and enhancements. While iOS updates enhance the iPhone experience, they can slow down older devices. To restore performance, many users choose to revert. You can use SHSH Blobs to downgrade iOS and return to a more stable version.
Apple, however, typically allows the installation of the latest iOS version. It leaves little room for users to explore earlier firmware. In this comprehensive guide, we will explore the world of SHSH blobs. It will also discuss how they can be utilized to downgrade your iPhone's operating system.
Part 1: What Are SHSH Blobs and How Do They Work
SHSH blobs (Signature HaSH blobs) are Apple-generated digital signatures that verify and authorize the installation of specific iOS versions. They are essential for the firmware verification process during iOS updates or restores via iTunes or Finder. To downgrade iOS, saving SHSH blobs is a key step.
During an iOS update or restore, Apple’s servers generate a unique SHSH blob tied to your device and firmware version. This encrypted signature is stored both locally and on Apple’s servers to verify the installation. Its main role is to block unauthorized downgrades to older iOS versions, making SHSH blobs essential if you plan to downgrade iOS.
Apple signs iOS versions for a limited time to ensure devices run the latest secure firmware. Once the signing window closes, official downgrades are blocked. To bypass this, users often save and use SHSH blobs to downgrade iOS after signing ends.
Part 2. Step-by-Step Guide on How To Save SHSH Blobs Using Different Methods
Learning how to save SHSH blobs is crucial if you plan to downgrade your iOS device in the future. SHSH blobs are unique digital signatures that Apple uses to verify firmware installations, and once the signing window closes, they’re the only way to restore older iOS versions. By saving them early, you ensure your device has a fallback option in case of performance issues or bugs in newer updates. Below are four reliable methods to save SHSH blobs and protect your ability to downgrade iOS:
Method 1: Save SHSH Blobs With TSS Saver
One of the simplest ways to download SHSH blobs is by using the TSS Saver website. Follow these straightforward step-by-step instructions:
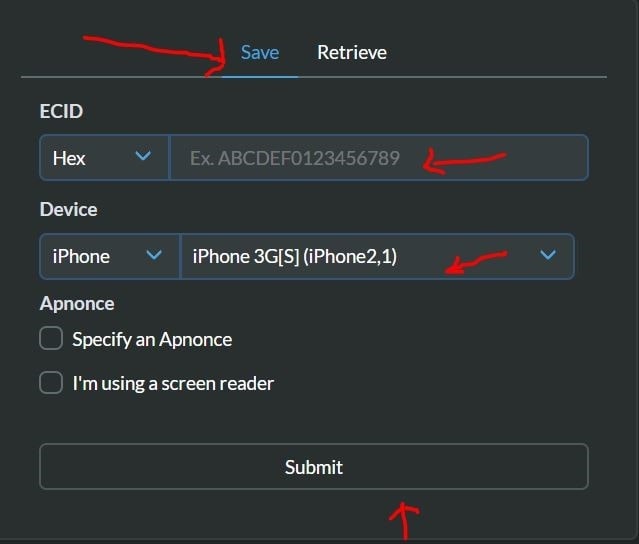
- Step 1: Open your web browser and navigate to the TSS Saver website. Find your device's ECID (Exclusive Chip ID) number. For that, Connect your iPhone, iPad, or iPod Touch to your computer and open iTunes. Click on your device's serial number in iTunes, and it will reveal the ECID.
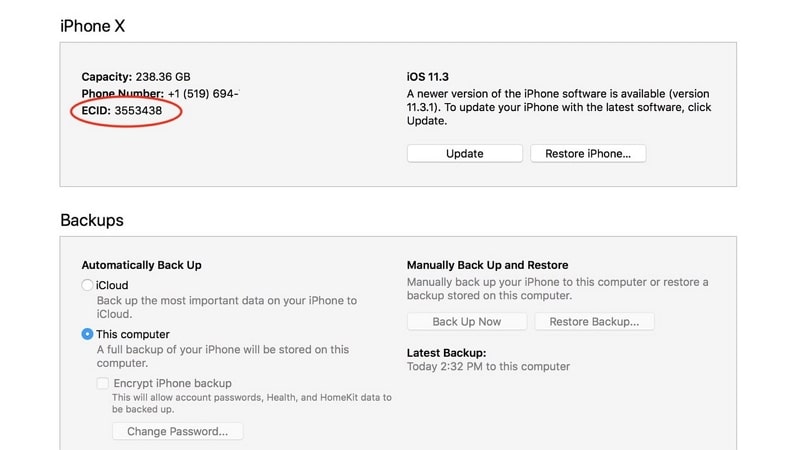
- Step 2: Enter the ECID and your device's model on the TSS Saver website. Click on the "Submit" or "Save SHSH" button to generate and save the SHSH blobs for your device. It will generate a link that you need to save for accessing blobs in the future.
Method 2: Save SHSH Blobs via RedSn0w
RedSn0w is a popular jailbreaking tool for iOS devices and SHSH saver. You can use this tool to save SHSH blobs for your iPhone. Here are the steps to save SHSH blobs via RedSn0w:
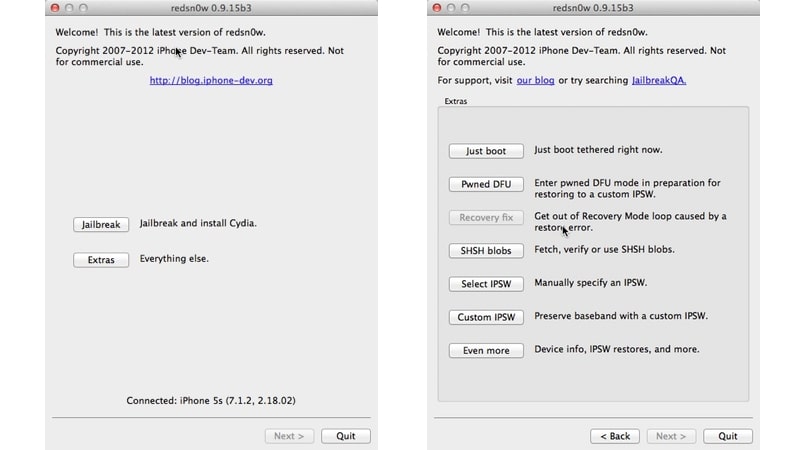
- Step 1: Download RedSn0w from the website. Once the download is complete, locate and open the Zip file in your Downloads folder. Find the RedSn0w app in the Zip file and drag it to the Applications folder on your Mac. Afterward, open the RedSn0w app.
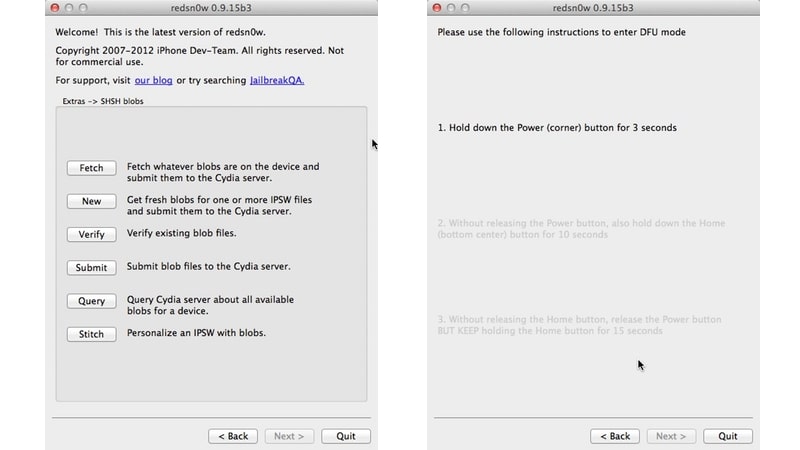
- Step 2: Inside the RedSn0w app, click the "Extras" option in the menu. Choose "SHSH Blobs" from the available choices. Click on "Fetch" to retrieve the SHSH blobs for your device.
- Step 3: Prepare your device for the Jailbreak process by putting it into DFU Mode. Follow the instructions outlined in the RedSn0w app or use the following instructions:
Instructions: Use an Apple-certified USB cable to connect your device to the Mac. Hold the Power button and use the slider to power off your device. Click "Next" in the RedSn0w app. Follow the on-screen timer and instructions to enter DFU (device firmware update) mode.
- Step 4: Once your device is in DFU mode, RedSn0w will identify your build and send the SHSH blobs to the Cydia server. They will be stored there until the jailbreak becomes available.
Method 3: Save Blobs via shshd
shshd is a convenient tweak designed for automatic blob saving. Once installed, it relieves you of the need to manually save blobs. It takes care of the entire process in the background. It's important to note that shshd requires your device to be jailbroken to function. Here are the steps for saving blobs via shshd:
Instructions: Launch your package manager and look for the "shshd" package using the search feature. Proceed to download and install the package. Tap "Done" when prompted to finish the installation process. This will automatically save the blobs every time you jailbreak the iPhone, and you can retrieve them from the TTS saver website by entering the ECID number.
Method 4: Save SHSH Blobs via iFaith
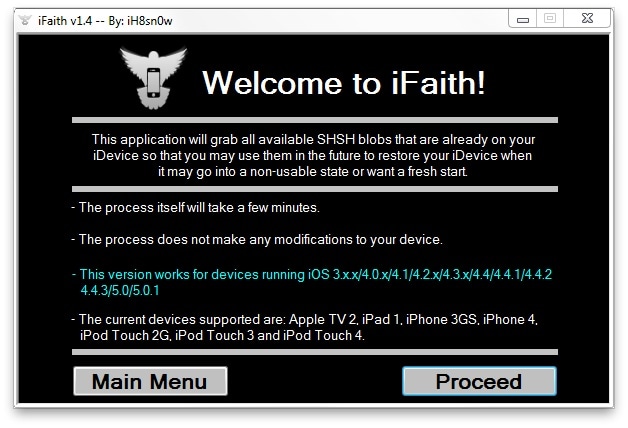
For older iPhone models, iFaith can be a valuable tool for downgrading. It is compatible with iOS devices running up to iOS 5.0.1. Moreover, the tool is also Windows only. Use the following steps to save SHSH blobs via iFaith:
- Step 1: Install and launch iFaith on your Windows computer. Click "Dump SHSH Blobs" and choose "Proceed" on the next screen.
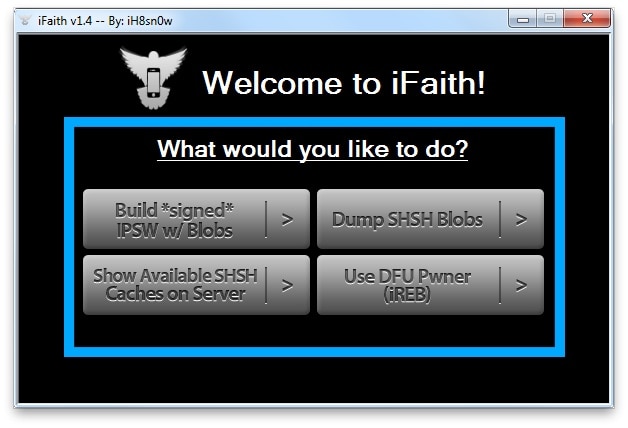
- Step 2: Now connect your iOS device to the computer you want to downgrade and put it into DFU Mode. Once the device is in DFU mode, tap "Start." It will kickstart the process of capturing SHSH blobs. Once all SHSH blobs are captured, select the location on your computer to save them. You can later use the blobs to downgrade iOS or create a custom IPSW file.
Part 3. How To Use SHSH Blobs To Downgrade an iOS Device With the Help of Popular Tool
Wondering about how to downgrade an iOS device with SHSH blobs? Once you have SHSH blobs of your desired iOS version, you can use a tool called FutureRestore. Along with the tool, you need the desired unsigned IPSW file. Once you have all three items, move them to a folder and use the following steps:
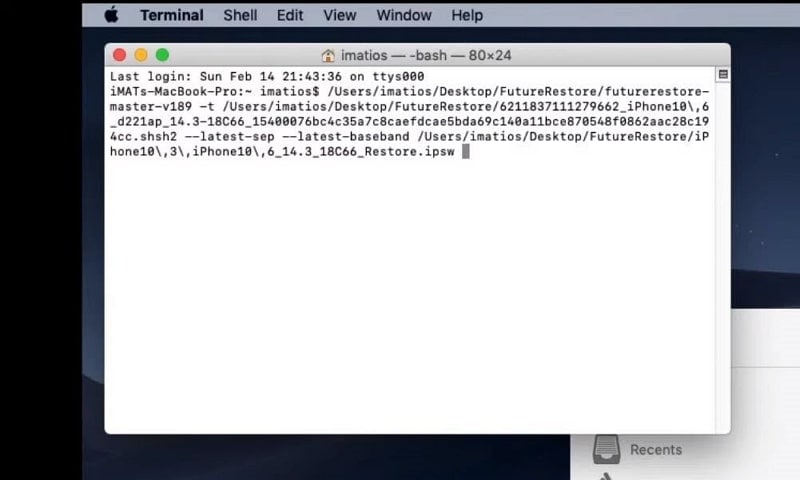
- Step 1: Begin by connecting your iPhone to the computer using a USB cable and ensure your computer is connected to the internet. Next, open Terminal on Mac or Command Prompt on Windows.
- Step 2: Drag and drop the unarchived FutureRestore file into the Terminal (Mac) or CMD (Windows) window. Then, type "-t" to indicate you're going to use SHSH2 blobs. Now, drag and drop the SHSH2 blob file into the Terminal or CMD window.
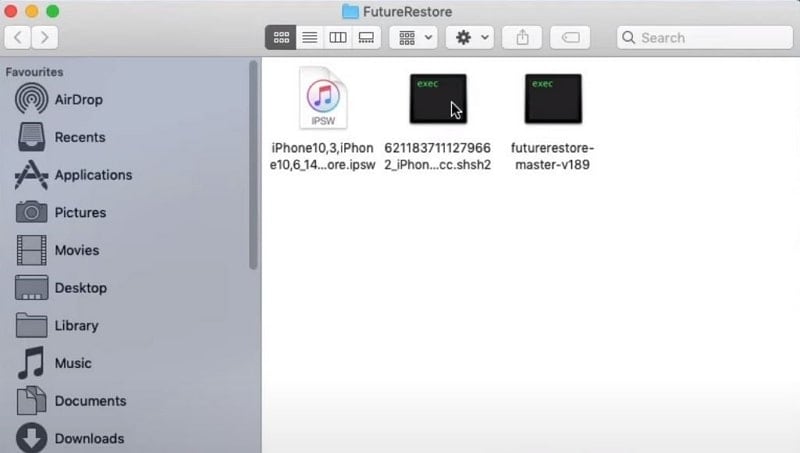
- Step 3: Based on whether your iPhone has a SIM card or not, enter the respective flags. For iPhones without a SIM card, type "--latest-sep --latest-no-baseband." For iPhones with a SIM card, type "--latest-sep --latest-baseband."
- Step 4: Finally, drag and drop the unsigned IPSW file into the CMD or Terminal window. Once the file is in place, press Enter to initiate the downgrading process.
Part 4. Downgrading iOS Devices Without SHSH Blobs
While you can use SHSH blobs to downgrade iOS, they aren’t the only option. Tools like Dr.Fone - System Repair (iOS) offer a simpler way to downgrade or upgrade your device—even to the latest beta—without jailbreaking. It’s a reliable solution for users seeking flexibility without technical hassle."
Wondershare Dr.Fone – System Repair is a powerful iOS repair toolkit designed to keep your iPhone or iPad running smoothly. Trusted by millions, it can fix over 150 iOS system issues—including boot loops, update failures, and stuck screens—without causing data loss. More importantly, Dr.Fone also allows users to downgrade iOS versions safely and easily, without the need for jailbreaking or technical expertise. Follow these simple steps to downgrade your iOS device using Wondershare Dr.Fone:
Dr.Fone - System Repair (iOS)
Upgrade and Downgrade iOS Without iTunes
- Only fix your iOS to normal, no data loss at all.
- Fix various iOS system issues stuck in recovery mode, white Apple logo, black screen, looping on start, etc.
- Downgrade iOS without iTunes at all.
- Work for all iPhone/iPad/iPod Touch, running on all iOS versions
- Step 1: Opt for System Repair in Wondershare Dr.Fone
After installing and launching Wondershare Dr.Fone, access "System Repair" through "Toolbox".

- Step 2: Select the Device Type to Repair
Now choose "iOS" and click "iOS Upgrade/Downgrade" on the following screen.

- Step 3: Select Downgrade iOS
select "Downgrade iOS" from the two options for the execution of the required process.

- Step 4: Backup iDevice
A prompt will appear asking you to back up your iOS device data before executing this process.
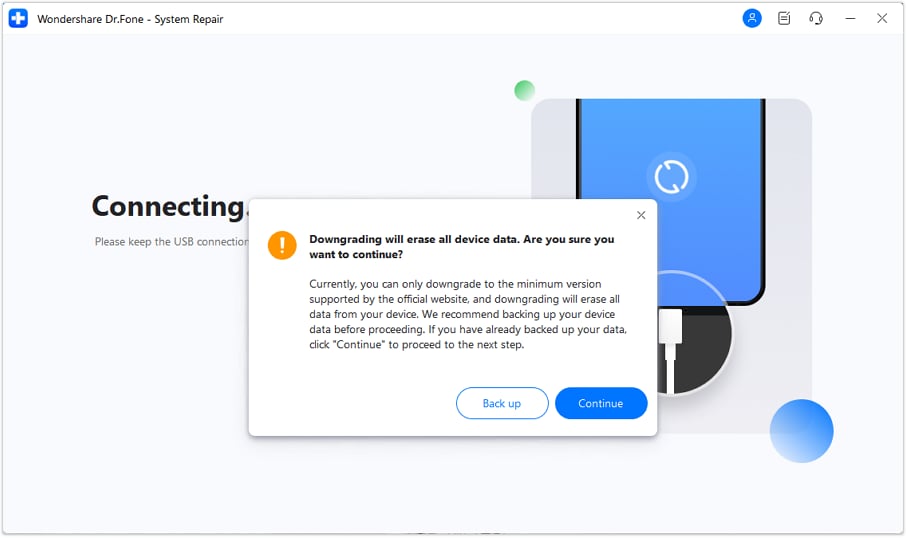
💡 Essential Backup Before iOS Downgrade
Tips: To avoid data loss during iOS downgrade, it’s strongly recommended to use Dr.Fone - Phone Backup (iOS) for a full, secure backup of your iPhone. This tool enables you to selectively export and save important files—contacts, photos, messages, and more—before downgrading. Protect your data and ensure a smooth restore process after reverting to a signed iOS version.
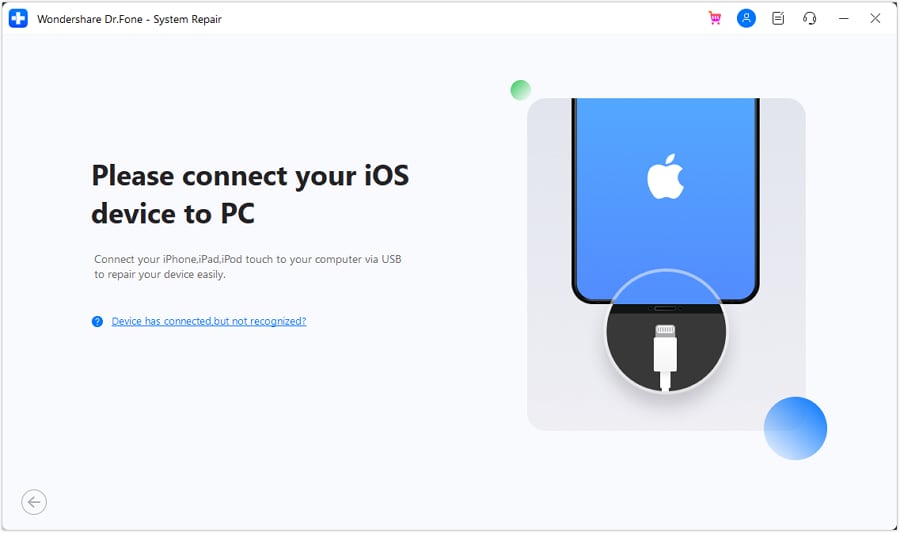
- Step 5: Connect iDevice with USB Cable
You will then be asked to connect your iDevice with a USB connection.
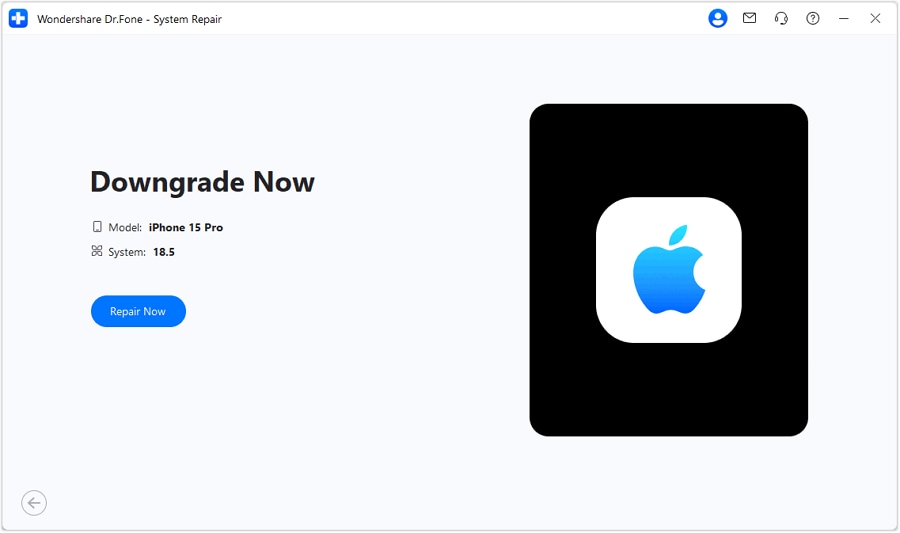
- Step 6: Get Your Desired iOS Firmware
It will show the list of available firmware. Click "Download" to get your desired firmware.

- Step 7: Perform the Downgrade Process
Wait for the firmware download to complete. When it is completed, click "Repair Now" to begin the downgrading process.
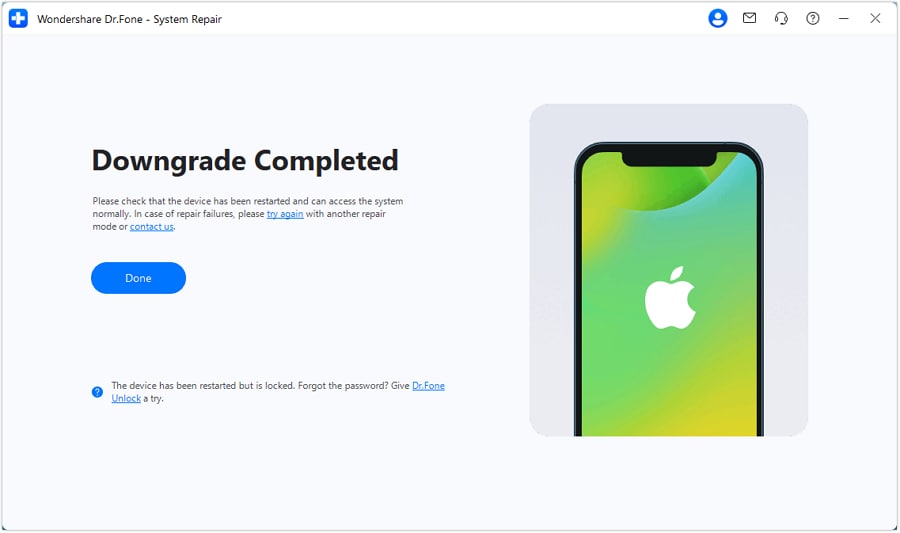
- Step 8: Successfully Downgrade Your iOS Device
This process will take some time, and when it is done, click "Done".
The Best Solution for iOS 26 Beta Issues
Tips: Dr.Fone - System Repair now enables zero-data-loss solutions for iOS 26 Beta crashes (boot loops/black screen/failed updates) and one-click downgrades to signed versions (e.g. iOS 18.5), completing in 10 minutes. Supports all iPhone models, bypassing iTunes factory reset risks. Downgrades require open Apple signing windows (real-time tool verification). Pre-export critical data when reverting from iOS 26.
Conclusion
In summary, this guide explored how to use SHSH blobs to downgrade iOS, giving users a way to reinstall older versions on their devices. We covered multiple methods to save SHSH blobs and detailed how to use FutureRestore to complete the downgrade process.
If you don't have access to SHSH blobs or find the process too advanced, an easy solution is Wondershare Dr.Fone. This versatile tool proved to be a promising option for those seeking to explore older iOS versions without the reliance on saved SHSH blobs. With Dr.Fone's System Repair feature, users can downgrade their iOS devices with ease.
4,624,541 people have downloaded it


Upgrade & Downgrade
- iOS Beta Install
- 1. Download iOS Beta Profile
- 2. Download the iOS 13 Beta
- 3. iOS 16 Beta Download
- 4. Uninstall iOS Beta
- 5. Install iPhone Beta Profile
- 6. Install Mac Beta Profile
- 7. Install iOS 15 Beta Profile
- 8. Upgrade iPad to iOS 14
- iOS News
- 1. Update iPhone 4s to iOS 9
- 2. Cheaper iPhone
- 3. Customize iPhone Home Screen
- 4. Know About iOS 15 Lock Screen
- 5. Add Lyrics to Song on Apple Music
- 6. Current iOS Version
- 7. Current iOS for iPad
- 8. iOS 19 and the iOS 26 Rumor
- iPhone Downgrade Tips
- 1. Downgrade iOS Like a Pro
- 2. Roll Back to an Older iOS Version
- 3. Downgrade to iOS 15
- 4. Install Developer Profile
- 5. Downgrade iOS without iTunes
- 6. Downgrade to iOS 14
- 7. Download and Install the iOS 16
- iPhone Update Tips
- 1. iPhone & iPad Security Updates
- 2. Undo an Update on iPhone
- 3. Update iPhone with/without iTunes
- 4. Fix iPhone Checking for Update Stuck
- 5. Fix iPad Software Update Failed
- 6. Fix iPhone Stuck On Update
- 7. Fix iPhone Won't Update
- 8. Fix Update Server Not Be Contacted
- 9. Fix iPhone Stuck on Update Requested
- 10. Resolve iPhone Cellular
- 11. Resolve iPhone Error 1110
- 12. Fix iPhone Frozen
- iOS 11/12 Problems
- 1. Fix iPhone Stuck on Waiting
- 2. Fix iPhone Can't Make Calls
- 3. Fix iPhone Stuck on Logo
- 4. Fix Photos Disappeared from iPhone
- 5. Fix iPhone Keeps Freezing
- iOS 13/14 Problems
- 1. Fix CarPlay Not Connecting
- 2. Fix Resolve Apps Won't Open
- 3. Fix Song/Playlist Missing
- 4. Fix iPhone Asking for Passcode
- 5. Fix Map Voice Navigation Won't Work
- 6. Fix iMessage Not Working
- 7. Recover Deleted Data on iOS 14
- 8. Recover Disappeared Notes on iOS 14
- iOS 15 Problems
- iOS 16 Problems
- 1. Fix iPhone Wi-Fi Not Working
- 2. Fix iOS 16 Battery Drain Issues
- 3. Fix Screen Mirroring Not Working
- 4. Fix Apple CarPlay is Not Supported
- 5. Fix iPhone Screen Not Responding
- 6. Fix iPhone Apps Keep Crashing
- 7. Fix Call Failed iPhone Issue
- 8. Fix iPhone Stuck On Apple Logo
- 9. Counter iPhone Heating Problems
- 10. Fix iPhone Stuck in Boot Loop
- 11. Fix iPhone Bluetooth Not Working
- iOS 17 Problems
- 1. iPhone Freezing After Update
- 2. iOS 17 Wallpapers Blurry at Top
- 3. Fix iPhone Charging Slow
- 4. Enable Live Activities iOS 17
- 5. Fix iOS 17 Apps Crashing
- 6. Fix iPhone Stuck on Verifying Update
- 7. Overheating after 17 Update
- 8. Fix iOS 17 Keyboard Bug
- 9. Fix iOS 17 Green Screen Issue
- 10. iOS 17 Bugs & Fixes
- 11. No iOS 17 Update on Your iPhone
- 12. iOS 17 Unable to Download
- 13. Missing contacts with iOS 17 update
- iOS 18 Problems
- 1. iOS 18 Black Screen
- 2. iPadOS 18 Math Notes Issues
- 3. iPhone Email Not Working
- 4. iPhone Contacts Disappeared
- 5. iPhone Stuck in Restore Mode
- 6. iPhone Stuck on Preparing Update
- 7. iPhone Flashlight Not Working
- 8. iPhone Bluetooth Issues
- 9. Stuck on Terms and Conditions
- 10. Frozen iPhone iOS 18
- 11. iOS 18 Beta Boot Loop Issue
- 12. iOS 18 Beta Overheating
- 13. iOS 18 Beta Volume Bug
- iOS 26 Topics
- ● Manage/transfer/recover data
- ● Unlock screen/activate/FRP lock
- ● Fix most iOS and Android issues
- Free Download Free Download Free Download


James Davis
staff Editor
Generally rated4.5(105participated)