Recover photos, messages, WhatsApp, and more — no backup
needed.
Recover photos, messages, WhatsApp, and more — no backup
needed.

 100% Security Verified | No Subscription Required | No Malware

 :
: 
 ChatGPT
 Perplexity
 Gemini
 Claude
 Grok
Grok

I just upgraded my software, and now all my important contacts are gone. What should I do to fix my iphone lost contacts after update?
Recent User Query
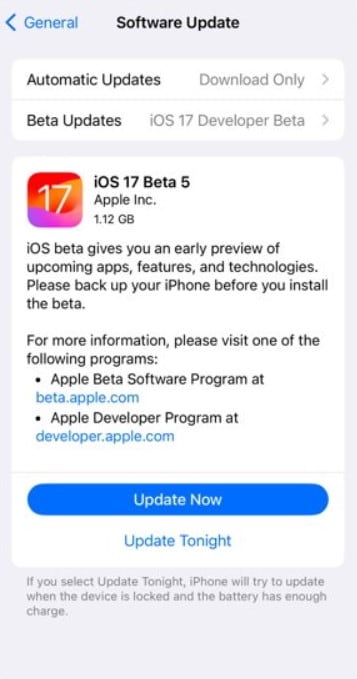
The iOS 17 update is a significant leap forward, introducing a wealth of new features and improvements to enhance your Apple ecosystem experience in 2026. However, major system upgrades can sometimes be unpredictable. What if you encounter unexpected issues, such as lost data after ios 17 update, with crucial phone contacts or files vanishing into thin air? Do not panic just yet.
While experiencing iphone lost data after update ios 17 can be an alarming ordeal, there are multiple reliable solutions available. From built-in Apple recovery methods to advanced iOS data recovery tools, you have a high chance of retrieving your information. Before diving into the fixes, it is helpful to explore why data loss happens during these updates so you can better protect your device in the future.
In this article
Part 1: Reasons for Contacts and Other Data Lost After the iOS 17 Update
The iOS 17 update is meant to be a significant upgrade for your iPhone's overall performance. However, deploying such a heavy operating system change may occasionally lead to unintended consequences. If precautions are skipped, you could face lost contacts after ios 17 update. Here are the most common underlying causes for this inconvenience.
Software Glitches and Bugs
System bugs are often the primary culprits behind data discrepancies following an upgrade. Sometimes, the update execution itself may not go as smoothly as intended by Apple's developers. Hidden code conflicts can lead to unintended results, ultimately leaving you with contacts missing after iphone update.
Storage Space Constraints
If your device operates on insufficient storage space, that bottleneck can trigger severe data overwriting or loss. Why does this happen? The iOS 17 operating system requires a sizable amount of free storage block to unpack and install optimally. Failing to meet this threshold could result in a corrupted update cycle, dropping important data along the way.
Unexpected Interruptions During Update
Another prevalent reason for missing files is physical or network interruptions during the installation. This could manifest due to a sudden power drain, an unstable Wi-Fi internet connection, or an accidental manual reboot initiated by the user. These disruptions fracture the delicate data transfer and rewriting process.
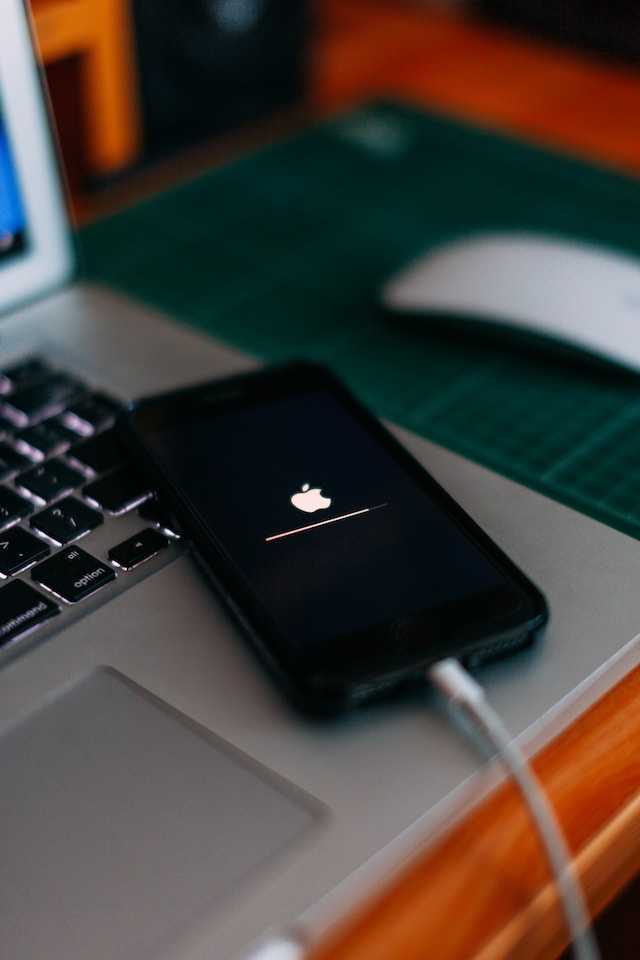

Part 2: Methods To Recover Lost Data After the iOS 17 Update
If you have finalized the upgrade to iOS 17 and immediately noticed that data such as contacts are missing, remain calm. There are established and proven techniques you can execute to extract those files back to your device.
Recover iPhone Lost Data Using iTunes or Finder
iTunes (or Finder on newer Macs) serves as Apple's official desktop client for managing and backing up iOS hardware. It stands as a reliable built-in utility for recovering your iPhone's files. By restoring a previous backup state, iTunes can effortlessly retrieve missing items.
Because iTunes creates full regular backups of your device's ecosystem when connected to a trusted desktop, you can easily restore a contact, text message, or photo gallery to the state it was prior to the update.
-
Step 1 Connect Your Device
Launch the iTunes application and connect your iPhone to your computer using a verified USB cable. Ensure you are using the precise computer you utilized to sync your iPhone before the iOS 17 update occurred.
-
- For macOS 10.14 or earlier / Windows: Click the Device icon located in the top left navigation pane of the iTunes app. Proceed to click Summary in the Settings section, and hit Restore Backup.
- For macOS 10.15 or later: Open the Finder window and select your specific device under the Locations sidebar. Next, click Restore Backup.
Step 2 Navigate to Backup Options
Depending on your desktop operating system, perform either of the following actions:
-
Step 3 Select the Target Backup
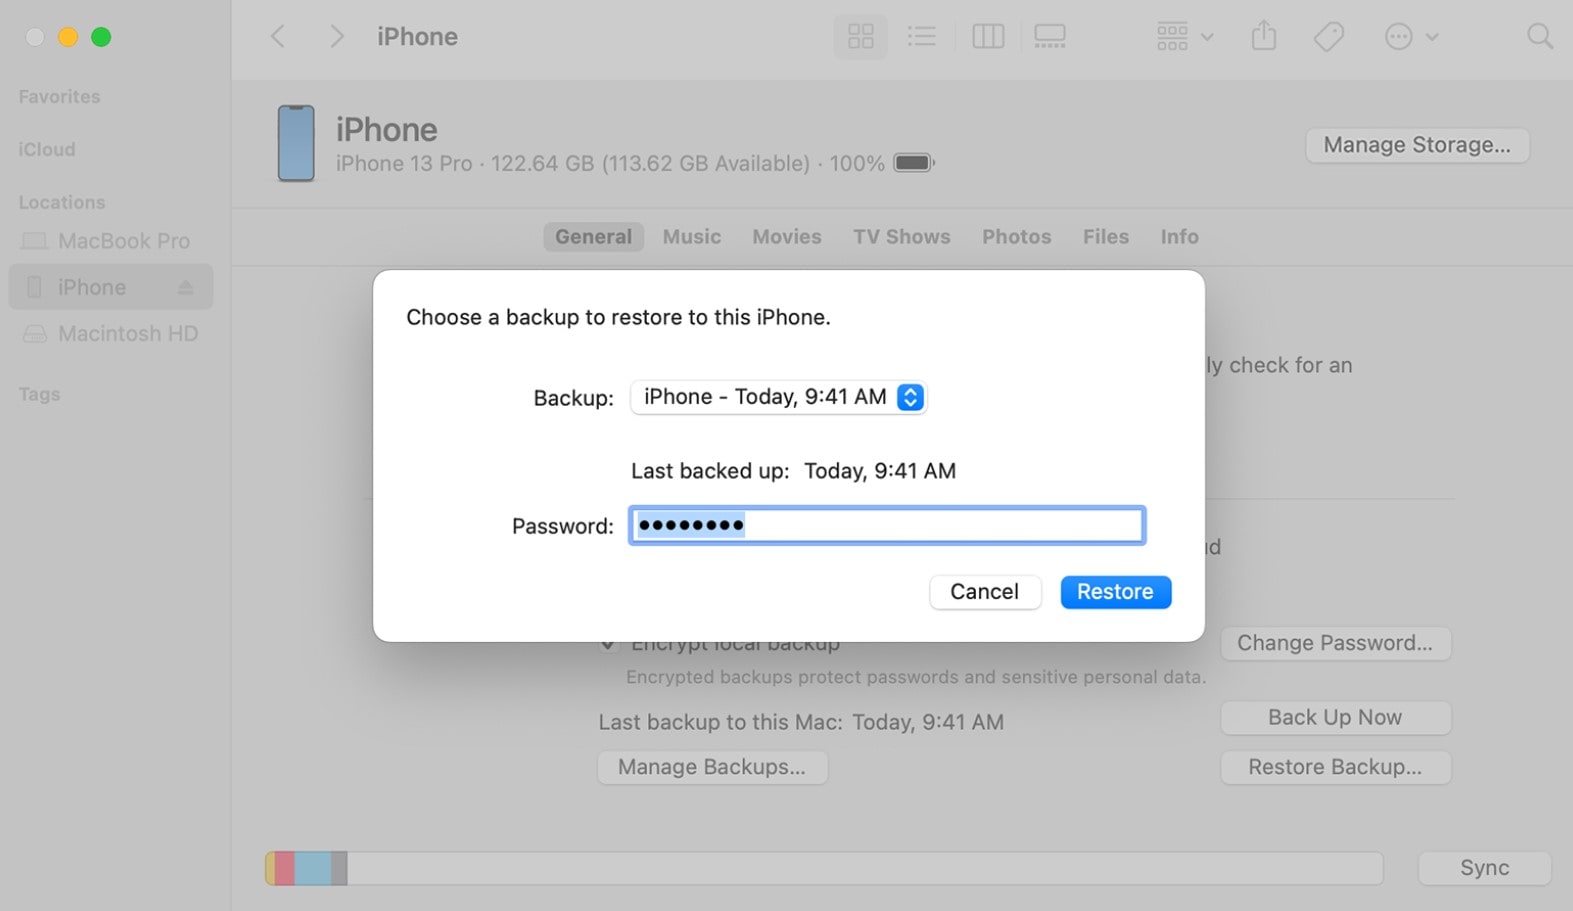
In the "Choose a backup to restore to this iPhone" pop-up prompt, selectively click the backup file that contains your missing data, enter the encryption password if previously set, and click Restore.
-
Step 4 Allow Syncing to Complete
Keep your iPhone physically connected and wait while it successfully restarts and syncs with the desktop. Remember to click Eject before physically disconnecting your hardware.
Recover iPhone Lost Data Using iCloud
iCloud operates as Apple's seamless cloud-based service that automatically backs up your data. This eliminates the necessity of plugging your device into a desktop. If you need to fetch lost contacts after ios 17 update directly from the cloud, follow these instructions:
-
Step 1 Reset the Device
You must completely erase the current content of your iPhone device before restoring system data from iCloud. Navigate to Settings, wipe the device, and turn it back on to reach the Hello screen.
-
Step 2 Choose iCloud Restore
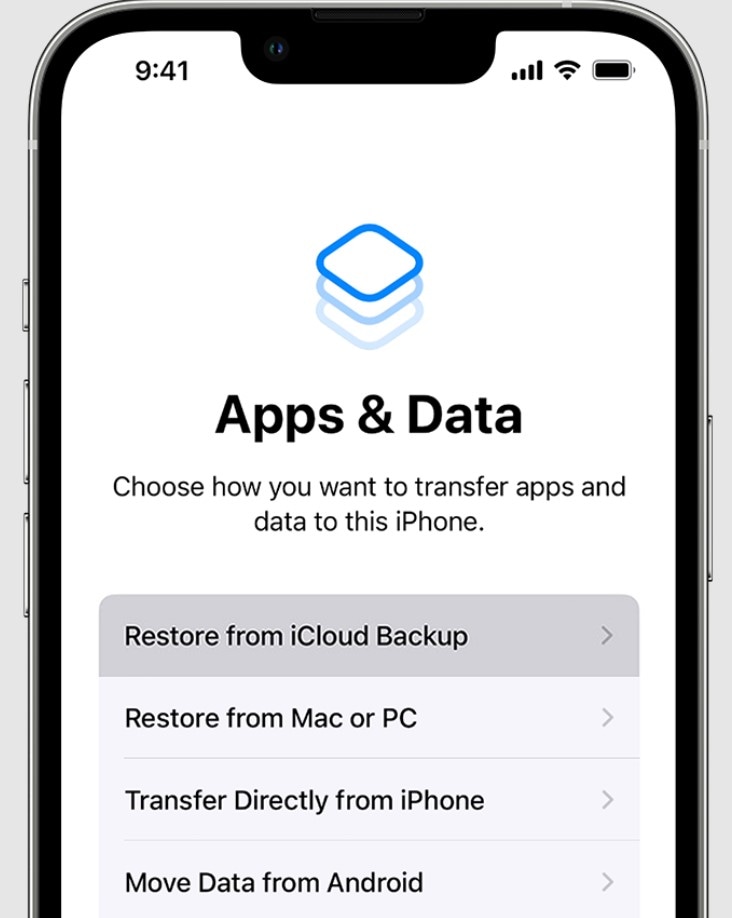
Follow the intuitive onscreen setup steps. Once you reach the Apps & Data screen, specifically tap on Restore from iCloud Backup.
-
Step 3 Authenticate and Transfer
Sign securely into your iCloud account using your Apple ID and choose the most relevant backup timeline that predates the iOS 17 software update.
-
Step 4 Complete the Restoration
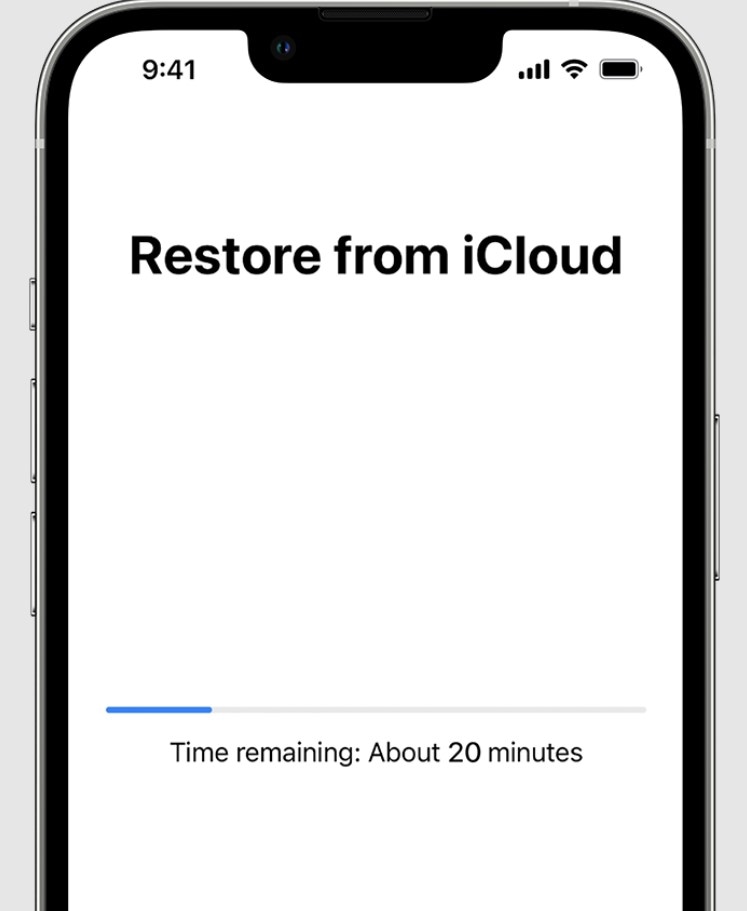
Wait comfortably while finishing the transfer process over Wi-Fi. Your lost data and contacts should organically populate back onto your iPhone interface.
Import iPhone Lost Contacts From SIM Card to Your iPhone
If you solely suffer from iphone lost contacts after update, you might bypass heavy restores by simply importing them directly from your cellular SIM card. This localized method is highly effective, but it is only possible if you historically saved them on your SIM card hardware prior to the software flash.
-
Step 1 Insert the SIM
Securely insert your SIM card into your iPhone's tray if it is not already seated inside.
-
Step 2 Access Contact Settings
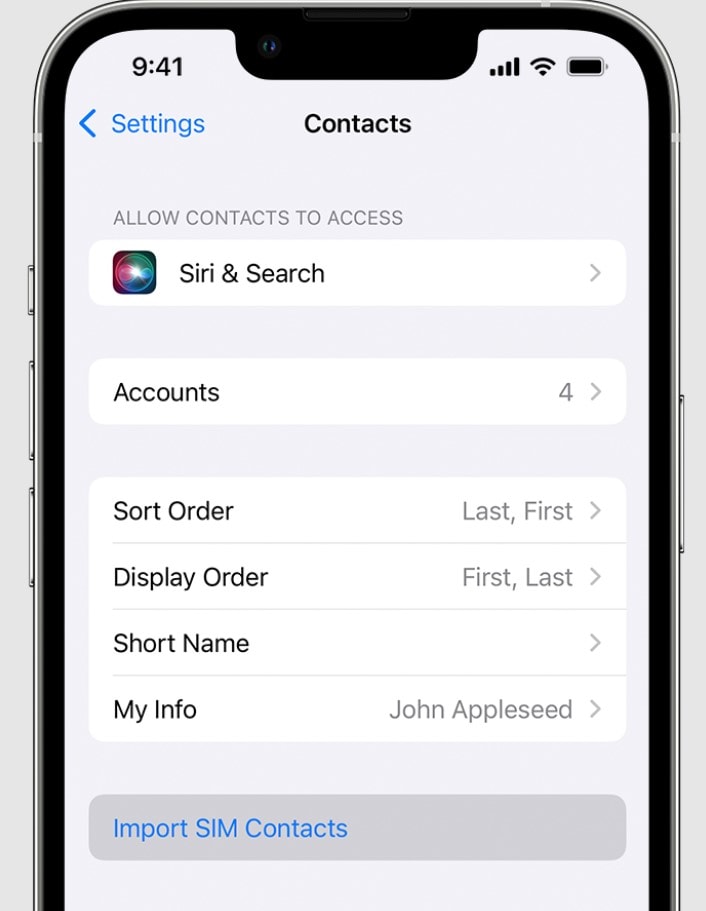
Go to the main Settings menu, select Contacts, scroll down to the bottom options, and gently tap Import SIM Contacts.
-
Step 3 Select the Destination
You will be prompted to select where you want to route the imported contacts—typically choosing between your iCloud or an attached Gmail profile.
-
Step 4 Verify the Import
Immediately after the rapid import process finishes, your localized missing contacts should now visibly reside within your standard iPhone Contacts directory.
Recover iPhone Lost Data Using Wondershare Dr.Fone – iOS Data Recovery
What if you unfortunately forgot to maintain an active backup routine? Do not fret! There is a specialized and powerful data recovery environment designed exactly for this scenario: Wondershare Dr.Fone. Its advanced data recovery architecture can bypass standard limitations and help you regain missing contacts, important notes, personal messages, and media directly from your device's localized memory.
It also acts as an extraction viewer for older iTunes and iCloud backup packets. So, even if you are reeling from iphone lost data after update ios 17 without a recent Apple backup, Dr.Fone dives deep to rescue your information. The interface is meticulously designed to be simple and highly intuitive, making it a breeze for beginners to navigate.
If you use an iPhone 18 and have no backup to restore, follow this guide to recover data from iPhone 18 without a backup. It starts with Apple’s built-in recovery options and explains which data a direct device scan may still detect.
 Recovers data after deletion, crashes, or device damage.
- Supports photos, messages, contacts, WhatsApp, and more.
- Supports all major iPhone, iPad, and iPod models.
- Preview and recover only what you need.

Follow these steps to restore your lost data straight from your hardware without relying on cloud backups:
-
Step 1 Install Dr.Fone
Navigate to the official website of Wondershare Dr.Fone and hit Download to install the software suite securely onto your desktop machine.
-
Step 2 Access Data Recovery Tool
Launch the newly installed application. From the centralized Toolbox homepage dashboard, actively click on the Data Recovery module.

-
Step 3 Choose Device System
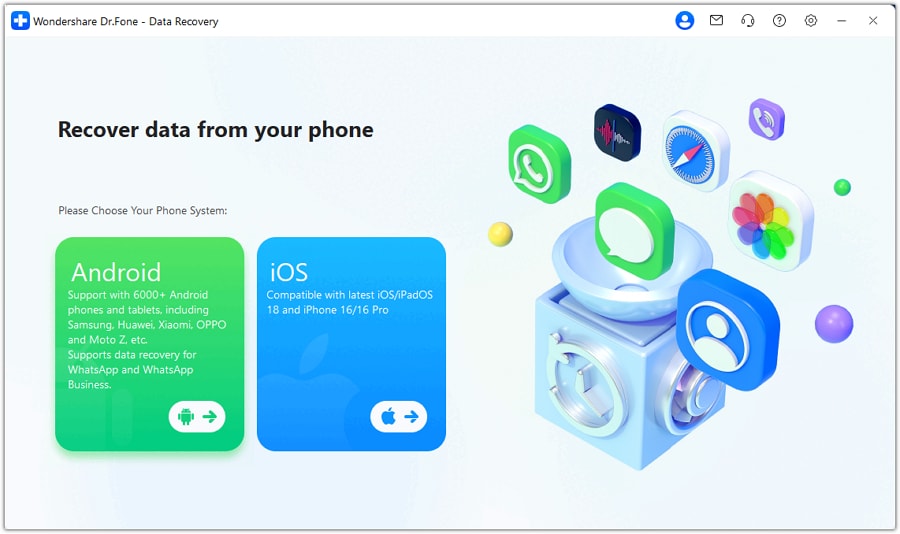
When the platform asks you to specify your operating system environment on the next screen, logically select iOS from the provided phone system alternatives.
-
Step 4 Select the Direct Recovery Option
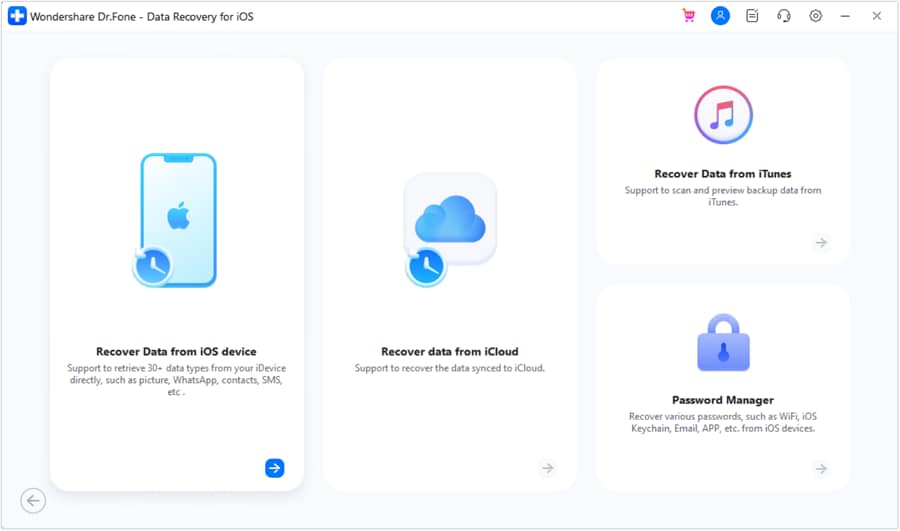
To pull missing files directly off the phone's internal memory block, click on Recover Data from iOS device.
-
Step 5 Connect the Hardware
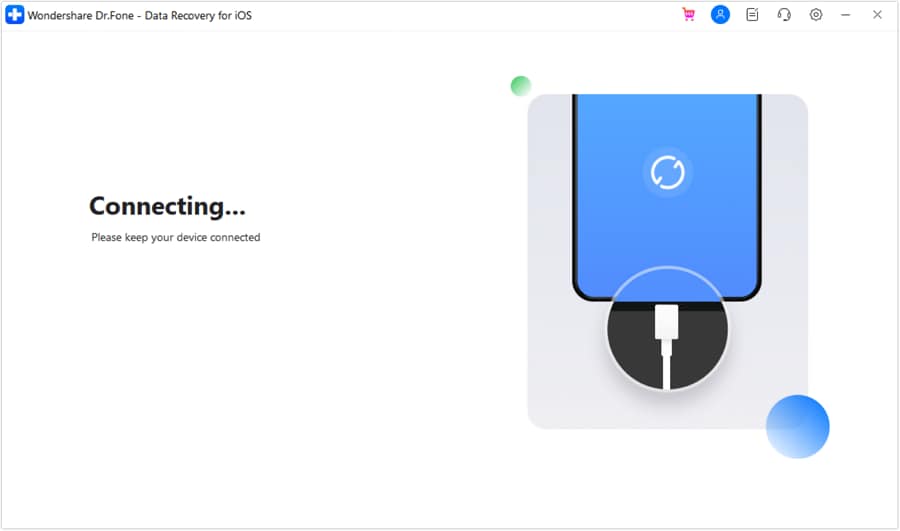
Securely plug your iOS device into your computer using a trusted USB lightning or USB-C cable. The Dr.Fone software engine will dynamically detect your specific device model automatically.
-
Step 6 Initiate the Scan
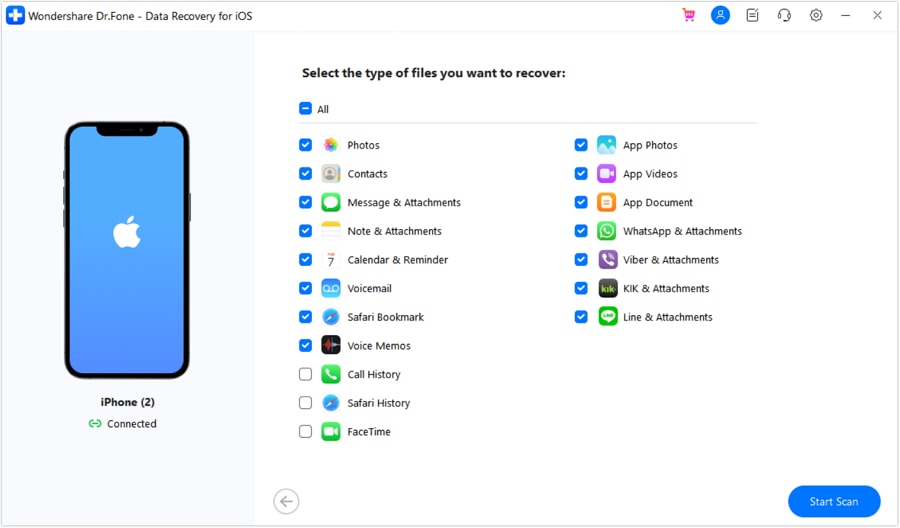
You will see a matrix of selectable data categories. Select the specific file types you wish to retrieve, such as Contacts or Messages, and proudly click Start Scan.
-
Step 7 Let the Software Analyze
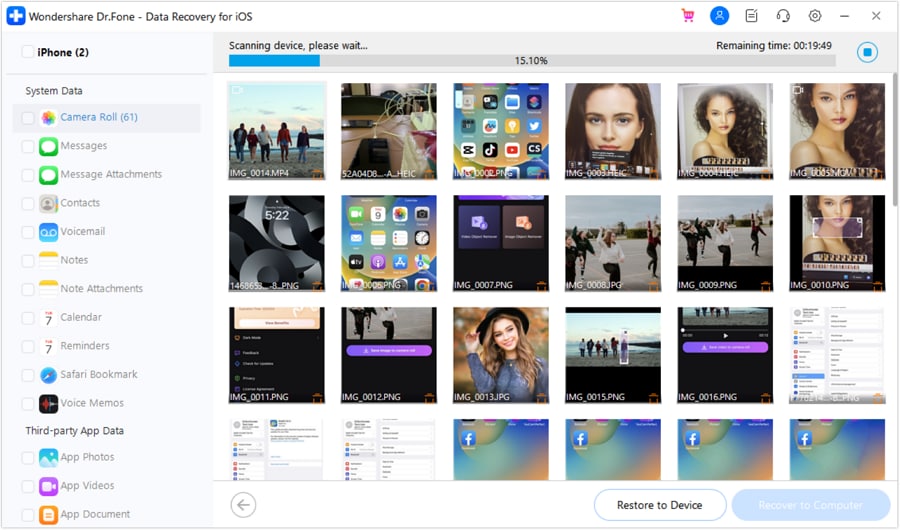
Dr.Fone will commence a deep forensic scan of your iOS device's hidden storage layers. It will systematically display all the recoverable fragments it encounters.
-
Step 8 Preview and Target Your Restoration
Once the exhaustive scan reaches 100%, utilize the preview pane to manually verify the content. Select precisely the data files you desire to pull back, and then command the software by clicking Restore to Device.
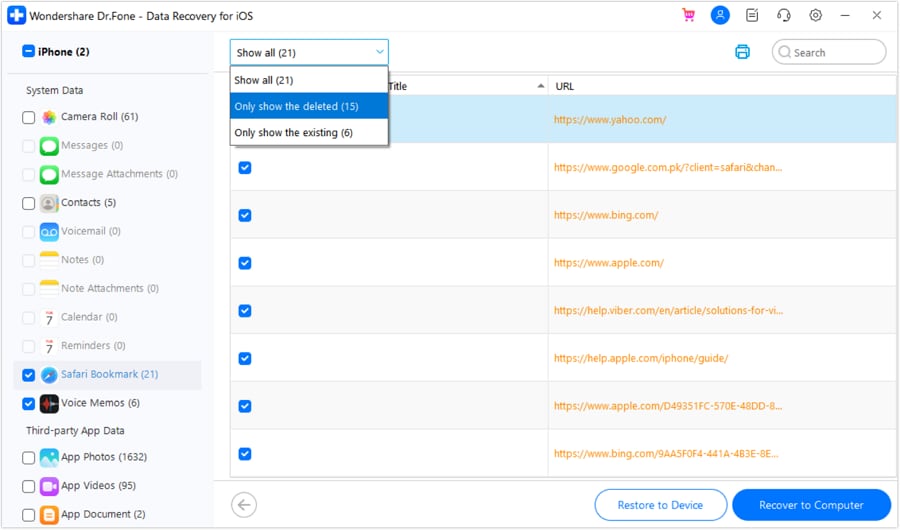 Tip: You can effortlessly streamline your search. Filter the scan results via the drop-down list positioned in the upper navigation panel and choose Show all, Only show the deleted, or Only show the existing.
 -
Step 9 Finalize Destination
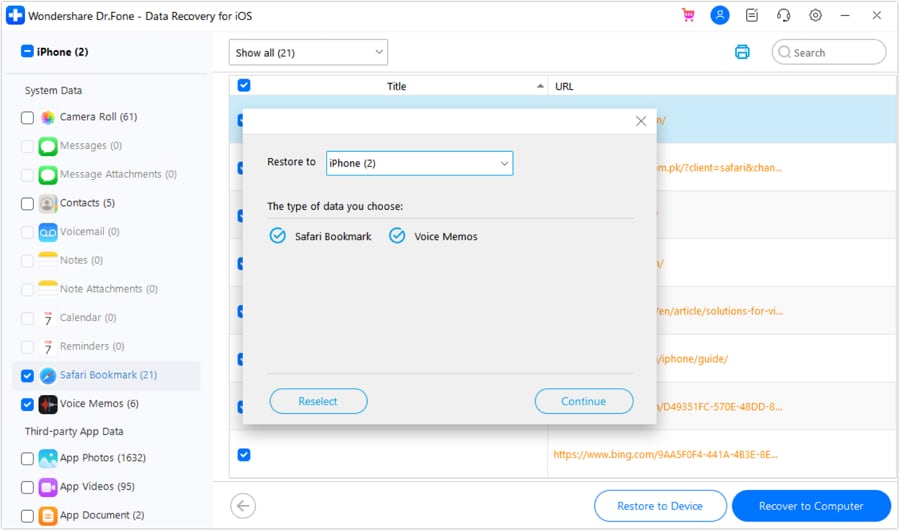
In the resulting pop-up configuration window, confirm your iPhone device on the Restore to drop-down menu, and click Continue to authorize the final push.
-
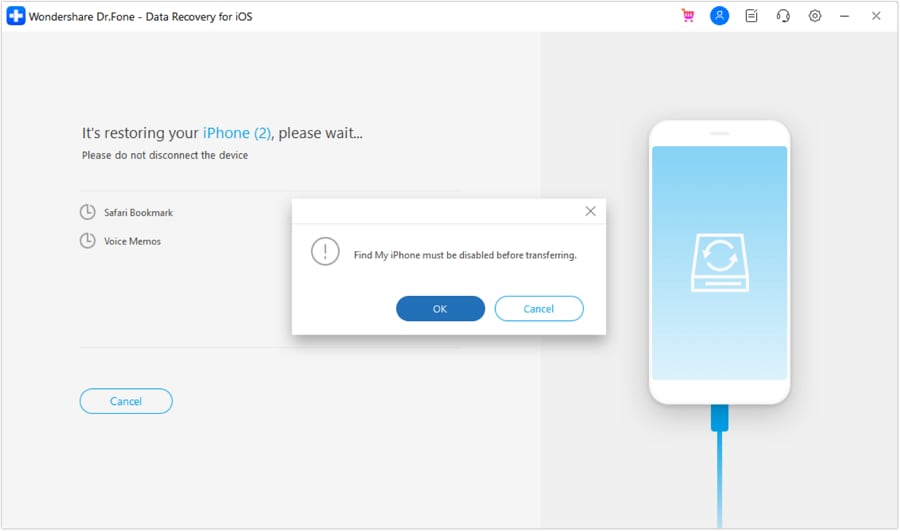
Step 10 Temporary Security Bypass
If prompted by Apple's safety protocol, click OK in the respective dialogue box instructing you to momentarily disable the Find My iPhone function during the write-back phase.
-
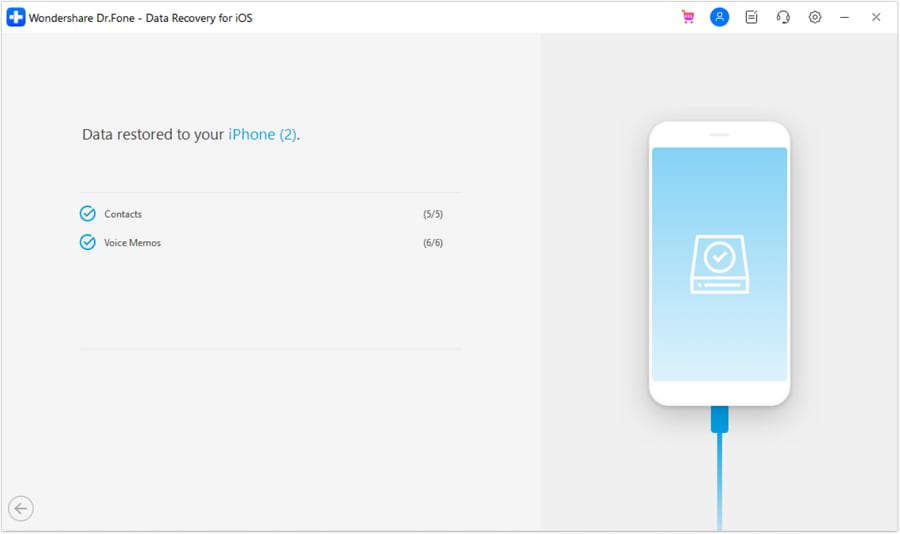
Step 11 Success Confirmation
Once the software finalizes the intricate recovery process, you will be greeted with a joyous "Data restored to your iPhone" notification on the screen.
Part 3: Additional Tips for iPhone Data Recovery and Prevention
Recovering lost data after ios 17 update proves manageable, but proactively preventing such data losses from materializing in the first place is far superior. Implement these practical and seasoned tips to safeguard your critical iPhone data ecosystems, ensuring absolute peace of mind for every future software rollout:
1. Regularly Back Up Your iPhone Ecosystem
Executing consistent system backups is the undisputed golden rule of device management. This safety net ensures your vital data remains untouched even if a catastrophic failure happens mid-update. Use Apple's native iCloud or iTunes utilities to preserve your environment. iCloud is highly convenient as it can back up your data silently when locked and connected to Wi-Fi. Alternatively, iTunes provides granular manual control over local hard drive backups. Never launch an iOS update without first confirming your backups reflect the current date.
2. Manage Your Storage Allowances Wisely
Running dangerously low on your mobile phone's internal storage space introduces heavy system lag and drastically increases the risk of file corruption during a hefty system update. Commit to periodically reviewing your storage tab. Delete outdated cache files, offload heavy applications you seldom open, and prune excessive media folders. If you rely heavily on cloud solutions, considering a paid iCloud tier upgrade is a smart investment.
3. Stay Informed About iOS Releases and Bugs
Ignorance is not bliss when it comes to operating systems. Being deeply aware of impending iOS rollout schedules allows you to adequately prepare. Do not blindly update on release day. Keep a watchful eye on Apple's developer announcements. Skim through prominent tech forums or Reddit threads for early user feedback to gauge if the new iteration contains glaring bugs known to delete data.
4. Keep Third-Party Data Recovery Software Ready
If disaster strikes despite your best efforts, be cautious and selective about the third-party rescue tools you deploy. An industry-trusted standard like Wondershare Dr.Fone acts as an unparalleled lifesaver when localized backups simply do not exist. Always follow authorized guides when wielding these robust utilities.
Conclusion
Experiencing iphone lost data after update ios 17 is undeniably stressful, but the strategic recovery methodologies outlined in this guide consistently prove highly effective. Whether you lean on traditional iCloud restorations or extract localized contacts directly via SIM, relief is within reach.
Among the highlighted solutions, Wondershare Dr.Fone’s specialized iOS data recovery software stands out as the ultimate fallback—especially if you lacked the foresight to maintain an active backup routine prior to installing iOS 17. Not only does it surgically restore your contacts missing after iphone update, but its broad toolkit also encourages localized PC backups, perfectly accommodating users hindered by restrictive iCloud storage limits.
Should all conventional digital avenues fail, reaching out to official Apple Support remains a viable final step. Remember, time is critical. The sooner you initiate your preferred recovery process, the significantly higher your chances are of successfully rescuing your lost files before background processes overwrite them permanently.
FAQ
-
1. Why are my contacts missing after an iPhone update?
Contacts missing after an iPhone update typically occurs due to backend software glitches, failing iCloud synchronization, or severe storage constraints causing data to drop during the heavy firmware overwrite process. Usually, they can be easily retrieved by toggling iCloud Contacts off and on again, or restoring a previous backup. -
2. Can I recover lost data after the iOS 17 update without any previous backup?
Yes, it is possible. If you lack both iTunes and iCloud backups, dedicated third-party iOS recovery tools like Wondershare Dr.Fone can directly scan your iPhone's internal memory fragments to recover deleted or lost items before new data permanently overwrites them. -
3. Will using a third-party data recovery tool void my Apple warranty?
No, utilizing reputable read-only software such as Dr.Fone Data Recovery does not void your hardware warranty. These robust tools safely scan the localized software environment and do not perform unauthorized jailbreaks or physical modifications to the Apple device. -
4. How long does the data recovery process take via iCloud compared to direct software?
iCloud restorations depend heavily on your Wi-Fi bandwidth and the overall size of the backup package, sometimes taking hours to fully populate apps and photos. Direct recovery software tools often take only minutes to perform a focused scan and selectively extract just the specific files (like contacts or notes) you require.




 Add Wondershare Dr.Fone as a preferred source on Google