How to Activate and Customize iOS 17/18/26 StandBy Mode
Dec 31, 2025 • Filed to: Phone Repair Solutions • Proven solutions
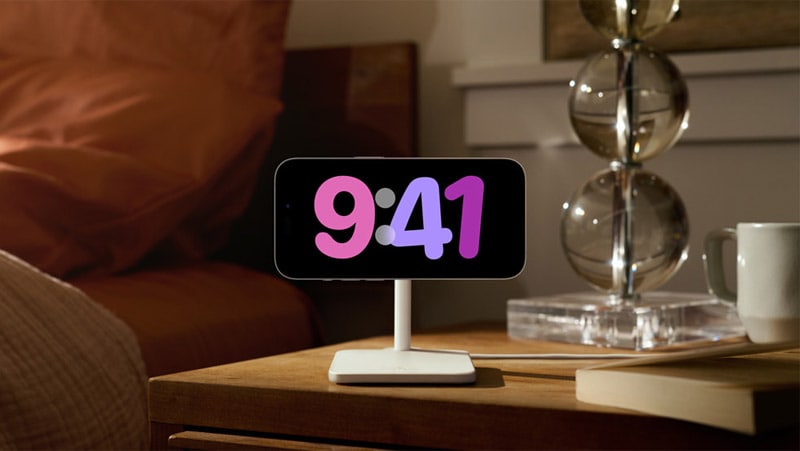
With the official release of iOS 17/18/26 on the horizon, excitement is growing among iPhone users eager to explore its newest features—especially the enhanced StandBy Mode. This innovative addition turns your iPhone into a customizable smart display when placed in landscape orientation while charging, making it perfect for use as a bedside clock, calendar, or live photo frame.
Whether you're already testing the iOS 17/18/26 beta or planning to upgrade soon, this guide covers everything you need to know about iOS 17/18/26 StandBy Mode—from how it works to how to customize it for your daily routine.
So, let's discover how the StandBy mode is set to transform your iPhone experience.
Part 1: What Is the StandBy Mode in iOS 17/18/26
The new StandBy Mode in iOS 17/18/26 brings a dynamic, full-screen experience to your iPhone while it’s charging in landscape orientation. Once activated, StandBy displays glanceable information—like clocks, calendars, smart widgets, and even your favorite photos—transforming your iPhone into a sleek, personalized smart display.
Perfect for nightstands, desks, or countertops, iOS 17/18/26 StandBy Mode offers both functionality and style. It’s especially useful on models like the iPhone 14 Pro or newer, where the always-on display keeps your information visible at all times without waking the device.
But don't worry, though. iOS 17/18/26 StandBy mode-supported devices also include iPhone SE, iPhone X series, iPhone 11, and later, as long as it’s eligible for the iOS 17/18/26 update. You can expect to get your hands on this feature in the fall when Apple officially releases iOS 17/18/26. But if you're using the public beta software, you can try it out right now.

Part 2: Benefits of iOS 17/18/26 StandBy Mode
iOS 17/18/26 StandBy Mode brings several benefits to your iPhone charging experience:
- Enhanced Charging Experience
iOS 17/18/26 StandBy Mode provides a visually engaging and informative screen while charging your iPhone. This makes the charging process more practical.
- Glanceable Information
The full-screen display offers easily readable information from a distance, allowing you to quickly check notifications, time, or other important details without picking up your phone. It can also serve as a convenient bedside clock.
- Customizable
StandBy mode iOS 17/18/26 allows customization. Therefore, you have the option to tailor the information displayed on the StandBy screen to suit your preferences and make it more personal.
Part 3: How to Enable and Customize StandBy Mode in iOS 17/18/26
StandBy mode is active by default in iOS 17/18/26, at least in the public beta version. But in case you find that the feature is not enabled or you wish to activate it manually, follow these steps.
How to activate standby mode iOS 17/18/26:
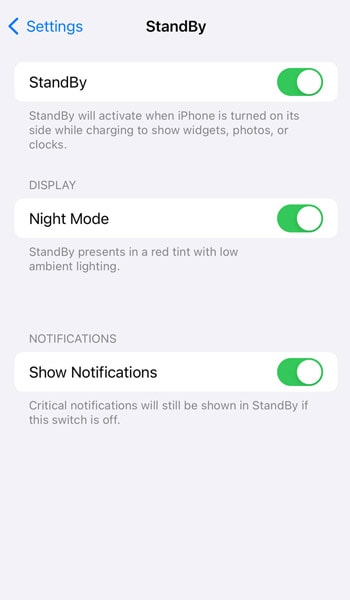
- Step 1: Open your iPhone Settings.
- Step 2: Scroll down and locate the StandBy settings.
- Step 3: Toggle the activation switch to turn on StandBy mode.

Given that StandBy mode works when your iPhone is charging and placed horizontally, you can use different charging methods and keep your iPhone in a horizontal orientation. This includes using a MagSafe charging dock, a standard Qi-enabled wireless charging pad, or a standard lightning cable.
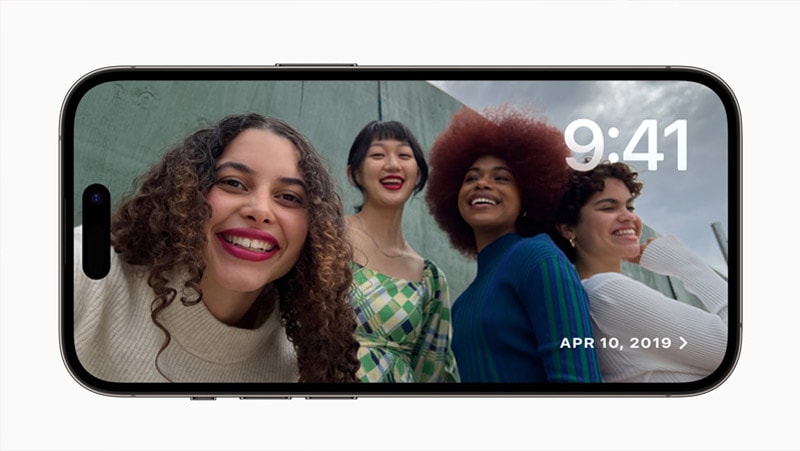
By default, when you enable the StandBy mode iOS 17/18/26, it mode will display featured photos and memories from your photo library or a clock, but you can customize it to your liking.
How to customize StandBy mode:
If you swipe sideways on a docked iPhone, you will be able to cycle between three StandBy mode panels.
- Interactive widgets
The first panel features two columns of interactive widgets, similar to those on the iPhone home screen. You can customize this panel by tapping and holding to add or remove widgets, rearrange them, and enable Smart Rotate and Widget Suggestions for a personalized experience.
- Photo and clocks
The second panel is a photo clock that shows the time and your choice of photo albums or categories (e.g., pets, nature, people). Long-press on a photo to switch between themes. You can also add specific albums to be displayed using the "+" button and hide themes you don't like using the eye icon.
- Large clock
The third panel displays a larger clock. Press and hold the screen, then tap the white button that appears in the bottom right corner. This will reveal different color options for the interface. Customize the Clock Style to your preferences and confirm the changes by tapping 'Done' after tapping the 'X' icon.

Part 4: Tips for Making the Most of iOS 17/18/26 StandBy Mode
Every journey begins with a first step. If you're uncertain about how to use StandBy Mode in iOS 17/18/26, here are some valuable tips to get you started:
1) Notifications and alerts
If you want to allow messages and alerts to appear when your iPhone is docked, make sure to turn on "Show Notifications" in your StandBy settings. For added privacy, you can enable "Show Preview on Tap Only." It will require Touch ID or Face ID to see the full notification.
2) Location Awareness
StandBy mode has a cool feature you may not be aware of - location awareness. If you have different MagSafe accessories for various locations (like your desk, bedside, or kitchen), your iPhone will automatically adapt to the StandBy mode configuration you've defined for each location.
3) Interacting with widgets
Many widgets in StandBy mode can be interacted with. For example, you can check off tasks in your Reminders list right from the widget.
Bonus: Troubleshooting StandBy Mode in iOS 17/18/26 Not Working
Is your iOS 17/18/26 StandBy mode not functioning correctly? Occasionally, your device may encounter system glitches that impede a successful update. As a result, it can potentially lead to malfunctions in certain functions or features.
If you're experiencing glitches with iOS 17/18/26 StandBy Mode, Wondershare Dr.Fone - System Repair (iOS) can help. Fully compatible with iOS 17/18/26, this tool performs an in-depth scan to detect system errors affecting features like StandBy Mode.
Dr.Fone - System Repair (iOS)
Repair iOS System Errors Without data loss.
- Only fix your iOS to normal, no data loss at all.
- Fix various iOS system issues stuck in recovery mode, white Apple logo, black screen, looping on start, etc.
- Downgrade iOS without iTunes at all.
- Work for all iPhone/iPad/iPod Touch, running on all iOS versions
How to troubleshoot and fix the issue with StandBy mode iOS 17/18/26:
- Step 1: Launch the Dr.Fone iOS System Repair Tool
Start by downloading and installing the Wondershare Dr.Fone software onto your computer. After installation, open the software and go to the "System Repair" section > "iOS System Repair."

4,624,541 people have downloaded it
- Step 2: Opt for "Standard Repair" mode
Within Dr.Fone, pick the "Standard Repair" mode. This choice ensures a safe repair procedure without risking any of your iPhone's data.

- Step 3: Activate recovery mode
Follow the instructions in Dr.Fone to activate Recovery Mode for your iPhone. This step is essential for an effective repair.

- Step 4: Identify your iPhone
While your iPhone is in Recovery Mode, Dr.Fone will identify your iPhone’s model and current iOS version. Next, it will download the appropriate iOS firmware customized to your iPhone's specifications.

- Step 5: Begin the iOS system repair
After the firmware has been successfully downloaded via Dr.Fone, click on "Repair Now" to initiate the iOS system repair process.

The Best Solution for iOS 17/18/26 Issues
Tips: Dr.Fone - System Repair now enables zero-data-loss solutions for iOS 17/18/26 crashes (boot loops/black screen/failed updates) and one-click downgrades to signed versions (e.g. iOS 18.5), completing in 10 minutes. Supports all iPhone models, bypassing iTunes factory reset risks. Downgrades require open Apple signing windows (real-time tool verification). Pre-export critical data when reverting from iOS 17/18/26.
Conclusion
You’re now ready to explore the benefits of iOS 17/18/26 StandBy Mode—a smart, customizable display feature that activates when your iPhone is charging in landscape mode. Whether you want a sleek bedside clock, photo slideshow, or quick-glance widgets, StandBy Mode enhances how your iPhone works while docked. Try it out and see how this powerful iOS 17/18/26 feature can make your daily routine more efficient and visually engaging.
4,624,541 people have downloaded it
iOS Repair Solutions
- iPhone Problems
- iPhone Keeps Freezing
- iPhone Got Bricked
- iPhone Stuck on Apple Logo
- iPhone Stuck On White Screen
- iPhone Black Screen of Death
- iPhone Red Screen of Death
- iPhone Stuck on Connect to iTunes
- iPhone Camera is black
- iPhone Front Camera Not Working
- iPhone Sim Not Supported
- iPhone Reboot Loop
- iPhone Cannot Get Mail
- iPhone Battery Draining Fast
- iPhone Overheating While Charging
- iPhone Apps Stuck on Loading
- iPhone Flashlight Greyed Out
- iPhone Plays Music by Itself
- iPhone Screen Won't Rotate
- iPhone Won't Play Music
- iPhone Silent Switch Not Working
- iPhone Stuck on Charging Screen
- iPhone Volume Button Is Stuck
- Airpods Won't Connect to iPhone
- Apple Pencil Keeps Disconnecting
- iPhone Proximity Sensor
- Find My iPhone Problems
- Save A Water Damaged iPhone
- SIM Failure on iPhone
- Yahoo Mail Not Working on iPhone
- iPhone Quick Start Not Working
- iPhone Recent Calls not Showing
- Can't Update/Restore iPhone
- iPhone Activation Error
- iPhone Error 35
- iPhone Error 75
- iPhone Error 78
- iPhone Error 2015
- iPhone Error 7005
- iPad/iPod Problems
- Common iPad Problems
- iPad Apps Freezing
- Apps Not Downloading on iPad
- Cannot Connect to App Store
- iPad Screen Flickering
- iPad Keeps Dropping Wi-Fi
- iPad Not Charging
- iPad Email Problems
- iPad Ghost Touch and Typing
- iPad Magic Keyboard Not Working
- iPad Power Button Not Working
- iPod Stuck on the Apple Logo
- iTunes Problems
- Cannot Connect to iTunes Store
- iTunes Won't Open on Windows
- iTunes Stopped Working on Windows
- iTunes Match Not Working
- iTunes Corrupt Backup
- Top iTunes Remote for Android
- Top iTunes Alternatives for Android
- Update iTunes On Computer
- iTunes Error 9
- iTunes Error 11
- iTunes Error 21
- iTunes error 54
- iTunes Error 2005/2003
- iTunes Error 2009
- iTunes Error 3014
- iTunes Error 9006
- iOS Upgrade & Downgrade
- Update iPhone with/without iTunes
- Download and Install iOS 16
- Top iOS Downgrade Tools
- Downgrade iOS without iTunes
- Downgrade From iOS 15 to iOS 14
- iPhone Stuck On Verifying
- iPhone Error 1110 While Updating
- AirPlay Not Working After Update
- iPhone Can't Make Calls afterUpdate
- Photos Disappeared iPhone after Update
- Downgrade iOS 16 to iOS 15
- Reset iDevice
- Reset iPhone with iTunes
- Reset iPhone without iTunes
- Hard Reset iPhone Without PC
- Reset iPod without iTunes
- iPhone Reset Tips
- Reset iPhone Password
- Reset iPhone Without Apple ID
- DFU Mode
- Top Tools to Enter DFU Mode
- Backup iOS in DFU Mode
- Restore iOS from DFU Mode
- Exit DFU Mode
- Recover Data from DFU Mode
- Put iPhone in DFU Mode
- Recovery Mode


Daisy Raines
staff Editor
Generally rated4.5(105participated)