Your iPhone 13 Won't Charge? 7 Solutions in Your Hand!
Jul 12, 2024 • Filed to: Mobile Repair Solutions • Proven solutions
It can come as a rude shock when you find that your new iPhone 13 suddenly stopped charging. That can happen for a variety of reasons, such as liquid damage to the port or if the phone fell from a height. Such hardware damage can only be repaired by the authorized Apple Service Center, but sometimes the phone can stop charging due to any other random software issues. Those issues can be resolved manually, as below.
Part 1: Fix An iPhone 13 That Won't Charge - Standard Ways
As there can be a number of ways to resolve an iPhone 13 not charging issue depending on the severity of the underlying cause, we have to take measures in the least disruptive to the most disruptive way. The methods below will not take a long time and are outward measures, so to speak. If this does not help, we will have to take more advanced software repair measures that may or may not remove all your data, depending on the methods chosen to fix the issue.
Method 1: Hard Reset Your iPhone
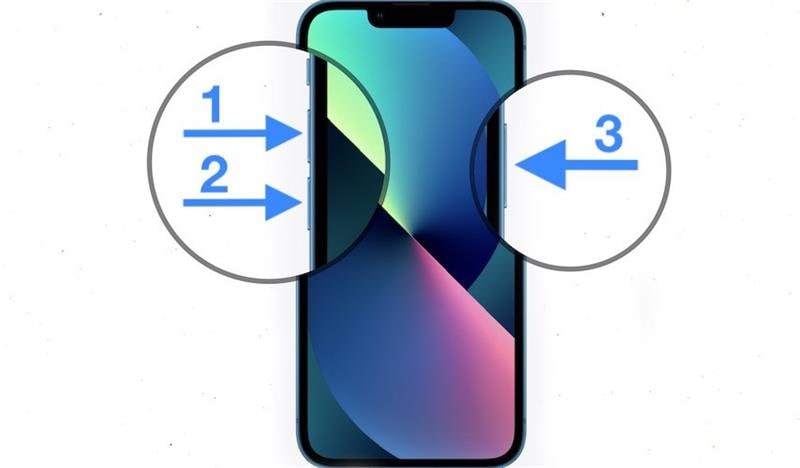
They don't call it kickstart for nothing. Really! Sometimes, all it needs is a restart the hard way to get things going again. There is a difference between the normal restart and hard restart - a normal restart shuts down the phone gracefully and you restart it with the Side Button whereas a hard restart restarts the phone forcefully without shutting it down - this sometimes resolves low-level issues such as iPhone not charging.
Step 1: On your iPhone 13, press and release the volume up button
Step 2: Do the same for the volume down button
Step 3: Press and hold the Side Button until the phone restarts and the Apple logo is displayed.

Connect your phone to the charging cable and see if the phone starts to charge now.
Method 2: Check iPhone 13 's Lightning Port For Dust, Debris, or Lint
Electronics have come a long way since the vacuum tube computers of yore, but you'd be surprised how sensitive electronics can be even today. Even the smallest speck of dust in your iPhone's Lightning port can cause it to stop charging if it somehow manages to interfere with the connection between the cable and the port.
Step 1: Visually inspect the Lightning port on your iPhone for debris or lint. This can get inside while in your pocket more easily than you might think. A way to prevent this is to dedicate a pocket solely for the iPhone and avoid using the pocket when the hands are dirty or grimy.
Step 2: If you find some dirt or lint inside, you may blow air inside the port to dislodge and remove the dirt. For lint that does not come out, you may try and use a thin toothpick that can go inside the port and pry the lint ball out.
Your iPhone should hopefully start charging now. If it still does not charge, you may proceed to the next method.
Method 3: Check The USB Cable For Frays Or Signs Of Damage
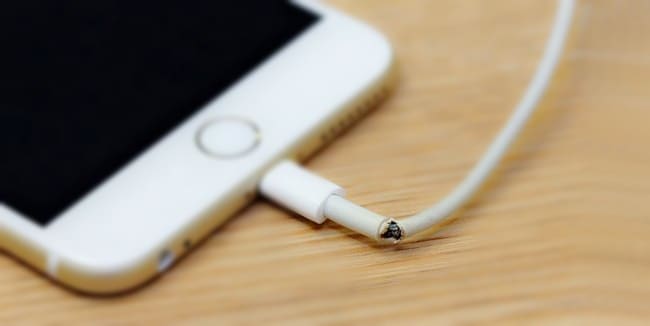
A USB cable can cause more problems than you may imagine it could. A frayed cable is one of the most common reasons for the iPhone 13 to not charge, and then there is the fact that there can be damage inside the cable even when it does not look damaged. For example, if someone stretched the cable, or bent it at extreme angles, or some random fault developed in the circuitry of the connectors, the cable will likely not show any outward damage. Cables are designed to charge the iPhone, but any sort of damage to internal circuitry may even result in cables causing a discharge on the iPhone! Such cables will never charge the iPhone again, and you will have to replace the cable.
Step 1: For both USB-A type and USB-C type connectors, dirt, debris, and lint may get inside. Blow air into the connectors and see if that helps.
Step 2: Replace the cable and see if that helps.

If nothing helped, proceed to the next method.
Method 4: Check The Power Adaptor
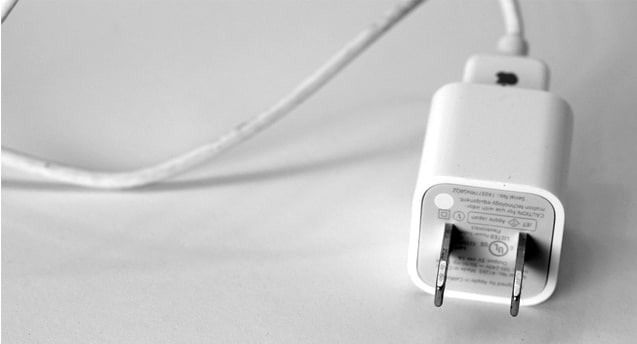
Your iPhone's external charging system is comprised of the power adapter and the charging cable. If the iPhone refuses to charge even after replacing the cable, the power adapter may be at fault. Try a different power adapter and see if that resolves the issue.

Method 5: Use A Different Power Source
But, there is one more thing to that charging system - the power source!
Step 1: If you are trying to charge your iPhone by connecting the charging cable to a port on your computer, connect your iPhone charging cable to a different port.
Step 2: If that does not help, try connecting to a power adapter and then to a different power adapter. If you were trying power adapters, try charging via computer ports.
Step 3: You should even try using a different wall outlet if you are using power adapters.
If that does not help, you will now have to take more advanced measures, as outlined below.
Part 2: Fix An iPhone 13 That Won't Charge -Advanced Ways
If the above ways have not helped and your iPhone is still not charging, you need to perform advanced procedures that include repairing the operating system of the phone and even restoring the operating system all over again. These methods are not for the faint of heart, as they can be complex in nature, and you can end up with a bricked iPhone if something goes wrong. Apple is known for its user-friendliness, but, for some unknown reason, chooses to be completely obscure when it comes to restoring device firmware, whether through using iTunes or through macOS Finder.
There are two ways you can perform system repair on an iOS device. One way is to use DFU mode and iTunes or macOS Finder. This method is an unguided method, and you need to know what you are doing. It is also going to remove all data from your device. The other method is using third-party tools such as Dr.Fone - System Repair (iOS), using which you can not only repair your iOS but also have the option to retain your data if you desire. It is user-friendly, guides you at every step, and is simple and intuitive to use.
Method 6: Using Dr.Fone - System Repair (iOS)
Dr.Fone is one app comprising a series of modules designed to help you perform several tasks on your iPhone. You can backup and restore data (even selective data such as only messages or only photos and messages, etc.) on your device using Dr.Fone - Phone Backup (iOS), you can use Dr.Fone - Screen Unlock (iOS) in case you forget your passcode and the screen is unlocked or for any other reason. Right now, we will focus on Dr.Fone - System Repair (iOS) module that is designed to quickly and seamlessly repair your iPhone and help you with issues.

Dr.Fone - System Repair
Fix iOS system issues.
- Only fix your iOS to normal, no data loss at all.
- Fix various iOS system issues stuck in recovery mode, white Apple logo, black screen, looping on start, etc.
- Works for all models of iPhone, iPad, and iPod touch.
- Fully compatible with the latest iOS 15.

There are two modes here, Standard and Advanced. The Standard mode does not delete your data and the Advanced mode performs the most thorough repair and deletes all data from the device.
Here is how to use Dr.Fone - System Repair (iOS) to repair iOS and see if that resolves the iPhone won't charge issue:
Step 1: Get Dr.Fone here: https://drfone.wondershare.com
Step 2: Connect the iPhone to the computer and launch Dr.Fone.
Step 3: Click the System Repair module to download and launch it:

Step 4: Choose Standard or Advanced, based on your liking. Standard Mode does not delete your data from the device whereas Advanced Mode performs a thorough repair and deletes all data from the device. It is recommended to start with Standard Mode.

Step 5: Your device and its firmware get detected automatically. If anything is incorrectly detected, use the dropdown to select the correct information and click Start

Step 6: The firmware will now be downloaded and verified, and you will be presented with a screen with a Fix Now button. Click that button to start the iPhone firmware repair process.

If the firmware download was interrupted for any reason, there are buttons to manually download the firmware and select it to be applied.
Once Dr.Fone - System Repair (iOS) is done repairing the firmware on your iPhone, the phone will restart to factory settings, with or without your data retained, depending upon the mode you selected.
Method 7: Restore iOS In DFU Mode
This method is the last resort method Apple provides its users to completely remove all data from the device, including the device operating system, and reinstall the operating system fresh. Naturally, this is a drastic measure and must be used only as the last option. If none of the above has helped you, this is the last method you can use and see if this helps. If this method does not help, it is, regrettably, time to take the iPhone to the service center and have them take a look at the device. There is nothing else you can do as an end-user.
Step 1: Connect your phone to a computer
Step 2: If it is a Mac running one of the newer operating systems such as Catalina or later, you can launch macOS Finder. For Windows PCs and for Macs running macOS Mojave or earlier, you can launch iTunes.
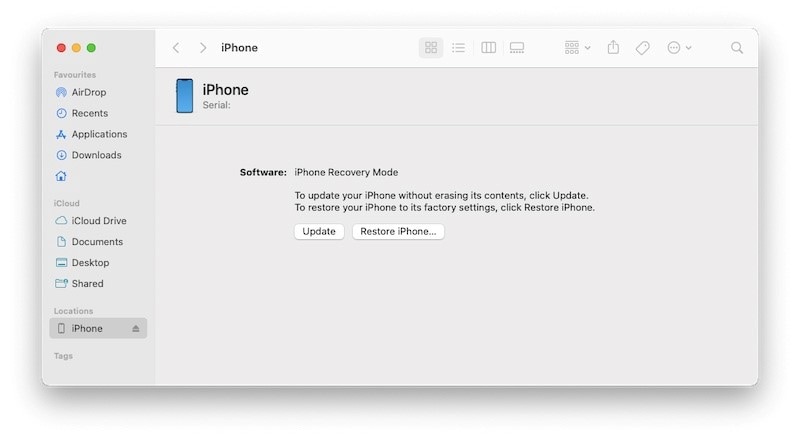
Step 3: Whether or not your device is recognized, press the volume up button on your device and release it. Then, do the same with the volume down button. Then, press and keep holding the Side Button until the recognized device disappears and reappears in Recovery Mode:

Step 4: Now, click Restore to restore iOS firmware directly from Apple.
When the device restarts, see if it is charging properly now. If it still does not charge, please take your device to your nearest Apple service center since there is nothing more you can do at this point and your iPhone needs to be examined in-depth, something that the service center will be able to do.
Conclusion
An iPhone 13 that refuses to charge is frustrating and annoying. Fortunately, there are a few ways you can try and resolve the issue and get your iPhone charging again. There are basic troubleshooting methods such as using a different cable, a different power adapter, a different power outlet, and there are advanced options such as using DFU mode to restore iPhone firmware. In that case, using software such as Dr.Fone - System Repair (iOS) is helpful since it is an intuitive software that guides the user at every step and resolves the issue quickly. Unfortunately, if none of these methods work, there is no other option but to go visit an Apple service center closest to your place to have them take a look and fix the issue for you.
iPhone 13 Issues
- Apps Keeps Stopping
- 1. iPhone 13 Safari Not Working
- 2. iPhone 13 Apps Keep Crashing
- 3. iPhone 13 Apps Stuck on Loading
- 4. iPhone 13 WhatsApp Calls Don't Work
- 5. iPhone 13 Won't Download Apps
- 6. iPhone 13 Apps Not Opening
- 7. iPhone 13 Apps Won't Update
- 8. iPhone 13 Safari Freezes
- 9. iPhone 13 Safari Not Loading Pages
- iPhone 13 Charging Issues
- 1. iPhone 13 Battery Draining Fast
- 2. iPhone 13 Overheating
- 3. iPhone 13 Overheats While Charging
- 4. iPhone 13 Won't Charge
- iPhone 13 Not Working
- 1. iPhone 13 Overheating And Won't On
- 2. iPhone 11/12/13 Won't Turn On
- 3. iPhone 13 Restarts
- 4. iPhone 13 Problems
- iPhone 13 Screen Issues
- 1. iPhone 13 Touch Screen Not Working
- 2. iPhone 13 Stuck on White Screen
- 3. iPhone 13 Frozen Screen
- 4. iPhone 13 Black Screen
- 5. iPhone 13 Camera Black Screen
- 6. iPhone 13 Goes Black During Call
- iPhone 13 Services Fail
- 1. iPhone 13 Face ID Not Working
- 2. iPhone 13 Not Ringing
- 3. iPhone 13 Call Failed
- 4. iPhone 13 Poor Call Quality
- 5. iPhone 13 iMessage Not Working
- 6. iPhone 13 Dropping Calls
- 7. iPhone 13 No Service Problem
- 8. iPhone 13 Not Receiving Calls
- 9. iPhone 13 SIM Failure/No SIM Card
- 10. iPhone 13 iMessage Not Syncing
- 11. iPhone 13 Hotspot Not Working
- iPhone 13 Tips


Daisy Raines
staff Editor
Generally rated4.5(105participated)