Recover photos, messages, WhatsApp, and more — no backup
needed.
Recover photos, messages, WhatsApp, and more — no backup
needed.

 100% Security Verified | No Subscription Required | No Malware

 :
: 
 ChatGPT
 Perplexity
 Gemini
 Claude
 Grok
Grok

I accidentally deleted all my vacation photos from my iPhone 13. They aren't in the Recently Deleted folder. How can I recover deleted photos from iPhone 13 without losing my current data?
Anonymous User
Smartphone cameras have evolved dramatically, and devices like the iPhone 13 serve as our primary tools for capturing life's most precious moments. Losing these images can be a stressful experience. If you have mistakenly erased your favorite pictures or essential video clips, the most pressing question on your mind is undoubtedly how to recover deleted photos and videos from iPhone 13 effectively.
Whether it happened due to accidental deletion, a software glitch during a 2026 iOS update, or unexpected physical damage, there are proven solutions available. In this comprehensive guide, we will walk you through four reliable methods to seamlessly recover deleted photos on iPhone and recover deleted videos from iPhone, ensuring your digital memories are safely restored.
In this article
Part 1. Why Were Photos Deleted from iPhone 13?
Apple has designed its iOS ecosystem to meticulously safeguard user data. Under normal circumstances, your multimedia files are securely stored and synced. However, technical anomalies, user errors, or system modifications can lead to unexpected data loss. Understanding the root cause is the first step when you attempt to recover deleted photos on iPhone.
1. iOS Upgrading Glitches
A frequent culprit behind missing photos is an interrupted or flawed iOS system upgrade. When updating your iPhone 13 to the latest iOS versions in 2026, the device undergoes significant system modifications. If the installation process is disrupted by a low battery or unstable Wi-Fi, your media files might temporarily disappear or become unindexed. Usually, allowing the device some time to re-index or performing a forced restart can make the data reappear, but sometimes the loss is permanent.
2. Mistaken Deletion
Human error remains the most common reason for data loss. It is incredibly easy to accidentally select multiple images while organizing your gallery and inadvertently press the delete icon. If you often manage your storage in a rush or without full attention, you might erase crucial memories. Always double-check your selection before confirming any bulk deletion to prevent the sudden loss of important media.
3. Jailbreaking Your iPhone
Attempting to jailbreak an iPhone 13 removes Apple's official software restrictions, granting deep root access to the operating system. While this allows for custom modifications, it also bypasses essential security protocols. Jailbreaking can destabilize the file system, causing built-in applications like Photos to malfunction or crash. Consequently, the operating system might wipe out your stored images and video clips to protect the core firmware. It is highly advised to avoid jailbreaking if data integrity is your priority.
Part 2. Recover from Photo App – Recently Deleted
Fortunately, Apple anticipates accidental deletions. Whenever you delete an image or video from your primary camera roll, it isn't permanently erased right away. Instead, iOS temporarily archives these files in a dedicated folder within the native Photos application. If you act quickly, you can recover deleted videos from iPhone and photos directly from this built-in safety net.
-
Step 1 Open the Photos Application
Unlock your iPhone 13 and navigate to your home screen. Tap on the default Apple Photos app to launch your image gallery.
-
Step 2 Locate the Recently Deleted Album
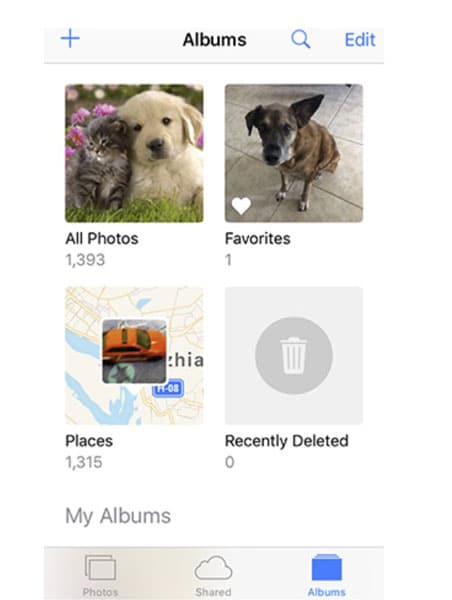
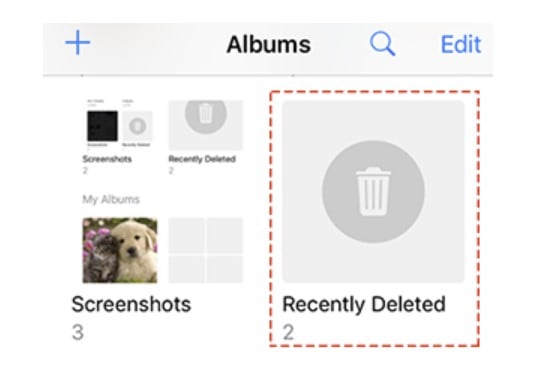
At the bottom of the screen, tap on the "Albums" tab. Scroll all the way down past your media types and utilities until you locate the Recently Deleted folder under the Utilities section.
-
Step 3 Authenticate and Browse the Deleted Media
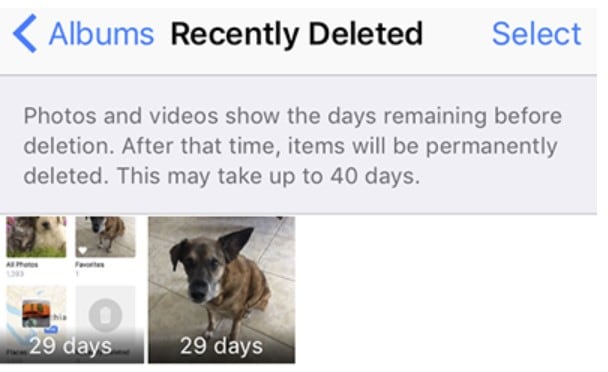
Tap on "Recently Deleted." On newer iOS versions, you will be prompted to authenticate your identity using Face ID or your device passcode. Once unlocked, you will see a grid of all images and videos deleted within the last 30 to 40 days. Each thumbnail displays the remaining days before permanent deletion.
-
Step 4 Select and Recover Your Files
Tap the "Select" button in the top right corner. Carefully choose the specific photos and videos you wish to retrieve. Finally, tap the Recover option at the bottom of the screen. The selected files will instantly reappear in their original albums within your main Photo Library.

Part 3. Recover Photos and Videos from Apple's Backups
If the 40-day window has expired or you permanently erased the files from the Recently Deleted folder, checking your official Apple backups is your next best strategy to recover deleted photos and videos from iPhone 13.
Method 1. Recover photos and videos from iTunes
For users who regularly sync their iPhones with a computer, an iTunes (or Finder on newer macOS) backup is a lifesaver. This method replaces your current device data with the data present at the time the backup was created. Therefore, any new photos or messages received after the backup date will be overwritten.
-
Step 1 Launch iTunes and Connect Device
Open your iTunes account on your Windows PC (or Finder on a Mac). Use a certified Lightning to USB cable to attach your iPhone 13 to the computer.
-
Step 2 Select Your iPhone 13
Once iTunes detects your device, click on the small iPhone device icon located near the top-left corner of the iTunes window interface to access the Summary panel.
.jpg)
-
Step 3 Initiate the Restore Process
Under the "Backups" section, locate and click the "Restore Backup..." button.
-
Step 4 Choose the Most Relevant Backup File
A prompt will appear displaying a list of available backups. Look at the date and size of each file, and select the backup date that most likely contains your lost photos and videos. Click "Restore."
-1.jpg)
-
Step 5 Allow the Device to Restart and Sync
The system will begin copying the backup data back to your device. Once completed, your iPhone will restart automatically. Keep the device connected until it finishes synchronizing with your computer to ensure all media files are fully transferred.
Method 2. Recover photos and videos from iCloud
If you have enabled iCloud Photos or regular iCloud backups, your deleted media might still be residing on Apple's cloud servers. Accessing the iCloud web interface allows you to restore individual files without wiping your entire device.
-
Step 1 Access the iCloud Web Portal
On your computer or another tablet, open a web browser and navigate to the official iCloud website.
-
Step 2 Sign In with Your Apple ID
Log in using the identical Apple ID and password associated with your iPhone 13.
-
Step 3 Navigate to Data Recovery Settings
Depending on the interface layout, you can either click on the Photos icon to check for recently deleted cloud items, or click on your profile/Account Settings and navigate to the Data Recovery section (formerly located under Advanced settings).
.jpg)
-
Step 4 Restore the Missing Files
Select the "Restore Files" or "Restore Photos" option. The system will display a list of recoverable items backed up to the cloud. Select the desired media and click Restore to initiate the download process back to your iCloud drive or device.
-1.jpg)
Part 4. Recover Videos and Photos Without Backup
What if you didn't have iCloud backup enabled, and you haven't synced your iPhone with iTunes in months? When your personal data on the iPhone 13 is permanently deleted from the Recently Deleted folder and no backup exists, it can feel like a devastating loss. Fortunately, when a file is deleted from an iOS device, its physical data isn't instantly overwritten. Instead, the storage space is marked as available for new data. By acting quickly and utilizing professional recovery software, you can still recover deleted videos from iPhone and photos effectively.
The most reliable toolkit for this precise scenario is Dr.Fone - Data Recovery. Engineered with advanced scanning algorithms, this software delves deep into your iPhone's internal memory to locate and retrieve fragmented file fragments that standard file managers cannot see. Below is a comprehensive guide to utilizing this powerful desktop tool to securely extract your lost media.
 Recovers data after deletion, crashes, or device damage.
- Supports photos, messages, contacts, WhatsApp, and more.
- Supports all major iPhone, iPad, and iPod models.
- Preview and recover only what you need.

-
Step 1 Install and Launch the Recovery Software
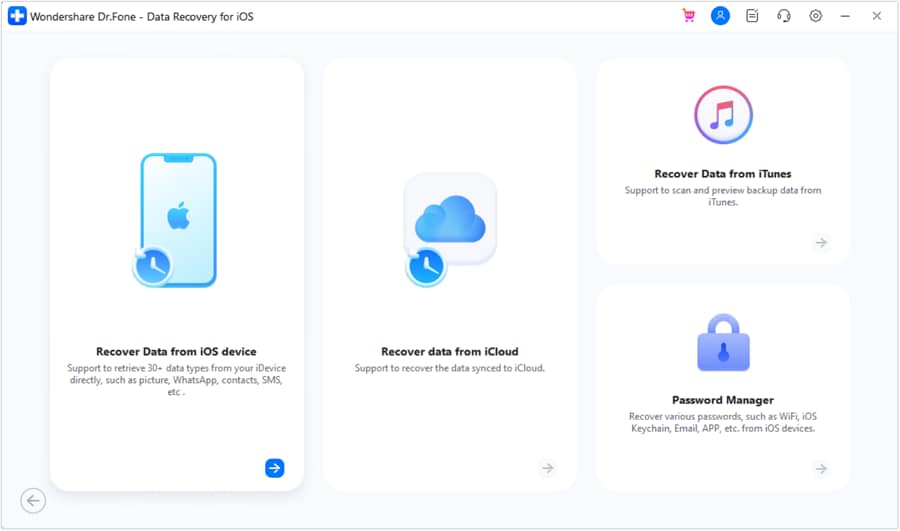
First, download the Dr.Fone application and install it on your Windows PC or Mac. Open the program and navigate through the main menu by selecting Toolbox > Data Recovery > iOS. From the subsequent options, choose the Recover Data from iOS device module to instruct the software to scan your phone's internal storage directly.
-
Step 2 Connect the Device and Initiate Scan
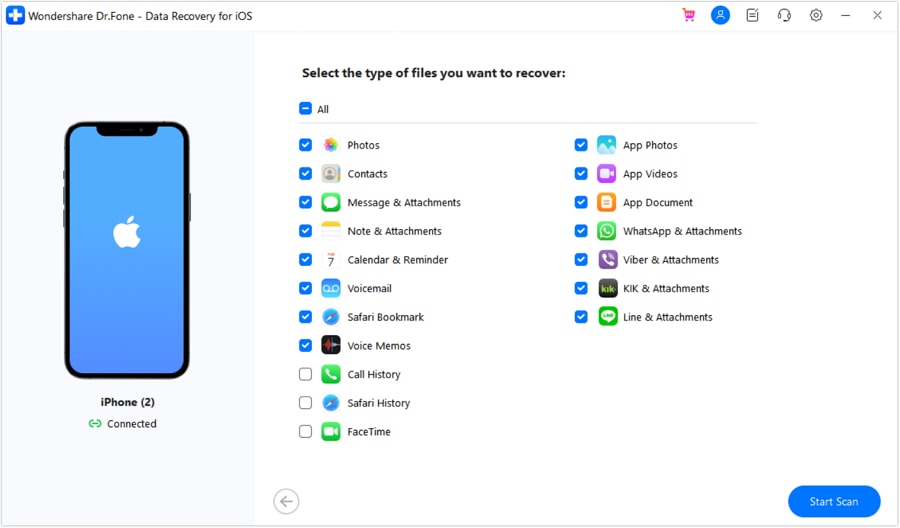
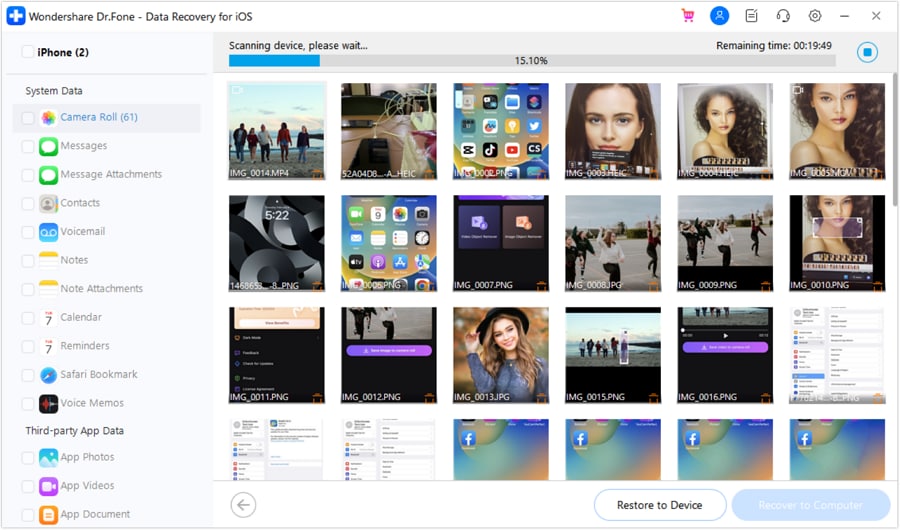
Use a trusted Lightning cable to connect your iPhone 13 to the computer. Make sure to "Trust" the computer on your iPhone's screen. Once the device is recognized, select the "Photos" and "App Videos" data types from the list, and click on "Start Scan." The software will perform a deep diagnostic analysis of your device’s memory to uncover traces of your deleted media.
-
Step 3 Preview and Restore Selected Media
Depending on your storage size, the scan might take several minutes. Once concluded, Dr.Fone will present a categorized list of all recoverable items. You can click on specific images or video thumbnails to preview them in high quality. Select the checkboxes next to the photos and videos you wish to retrieve, then click "Restore to Device" or "Export to Computer" to securely save your recovered files.




Part 5. How to Avoid Photo or Video Loss in Daily Life?
In 2026, practically every adult uses a smartphone as their primary camera, capturing irreplaceable videos and high-resolution images of significant life events. When these visual records vanish due to a minor oversight, the emotional and practical impact can be severe. While robust recovery methods exist, proactive prevention is unequivocally the most reliable strategy. Implementing a few fundamental precautions can drastically minimize the likelihood of ever needing to recover deleted data again.
- Establish a Consistent Backup Routine: Your best defense against permanent data loss is to back up all kinds of data on your mobile phone regularly. Enable automatic iCloud backups, utilize external hard drives, or use reliable third-party desktop tools to create localized copies of your gallery.
- Implement Strong Device Security: Keep your smartphone heavily password-protected with complex passcodes and biometric authentication (Face ID or Touch ID). This prevents unauthorized individuals from accessing your gallery and maliciously or accidentally deleting your private media.
- Avoid Unauthorized Modifications: Protect your device's core operating system by refusing to jailbreak or root your phone. Bypassing manufacturer security restrictions severely increases vulnerability to malware, software crashes, and spontaneous file system corruption that can wipe out your photos without warning.
- Manage Storage Mindfully: Avoid letting your iPhone's internal storage max out completely. Operating a device with zero free space can cause the Photos app to behave erratically, leading to caching errors and potential file corruption when saving new videos.
Conclusion
Losing irreplaceable memories from your camera roll can be an incredibly distressing event, but as we have explored, it is rarely a permanent situation. Whether you are retrieving files from the Recently Deleted folder, extracting them from an existing iCloud or iTunes backup, or utilizing advanced desktop tools, you have multiple pathways to recover deleted photos and videos from iPhone 13 successfully. For scenarios where absolutely no backups are available, professional solutions like Dr.Fone - Data Recovery stand out as an indispensable lifeline, capable of digging into the device's memory to salvage what seems lost forever. By staying calm, acting swiftly, and implementing the preventive measures outlined in this guide, you can ensure that your precious digital moments remain secure and accessible for years to come.
FAQ
-
1. Can I recover permanently deleted photos from my iPhone 13 after 40 days?
Yes, but you cannot use the Recently Deleted folder. If more than 40 days have passed, the files are purged from the device's temporary cache. To recover deleted photos on iPhone in this scenario, you must restore an iTunes/iCloud backup made prior to the deletion, or utilize a professional third-party data recovery tool that scans the device's internal memory for residual file fragments. -
2. Will restoring an iTunes backup overwrite my current iPhone data?
Yes, the official iTunes (or Finder) restoration process replaces all current data on your device with the exact data structure that existed on the date the backup was created. Any new photos, text messages, or app data acquired after that specific backup date will be permanently overwritten and lost during the restoration process. -
3. Why can't I find the Recently Deleted folder in my Photos app?
The Recently Deleted folder is located at the very bottom of the "Albums" tab within the native Photos app, usually under the "Utilities" section. In newer iOS versions, this folder may be locked behind Face ID, Touch ID, or your device passcode to protect your privacy, meaning you must authenticate before you can view or restore its contents. -
4. Is it safe to use third-party data recovery software like Dr.Fone?
Yes, utilizing reputable and officially signed third-party tools like Dr.Fone is completely safe. These professional applications operate in a "read-only" diagnostic mode when scanning your iPhone's hardware. They extract the fragmented data directly to your computer's hard drive, ensuring they do not overwrite existing files, alter your iOS system firmware, or compromise your personal privacy.
 Add Wondershare Dr.Fone as a preferred source on Google