How to Restore iTunes Library In 3 Simple Ways

May 18, 2026 • Filed to: Device Data Management • Proven solutions
 TL;DR:
You can restore your iTunes library manually using a local backup, a connected iPod, or iCloud synchronization, but Wondershare Dr.Fone Basic - iTunes Manager provides the most automated method to rebuild your collection directly from an iOS device.
● To recover music directly from an iPod, you must enable Disk Use on the iTunes device summary page, adjust Windows or Mac settings to reveal hidden files, and manually copy the concealed iPod_Control/Music folder into your new library.
● Restoring from a local backup requires updating the iTunes Media folder location via the Advanced Preferences tab, whereas iCloud recovery requires signing in with an Apple ID and enabling iCloud Music Library in the General Preferences tab.
● Dr.Fone Basic - iTunes Manager bypasses manual folder extraction for Mac and Windows users by utilizing the Rebuild iTunes Library function to scan a wireless or USB-connected iOS device and selectively transfer supported media files.
Ask AI for a summary
 ChatGPT
 Perplexity
 Gemini
 Claude
 Grok
Grok
Dr.Fone Basic:
Better Control for Your Phone
Manage, transfer, back up, restore, and mirror your device
Restoring your iTunes Library can feel like a daunting task, especially if you've lost all your precious music and media files accumulated over the years. Whether you're a music enthusiast who cherishes every track, an Apple aficionado who relies on iTunes for seamless device integration, or a tech geek who loves having a perfectly organized library, this guide will walk you through the three most common methods to restore your iTunes library. We'll cover everything from using backup files to more advanced techniques, ensuring you have all the information you need. Plus, we'll introduce you to the Dr.Fone Basic - iTunes Manager as the best method for a hassle-free restoration process, enabling you to get back to enjoying your media without the headache of manual recovery.
Part 1: Introduction to Restoring iTunes Library
Your iTunes library is more than just a collection of songs; it's a carefully curated archive of your musical tastes and memories. Losing it can be frustrating, but restoring it doesn't have to be. Let's explore the three common methods to bring your iTunes library back to life:
Method 1: Restoring iTunes Library from Backup
Restoring your iTunes Library from a backup is one of the most straightforward methods to get back your music collection. If you've been diligent about creating regular backups, this process will enable you to retrieve your files with relative ease. Whether you use Time Machine on macOS or an external hard drive, knowing how to restore Apple Music Library from backup can save you a lot of time and hassle. Here, we'll guide you through the steps to ensure your precious media files are restored efficiently and effectively.
Step-by-Step Guide:
- Locate Your Backup: Ensure you have a recent backup of your iTunes library. Typically, iTunes creates backup files in the iTunes Media folder. You can find this folder by going to your Music directory on your computer.
How to Restore Previous iTunes Library From A Backup (Mac & PC)
- Open iTunes: Launch iTunes on your computer. Make sure you have the latest version installed to avoid any compatibility issues.
- Go to Preferences: Click on "Edit" in the menu bar at the top of the screen, then select "Preferences" from the drop-down menu. This will open the iTunes Preferences window.
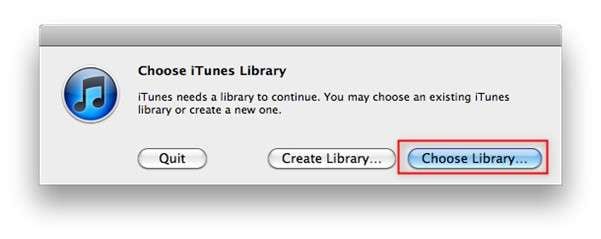
- Restore Library: Under the "Advanced" tab in the Preferences window, click on the "Change" button next to the "iTunes Media folder location." Browse and select the location of your backup folder. After selecting your backup, click "Okay" to confirm and begin restoring your library from the backup. This process might take some time, depending on the size of your library. Once completed, all your music, playlists, and other media should be restored.
Method 2: Restoring iTunes Library from iPod
Restoring your iTunes library directly from your iPod can be a lifesaver, especially if you don't have a recent backup stored on your computer. This method allows you to use your iPod as a source to rebuild your library. While the process may seem a bit challenging at first, it's a reliable way to recover lost files. In this section, we'll explain how to use your iPod for an Apple Music restore library procedure, making sure you get back your favorite tunes and playlists effortlessly.
Step-by-Step Guide:
- Connect Your iPod: Begin by plugging your iPod into your computer using the USB cable that came with your device. Ensure that the connection is secure.
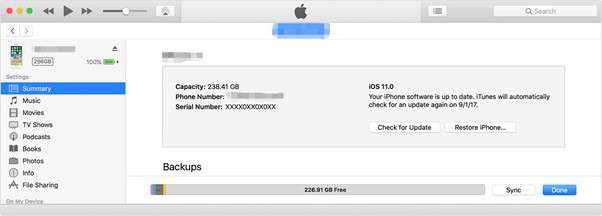
- Enable Disk Use: Open iTunes on your computer. Once iTunes recognizes your iPod, select your device from the list and navigate to the device summary page. There, you will find an option to enable "Disk Use." Check this option to allow your computer to access the iPod's files.
- Show Hidden Files: Navigate to the iPod drive on your computer. Depending on your operating system, you may need to adjust settings to show hidden files and folders. On Windows, you can do this by going to File Explorer, selecting the "View" tab, and checking the box for "Hidden items." On a Mac, you can press Command + Shift + Period to toggle hidden files.
- Copy Music Files: Within the iPod drive, locate the "iPod_Control" folder, which is typically hidden. Inside this folder, you will find the "Music" folder. This folder contains all your music files, although they may be organized in a cryptic manner. Copy the "Music" folder to a location on your computer where you can easily find it.
- Add to iTunes: Open iTunes and prepare to import your music. Drag the copied "Music" folder from your computer into your iTunes library. iTunes will process and organize the files, making your music accessible through the application.
By following these steps, you can efficiently transfer music from your iPod to your computer and manage it through iTunes.
Method 3: Restoring iTunes Library from iCloud
Restoring your iTunes library from iCloud can be a convenient and efficient way to recover your music, playlists, and other media files. This method leverages the power of cloud storage to ensure that your valuable data is always backed up and accessible, even if your local storage encounters issues. Utilizing iCloud for your music library allows for seamless synchronization across all your Apple devices. In this section, we will detail the steps necessary to restore your iTunes library from iCloud, ensuring that you never lose your cherished collections. By following these instructions, you can easily manage and restore iTunes library content, ensuring a hassle-free experience.
Step-by-Step Guide:
- Open iTunes: Launch iTunes on your computer by clicking on the iTunes icon on your desktop or finding it in your applications folder.
- Sign In: Sign in to your Apple ID associated with your iCloud account. This can be done by going to the "Account" menu and selecting "Sign In." Enter your Apple ID and password to access your account.
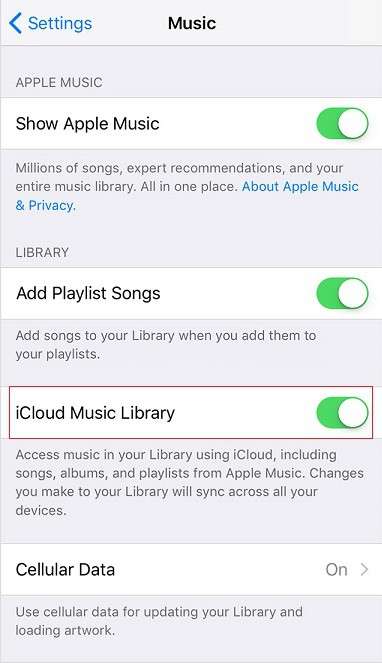
- Enable iCloud Music Library: Navigate to "Preferences" found under the "Edit" menu on Windows or the "iTunes" menu on Mac. In the "General" tab, check the box labeled "iCloud Music Library." Confirm your selection by clicking "OK." This will start syncing your iCloud music library with iTunes.
- Download Songs: Once your iTunes library is populated with your iCloud music, you can start downloading the songs you wish to restore. Simply click on the cloud icon next to each track, album, or playlist to download them to your local library. This ensures you have access to your music even without an internet connection.
Part 2: The Best Method for Restoring iTunes Library: Dr.Fone Basic - iTunes Manager
While the above methods are effective, they can be time-consuming and complex, requiring a considerable amount of effort and technical know-how. Wondershare Dr.Fone - iTunes Manager offers a seamless and efficient way to restore your iTunes library directly, saving you both time and hassle. Here's how it works: By leveraging an intuitive interface and advanced features, Dr.Fone ensures that your music, playlists, and other data are quickly and accurately restored to your iTunes library. Whether you're dealing with a corrupted playlist or a complete reinstallation, Dr.Fone simplifies the entire process, making it accessible for users of all technical levels. If you're wondering how to restore iTunes library, Dr.Fone is your go-to solution.
Dr.Fone - Phone Manager (iOS)
The Best Method for Restoring iTunes Library
- Transfer, manage, export/import your music, photos, videos, contacts, SMS, Apps, etc.
- Back up your music, photos, videos, contacts, SMS, Apps, etc., to the computer and restore them easily.
- Transfer music, photos, videos, contacts, messages, etc., from one smartphone to another.
- Transfer media files between iOS devices and iTunes.
- Fully compatible with the newest iOS system.


Step-by-Step Guide
If you seek to transfer media data from iOS to iTunes with Dr.Fone iTunes Library feature, this guide will be pretty helpful for you. Find out how Dr.Fone helps in executing this task.
Step 1: Open iTunes Library
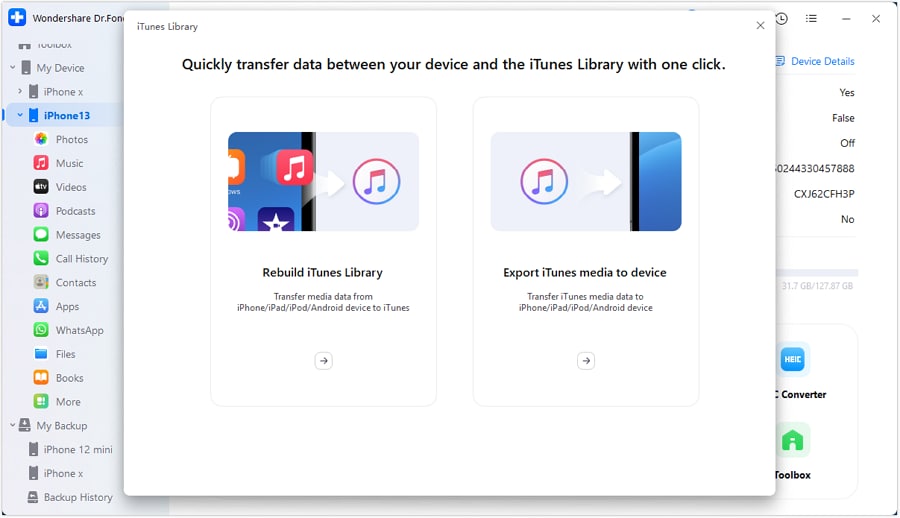
Launch Dr.Fone on your computer and connect your iPhone via Wireless or USB. From the left panel, open your iPhone section. Choose iTunes Library from the list on the homepage.

Step 2: Choose the Right Operation for iTunes
When the new window appears, choose the function for iTunes Library. Select Rebuild iTunes Library to transfer media from iOS to iTunes.
Step 3: Start the Process
In the next window, click Start to begin copying data from the iPhone to iTunes.

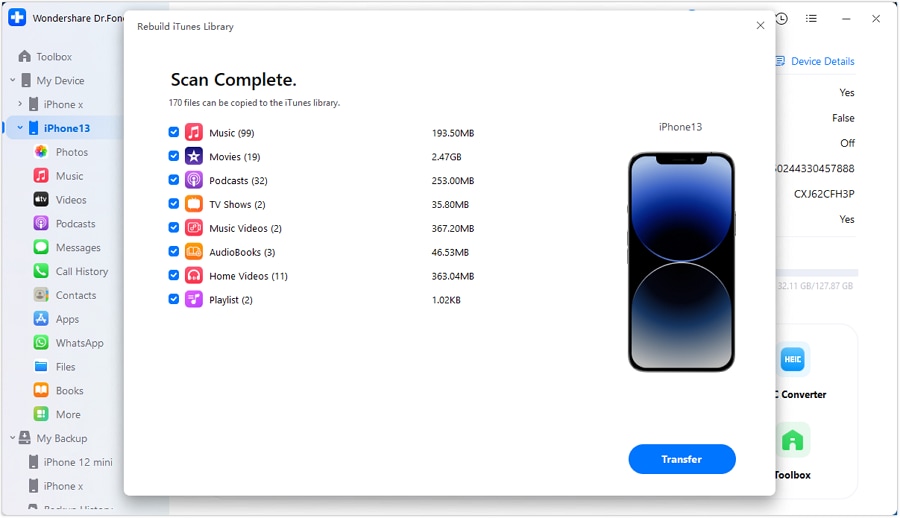
Step 4: Choose File Types and Continue
Once the iOS device scan completes, you'll see a list of supported file types. Select the data you want to transfer and click Transfer to proceed.
Step 5: Check Transfer Completion
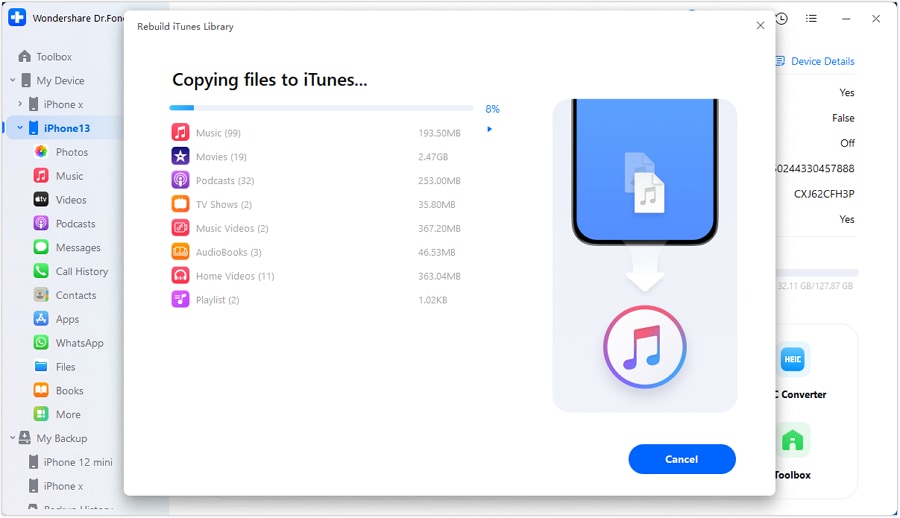
The next window will show the progress bar. Wait until the selected data is transferred from the iOS device to iTunes. To stop the process, click Cancel.
Step 6: Verify Data Transfer
Once the process is complete, a prompt window will appear. Click OK to finish.

Benefits of Dr.Fone Basic - iTunes Manager:
- Efficiency: It quickly transfers media from iOS to iTunes with minimal effort, saving you valuable time and ensuring a seamless transfer process.
- User-friendly: With an intuitive interface and simple steps, it is designed to be easy for anyone to use, regardless of their tech expertise.
- Versatility: It supports various file types, including music, videos, photos, and more, providing detailed control over what you transfer, ensuring you can manage your media exactly how you want.
Conclusion
Restoring iTunes library doesn't have to be a daunting task. Whether you choose to restore from a backup, your iPod, or iCloud, there are multiple ways to get your music back. However, for a hassle-free and efficient restoration process, Dr.Fone Basic - iTunes Manager stands out as the best method. Ready to restore your iTunes library with ease? Get started with Wondershare Dr.Fone - iTunes Manager today!
By following these methods, you'll have your iTunes library restored in no time. Enjoy your music and happy listening!
Dr.Fone Basic:
Better Control for Your Phone
Manage, transfer, back up, restore, and mirror your device


iTunes Manage
- iTunes Backup
- 1. Does iTunes Backup Photos
- 2. Forgot iTunes Backup Password
- 3. Fix iTunes Corrupt Backup
- 4. Fix iTunes Backup Session Failed
- 5. Change iTunes Backup Location
- 6. View Files on iTunes Backup
- 7. Backup WhatsApp Using iTunes
- 8. Top 5 iTunes Backup Managers
- 9. Top 6 Free iTunes Backup Extractor
- 10. Backup iMessage Without iTunes
- iTunes Restore
- 1. Restore Photos from iTunes Backup
- 2. Restore Data from iTunes Backup
- 3. Restore WhatsApp Using iTunes
- iTunes Rebuild
- 1. Transfer iPad Purchases to iTunes
- 2. Transfer iPad Music to iTunes
- 3. Transfer iPod Music to iTunes
- 4. Transfer Android Music to iTunes
- 5. Import Multiple Lyrics to iTunes
- iTunes Transfer
- 1. Sync iTunes Media to iCloud
- 2. Sync iTunes Media to Android
- 3. Transfer iTunes Music to iPod
- 4. Transfer iTunes Music to Flash Drive
- 5. Transfer iTunes Music to Android
- 6. Transfer iTunes Music to Google Play
- 7. Put iTunes Audiobooks to Android
- 8. Copy iTunes Playlists to Hard Drive
- 9. Move iTunes Library to PC / Mac
- 10. Export iPhone Contacts from iTunes
- 11. Export Playlist from iTunes
- iTunes Plugins/Alternatives
- 1. Top 3 iTunes Plugins
- 2. Top 20 Alternatives to iTunes
- 3. Top 3 iTunes Alternatives for Android
- 4. Top 5 iTunes Remote for Android
- iTunes Problems
- 1. Fix iTunes Error 11
- 2. Fix iTunes Error 1100
- 3. Fix iTunes Error 2005/2003
- 4. Locked Out Of iTunes
- 5. Forgot iTunes Password
- 6. Account Has Been Disabled in iTunes
- iTunes Tricks
- 1. Change the iTunes Skin
- 2. Use File Sharing in iTunes
- 3. Use Home Sharing in iTunes
- 4. Recover iPhone Data from iTunes
- 5. See iTunes Purchase History
- 6. Get Free iTunes Cards Legally
- 7. iTunes Visualizers Download
- 8. Watch iTunes Movie on Android
- 9. Update iTunes On Your Computer
- 10. Install iTunes on Windows / Mac
- ● Manage/transfer/recover data
- ● Unlock screen/activate/FRP lock
- ● Fix most iOS and Android issues
- Free Download Free Download Free Download


Daisy Raines
staff Editor