A Full Guide on How to Use iTunes Home Sharing

May 19, 2026 • Filed to: Device Data Management • Proven solutions
 TL;DR:
iTunes Home Sharing allows you to stream and automatically transfer media libraries across up to five Mac or Windows computers, Apple TVs (2nd generation and above), and iDevices running iOS 4.3 or later connected to the same Wi-Fi or Ethernet network using a single Apple ID.
● The feature requires all devices to share a network and Apple ID, but it lacks the ability to transfer metadata, share Audible.com audiobooks, or automatically block duplicates unless you manually select "Items not in my library" before transferring.
● Use iTunes Home Sharing for wireless media access across limited personal devices, but rely on iTunes File Sharing via USB to transfer app-associated files across unlimited devices without an Apple ID while fully preserving metadata.
● If devices fail to connect, resolve the issue by ensuring the Bonjour Service is running on Windows, disabling IPv6, turning on "Wake for network access" for sleeping computers, or re-entering your Apple ID after an OS X or iTunes update.
Ask AI for a summary
 ChatGPT
 Perplexity
 Gemini
 Claude
 Grok
Grok
Dr.Fone Basic:
Better Control for Your Phone
Manage, transfer, back up, restore, and mirror your device
iTunes Home Sharing feature, introduced with the release of iTunes 9, enables iTunes Media Library to be shared among up to five computers connected through Home Wi-Fi or Ethernet Network. It can also stream those Media Libraries to an iDevice or Apple TV. It can automatically transfer newly purchased music, movie, apps, books, TV shows between those computers.
With iTunes Home Sharing, you can share iTunes video, music, movie, app, books, TV shows, photos, etc. There is also a software which can share iTunes library between devices (iOS and Android), share to PC, and it automatically converts almost any music file to a format supported by your device and iTunes.
- Part 1. What Are the Advantages and Disadvantages of iTunes Home Sharing
- Part 2. How to Setup iTunes Home Sharing
- Part 3. Enable Automatic Transfer of Media Files
- Part 4. Avoid Duplicate File from Other Computers
- Part 5. Set Up iTunes Home Sharing on Apple TV
- Part 6. Set Up Home Sharing on iDevice
- Part 7. What iTunes Home Sharing Falls Short
- Part 8. Five Most-asked Problems with iTunes Home Sharing
- Part 9. iTunes Home Sharing VS. iTunes File Sharing
- Part 10. Best Companion of iTunes Home Sharing to Maximize iTunes Features
Part 1. What Are the Advantages and Disadvantages of iTunes Home Sharing
Advantages of iTunes Home Sharing
- 1. Share music, movie, app, books, TV shows, and photos.
- 2. Automatically transfer purchased media files to the shared computer.
- 3. Stream media files shared among the computers to an iDevice or Apple TV (2nd generation and above).
Disadvantages of iTunes Home Sharing
- 1. Cannot transfer metadata.
- 2. Cannot check for duplicate media files when manually transferring content between computers.
- 3. Updates cannot be transferred among the computers.
Part 2. How to Setup iTunes Home Sharing
Requirements:
- At least two computers – Mac or Windows. You can enable home sharing on up to five computers with the same Apple ID.
- An Apple ID.
- Latest version of iTunes. You can download the latest version of iTunes from Apple's official website.
- Wi-Fi or Ethernet home network with active Internet Connection.
- An iDevice should run iOS 4.3 or later.
Set Up Home Sharing On Computers
Step 1: Install the latest version of iTunes and launch it on your computer.
Step 2: Activate Home Sharing from iTunes File menu. Choose File > Home Sharing > Turn On Home Sharing. For iTunes version 10.7 or earlier choose Advanced > Turn On Home Sharing.

You can also turn on Home Sharing by selecting Home Sharing in the SHARED section of Left Sidebar.
Note: If the left sidebar is not visible, you can click "View" > "Show Sidebar".
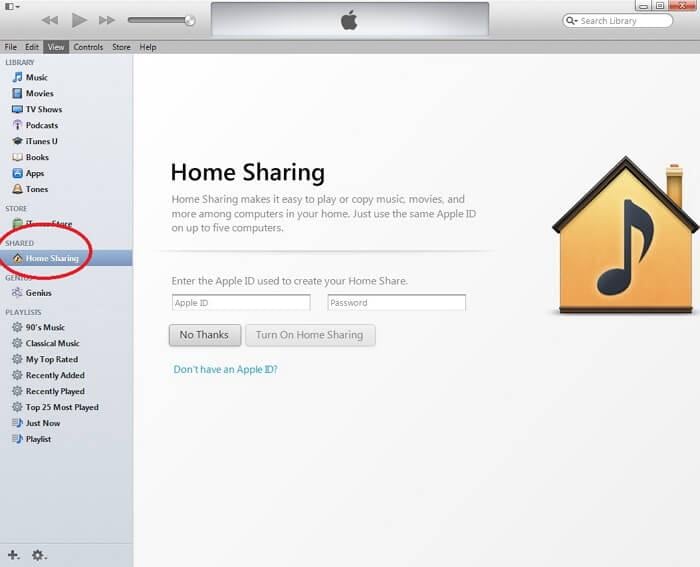
Step 3: Enter Apple ID and password on the right side of the page labeled as Enter the Apple ID used to create your Home Share. You need to use the same Apple ID on all the computers you want to enable Home Sharing.

Step 4: Click on Turn On Home Sharing. iTunes will verify your Apple ID and if the ID is valid the following screen will appear.

Step 5: Click on Done. Once you have click on Done, you will no longer be able to see Home Sharing in the SHARED section of left sidebar until it detects another computer with Home Sharing enabled.
Step 6: Repeat step 1 to 5 on every computer you like to enable iTunes Home Sharing. If you have successfully enabled Home Sharing on every computer by using the same Apple ID, you can see that computer in the SHARED section like below:

Part 3. Enable Automatic Transfer of Media Files
To enable automatic transfer of Media Files please follow the below steps:
Step 1: Click on the Settings… button on the lower right side of the page while viewing the content of a computer within the Home Share.

Step 2: From the next screen select for which type of files you want to enable automatic transfer and click Ok.

Part 4. Avoid Duplicate File from Other Computers Files
To avoid duplicate file from other computers from showing in the list follow the below steps:
Step 1: Click on the Show menu located at the bottom-left side of the page.

Step 2: Select Items not in my library from the list before transferring any files.

Part 5. Set Up iTunes Home Sharing on Apple TV
Let's see step by step on how to enable Home Sharing on Apple TV 2nd and 3rd generation.
Step 1: On Apple TV choose Computers.

Step 2: Choose Yes to enable Home Sharing using the Apple ID.

Step 3: On the next screen you will find that Home Sharing has been enabled this Apple TV.

Step 4: Now, your Apple TV will automatically detect computers that have Home Sharing enabled with the same Apple ID.

Part 6. Set Up Home Sharing on iDevice
To enable Home Sharing on your iPhone, iPad and iPod having iOS 4.3 or above follow these steps:
Step 1: Tap settings, then select Music or Video to enable Home Sharing. This will enable Home Sharing for both type of contents.

Step 2: Enter the Apple ID and password. Use the same Apple ID that you have used to enable Home Sharing on your computer.
Step 3: To play music or video on your iPhone with iOS 5 or later tap either Music or Videos > More… > Shared. If you are using earlier version of iOS tap iPod > More… > Shared.
Step 4: Now, select a shared library to play music or videos from that.
Step 5: To play music or video on your iPad or iPod Touch with the earlier version of iOS 5, tap iPod > Library and select a shared library to play from that.
Part 7. What iTunes Home Sharing Falls Short
- 1. To enable Home Sharing among multiple computers, all the computers must be within the same Network.
- 2. To create Home Sharing, all the computers must be enabled with the same Apple ID.
- 3. With a single Apple ID, up to five computers can be brought into the Home Sharing network.
- 4. Need iOS 4.3 or later to enable Home Sharing on iDevice.
- 5. Home Sharing cannot transfer or stream audiobook content purchased from Audible.com.
Part 8. Five Most-asked Problems with iTunes Home Sharing
Q1. Home Sharing is not working after setting up Home Sharing
1. Check your network connection
2. Check the computers firewall settings
3. Check Antivirus settings
4. Check if the computer is not on sleeping mode.
Q2. Home Sharing is not working on iOS device after updating OS X or iTunes
When OS X or iTunes is updated ,Home sharing signs out the Apple ID used to create the Home Sharing. So, enabling the Home Sharing again using the Apple ID will solve the issue.
Q3. Home Sharing might not work when upgrade to iOS 7 in windows
When iTunes is downloaded, a service called Bonjour Service is also downloaded. It allows remote apps and share libraries to be used with Home Sharing. Check if the service is running on your windows.
1. Control Panel > Administrative Tools > Services.
2. Select Bonjour Service and check the status of this service.
3. If status is Stopped start the service by right clicking on the service and selecting start.
4. Restart iTunes.
Q4. Home Sharing might not work when IPv6 is enabled
Disable IPv6 and restart iTunes.
Q5. Cannot connect to a computer when it is on sleeping mode
If you want make your computer available while it is on sleeping mode open System Preferences > Energy Saver and enable "Wake for network access" option.
Part 9. iTunes Home Sharing VS. iTunes File Sharing
| iTunes Home Sharing | iTunes File Sharing |
|---|---|
| Allows media library to be shared among multiple computers | Allows files associated with an app on iDevice to transfer from iDevice to computer |
| Required same Apple ID to enable home sharing | No Apple ID required to transfer file |
| Need Home Wi-Fi or Ethernet Connection | File sharing works with USB |
| Cannot transfer Metadata | Preserves all the Metadata |
| Up to five computers can be brought into the home sharing | No such limit |
Part 10. Best Companion of iTunes Home Sharing to Maximize iTunes Features
With iTunes Home sharing, iTunes really makes a wonderful life in your family. Everything is made so easy. But when it comes to file sharing, the complicated iTunes operations and restrictions may bore most of us.
We eagerly call for an alternative tool to ease iTunes file sharing as much as possible.
Dr.Fone - Phone Manager
Tried and True Tool to Achieve 2x Faster iTunes File Sharing
- Transfer iTunes to iOS/Android (vice versa) much faster.
- Transfer files between iOS/Android and computer, including contacts, photos, music, SMS, and more.
- Manage, export/import your music, photos, videos, contacts, SMS, Apps etc.
- Manage your phones on computer.


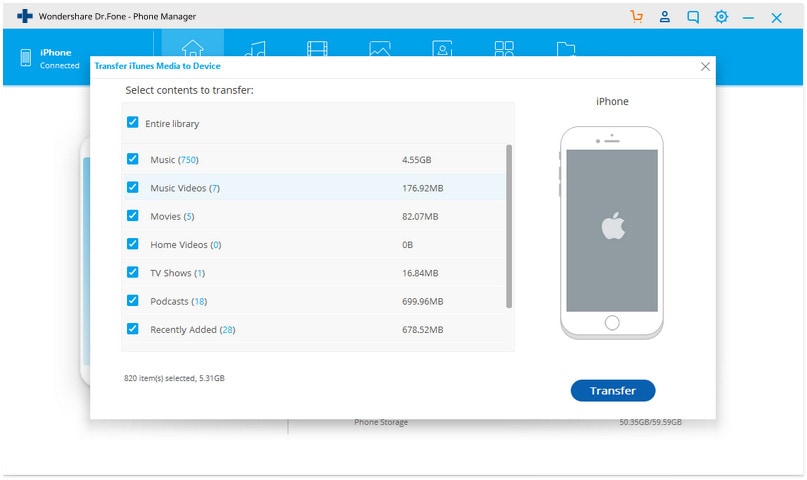
Just have a look at Dr.Fone - Phone Manager interface on iTunes file sharing.
Dr.Fone Basic:
Better Control for Your Phone
Manage, transfer, back up, restore, and mirror your device


iTunes Manage
- iTunes Backup
- 1. Does iTunes Backup Photos
- 2. Forgot iTunes Backup Password
- 3. Fix iTunes Corrupt Backup
- 4. Fix iTunes Backup Session Failed
- 5. Change iTunes Backup Location
- 6. View Files on iTunes Backup
- 7. Backup WhatsApp Using iTunes
- 8. Top 5 iTunes Backup Managers
- 9. Top 6 Free iTunes Backup Extractor
- 10. Backup iMessage Without iTunes
- iTunes Restore
- 1. Restore Photos from iTunes Backup
- 2. Restore Data from iTunes Backup
- 3. Restore WhatsApp Using iTunes
- iTunes Rebuild
- 1. Transfer iPad Purchases to iTunes
- 2. Transfer iPad Music to iTunes
- 3. Transfer iPod Music to iTunes
- 4. Transfer Android Music to iTunes
- 5. Import Multiple Lyrics to iTunes
- iTunes Transfer
- 1. Sync iTunes Media to iCloud
- 2. Sync iTunes Media to Android
- 3. Transfer iTunes Music to iPod
- 4. Transfer iTunes Music to Flash Drive
- 5. Transfer iTunes Music to Android
- 6. Transfer iTunes Music to Google Play
- 7. Put iTunes Audiobooks to Android
- 8. Copy iTunes Playlists to Hard Drive
- 9. Move iTunes Library to PC / Mac
- 10. Export iPhone Contacts from iTunes
- 11. Export Playlist from iTunes
- iTunes Plugins/Alternatives
- 1. Top 3 iTunes Plugins
- 2. Top 20 Alternatives to iTunes
- 3. Top 3 iTunes Alternatives for Android
- 4. Top 5 iTunes Remote for Android
- iTunes Problems
- 1. Fix iTunes Error 11
- 2. Fix iTunes Error 1100
- 3. Fix iTunes Error 2005/2003
- 4. Locked Out Of iTunes
- 5. Forgot iTunes Password
- 6. Account Has Been Disabled in iTunes
- iTunes Tricks
- 1. Change the iTunes Skin
- 2. Use File Sharing in iTunes
- 3. Use Home Sharing in iTunes
- 4. Recover iPhone Data from iTunes
- 5. See iTunes Purchase History
- 6. Get Free iTunes Cards Legally
- 7. iTunes Visualizers Download
- 8. Watch iTunes Movie on Android
- 9. Update iTunes On Your Computer
- 10. Install iTunes on Windows / Mac
- ● Manage/transfer/recover data
- ● Unlock screen/activate/FRP lock
- ● Fix most iOS and Android issues
- Free Download Free Download Free Download


James Davis
staff Editor