Easily Transfer Music From Android to iTunes: Top 2 Methods Explained
Oct 24, 2025 • Filed to: Device Data Management • Proven solutions
Dr.Fone Basic:
Better Control for Your Phone
Manage, transfer, back up, restore, and mirror your device
Managing music across different devices can feel challenging without the right tools and techniques. However, transferring tracks from your Android device to iTunes doesn't have to be a complex process. While Android and iTunes operate on different platforms, straightforward methods exist to bridge this gap. Knowing the right steps can keep your favorite tracks easily accessible.
This guide will explore two of the best ways to transfer music from Android to iTunes. These approaches ensure your playlists and songs remain organized without compromising audio quality. By following these simple steps, you can streamline your music transfer process and enjoy your collection across devices.

Part 1. How To Sync Music From Android to iTunes Automatically?
To make the process effortless, an automated solution can save you both time and provide security. One tool that stands out for its efficiency in performing this task without a hitch is Wondershare Dr.Fone. It is a versatile solution designed to simplify managing data across devices.
This program caters to users who frequently transfer files like music, photos, and videos between Android phones and other platforms. Moreover, the iTunes Manager feature within Dr.Fone is particularly noteworthy for its music transfer capabilities.
It allows users to effortlessly sync music from Android to iTunes, bridging the compatibility gap between the two systems. Detecting and organizing music files automatically ensures your library stays updated without any manual intervention. This feature is a game-changer for anyone looking to maintain a unified music collection across multiple devices.
What You Need To Do To Sync Music From Android to iTunes Automatically?
The steps needed to achieve this task via Dr.Fone – Phone Manager (Android) have been explained below in full detail:
Step 1. Make Your Way to Rebuild iTunes Library to Select This Option
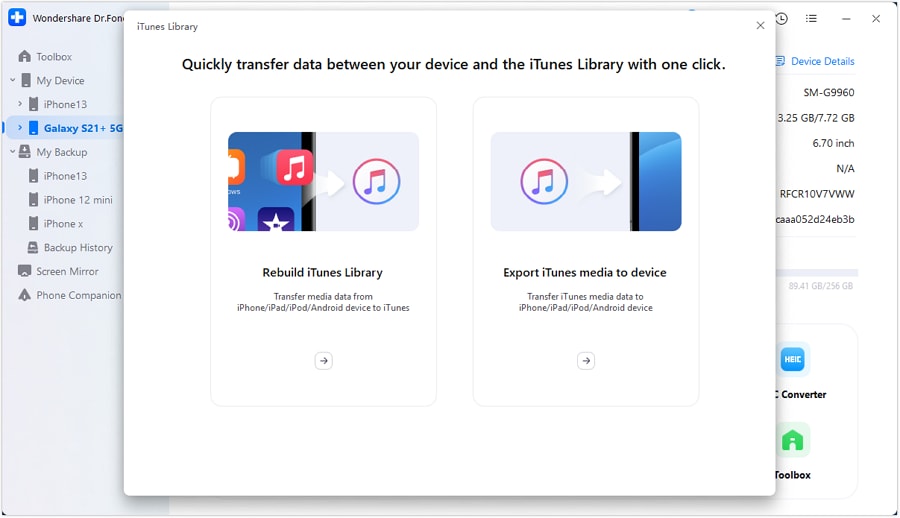
You can start by attaching your Android device to your computer and launching Dr.Fone – Phone Manager (Android) to select the device from the left panel. Now, click “iTunes Library” from the list of options located under the phone report. On the subsequent screen, you will need to go for the “Rebuild iTunes Library” option to continue the procedure.

Step 2. Proceed to Transfer the Music Tracks from Android
On the subsequent screen, click "Start" and choose the data you want to transfer to iTunes. When you have selected all the desired ones, simply tap "Transfer" to let the process commence. It will take a while to complete the operation, depending on the size of the data you are migrating. At the end, you can tap "OK" to confirm the success of the transfer process and unlink your Android phone.

Part 2. How To Transfer Music From Android to iTunes Manually?
For those who want to be in control of each step of the operation, multiple ways exist to do so. Transferring music from Android to iTunes manually is an excellent alternative in this scenario.
While this method requires a bit more effort, it ensures you can organize your music exactly how you want. The following instructions will outline how to manually add music to the iTunes library with efficiency:
2-1. Move Music From Android to Your PC
The first thing you will need is to get the tracks you want to move on your computer somehow. This bridges your phone and iTunes, ensuring your songs are ready for syncing.
Two effective ways to accomplish this are using a dedicated tool or relying on a built-in feature. Follow the guides below to learn how each method works and choose the one to transfer music from Android to iTunes:
Way 1. Wondershare Dr.Fone
A dedicated transfer tool is optimal when looking for a fast and hassle-free way to move your music to iTunes. Wondershare Dr.Fone offers an excellent solution with its Export All Data feature. This function allows you to transfer your entire music library in just a few clicks, making it ideal for bulk transfers.

Wondershare Dr.Fone
One-Stop Solution to Move Music From Android to Your PC
- Transfer files between Android and computer, including contacts, photos, music, SMS, and more.
- Manage, export/import your music, photos, videos, contacts, SMS, Apps, etc.
- Transfer iTunes to Android (vice versa).
- Manage your Android device on the computer.
- Fully compatible with the newest Android OS.
It not only saves time but also ensures that all your tracks are exported without missing any files or compromising quality. Follow these instructions for how to transfer Android music to iTunes in a straightforward way:
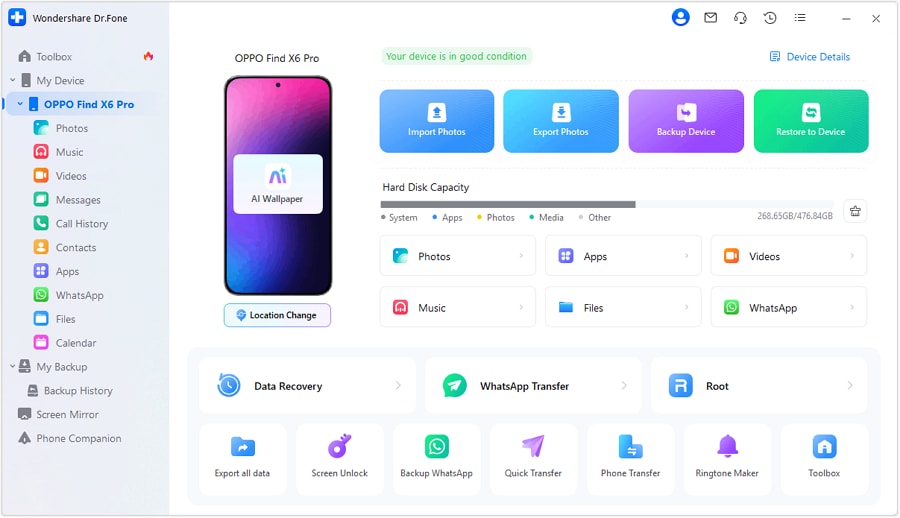
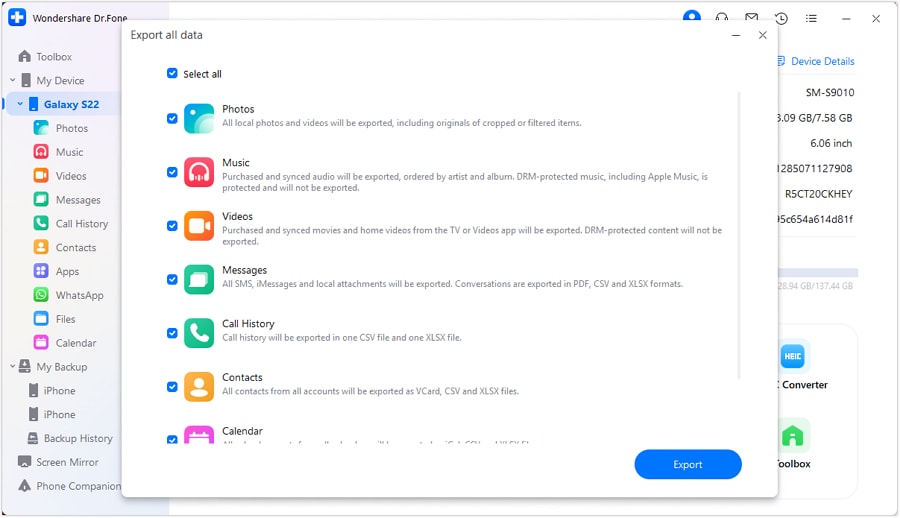
Step 1. As you select your device from the left side after launching Dr.Fone – Phone Manager (Android) and connecting your Android, click “Export All Data.” Doing this will take you to the “Export all data” screen, where you must choose the “Music” category.

Step 2. Then, hit “Export” and wait for the data migration process to complete successfully. Afterward, you can employ the “Open in Folder” option to view the newly transferred tracks for confirmation.

Way 2. File Explorer
When you are not interested in using an external tool, you can simply connect the Android phone to the computer for file transfer. Your computer’s built-in file management system requires no extra program to interact with an Android.
File Explorer allows you to browse through your mobile’s storage, locate your music files, and copy them directly to your PC. The following can help you sync Android to iTunes via this simple method:
Step 1. Plug your Android phone into your PC using a USB cable and ensure the connection mode has the required permissions. Once the mobile is detected, use File Explorer to locate your Android device under "This PC."

Step 2. Once in the device storage, find your targeted folder and copy all of the tracks you want to move. Finally, navigate to your desired location on your PC and paste the copied data into this folder.
2-2. Add Android Music to iTunes From the PC
Once all files are in the desired location on your computer, you can launch iTunes to proceed. It is where you'll organize and sync your music library for easy access across your Apple devices. While doing so may seem like a hassle, it is not the case if you follow the simple steps next to sync music from Android to iTunes:
Instructions. To commence, launch the latest version of iTunes on your PC and click the “File” option from the top left corner. Following that, opt for “Add File to Library” or “Add Folder to Library” from the drop-down menu and browse to the targeted location. After selecting the track you want to move, click "Open" and wait for the program to import files.

Conclusion
In summary, trying to transfer music from Android to iTunes is a straightforward process that can be accomplished manually or with the aid of dedicated tools. While using the manual way provides a primary and hands-on method, tools like Dr.Fone streamline the process. This robust program offers bulk transfers and easy synchronization, saving you time and effort.
You can either go the manual route or opt for a more automated solution, but both ensure that your Android music library is effortlessly integrated into iTunes. For those looking for a faster, more efficient solution, Wondershare Dr.Fone is highly recommended.
Dr.Fone Basic:
Better Control for Your Phone
Manage, transfer, back up, restore, and mirror your device
iTunes Manage
- iTunes Backup
- 1. Does iTunes Backup Photos
- 2. Forgot iTunes Backup Password
- 3. Fix iTunes Corrupt Backup
- 4. Fix iTunes Backup Session Failed
- 5. Change iTunes Backup Location
- 6. View Files on iTunes Backup
- 7. Backup WhatsApp Using iTunes
- 8. Top 5 iTunes Backup Managers
- 9. Top 6 Free iTunes Backup Extractor
- 10. Backup iMessage Without iTunes
- iTunes Restore
- 1. Restore Photos from iTunes Backup
- 2. Restore Data from iTunes Backup
- 3. Restore WhatsApp Using iTunes
- iTunes Rebuild
- 1. Transfer iPad Purchases to iTunes
- 2. Transfer iPad Music to iTunes
- 3. Transfer iPod Music to iTunes
- 4. Transfer Android Music to iTunes
- 5. Import Multiple Lyrics to iTunes
- iTunes Transfer
- 1. Sync iTunes Media to iCloud
- 2. Sync iTunes Media to Android
- 3. Transfer iTunes Music to iPod
- 4. Transfer iTunes Music to Flash Drive
- 5. Transfer iTunes Music to Android
- 6. Transfer iTunes Music to Google Play
- 7. Put iTunes Audiobooks to Android
- 8. Copy iTunes Playlists to Hard Drive
- 9. Move iTunes Library to PC / Mac
- 10. Export iPhone Contacts from iTunes
- 11. Export Playlist from iTunes
- iTunes Plugins/Alternatives
- 1. Top 3 iTunes Plugins
- 2. Top 20 Alternatives to iTunes
- 3. Top 3 iTunes Alternatives for Android
- 4. Top 5 iTunes Remote for Android
- iTunes Problems
- 1. Fix iTunes Error 11
- 2. Fix iTunes Error 1100
- 3. Fix iTunes Error 2005/2003
- 4. Locked Out Of iTunes
- 5. Forgot iTunes Password
- 6. Account Has Been Disabled in iTunes
- iTunes Tricks
- 1. Change the iTunes Skin
- 2. Use File Sharing in iTunes
- 3. Use Home Sharing in iTunes
- 4. Recover iPhone Data from iTunes
- 5. See iTunes Purchase History
- 6. Get Free iTunes Cards Legally
- 7. iTunes Visualizers Download
- 8. Watch iTunes Movie on Android
- 9. Update iTunes On Your Computer
- 10. Install iTunes on Windows / Mac
- ● Manage/transfer/recover data
- ● Unlock screen/activate/FRP lock
- ● Fix most iOS and Android issues
- Manage Now Manage Now Manage Now


Selena Lee
chief Editor