
How to Root Any Moto G Model in 2026 (5G, Play, Power & More)

Jun 30, 2026 • Filed to: Device Data Management • Proven solutions
 TL;DR:
To successfully root your Motorola Moto G using the Superboot method, you must execute OS-specific terminal commands from the extracted Superboot zip file while the phone is connected in bootloader mode.
● Before starting, you must back up all data to prevent permanent loss, charge the battery to at least 60%, install the Android SDK and official Motorola drivers, enable USB Debugging, and unlock the bootloader via the official Motorola website.
● To execute the root, power off the device, hold the power and volume down buttons to enter bootloader mode, connect via USB, and run your system-specific script (superboot-windows.bat as administrator for Windows, or the corresponding .sh files with sudo privileges for Mac and Linux).
● The Superboot process relies on command-line execution which can be complex and time-consuming, making alternatives like Android Root or Dr.Fone better suited for users seeking a more straightforward setup without terminal commands.
Ask AI for a summary
 ChatGPT
 Perplexity
 Gemini
 Claude
 Grok
Grok
Dr.Fone Basic:
Better Control for Your Phone
Manage, transfer, back up, restore, and mirror your device
The Moto G is one of Motorola’s most popular smartphones, available in multiple generations like Moto G (1st, 2nd, 3rd, and newer models). Powered by Android OS, a fast processor, and a dependable camera, it delivers great performance. However, if you truly want to unlock its full potential, you need to root Moto G.
Rooting your Moto G gives you advanced control, better performance, and access to custom ROMs or apps that require root access. In this guide, we’ll walk you through two reliable methods to root Motorola Moto G, along with the essential steps and precautions you must take before starting the rooting process.
Part 1: Before You Begin: Essential Prerequisites for Rooting
A common mistake many users make before they root Moto G or any other Android device is skipping proper research. If the process isn’t done correctly, it can lead to corrupted software or firmware issues. Another frequent problem is data loss, since rooting often wipes all stored files. To avoid these risks when you root Motorola Moto G, it’s crucial to follow key prerequisites and prepare your device properly.
1. Make sure that you have taken a backup of your data. After performing the root, your device would remove all the user data.
2. Try to charge your battery 100% before the commencement of the root. The entire operation might get compromised if your battery dies in between. In any case, it should not be less than 60% charged.
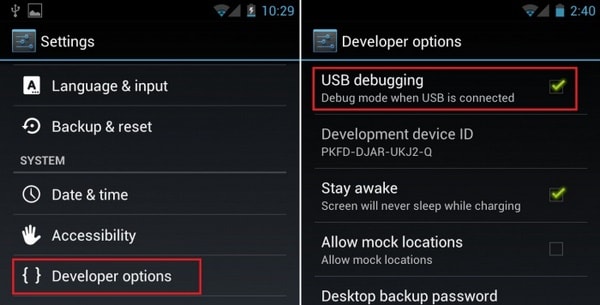
3. The USB Debugging option should be enabled. To do so, you need to go to the “settings” and go all the way down to the “Developer option”. Turn it on and enable USB Debugging.
4. Install all the essential drivers on your phone. You can either visit the official Motorola site or download the drivers from here.
5. There are some antivirus and firewall settings that disable the process of rooting. To root Motorola Moto G, make sure that you have disabled the in-built firewall.
6. Additionally, the bootloader of your device should be unlocked. You can do it by visiting the official Motorola website here.
7. Lastly, use a reliable rooting software. It will make sure that your device won’t be harmed in the process. We have come up with two of the most trusted methods to root Moto G here. You can certainly give them a try.
Part 2: Root Moto G with Superboot
If you’re looking for an alternative method, Superboot is a reliable option to root Moto G. While it may not be as feature-rich as some advanced tools like Dr.Fone, it’s considered safe and is widely used by Moto G users. Simply follow the step-by-step guide to root Motorola Moto G with Superboot for a smooth and secure process.
1. Firstly, you need to install the Android SDK on your system. You can download it from here.
2. Download Supberboot from here. Unzip the file to a known location in your system. The filename would be “r2-motog-superboot.zip”.
3. Turn the power “off” of your Moto G and simultaneously press power and volume down button. This will put your device in the bootloader mode.
4. Now, you can simply connect your device with your system using a USB cable.
5. The procedure is quite different for Windows, Linux, and Mac users. Windows users simply need to run the command superboot-windows.bat on the terminal. Make sure that you have the administrator privileges while doing so.
6. If you are a MAC user, you need to open the terminal and reach the folder containing the newly extracted files. Simply run these commands:
chmod +x superboot-mac.sh
sudo ./superboot-mac.sh
7. Lastly, Linux users also need to reach the same folder containing these files and run these commands on the terminal:
chmod +x superboot-linux.sh
sudo ./superboot-linux.sh
8. Now, all you got to do is reboot your device. When it will turn on, you will realize that your device has been rooted.
One downside of using Superboot to root Moto G is its complexity, as it may take extra time to complete the process correctly. If you find Superboot difficult, you can always choose a simpler method and root Motorola Moto G using Android Root for a more straightforward experience.
Dr.Fone - Phone Manager (Android)
Backup & Transfer Android Data Turns Flexible.
- One-click to back up the whole Android device to your computer.
- Preview and selectively restore files to any device with simplicity.
- Export what you want from the backup to your computer.
- Your device's data remains intact during the restore process.


Conclusion
Once you successfully root Moto G, you can unlock its full potential. From installing apps outside the Play Store to customizing system features, rooting gives you complete control over your device. Enjoy the enhanced performance and flexibility of your rooted Motorola Moto G.
Dr.Fone Basic:
Better Control for Your Phone
Manage, transfer, back up, restore, and mirror your device


Motorola Manage
- Motorola Transfer
- 1. Download Pictures to PC
- 2. Transfer Motorola to Mac
- 3. Transfer Whatsapp from Moto to iOS
- 4. Transfer Music from Mac to Moto
- 5. Transfer WhatsApp from iOS to Moto
- Motorola Unlock
- 1. Unlock Motorola Without Factory Reset
- 2. Network Unlock Motorola One 5G Ace
- 3. Sim Unlock Moto G Phone
- 4. Unlock Moto Without Factory Reset
- 5. Unlock Motorola Bootloader
- 6. Bypass FRP Lock on Motorola
- 7. Reset Motorola Phone When Locked
- Motorola Repair
- 1. Motorola Won't Power On
- 2. Android App Not Installed Error
- 3. Black Screen of Death Error
- 4. Unbrick Android Phone
- 5. Encryption Unsuccessful Error
- 6. Stuck at Android System Recovery
- 7. Android Won't Turn On
- 8. Android Stuck on Boot Screen
- Motorola Tips
- 1. Turn Off a Motorola Phone
- 2. Mirror Motorola Screen to PC
- 3. Back up Motorola to PC
- 4. Control Motorola from PC
- 5. Format Motorola Phone in 2026
- 6. Reboot Any Motorola Phone
- 7. How to Screenshot on Motorola
- 8. Restart Any Motorola Phone
- 9. Motorola Phone Restore Guide
- 10. Set Up Voicemail on Motorola
- ● Manage/transfer/recover data
- ● Unlock screen/activate/FRP lock
- ● Fix most iOS and Android issues
- Free Download Free Download Free Download


James Davis
staff Editor