
A Complete Guide to Format Your Android Phone

Jun 16, 2026 • Filed to: Phone Repair Solutions • Proven solutions
 TL;DR:
Formatting an Android phone to permanently erase user data requires either a standard factory reset via the Settings menu for accessible devices, hardware-triggered Recovery Mode for unresponsive systems, or PC-based execution using ADB commands or Dr.Fone Data Eraser.
● A complete data backup is a mandatory prerequisite to prevent permanent loss, executable either through Google Account cloud synchronization or a local PC transfer using Dr.Fone Basic (Android).
● Recovery Mode bypasses the OS for devices stuck in a boot loop or frozen, requiring the phone to be fully powered off before holding brand-specific hardware keys, such as Volume Up + Home + Power for Samsung.
● PC-based formatting manually requires downloading Android platform-tools, setting system environment variables, and running the —wipe_data command via ADB shell, while Dr.Fone Data Eraser (Android) offers a guided alternative for a deeper data wipe prior to device resale.
Ask AI for a summary
 ChatGPT
 Perplexity
 Gemini
 Claude
 Grok
Grok
If you want to format an Android phone, you need more than a basic reset. A full phone format should remove accounts, personal files, app data, and saved settings so the device is ready for resale, recycling, troubleshooting, or a fresh start.
This guide explains how to format Android phone safely in three practical ways: through factory reset, recovery mode, and PC-based tools. It also shows how to back up your data first and when to use professional phone formatting software for a deeper, more secure wipe.
Part 1: Backup data before formatting Android phone
Before you format this phone or any Android device, the first step should always be backup. Formatting erases user data, app content, saved accounts, downloaded files, and many system preferences. If you skip backup, important data may be permanently lost.
You should back up your phone before formatting it for any of these reasons:
- You plan to sell, trade in, or give away the device: A backup helps you move your content to a new phone without losing photos, contacts, or documents.
- You need to troubleshoot serious system issues: Formatting can fix software problems, but you may still want your important files later.
- You want a clean start: Even when the goal is to format the phone completely, preserving selected data gives you more control after setup.
Option 1: Using Google Account
Google services offer a simple way to preserve your most important content before you format an Android phone.
PHOTOS & VIDEOS: Open the Google Photos app and check whether your latest media has synced. Items that are not backed up usually show a cloud-related status icon. Then go to Settings > Backup & Sync and turn backup on if needed.
FILES: Upload documents and other important files to Google Drive. Open the app, tap the “+” icon, select Upload, and choose the files you want to save.
MUSIC: If you keep local music files on a computer, move or sync them before formatting so they are not lost with the device wipe.
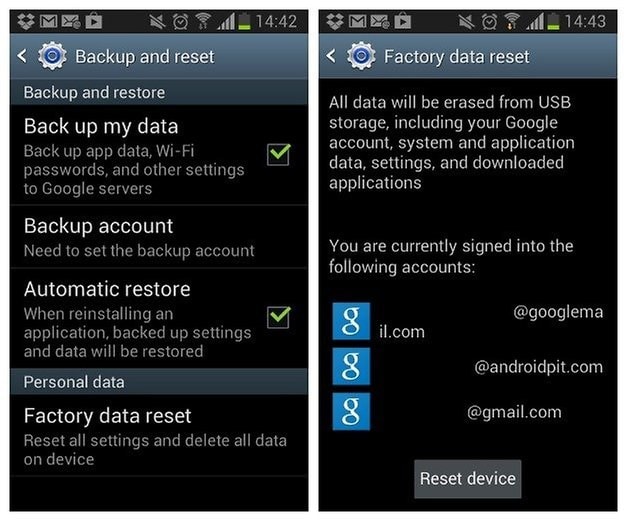
ANDROID BACKUP SERVICE: On many Android devices, you can go to Settings > Personal > Backup & Reset and switch on “Backup My Data.” To restore later, use Settings > Personal > Backup & Reset > Automatic Restore.
Option 2: Backup using the Dr.Fone - Phone Backup:
If you want a faster and more controlled backup workflow, Dr.Fone Basic (Android) gives users a more convenient one-click method to back up and restore Android data from a computer.
After installing the software on your PC, you only need to connect your smartphone with Data Cable and the app automatically detects all your data. Then navigate to the My Backup > Back Up Now. This one-click process gives you a total backup option just in a few minutes.

If you want to restore the data, just connect your device when the Toolkit is running and you can see an option to “Restore” from your Backup data. You can even select some of the files you require from the total backup.
Dr.Fone Basic (Android)
Flexibly Backup and Restore Android Data
- One-click to back up the whole iOS device to your computer.
- Export what you want from the backup to your computer.
- Your device's data remains intact during the restore process.
- Supports iPhone, iPad, iPod touch, and the latest iOS version.


It is the simplest method to back up and restore any android device in the market. Just try its seamless and effortless feature to experience its vast workability and see the difference.
Backing up first is especially important if your next step is to format the phone from recovery mode or from a PC, where the wipe can be more immediate and less forgiving.
Part 2: How to format Android phone via factory reset
Factory reset is the easiest built-in method for users who can still access the device normally. It works well when your goal is to format phone storage, remove personal data, and return the system to default settings before reuse or transfer.
Follow these steps to format Android phone by factory reset:
- Open Settings and look for the reset section. Depending on the brand, it may be listed under System, Security, General Management, or About Phone.
- Tap Factory Data Reset or the similar option available on your device.
- Review what will be erased, then confirm by tapping Reset Phone or the equivalent confirmation button.

After confirmation, the phone will begin removing accounts, apps, settings, and local data.
During the whole process, your device may restart a few times. After some time, your device will be reset successfully and you should get a confirmation for the same on the screen.
This method is ideal for users searching terms like format a phone, android format, or format android when the device is still functioning and accessible.
Part 3: How to format Android phone in recovery mode
If your device is frozen, stuck in a boot loop, or you cannot open the Settings app, Recovery Mode is often the best way to format Android phone. This method is commonly used when normal reset options are unavailable.
If you can’t execute a normal factory reset like when your phone won’t switch on properly, you can reset it through Recovery mode.
First, ensure that your device is fully shut down. Press and hold the correct combination of keys to start the phone in recovery mode. This can be different from device to device.
Nexus: Volume up + Volume Down + Power
Samsung: Volume up + Home + Power
Motorola: Home + Power
If your device is not responding to the above combinations just google search the combination for your phone.
Leave the buttons when your device is switched on.
Use the Volume Up and the Volume Down buttons to navigate through. And, scroll down until you see the Recovery Mode.
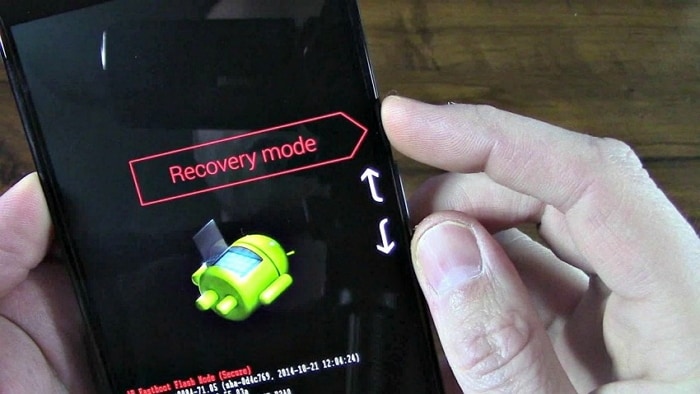
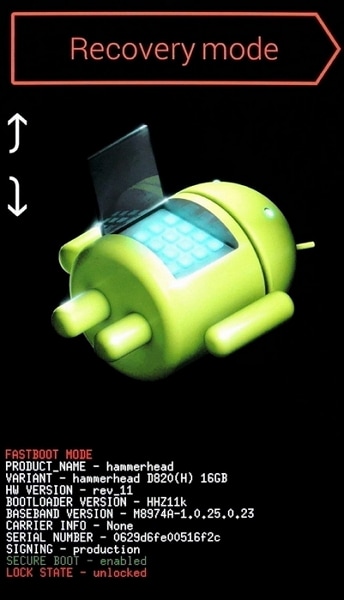
Press the power switch to start through recovery mode. Your screen will be like the bottom image.
Hold the power button now and keep tapping the Volume Up button. Then a screen pops up.
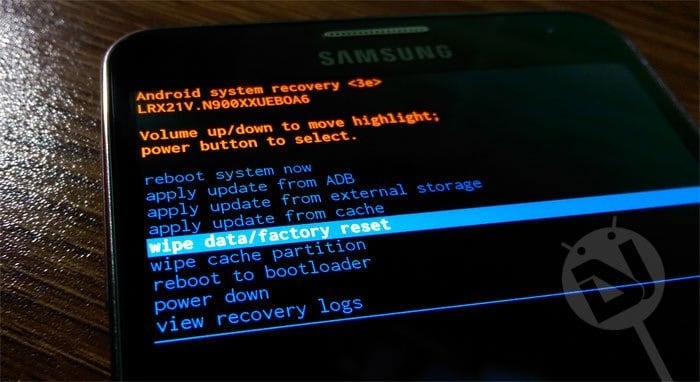
Go to the wipe data/factory reset option using the volume buttons and click the power button to accept it. After that, select “Yes” to erase all the data.
NOTE: IF YOUR DEVICE FREEZES AT ANY POINT JUST HOLD THE POWER BUTTON UNTIL IT RESTARTS. If your problems aren’t corrected even after a factory reset it’s likely to assume that the problem is with the hardware and not the software.
Recovery Mode is especially useful for users who need to format device storage without unlocking the phone first. It is also one of the most effective answers for search intent around cellphone format and format mobile in a troubleshooting context.
Part 4: How to format Android phone from PC
If you want more control or the phone is difficult to manage directly on the device, formatting from a computer can be useful. This is the section that best addresses search intent such as software to format android phone on pc and phone formatting software.
The third process to format your device is with your PC. It required a PC and a connection between both of them via USB.
Step 1: Click on the link and download it. After the download is completed right-click the ZIP file and click ‘extract all’. Tap the browse option and choose your ‘C:\ProgramFiles’ directory.
Step 2: Rename the extracted file folder to ‘AndroidADT’. (Just to read it and access it quicker)
Step 3: Now after the previous step right-clicks ‘Computer’ in the file browser and choose Properties>Advanced System Settings>Environment Variables.
Step 4: In the System, variable window click Path>Edit. Press ‘END’ to move the cursor to the end of the selection.
Step 5: Type ‘;C:\Program Files\AndroidADT\sdk\platform-tools\’ and make sure that you type the semicolon in the beginning, after this click okay to save your changes.
Step 6: Open CMD.
Step 7: Connect your Android phone to your PC. Type ‘adb shell’ in cmd and press ENTER. Once the ADB is connected type ‘—wipe_data’ and press enter. After this, your phone will restart and restores the Android to factory settings.
Now, you have successfully reset your device using a PC.
For many users, however, a command-based workflow is not the most convenient option. If you want a more user-friendly format for phone management from a PC, a guided desktop tool can be easier than configuring ADB manually.
A dedicated solution such as Dr. Fone Data Eraser (Android) can be a better fit when you want to erase personal information more thoroughly before resale, recycling, or device transfer. It is particularly relevant when the goal is not just to reset Android, but to use reliable software to format android phone on pc with a simpler interface.
Conclusion
Knowing how to format Android phone correctly helps you protect your privacy, solve software issues, and prepare a device for resale or reuse. In this guide, you learned how to back up your data, use factory reset, enter recovery mode, and format Android from a PC based on your situation.
For users who want a more complete wipe and a more convenient desktop workflow, Dr. Fone Data Eraser (Android) is a strong option. It is designed to erase Android data more thoroughly and is especially useful when you need dependable phone formatting software before giving your phone to someone else.
FAQs


Android Erase
- Android Diagnostics
- 1. Fix Android Microphone Issues
- 2. Test NFC on Android Device
- 3. Check Android Device in Minutes
- 4. Apps For Sensor Check Android
- 5. Apps for Testing Device's Hardware
- 6. Tools for Conducting Screen Tests
- 7. Ways to Check Phone's Vibrations
- 8. Check Mobile Signal Strength
- 9.Realme Touch Screen Test Codes
- 10.Android Codes To Test Touch Screen
- 11.Phone Processor Speed Tests
- Erase Android
- 1. Delete Browsing History on Android
- 2. Clear App Data and Cache on Android
- 3. Delete Photos from Android
- 4. Wipe Android When It's Lost
- 5. Wipe Cache Partition on Android
- 6. Delete Text Messages on Android
- 7. Delete WhatsApp Backup
- 8. Wipe Data or Factory Reset
- 9. Erase Android Data Before Selling
- 10. Delete Contacts on Android
- 11.Delete Multiple Contacts on Android
- 12.Wipe Android Phone before Selling
- 13.Delete Photos on Android
- 14.Remove Pre-installed Apps
- 15.Delete Apps on Android
- 16. Access Trash on Android
- Android Reset
- 1. Restart Phone without Power Button
- 2. Reset Phone without Volume Buttons
- 3. Factory Reset Android Phone
- 4. Hard Reset Android Phone Using PC
- 5. Hard Reset Locked Infinix Phone
- 6. Factory Reset Lenovo Phone
- 7. Factory Reset Android Tablets
- 8. Factory Reset Lenovo Tablets
- 9. Format Your Android Phone
- 10. Hard Reset Android Phones
- 11.Reset Android Without Home Button
- 12.Restart Your Android Phone
- 13.Soft Reset Android Devices
- 14.Reset Android without Losing Data
- 15.Ways to Hard Reset Tecno Spark
- 16.Updated Android Factory Reset Code
- Data Erase Apps
- 1. Speed Booster for Android
- 2. Android Cleaners to Boost Device
- 3. Data Erase Apps to Protect Privacy
- 4. Data Eraser Apps to Wipe Android
- 5. 15 Best Cleaning Apps for Android
- Sell Old Android
- ● Manage/transfer/recover data
- ● Unlock screen/activate/FRP lock
- ● Fix most iOS and Android issues
- Free Download Free Download Free Download


James Davis
staff Editor