How to Transfer Photos from iPhone to Computer?

Jun 03, 2026 • Filed to: Device Data Management • Proven solutions
 TL;DR:
You can transfer iPhone photos to a computer using built-in Windows features for basic Camera Roll imports, cloud services for wireless syncing, or dedicated iOS management tools to handle hidden files and format incompatibilities.
● Built-in system tools like Windows 10 Photos, Windows 7/8 AutoPlay, and Windows Explorer require a direct USB connection and restrict transfers exclusively to visible Camera Roll images.
● Wireless methods utilizing iCloud Photo Library, Google Photos, Dropbox, or OneDrive require uploading images from the iPhone and subsequently downloading them to the PC via web portals or respective desktop sync applications.
● Transferring hidden images, accessing app-specific photos, or automatically converting HEIC files to JPG without altering native iPhone camera settings requires specialized utilities like Dr.Fone - Phone Manager or Dr.Fone - Data Recovery.
Ask AI for a summary
 ChatGPT
 Perplexity
 Gemini
 Claude
 Grok
Grok
Dr.Fone Basic:
Better Control for Your Phone
Manage, transfer, back up, restore, and mirror your device
Owning an iPhone, everyone swears by its excellent image quality. But, as the collection grows day by day, you lose out the free space on your iPhone, which might force your iPhone to function weirdly. For that matter, it is important to transfer photos from iPhone to computer.
Method 1: Import Any Photos from iPhone to PC using a USB cable (Windows 10/8/7/Vista/XP)
Though you can import pictures from iPhone to PC, there are photo type restrictions and OS barriers that make the transfer not a good experience. To avoid this and retain the picture quality, Dr.Fone - Phone Manager is an apt option for you.
Dr.Fone - Phone Manager (iOS)
Transfer Pictures from iPhone to PC Faster and More Easily
- Not only transfer pictures from iPhone to PC, but from iPhone to Android as well.
- Transfer SMS, contacts, music, etc. between your iOS and computer as well as between
- Import, manage, and export apps and media files can be done using this software.
- Fully compatible with all iPhone models and all Windows / Mac versions.


Let’s see the detailed guide on how to transfer photos from iPhone to computer:
Step 1: Install Dr.Fone - Phone Manager and launch it on your PC and then tap the "Phone Manager" tab.

Step 2: Now, connect your iPhone using a lightning cable and hit ‘Trust’ button on your iPhone.

Step 3: From the program window, hit the ‘Photos’ tab and preview your data available on your screen.

Step 4: You can either choose the specific folder/album from the left panel or select the desired photos to be transferred from your iPhone to the PC.
Step 5: After selecting the photos, tap on the ‘Export’ button, and from the drop-down menu choose ‘Export to PC’.
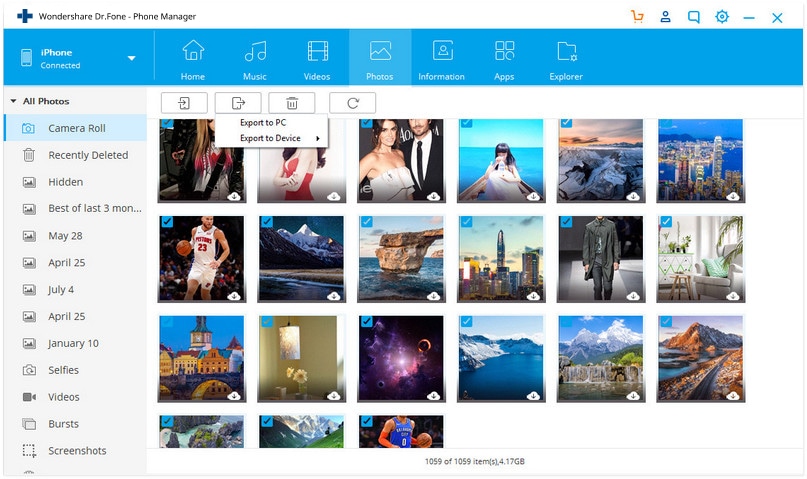
Follow the on-screen instructions to get the photos transferred to your PC. You can then view them in the destination folder over your computer.
Watch the video to understand how to transfer photos from iPhone to PC.
Do You Know: How to Transfer HEIC Photos from iPhone to PC?
High-Efficiency Image Container (HEIC) image is a container for HEIF photo format. Apple offers this functionality on iOS 11/12 and macOS High Sierra. These photos might not properly open on other platforms like Windows and Android (one of the greatest HEIC drawbacks).
But how to actually download HEIC pictures from iPhone to computer?
In most cases, the HEIC image can be saved to JPG when you transfer it to PC by tweaking iPhone settings: Settings > Photos > Formats > Automatic. But this way will disable your iPhone to take HEIC photos (a photo format occupying less space and having a higher definition than JPG).
With Dr.Fone - Phone Manager, you don’t need to tweak the iPhone settings, you can easily transfer photos from iPhone to PC or Android device as it automatically converts HEIC images to JPG format.
Method 2: Transfer Camera Roll Photos from iPhone to PC with Windows Services
There are multiple Windows services to download pictures from iPhone to computer. But, all the services only transfer the iPhone Camera Roll photos. To transfer other photos, you need to turn to dedicated programs like Dr.Fone - Phone Manager.
- 2.1 Use Windows Photos to Transfer Photos from iPhone to PC (Windows 10)
- 2.2 Use Windows AutoPlay to Transfer Photos from iPhone to PC (Windows 7/8)
- 2.3 Use Windows Explorer to Transfer Photos from iPhone to PC
2.1 Use Windows Photos to Transfer Photos from iPhone to PC (Windows 10)
Similar to Windows and Windows 8, Windows 10 supports the transfer of photos from iPhone Camera Roll photos to your PC. Here are the steps:
- Update your iTunes to the latest version on your computer and connect your iPhone using a lightning cable.
- Now, launch the Photos app on your Windows 10 PC and hit ‘Import’ from the top-right corner.

Select the Import option - Choose your preferred photos on your computer, and then tap the ‘Continue’ button. This is how to import photos from iPhone to Windows 10 PC.

Choose your photos to continue
2.2 Use Windows AutoPlay to Transfer Photos from iPhone to PC (Windows 7/8)
When how to import pictures from iPhone to PC is your concern, the Windows AutoPlay feature can come in handy. It automatically runs a DVD or CD inserted into the CD/DVD drive of your computer. You need to enable AutoPlay so that the DVD/CD drives can run on their own. Likewise, when you connect your iPhone to the PC, it will AutoPlay the device storage. Though this feature comes pre-enabled in computers, you can disable it as well.
How to use Windows AutoPlay to transfer photos for Windows 7 PC
- Get your iPhone connected through a USB with Windows 7. When the AutoPlay popup crops up, tap on the ‘Import Pictures and Videos using Windows’ option.

Import pictures and videos - Now, you need to tap the ‘Import Settings’ link on the following window. Define the destination folder by tapping the ‘Browse’ button against ‘Import to’.

Select a location on PC to save photos - Select a tag following the ‘OK’ button. Press the ‘Import’ button.
Note: Sometimes the AutoPlay doesn’t start up on its own. Try disconnecting and reconnecting your iPhone in such case.
How to use Windows AutoPlay to transfer photos for Windows 8
Here is the guide to understand how to get pictures from iPhone to PC using AutoPlay on Windows 8 –
- On your Windows 8 PC, connect your iPhone through a USB cable. As soon as the computer detects your iPhone, you need to trust the computer to proceed.
Trust the computer on your iPhone - Click on ‘This PC’ and then right-click on your iPhone, followed by ‘Import pictures and videos’.

- For the first time image import, choose ‘Review, organize, and group items to imports’. For later incidences of exporting photos from iPhone, tap ‘Import all new items now’.
- Hit the ‘More Option’ link for selecting the destination folder for your iPhone videos and photos. Press the ‘OK’ button followed by ‘Next’.
- Pick the desired photos from your iPhone and then tap the ‘Import’ button.

Select and import photos to Windows 8 computer
2.3 Use Windows Explorer to Transfer Photos from iPhone to PC
Your iPhone is treated as a file system or digital camera by the Windows system. As a result, you can import/download photos from iPhone to PC. It imports only your Camera Roll photos, which are not categorically arranged on your PC. You might learn how to download photos from your iPhone to your computer to make the job easy using Windows Explorer.
Here is how to move photos from iPhone to computer using Windows Explorer
- First of all, get your iPhone connected using a lightning cable to your Windows PC. Launch ‘My Computer’ and locate your iPhone under ‘Portable Devices’.

Go to the Portable Devices pane - Double-tap your iPhone icon and locate the ‘Internal Storage’. Open ‘Internal Storage’ by double-clicking it.

Enter the DCIM folder - Find the ‘DCIM’ folder (Camera Roll folder) under ‘Internal Storage’ and open it. Open any folder to check the desired photos and then copy-paste them after selecting the preferred folder on your Windows PC.

Select iPhone pictures to export to computer
Method 3: Transfer Photos from iPhone to PC Wirelessly
- 3.1 Use Google Photos to transfer iPhone Photos to PC
- 3.2 Use Dropbox to transfer iPhone Photos to PC
- 3.3 Use iCloud Photo Library to transfer iPhone Photos to PC
- 3.4 Use OneDrive to transfer iPhone Photos to PC
3.1 Use Google Photos to transfer iPhone Photos to PC
If you plan to transfer iPhone Photos to computer, you need to know how to upload photos from iPhone to Google Photos. You can turn on the automatic sync option and later transfer pictures from iPhone to computer easily by downloading them. You get unlimited space for storing pictures under 16-megapixel size.
Here is how to download pictures from iPhone to PC using Google Photos manually:
- Launch the Google Photos app after installing it on your iPhone, and log in with your Google account. The app will ask permission to access photos if you are using it for the first time. Press the ‘OK’ button here.
- Go to ‘Photos’ and hit the 3 vertical dots from the upper corner. ‘Select Photos’ or ‘Create a New Album’ needs to be selected.

Upload pictures to Google Photos from iPhone - After picking the photos, press ‘Done’ for creating and uploading the photos. Rename the album when prompted.
- Now, click the 3 dots from the top corner. Choose ‘Back Up’ and upload photos.
- Log-in to ‘Google Photos’ on your PC. From here, you can select the desired photos and then click the 3 vertical dots on the top-right corner and tap ‘Download’.

Download pictures to PC from Google Photos - The photos will be saved in your download folder on your computer.
3.2 Use Dropbox to transfer iPhone Photos to PC
For understanding how to put photos from iPhone to computer using Dropbox, you need to go through this section. You can access documents and photos etc., using this tool from your computer or iPhone.
Here is how to export photos from iPhone to PC using Dropbox:
- Install Dropbox iOS on your iPhone and log in using your existing Dropbox account if you have one.
Note: Create a Dropbox account if you don’t have one.
- Select ‘Files’ and then decide the destination folder. Click on the 3 dots from the top-right corner. Choose ‘Upload File’ and tap ‘Photos’, and then select the desired photos.

Upload iPhone photos to Dropbox - On your PC, visit Dropbox or download the Dropbox app and then log-in. Go to the folder you have synced photos in recently.
- Open the folder and download the photos you like.
3.3 Use iCloud Photo Library to transfer iPhone Photos to PC
You can transfer photos from iPhone to computer using iCloud Photo Library and manage videos and photos as well as store them on iCloud securely. It will update the photos on iPad, iPod Touch, iPhone, Mac, and other Apple products. You can even transfer photos from iPhone to PC using iCloud. After setting up your iCloud Photo Library, you can set automatic download to your Windows PC. iCloud For Windows is used to complete the process.
Here is the guide to know how to transfer pictures from iPhone to computer with iCloud Photo Library:
- On your iPhone, turn on iCloud Photo Library and then go to ‘Settings’.
- Click ‘[your name]’ and then ‘iCloud’. Browse ‘Photos’ and turn on ‘iCloud Photo Library’. It will store all photos on iCloud.

Toggle on the iCloud Photo Library option - Download iCloud For Windows from Apple’s official website and launch it after installation. Log in using your Apple ID that you have logged on your iPhone.
- Mark the checkbox against ‘Photos’ and tap ‘Options’, right next to it.

Select the Photos option - Select ‘Download New Photos And Videos To My PC’ to set automatic download. Now, hit ‘Done’ and ‘Apply’. Whenever there are new photos on your iPhone, a copy of photos from iPhone to PC will be saved under the Wi-Fi network.

Settings to download new photos to computer - You will find these photos under ‘File Explorer’ > ‘iCloud Photos’ > ‘Downloads’. To download photos by year, choose ‘Download Photos And Videos’ > select photos > ‘Download’.
3.4 Use OneDrive to transfer iPhone Photos to PC
Do you know how to import photos from iPhone to PC using OneDrive?
OneDrive is a Microsoft product that means for managing and synchronizing files across devices. You can upload a file onto OneDrive and then copy pictures from iPhone to PC without much hassle. We have given here the guide to download pictures from iPhone, so that you don’t have to worry much about it.
Here is the detailed guide about how to copy photos from iPhone to PC with OneDrive:
- Install the OneDrive app on your iPhone and launch it. Create your OneDrive account and note the credentials. Click on the ‘Add’ button from the top of the screen and create a folder, take a photo, or upload an existing one.
- For example, tap ‘Take a photo or video’ > allow OneDrive to access camera > ‘OK’ > Save the picture in OneDrive.

Add pictures from iPhone to OneDrive - Tap ‘Upload’ > select photos from iPhone > upload > ‘Done’.
- Now, go to your computer and open the OneDrive site > Folder options > ‘Download folder’.

Get pictures from OneDrive to PC - From the downloaded zip file, extract the photos on your PC.
Method 4: Transfer Hidden Photos from iPhone to PC
Believe it or not. Some photos may be invisible on your iPhone due to the following reasons:
- Private photos are set as hidden.
- Photos used by apps are not directly accessible.
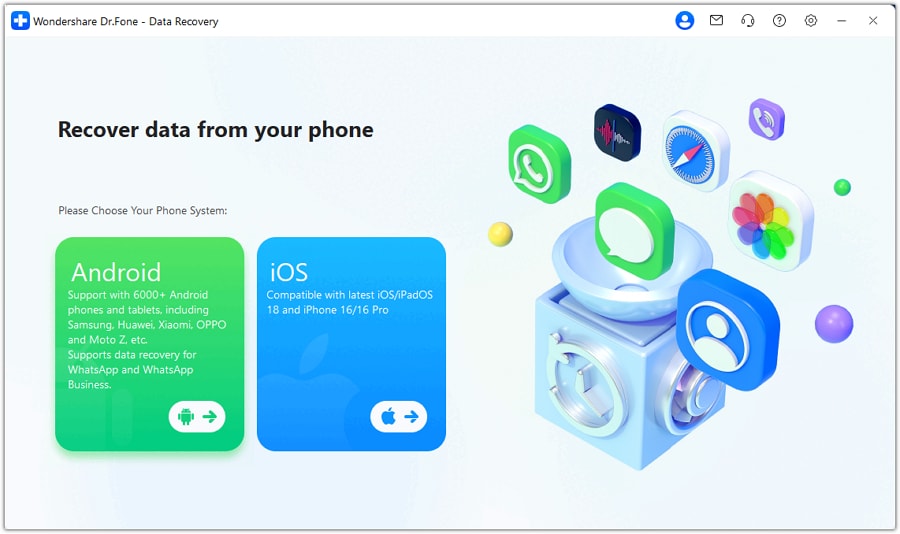
If you are worried about how to download photos from iPhone to PC when they are hidden, it’s better to opt for Dr.Fone - Data Recovery. It can scan all the hidden, app, and, of course, common photos in iPhone storage, and then download the pictures from iPhone without hassle. When it comes to data security and a high success rate in recovery, you can always vouch for Dr.Fone – Recover. Not only iPhone, but it can also get photos from iTunes and iCloud as well.
Dr.Fone - Data Recovery (iOS)
Find Out Hidden Photos in iPhone and Transfer to PC
- It supports the latest iPhone models and iOS version in them.
- HEIC photos are seamlessly supported.
- You get to preview all the hidden photos to decide whether to transfer to PC or not.
- The existing data doesn’t get overwritten when you save photos from your iPhone on your computer.
- It also recovers data from a broken, jailbroken, ROM flashed, factory reset, iOS updated device that lost data.
How to transfer hidden pictures from iPhone to PC
Here is the detailed guide for Dr.Fone - Data Recovery to retrieve iPhone photos and transfer them to computer:
Step 1: Install Dr.Fone - Data Recovery on your computer and launch it. Tap on the "Data Recovery" tab afterwards.
Note: Ensure that the iTunes has been updated prior to this activity and turn off the auto-sync to prevent any kind of data loss, and prevent recovering the deleted iPhone data.
Step 2: After connecting the iPhone through USB, trust the computer on it. When the software detects your iPhone, the various data types will be displayed on the screen.
Step 3: Select the ‘Photos’ and ‘App Photos’ in the lower zone, click on ‘Start Scan’ button and then scan the hidden photos on your iPhone. From the preview, you can select ‘Photos’ or ‘App Photos’ from the left panel.
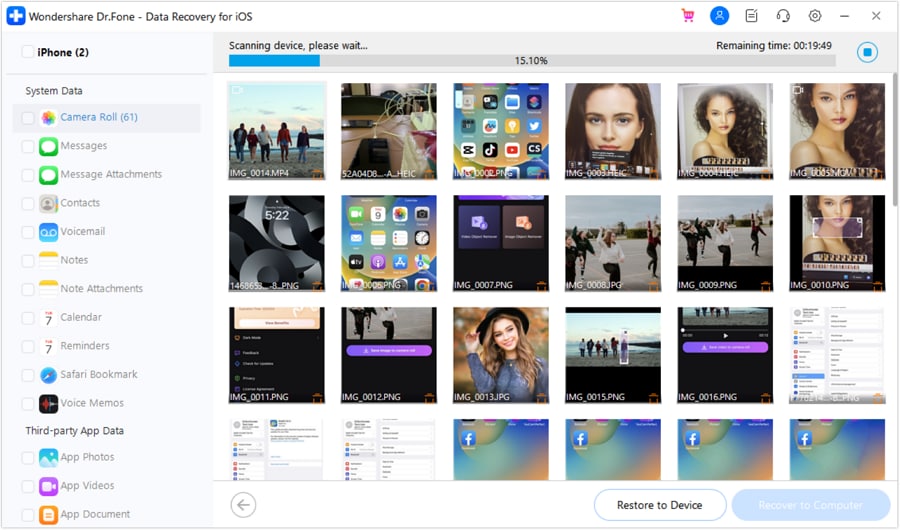
Step 4: Now, after selecting the individual photos, press ‘Recover to Computer’.
With the aforementioned tutorial, we now have understood how one can also transfer App and hidden Photos from iPhone to PC with Dr.Fone– Recover. You can even recover photos or pictures from social apps like WhatsApp, Kik, WeChat, etc. by scanning them with this tool.
In-depth video tutorial to learn how to transfer hidden photos from iPhone to computer:
Conclusion
From this article, we’ve known how to download pictures from iPhone to PC. Now, it is up to your convenience to choose the most suitable way from the aforementioned methods. Also, bear in mind that not all PCs support the HEIC format. Opt for a tool like Dr.Fone - Phone Manager and Dr.Fone - Data Recovery that simultaneously converts and transfers HEIC pictures. That will help you save a lot of time and that too, in a hassle-free way.
Dr.Fone Basic:
Better Control for Your Phone
Manage, transfer, back up, restore, and mirror your device


iPhone Photos
- Convert HEIC to JPG
- 1. Convert HEIC to JPG on Linux
- 2. Convert HEIC to JPG Windows
- 3. Best HEIC Converter Online
- 4. Convert HEIC to JPG High Quality
- Export iPhone Photos
- 1. Upload iPhone Photos to Google Drive
- 2. Transfer Photo from iPhone to PC
- 3. Transfer Photo from iPhone to iPhone
- 4. Transfer from iPhone to iPhone
- 5. Transfer from iPhone to iPad
- 6. Move iPhone Photo to External Drive
- 7. Transfer from iPhone to Flash Drive
- 8. Extract Photos from iPhone
- 9. Download Photo from iPhone
- Import Photos to iPhone
- 1. Transfer from Laptop to iPhone
- 2. Transfer Photo from Camera to iPhone
- 3. Transfer Photo from Mac to iPhone
- 4. Transfer Photos from PC to iPhone
- 5. Transfer from iPhone to PC
- 6. Transfer from Android to iPhone
- 7. Transfer from Samsung to iPhone
- Manage iPhone Photos
- 1. Back up iPhone Photos
- 2. Get Photos off iPhone
- 3. Send Large Size Photos from iPhone
- 4. Photo/Video Compressor Apps
- 5. Delete Photos from iPhone/iPad
- 6. iPhone Photos Disappeared Suddenly
- 7. iPhone Photoshop Alternatives
- Recover iPhone Photos
- 1. Restore Deleted Photos from iPhone
- 2. Recover Photos from iPod Touch
- 3. Recover Deleted Picture from iPhone
- Transfer iPhone Photos to Mac
- Transfer iPhone Photos to PC
- 1. Transfer Data from iPhone to PC
- 2. Transfer Photo to Computer
- 3. Transfer Photo to PC without iTunes
- 4. Transfer Library to Computer
- 5. Send Photo from iPhone to Computer
- 6. Import Photo from iPhone to Windows
- 7. Transfer Photo to Windows
- Transfer Photos from Google Drive
- 1. Download from Google Drive to iPhone
- 2. Transfer from Google Photo to iPhone
- 3. Download from iCloud to iPhone
- Transfer Photos to Google Drive
- Image Convert Tips
- ● Manage/transfer/recover data
- ● Unlock screen/activate/FRP lock
- ● Fix most iOS and Android issues
- Free Download Free Download


Bhavya Kaushik
contributor Editor