Syncing iPhone Messages to Your Mac: What You Need to Know

Oct 24, 2025 • Filed to: Device Data Management • Proven solutions
Dr.Fone Basic:
Better Control for Your Phone
Manage, transfer, back up, restore, and mirror your device
With our increasing reliance on digital communication, managing conversations across devices has never been more critical. How to sync messages from your iPhone to your Mac is not only a common question but a necessary digital skill for staying connected in today's world.
We're here to guide you through the standard methods before presenting an all-in-one solution that could revolutionize the way you manage your messages.
- Part 1. How To Sync Messages On iPhone To Mac Using Various Methods
- Method 1: Using iMessage to sync message from iPhone to Mac
- Method 2: Using iCloud to transfer messages from iPhone to Mac
- Method 3: Using iTunes On How To Sync iPhone Text Messages To Mac

- Part 2. Transfer Text Messages from iPhone to Mac in 3 Minutes
Part 1. How To Sync Messages On iPhone To Mac Using Various Methods
Method 1: Using iMessage to sync message from iPhone to Mac
One of the simplest ways to sync messages from iPhone to Mac is through Apple's iMessage service. This method ensures that all your iMessages are consistent and up-to-date across both devices. By enabling a few settings on your iPhone and Mac, you can seamlessly transfer your conversations, making it easier to pick up a chat exactly where you left off, regardless of which device you're using. Here's how you can set this up.
Ensure you're signed in with the same Apple ID on both your iPhone and Mac.
Step 1: On your iPhone, go to Settings > Messages and toggle on iMessage.

Step 2: On your Mac, open the Messages app and sign in with your Apple ID, if not already done.
Step 3: Go to Messages > Preferences in your Mac's Messages app and click on the iMessage tab.
Step 4: Check the box to enable Messages in iCloud and click "Sync Now" if necessary.
Pros:
- Seamless integration within the Apple ecosystem: This means that the product or service works effortlessly with other Apple devices and services, providing a smooth and unified user experience across the entire Apple platform.
- Real-time syncing across devices: This refers to the ability to instantly update and synchronize data between multiple devices, ensuring that any changes made on one device are immediately reflected on all other connected devices.
- Automatic iCloud backups: Enabling iCloud for messages means your conversations are regularly backed up to the cloud. This not only safeguards your data against potential loss but also allows for easy restoration if you switch to a new device.
- Access your messages from anywhere: Once synced, you can access all your iMessage conversations from any Mac logged into your iCloud account. This makes it easier to stay connected whether you're at home, in the office, or traveling.
- Unified messaging: By syncing your messages, you eliminate the hassle of fragmented conversations across devices. Whether you started a chat on your iPhone, you can continue it effortlessly on your Mac, ensuring you don't miss any crucial messages.
Cons:
- Requires an internet connection.
- Limited to iMessages (SMS texts might not sync unless you have Text Message Forwarding enabled).
Next, we'll explore another effective method:
Method 2: Using iCloud to transfer messages from iPhone to Mac
To extend the convenience of having your messages on both your iPhone and Mac, you can use iCloud to transfer messages from iPhone to Mac. This method involves leveraging Apple's cloud service to keep your messages synced and accessible across your devices. By enabling a few iCloud settings, you can ensure your messages are always up-to-date and securely backed up, making it simple to manage your conversations from anywhere. Below, we'll guide you through the steps to achieve this.
Step-by-Step Guide:
Step 1: On your iPhone, go to Settings > [Your Name] > iCloud.

Step 2: Toggle on Messages to upload your messages to iCloud.

Step 3: On your Mac, open the Messages app and ensure that you're signed in to iCloud with the same Apple ID.
Step 4: Access Messages preferences and check the box for Messages in iCloud.
Pros:
- Messages are backed up in iCloud: Your messages are safely stored in iCloud, ensuring you don't lose any important conversations.
- Accessible from any device with iCloud enabled: You can access your messages from any device that has iCloud enabled, making it easy to stay connected no matter where you are.
- Syncs across all devices: Your messages stay synchronized across all your Apple devices, so you can switch between devices seamlessly without missing a beat.
- Secure encryption: iCloud uses end-to-end encryption, keeping your messages private and secure from unauthorized access.
- Storage optimization: Offloading messages to iCloud frees up space on your device, helping to optimize performance and storage capacity.
Cons:
- Occupies iCloud storage space.
- May require purchasing additional iCloud space.
Method 3: Using iTunes On How To Sync iPhone Text Messages To Mac
If you're looking for an alternative solution on how to copy messages from iPhone to Mac, iTunes offers a reliable and straightforward method. By creating a backup of your iPhone through iTunes, you can ensure all your messages are securely saved and can be easily transferred to your Mac. This method is especially useful for those who prefer a local backup over cloud storage. Let's go through the steps to make this happen.
Step-by-Step Guide:
Step 1: Connect your iPhone to your Mac with a USB cable.
Step 2: Open iTunes and select your device.

Step 3: Click on "Back Up Now" to create a backup of your iPhone, including messages.
Step 4: To access messages, you'll need to restore the backup to another iPhone, as iTunes does not support viewing message archives directly.
Pros:
- Creates a complete backup of your iPhone, ensuring all your data is safely stored.
- Restores your iPhone from the backup in case of data loss or device replacement.
- Synchronizes your apps, photos, and settings across devices for seamless use.
- Allows easy transfer of data to a new iPhone, making upgrades hassle-free.
- Provides peace of mind by securing your personal information and digital content.
Cons:
- It is not suitable for viewing messages directly on your Mac.
- A bit cumbersome for just transferring messages.
Part 2. Transfer Text Messages from iPhone to Mac in 3 Minutes
Those looking for a comprehensive tool to manage their iPhone data on a Mac will find Wondershare Dr.Fone a game-changer. Boasting an intuitive interface and powerful transferring capabilities, Dr.Fone makes syncing your iPhone messages to your Mac a breeze.
Beyond just message syncing, Wondershare Dr.Fone offers a range of features that streamline data management. You can easily transfer photos, videos, contacts, and music between your iPhone and Mac without any hassle. The software also supports data backup and restoration, ensuring that your important information is always safe. With Dr.Fone, you can manage your apps, organize your files, and even troubleshoot iOS issues with just a few clicks. Whether you're a tech novice or a seasoned pro, Dr.Fone simplifies the entire process, making it an indispensable tool for any iPhone user.
Dr.Fone - Phone Manager (iOS)
Transfer Text Messages from iPhone to Mac in 3 Minutes
- Transfer, manage, export/import your music, photos, videos, contacts, SMS, Apps, etc.
- Back up your music, photos, videos, contacts, SMS, Apps, etc., to the computer and restore them easily.
- Transfer music, photos, videos, contacts, messages, etc., from one smartphone to another.
- Transfer media files between iOS devices and iTunes.
- Fully compatible with the newest iOS system.


How to Use Dr.Fone to Transfer Messages from iPhone to Mac
Step 1: Download and install Wondershare Dr.Fone on your Mac from the official website.
Step 2: Connect your iPhone to your Mac using a USB cable. Once connected, your iPhone should appear in Finder or iTunes, depending on your macOS version.
Step 3: Launch Dr.Fone by double-clicking on its icon. Once the program opens, navigate to the main menu and select the "Phone Manager" feature to proceed with managing your phone's data and settings.
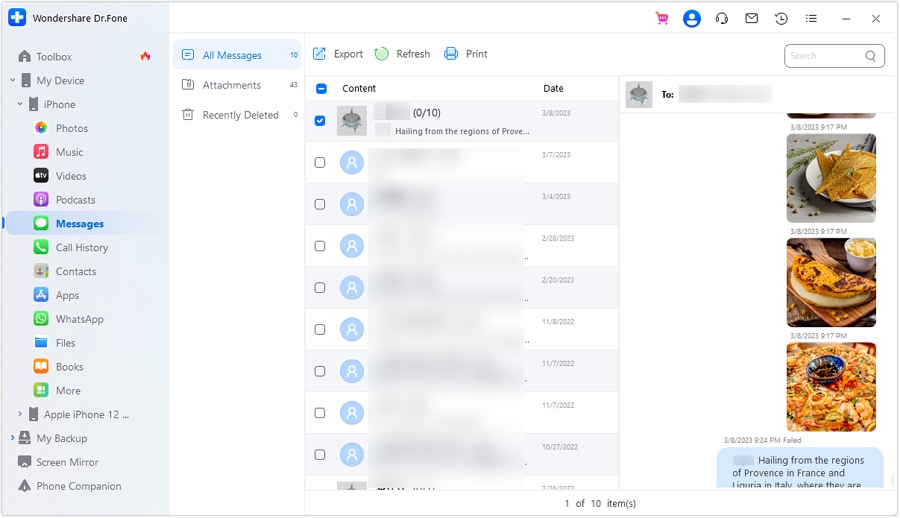
Step 4: To manage messages on your iOS device, navigate to My Device > iDevice > Messages in the left panel. You will see various message formats available. To view your entire iPhone inbox, select the All Messages section. Here, you can export full chat histories, including attachments, by clicking the Export button. Options include PDF, Excel, and CSV files. Additionally, you can print chats and refresh messages as needed.
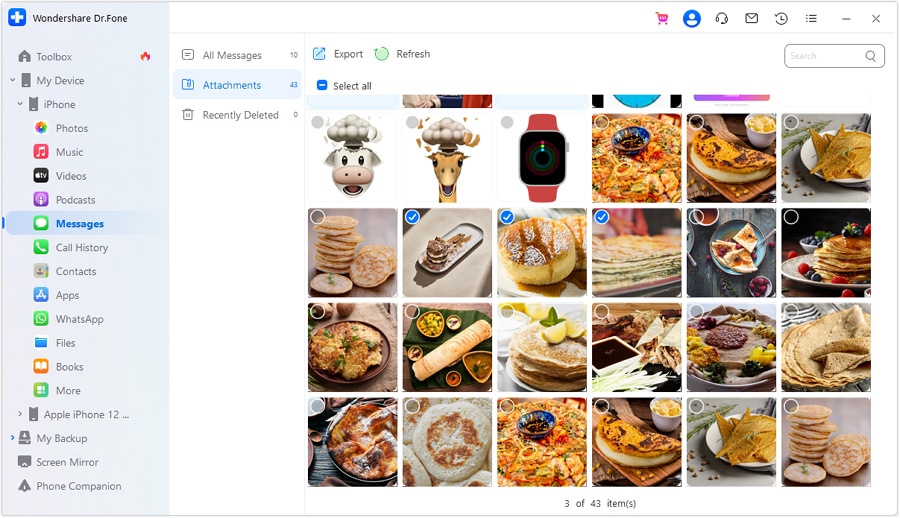
Step 5: If you wish to access the specific attachments within the Messages of your iOS device, look for the Attachments section. Export the entire attachments or specific ones with the Export option. Search for specific attachments with the search bar available on the top-right.
Pros of using Dr.Fone:
- User-friendly interface: The application boasts a simple and intuitive design, making it easy for users of any technical level to navigate and utilize its features effectively.
- Transfers a wide range of data types beyond messages: Beyond just text messages, the tool supports the transfer of photos, videos, contacts, call logs, and even app data, ensuring a comprehensive data migration process.
- No need for internet as it works via USB: The transfer process is conducted via a USB connection, eliminating the need for an internet connection and ensuring a faster and more secure data transfer.
- High-speed data transfer: The USB connection facilitates high-speed data transfer, allowing users to move large volumes of data quickly and efficiently without long waiting times.
- Cross-platform compatibility: The application is designed to work seamlessly across different operating systems, making it versatile and useful for users with various devices.
- Secure and private: With advanced encryption protocols, the tool ensures that all data transferred remains secure and private, protecting users' sensitive information from unauthorized access.
Final Words
We hope this guide has provided you with valuable insights into syncing messages from your iPhone to your Mac. Remember, consistent updates and trial-and-error are part of the process to find the system that works best for you. Whether it's utilizing built-in Apple services or adopting powerful third-party tools like Wondershare Dr.Fone, you're now equipped to create a harmonious connectivity between your iPhone and Mac. Remember to keep your software up to date for a smoother sync!
Dr.Fone Basic:
Better Control for Your Phone
Manage, transfer, back up, restore, and mirror your device


iPhone Messages
- Back Up iPhone Messages
- 1. Back up Messages on iPhone
- 2. Save Text Messages on iPhone
- 3. Back up Viber messages
- 4. Back up WhatsApp Data to Computer
- 5. Export WhatsApp Message from iOS
- Delete iPhone Messages
- 1. Delete iMessages on iPhone and iPad
- 2. Delete Snapchat Messages on iPhone
- 3. Delete WA for Everyone
- 4. Delete WA Message Permanently
- 5. Delete Text Messages from iPhone
- 6. Tips about WhatsApp Delete Message
- 7. Undelete Messages on iPhone
- 8. View Deleted iMessage History on PC
- Recover iPhone Messages
- 1. Recover iPhone Deleted Text Messages
- 2. Recover Deleted Viber Messages
- 3. Recover Messages on iPhone 13
- 4. Recover Deleted Message on iPhone 8
- 5. Recover Deleted Message iPhone 6
- 6. Transfer from iPhone to iPhone
- 7. Recover WhatsApp Messages Online
- 8. Restore 1-Year-Old WhatsApp Chats
- Restore iPhone Messages
- 1. Restore Kik Messages from iPhone
- 2. Restore Text Messages on iPhone
- 3. Restore Viber Messages Selectively
- 4. Restore Kik Messages to iPhone
- Transfer iPhone Messages
- 1. Transfer from Android to iPhone
- 2. Transfer from iPhone to iPhone
- 3. Transfer from iPhone to Computer
- 4. Transfer from Android to iPhone XS
- 5. WhatsApp from Android to iOS
- 6. Transfer from Android to iPhone 13
- 7. WhatsApp from iPhone to PC
- 8. Download Text Messages from iPhone
- 9. Sync iMessage between iPhone and Mac
- iPhone Messages Problems
- 1. iMessage Not Working
- 2. iMessage Keeps Crashing
- 3. iMessage Not Syncing on a Mac
- 4.iPhone won't send or receive texts
- 5. Message Blocking Is Active
- 6. Why Are My iPhone Messages Green
- iPhone Message Tricks
- 1. Export Messages from iPhone to PDF
- 2. Read Others WA Messages
- 3. iPhone Message Tips and Tricks
- 4. Access iMessage Online
- 5. Extract Text Messages from iPhone
- 6. Forward Text on iPhone and Android
- 7. Print Text Messages from iPhone
- 8. View iPhone Messages on PC/Mac
- 9. Tell If You Are Blocked on iMessage


Daisy Raines
staff Editor