
Odin Samsung Software - Step-by-Step Guide and Alternative Solutions
Aug 27, 2025 • Filed to: Phone Repair Solutions • Proven solutions
Are you struggling with persistent issues on your Samsung device and want to use Odin Samsung Software but don't know how? Don't worry! You’re not alone. Many Samsung users are in the same boat.
No matter whether it is pesky bugs or system crashes that flash your device. It's able to restore back your phone to optimal performance.
This blog will guide you through everything about using the Odin Flash tool. We have set up a detailed and step-by-step guide that discusses the process completely. We have included everything from Oding download and using Odin to common problems and tips to overcome them.
We have also discussed Dr. Fone - System Recovery. It is a nice and easy alternative to Odin. So, ready to solve all your problems in one go? Read on and become an expert in using these tools.
Part 1. What is Odin Samsung Software?
Odin Samsung Software is a Windows tool designed specifically for Samsung devices. It is a powerful utility that helps you perform advanced tasks on your Samsung smartphone or tablet.
Here are some key functions of Odin Android software:
Flashing Firmware: Odin Flash software allows you to install official Samsung firmware manually. This is helpful if you want to update your device or fix software issues.
Rooting Samsung Devices: You can use Odin Flash software to gain root access on your phone, which gives you more control over your device.
Installation of Custom Recovery: Odin can install custom recovery tools like TWRP, which allows you to customize or back up your phone more effectively.
Odin is often used on a phone that runs in its boot loop or has software problems. Also, it can be helpful for people who like to go beyond Samsung's customization limits.
What is Odin Mode?
Odin Mode in Samsung is a special mode on Samsung devices that allows the Odin software to connect to your phone. It is also referred to as Download mode. You can flash firmware, root the device, or perform recovery operations in this mode.
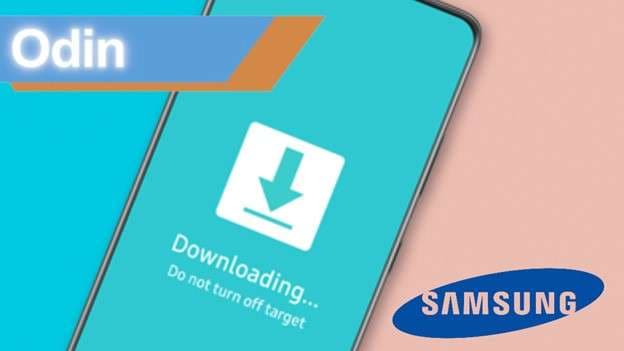
But with risks come the use of Odin software. The wrong usage might lead to errors in software or even damage your phone. It is thus essential to follow the proper instructions when using Odin. The next part will give details about Oding download software.
Part 2. Where to Download Odin Software?
You should download Odin software from a reputable and trusted website. Downloading untrusted or modified Odin can be harmful to your device.
Recommended Safe Sources for Odin Download:
Official Samsung Community Forums - Samsung usually publishes valid links on its official forums.
Trusted Websites: SamMobile and XDA Developers are websites that can be trusted for verified downloads of Odin software.
Download Odin Software Links for the latest Odin version:
SamMobile Odin Download Page (Download the latest Odin version available for the best compatibility).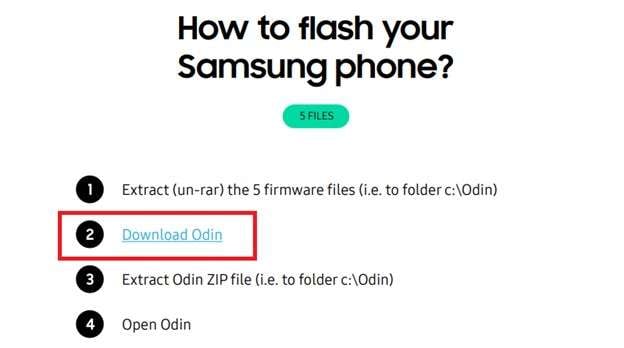
Older Versions: If you specifically need an older version for a particular device or issue, look at XDA Developers. They often publish previous releases. Here, you can download Odin for Samsung previous releases.
Before installing, take a look at the following things:
- Ensure that the file size is equivalent to what the website indicates.
- Scan the file for viruses via antivirus software.
- Use authentic sources. Avoid downloading from random sites that do not have user reviews or a good reputation. Refrain from third-party, unauthentic sources as they may transfer malware or fake tools to your device.
Downloading the Odin flash tool for Samsung safely from authentic places will ensure no problem with the device.
Part 3. How to Use Odin Flash Tool?
You need to make some preparations before using Odin to flash your device. Let’s break down these prerequisites first.
Steps to prepare for the process
Step 1. Make sure your phone is at least 80% charged. Flashing can drain the battery quickly. If your phone shuts down during the process. It can brick your device.
Step 2. You need to back up your data beforehand, as flashing will erase everything on your phone.
Step 3. Odin is only a Windows-based app. So you will need a Windows PC or laptop. Make sure Samsung USB Drivers are installed beforehand.
Step 4. Find Your Phone’s Model Number. Go to Settings > About Phone and locate the model number.
Step 5. Use this model number to search your device's firmware package. Download firmware packages from reputed websites only. You can visit the SamMobile website for firmware free download for Samsung.
Step 6. Samsung Odin does not use .zip or .rar files. Extract the firmware ZIP file on your PC. And look for files with the .tar.md5 extension. These will be used in Odin.
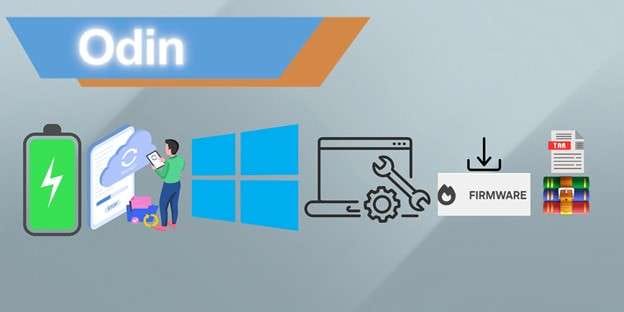
Step 7. Use your phone’s original USB cable and connect it to the computer using the cable. Enable developer options if necessary by taping your phone’s build number 7 times.
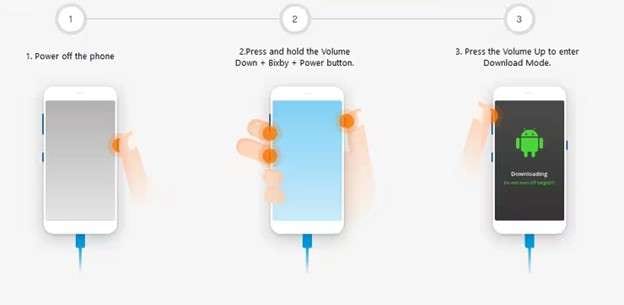
Step 8. You will need to put your mobile in download mode or Odin mode. This step can be specific to your phone’s model.
- Turn off your device after connecting it to your computer.
- Wait until the charging animation starts.
- Press and hold the Volume down, power button, and Bixby buttons together. This combination may be specific to your device’s model. Search for yours and then use.
- Release the buttons when the warning screen appears.
- Press the Volume up button to confirm and enter the download mode.
Step 9. Download Odin latest version and install it.
Steps to use Odin to flash your device
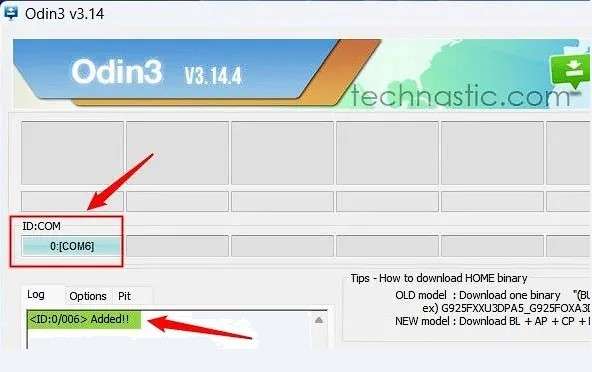
Step 1. Open Odin on your PC. Check if Odin recognizes your phone. Look at the ID: COM section in Odin. If it is highlighted, it shows a connected device. Check if the Log tab at the bottom shows an “Added” message.
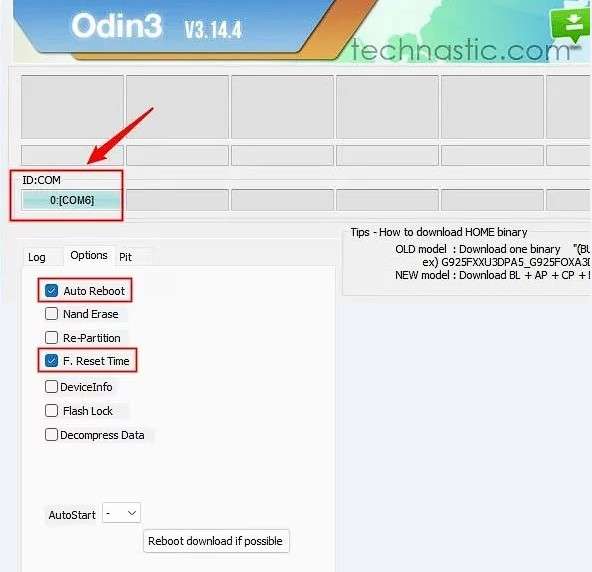
Step 2. Click the Options tab next to the Log tab. Select the checkboxes with Auto Reboot and F. Reset Time.
Step 3. In Odin, you will see buttons labeled BL, AP, CP, and CSC. Click each button and select the corresponding file from your firmware folder. For example, When you click BL, select the file that starts with BL_. Follow the same logic for AP, CP, and Home_CSC.
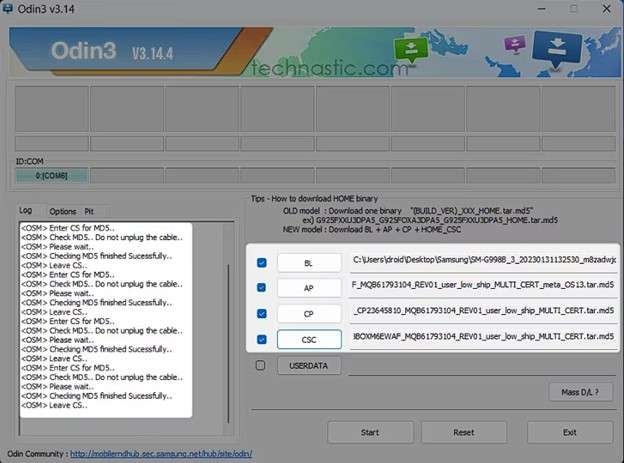
Step 4. Double-check everything and then click the Start button in Odin.
Step 5. Wait for the process to finish. Do not disconnect your phone or turn off your PC. If everything works fine, you’ll see a PASS message at the top of Odin, and at the end, the log tab will show an “all threads completed” message. Your phone will now reboot automatically.
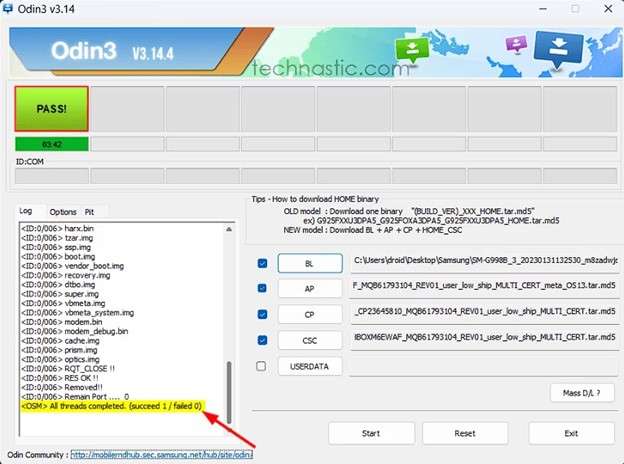
Step 6. If your Mobile phone boots into recovery mode, select Wipe data/ Factory Reset and then Reboot System.
Now, let’s review some Odin experiences.
Part 4. User Reviews and Common Experiences
Odin is a popular tool among Samsung users, but it has both good and bad sides.
What Users Like About Odin:
- Odin helps fix phones stuck in boot loops
- It’s great for manually installing new or old firmware updates.
- Advanced users flash custom ROMs easily.
Problems Users Face:
- People face compatibility issues. Some firmware may not match the device properly.
- Bricking risk is involved. A small mistake can damage the phone completely.
- Odin may not detect the phone without proper drivers. That’s why people face connection issues.
Odin helps solve big problems but needs careful use. Always follow the guide step by step to stay safe.
Are you also confused about using Odin? Don’t worry! Many people face this problem, especially if they are concerned about their expensive phones. If you’re looking for an easier alternative to simplify the process, try Dr. Fone System Repair (Android). It can automatically handle firmware downloads and repairs.
Part 5. Best Alternative: Dr.Fone - System Repair (Android)
For users who find Odin complicated or risky, Dr.Fone - System Repair (Android) is a simple and safer alternative. It is a user-friendly tool designed to fix many common Samsung phone issues without requiring advanced knowledge or manual processes.
Dr.Fone offers a simple interface, eliminating the need to manually download firmware or follow complex steps.
With guided steps, Dr.Fone reduces the risks associated with manual flashing, ensuring a safe repair process. Now, let’s learn how to use Dr. Fone and repair your device.

Dr.Fone - System Repair (Android)
Best Alternative to Odin Samsung to Repair Android System Errors.
- Fix your Android to normal, no skills required.
- Fix various Android system issues, stuck in boot loop, black screen, or won't turn on, looping on start, etc.
- The high success rate in resolving Android system issues.
- Compatible with a wide range of Android devices and OS versions
- User-friendly interface with easy-to-follow steps.
A step-by-step guide to using Dr.Fone for Samsung Repairs:
Step 1. Download and Install Dr.Fone on your PC from the official website.
Step 2. Launch the tool on your PC and open it. Using a genuine USB cable, connect your Samsung phone to your PC. Ensure that it is properly connected.
Step 3. Open the toolbox tab from the main page and select System Repair.

Step 4. Select the Android option for repair, and you will see a list of problems that Dr. Fone can resolve easily. click Start to initiate the process.
Step 5. Fill in the information of your phone, including the brand name, phone model, country, and carrier. Read the warning, and click check the Check box before the warning. Click the Next button to continue.

Step 6. Dr. Fone will show the instructions on the screen that are specific to your brand’s model. Follow carefully and press the buttons asked on the screen. Then press the Volume up button to confirm and enter in Download Mode.

Step 7. After your device enters in Download Mode, Dr.Fone will automatically download the correct firmware package that matches your device model. Wait until the downloading process is complete.

Step 8. Once the firmware is prepared, recheck the firmware details and hit Fix Now.
Step 10. This may erase all data on your phone, type “000000” to allow and proceed. The repair process will start. You will get updates on-screen regarding the progress of repair.
Step 11. When the repair is done, then Dr.Fone will show the successful process notice. Your phone will reboot normally after the process. If you encounter some issues, follow the on-screen instructions or hit Try Again.

Part 6. Comparison: Odin vs. Dr.Fone
Odin Samsung Software is:
- Perfect for experienced users who want complete control over firmware.
- Technical expertise is required, and it needs to be handled with utmost care.
- Carries a considerable risk of bricking the device or data loss if done incorrectly.
Wondershare Dr.Fone - System Repair
- Ideal for beginners or anyone looking for an easy way out.
- Entirely automated with an intuitive interface having on-screen instructions.
- Much safer to use and does not brick your device.
Dr.Fone is a better choice for an everyday user who wants a simple and reliable way to fix Samsung phone issues.
Conclusion
Odin Samsung Software is a utility tool for Samsung users who want to flash firmware, fix software problems, or customize their phones manually. However, using it requires knowledge in technology and carries risks. Bricking and data loss are possible.
Dr.Fone - System Repair (Android) is safer and easier to handle for non-technical users. Now, decide on a tool for yourself that fits your needs and experience level. But if you are looking for a solution that works without giving you any headaches, Dr.Fone is the best choice.
4,624,541 people have downloaded it
FAQs
You Might Also Like
Samsung Issue
- Samsung Phone Issues
- 1. Fix Samsung Camera Failed
- 2. Fix Samsung Phone Hang
- 3. Samsung Phone Not Displaying Incoming Calls
- 4.Fix a Bricked Samsung
- 5. Downloading Do Not Turn Off Target
- 6. Fix Samsung Stuck in Download Mode
- 7. Fix Samsung S5 Won't Turn On
- 8. Fix Samsung Pay Not Working
- 9. Samsung ROM Download & Install
- 10. Samsung Firmware Download
- 11. Fix Samsung Sudden Death
- 12. Fix Samsung Stuck on Boot Screen
- 13. Fix Samsung Frozen on Startup
- 14. Full Guide to Fix 'Samsung Galaxy Phone Keeps Restarting'
- 15. Fix Samsung S3 Won't Turn On
- 16. Fix Samsung J7 Problems
- 17. Fix Samsung S10 Gone Dead
- 18. Fix Samsung S10 Won't Turn On
- 19. Fix Samsung Galaxy S7
- Samsung Screen Issues
- 1. Fix Unresponsive Touchscreen
- 2. Fix Black Screen After Dropping
- 3. Resolve Screen Stuck on Boot Issue
- 4. Fix Samsung Fold Screen Issues
- 5. Fix Samsung Black Screen
- 6. Fix Samsung Screen Not Working
- 7. Fix Half of Screen Not Working
- 8. Fix Samsung Stuck on Bootloop
- 9. Fix Samsung Screen Blacked Out
- 10. Fix Screen Blacked During a Call
- 11. Fix Samsung Stuck on the Screen
- 12. Solve Samsung TV Blackout
- 13. Fix Samsung Flip Screen Not Working
- 14. Fix Screen Won't Respond
- Samsung Tablet Issues
- 1. Fix Samsung Tablet Problems
- 2. Fix Samsung Stuck on Logo
- 3. Fix Samsung Tablet Won't Turn On
- 4. Fix Touch Screen Not Working
- Samsung Update
- 1. Flash a Samsung phone
- 2. Samsung Mobile Software Update
- 3. Update Samsung Kies for Mac
- 4. Update Samsung to Android Oreo
- 5. Update Samsung Kies on PC
- 6. Update Android 6.0 for Samsung
- Samsung Useful Tricks
- 1. Remove Google Account Bypass
- 2. Hard/Factory Reset Samsung
- 3. Samsung Root Software
- 4. Transfer Files from Samsung to PC
- 5. Top 5 Samsung Kies Alternatives
- 6. Bypass Samsung Lock Screen Pin
- 7. SIM Network Unlock PIN
- 8. Transfer Whatsapp to iPhone
- 9. Samsung Auto Backup
- 10. Recover File on Samsung


Alice MJ
staff Editor
Generally rated4.5(105participated)