
Stuck in Android System Recovery Mode? How to Exit and Fix It

Oct 30, 2026 • Filed to: Phone Repair Solutions • Proven solutions
 TL;DR:
What to Try First
- Recovery menu responds: select Reboot system now. If it comes back, remove a tight case and check the buttons.
- Pixel shows No command: hold Power, briefly press Volume Up, then release both quickly to open the menu. Opening the menu is not a reset.
- Menu is frozen: use the Samsung or Pixel force-restart instructions, not a universal Android key combination.
- Cache option exists: Wipe cache partition clears temporary system files, not personal photos. If it is missing, skip it; do not substitute Wipe data.
- Still looping: compare factory reset, manufacturer repair, and supported firmware repair. Samsung Dr.Fone repair and factory reset erase data; a free Recovery Mode exit is a different operation.
Ask AI for a summary
 ChatGPT
 Perplexity
 Gemini
 Claude
 Grok
If your phone is stuck in Android system recovery mode, first use the Volume keys to highlight Reboot system now, then press Power to select it. This restarts the phone; it does not perform a factory reset. If the recovery menu returns, check for a pressed or damaged button before choosing an option that erases data.
The next step depends on the screen: No command may be waiting for the menu-opening button sequence, while a frozen menu or repeated recovery loop needs a different check. Below are model-specific restart and entry steps, cache and reset instructions, and the difference between exiting a mode and repairing firmware.
- Part 1. What is Android System Recovery Mode?
- Part 2. Common situations that lead to phones getting stuck in recovery mode
- Part 3. How to Safely Enter and Exit Android Recovery Mode
- Part 4: How to Fix Android Stuck in Recovery Mode (Manual Methods)
- Solution 1. Fixing 'No Command' Error through Key Combinations
- Solution 2. Wipe Cache Partition
- Solution 3. Factory Reset (Clear Warning on Data Loss)
- Solution 4. Custom ROM Flashing: Check Eligibility Before Proceeding

- Part 5: Recommended Easy Solution – Dr.Fone System Repair (Android)
Part 1. What is Android System Recovery Mode?
Android system recovery is a built-in maintenance mode that starts outside the normal Android operating system. It provides options for restarting, applying updates, clearing an available cache partition, and resetting user data when normal Android cannot load.
Android Recovery Mode and the Android recovery menu refer to this maintenance environment. Android system recovery 3e is a label on some older stock recovery interfaces, including older phones and tablets; the label alone does not identify a fault. Recovery is separate from the Fastboot/bootloader screen used for boot and firmware operations.
Inside the Android recovery screen, you may see options such as:
- Reboot system now to restart the phone normally
- Wipe cache partition to remove temporary system files
- Wipe data/factory reset to erase user data and return settings to their defaults; this is not the same as reinstalling or updating firmware
- Apply update options for maintenance or recovery tasks
In short, recovery mode is a useful tool, but if the phone cannot exit it or fails to enter it when needed, the underlying system may require manual troubleshooting or software repair.
Part 2. Common situations that lead to phones getting stuck in recovery mode
A phone can enter recovery accidentally through its startup buttons or return there because Android cannot start. A recovery loop can follow an interrupted update, an incompatible modification, or a button that remains pressed. The screen alone does not prove which cause applies.
Possible triggers include:
- Failed or incomplete updates - An interrupted update can leave the phone unable to start Android.
- Incorrect rooting or ROM changes - An incompatible ROM or unsuccessful system modification can prevent normal startup.
- System crashes or corrupted files - A damaged system can leave the phone repeatedly returning to recovery.
- Button problems - A stuck Power or Volume button can repeatedly trigger a maintenance mode during startup.
- No command screen - On Pixel, this can be an intermediate screen before the recovery menu. It is not, by itself, proof that the system is corrupted.
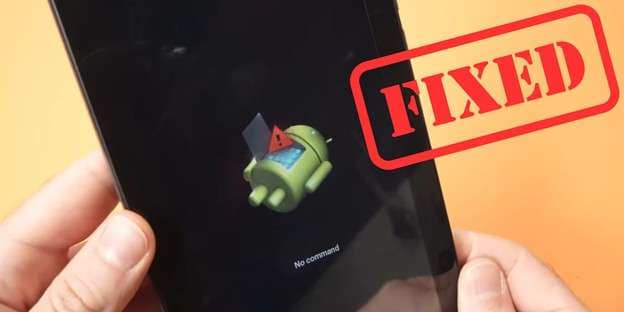
If Reboot system now returns to recovery: remove any case pressing on a key, then gently press and release the Power and Volume keys to check whether they move freely. Do not pry open the phone or force a damaged key. Charge it with a compatible charger if the battery is low, then try the model-specific restart below. A broken or unresponsive button calls for service rather than repeated button combinations.
Record the exact model and any error text, such as a failure to mount storage or open recovery, before escalating. Do not format partitions to experiment. If Android starts, unlock the phone and back up your data before further troubleshooting; a phone that cannot boot or unlock may not permit a new backup.
Part 3. How to Safely Enter and Exit Android Recovery Mode
Enter Android recovery mode only when needed and use its reboot option to leave it before considering a reset. If your phone is not entering recovery mode, distinguish a wrong key sequence or intermediate bootloader screen from a low battery, damaged button, or recovery-loading error.
Step-by-step procedure to enter recovery mode:
Pixel 6 and later: use this sequence when the phone is powered off. Power + Volume Down opens Fastboot first, not the recovery menu directly.
- Hold Power + Volume Down for up to 30 seconds until Fastboot appears. Release the buttons; holding too long can restart the phone.
- Use either Volume key to display Recovery Mode, then press Power to select it.
- At No command, hold Power, briefly press Volume Up, then release both quickly. You should now see Android Recovery.
Samsung Galaxy: power off, then use the combination for the phone's button layout until recovery opens:
- Physical Home button, such as Galaxy S6/S7: hold Volume Up + Home + Power. Release Power on vibration, then release the remaining keys when the menu appears.
- Dedicated Bixby and Power buttons, such as S8/S9/S10: hold Volume Up + Bixby + Power; release at vibration and the Samsung logo.
- Side key with no Home or dedicated Bixby button, such as Note10/Fold/Z Flip: hold Volume Up + Side; release at vibration and the Samsung logo.
Some model/software versions have an additional USB connection requirement. If your Galaxy does not open recovery, use its model-specific instructions rather than swapping Volume Up for Volume Down or repeatedly disconnecting USB. Other brands and earlier Pixels can use different entry sequences; these are not universal Android instructions.
If your phone is not entering recovery mode, try these checks first:
- Charge a low battery sufficiently with a compatible charger before retrying
- Make sure the buttons are not physically stuck or unresponsive
- Confirm the correct key combination for your device brand and model
- Distinguish the Fastboot/bootloader screen from recovery and follow the model's USB connection requirement
Step-by-step procedure to exit recovery mode manually:
With "Reboot System Now"
- Use the volume buttons to highlight Reboot system now inside the recovery menu.
- Press the Power button once to confirm, then wait for the phone to restart normally.
Using the forced restart technique
- Samsung Galaxy: hold Side/Power + Volume Down for more than 7 seconds. Release when the phone vibrates, the screen turns off, and the Samsung logo appears.
- Google Pixel: hold Power for up to 60 seconds. Release when the phone begins rebooting and the G logo appears.
These are alternative model-specific actions, not two steps to perform on every phone. If recovery opens again, select Reboot system now once. If it still loops, use the button checks in Part 2, then consider the eligible methods below.
Optional free exit tool for supported Samsung devices: on a Windows PC, connect the device and open Dr.Fone > Toolbox > System Repair > Android. The Android Recovery Mode utility provides free entry and exit, separate from paid firmware repair. A connection or device-support failure is not a reason to start a data-erasing repair automatically.
- Select Recovery Mode and click Exit, not Android Repair.
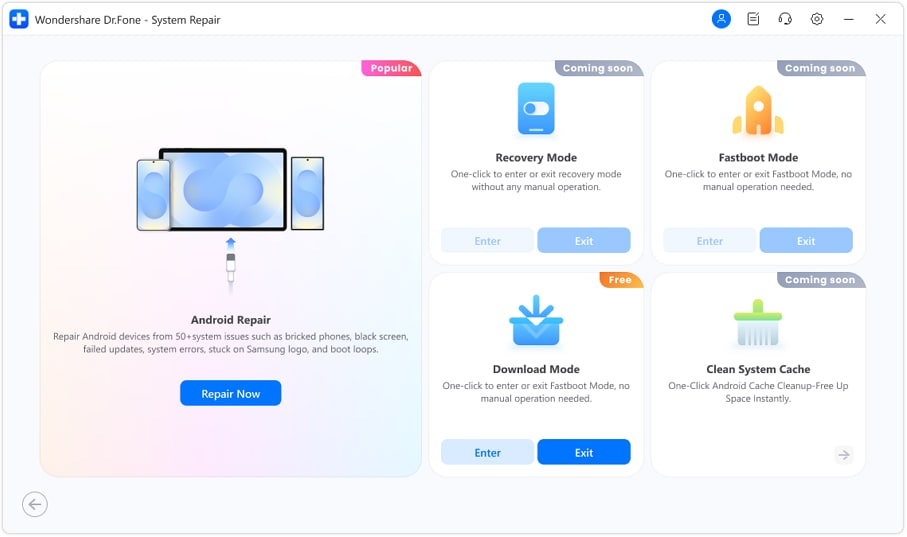
- Follow the exit prompt, keep the phone connected, and wait for startup to finish.

Exiting the mode does not reinstall firmware or guarantee that Android will start. If the same screen returns, continue with the relevant repair or service path rather than repeating the utility indefinitely.
Part 4: How to Fix Android Stuck in Recovery Mode (Manual Methods)
If your phone is stuck on the Android system recovery screen, start with the non-erasing actions in Part 3. The options below serve different purposes: opening the menu and clearing an available cache partition do not intentionally erase personal files; a factory reset or firmware installation can. A phone that still will not boot is not automatically a reason to approve a wipe.
Solution 1. Fixing 'No Command' Error through Key Combinations
A No command screen can be waiting for a button command rather than reporting a permanent fault. On Pixel, the following sequence opens the Android recovery menu without starting a factory reset.
If your Pixel shows No command, follow these steps:
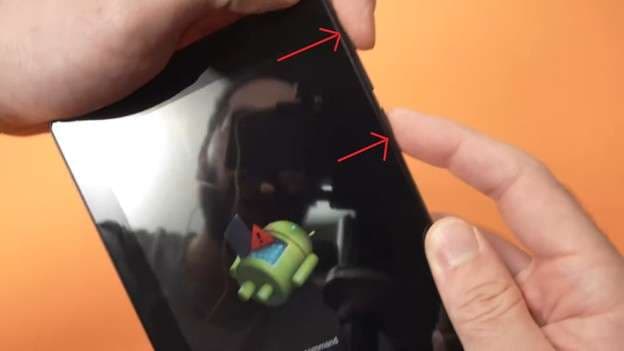
- On a Pixel showing No command, hold Power. Briefly press Volume Up, then release both buttons quickly. Do not hold both for five seconds or substitute Volume Down.
- When the menu appears, use the Volume keys to highlight Reboot system now, then press Power. Do not select Wipe data just to leave this screen.
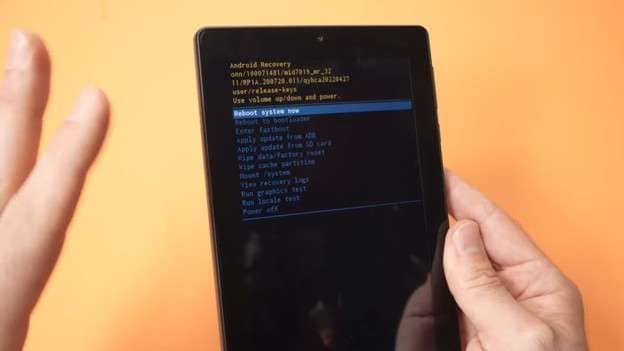
The pictures illustrate the buttons and menu, not a universal timing rule. On another brand or an older recovery 3e interface, use that model's menu-opening sequence. If the buttons cannot be operated, seek a supported connection-based exit option or service instead of trying random combinations.
Solution 2. Wipe Cache Partition
Use this only if Wipe cache partition is actually listed. It clears temporary system files without intentionally deleting personal photos or apps. It does not repair every startup problem. Some Android devices, including devices using A/B update designs, do not provide this option; its absence is not itself an error.
If it is missing, skip this method. Wipe data/factory reset is not a substitute for clearing cache.
Follow these steps to clear your cache partition:
- Use the Volume buttons to move through the recovery menu.
- Select Wipe cache partition.
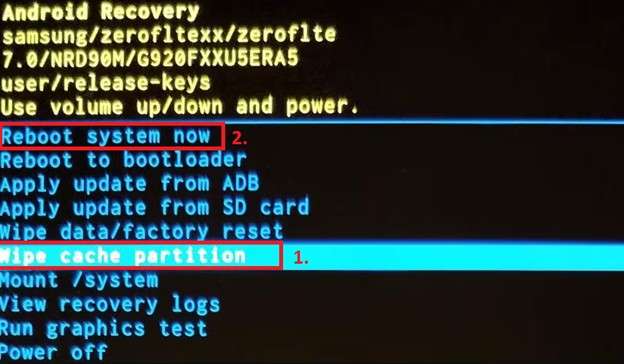
- Press the Power button to confirm the cache choice; accept a cache-only confirmation if shown.
- Wait until the process finishes.
- Select Reboot system now and press Power again.
If the menu returns after rebooting, cache clearing did not resolve the startup problem. Consider the data-preservation and repair choices below; this result alone does not diagnose hardware or firmware damage.
Solution 3. Factory Reset (Clear Warning on Data Loss)
A factory reset removes user data and settings and can help with some software conflicts. It does not reinstall a fresh firmware image and cannot repair a broken button. It erases locally stored photos, apps, and other personal data. Existing cloud backups may be restorable, but a reset does not create a backup.
Before confirming: know the Google Account and password previously used on the phone and its screen-lock credentials. Device protection can require them during setup; reset does not bypass ownership checks. On Pixel, Google advises waiting 24 hours after changing the account password before resetting. If unbacked-up files matter or you cannot verify account access, stop and discuss preservation options with authorized support.
Follow the steps below if you want to proceed with the factory reset:
- Choose Wipe data/factory reset using the Volume keys.
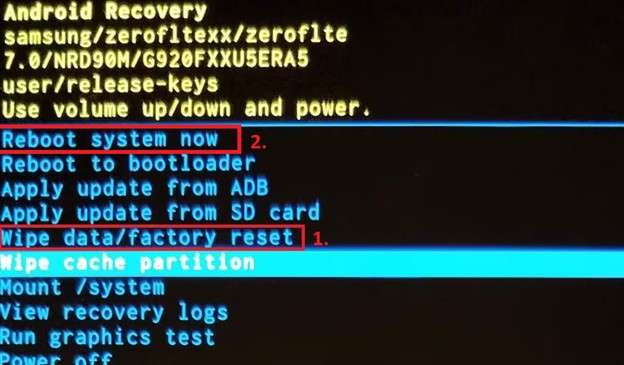
- Press the Power button to select the factory reset option.
- Read the confirmation and select Factory data reset or Yes - delete all user data, depending on the device, only if you accept the wipe.
- Choose Reboot system now when the reset is complete.
After the reset, complete setup with the required account, then restore an existing backup if available. If recovery still loops, repeating the wipe is unlikely to add useful information. Move to a manufacturer-supported repair or service assessment.
Solution 4. Custom ROM Flashing: Check Eligibility Before Proceeding
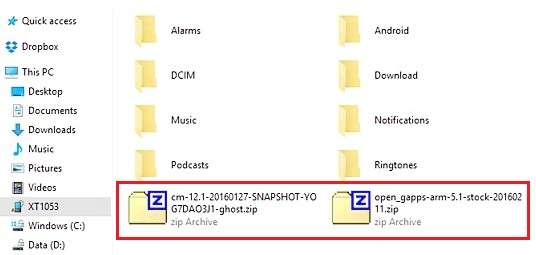
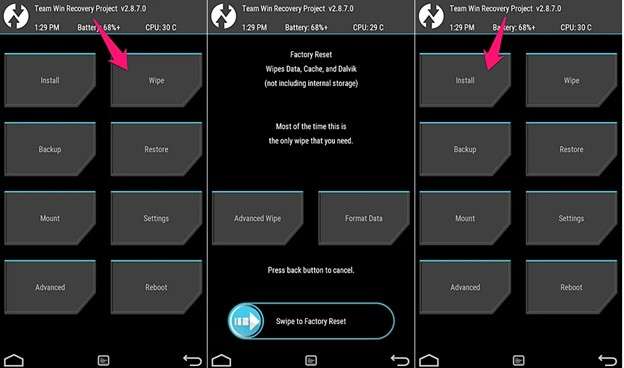
A custom ROM is not a general no-data-loss exit method. TWRP (Team Win Recovery Project) is a custom recovery with firmware installation, partition wiping, and backup/restore features. Its ability to read encrypted data depends on the device. It is not the stock Android recovery menu, and installing it is not a step every stuck phone can perform.
If Android cannot boot, you may be unable to enable OEM unlocking in Settings. Unlocking a bootloader normally triggers a factory reset, and many models have additional restrictions. ADB/Fastboot commands and TWRP images are not interchangeable across devices.
- Already using an unlocked bootloader and custom recovery? Return to the maintainer's instructions for your exact model, current firmware, ROM, and recovery version. Verify their installation and wipe requirements before selecting any package.
- Still on stock recovery, or unsure of those prerequisites? Do not start a generic unlock/flash procedure to save your files. Use the manufacturer repair option or authorized service instead.
The following illustrations show a custom ROM package and TWRP wipe/install interface. They are for recognizing an existing advanced setup, not instructions to install a universal ROM or select Wipe.
Manufacturer alternative for Pixel 4a and later, including Fold: connect the phone to a computer with a USB cable and open Google's Update & Software Repair tool. Follow its device-detection prompts and review whether it offers an update without a factory reset. If you choose a reset instead, it erases data. Do not assume every failed phone can be detected or updated without a wipe.
For an unsupported device, a failed connection, storage errors, or damaged keys, contact the manufacturer or an authorized repair center with the exact model and error text. Ask about data preservation before approving repair. Software cannot fix physical button or board damage.
Part 5: Recommended Easy Solution – Dr.Fone System Repair (Android)
Dr.Fone - System Repair (Android) provides guided firmware repair for supported software problems, including startup freezes, boot loops, and failed updates. It identifies the device, helps match compatible firmware, and shows download and repair progress, reducing the need to find and flash a firmware package manually.
The Android repair feature runs on Windows and supports eligible Samsung, Xiaomi, Redmi, and POCO models and firmware. It is not a repair solution for every Android device or physical hardware damage. For simply leaving a working recovery environment, try the free mode-exit utility first.

Dr.Fone - System Repair (Android)
Guided Firmware Repair for Supported Android System Problems.
- Follow guided device identification and firmware repair rather than manually choosing flashing commands.
- Fix various Android system issues, stuck in boot loop, black screen, or won't turn on, looping on start, etc.
- Match compatible firmware for supported Samsung, Xiaomi, Redmi, and POCO models.
- Use the separate no-root, data-preserving workflow on eligible Xiaomi, Redmi, and POCO devices.
- Follow firmware download and repair progress in an easy-to-follow interface.


Step-by-step guide to using Dr.Fone - System Repair:
The following workflow is for Samsung and erases device data. Back up first if the phone can boot and unlock; do not assume repair can create a backup from a non-booting phone. Stop if preserving unbacked-up data is your priority. Confirm the exact model and firmware are supported before approving repair. Eligible Xiaomi/Redmi/POCO devices use a separate data-preserving workflow, not these Samsung instructions.
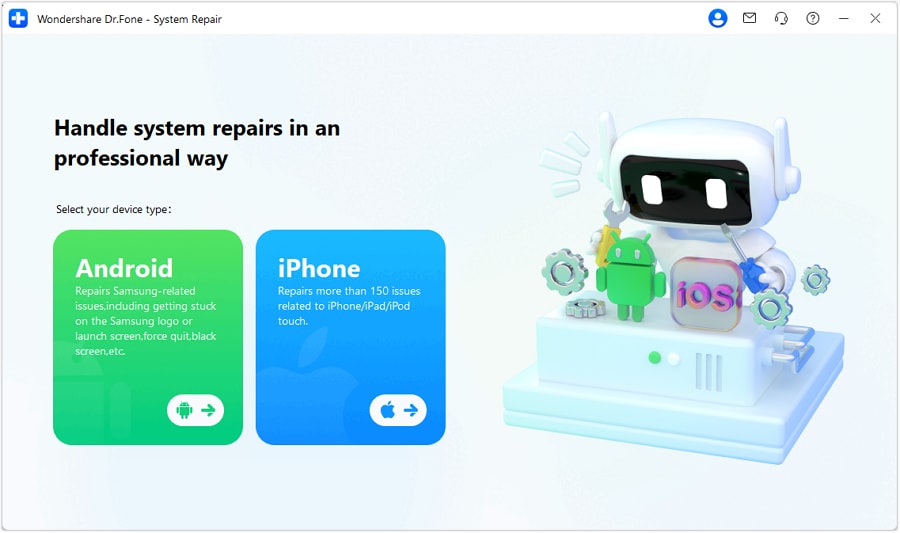
Step 1. Open the Samsung repair workflow. Install Dr.Fone on a Windows PC, connect the Samsung device, and choose Toolbox > System Repair.
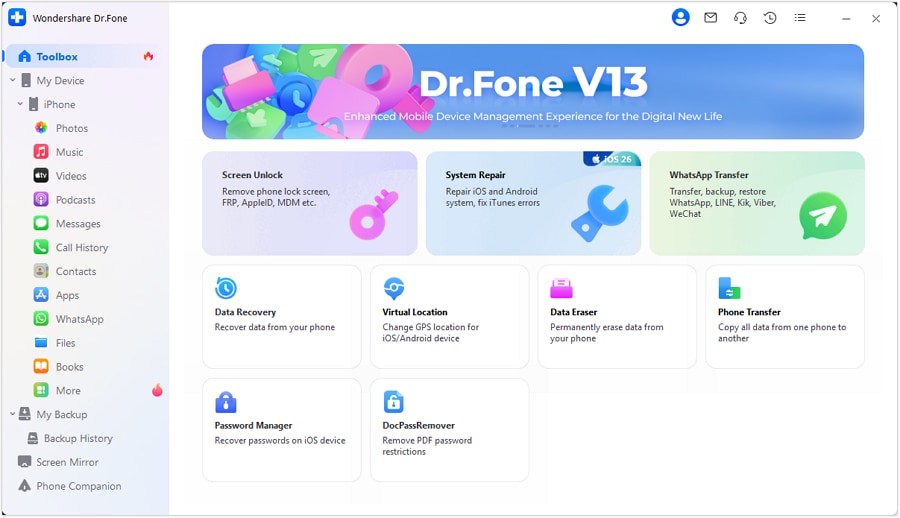
Select Android as the device type.
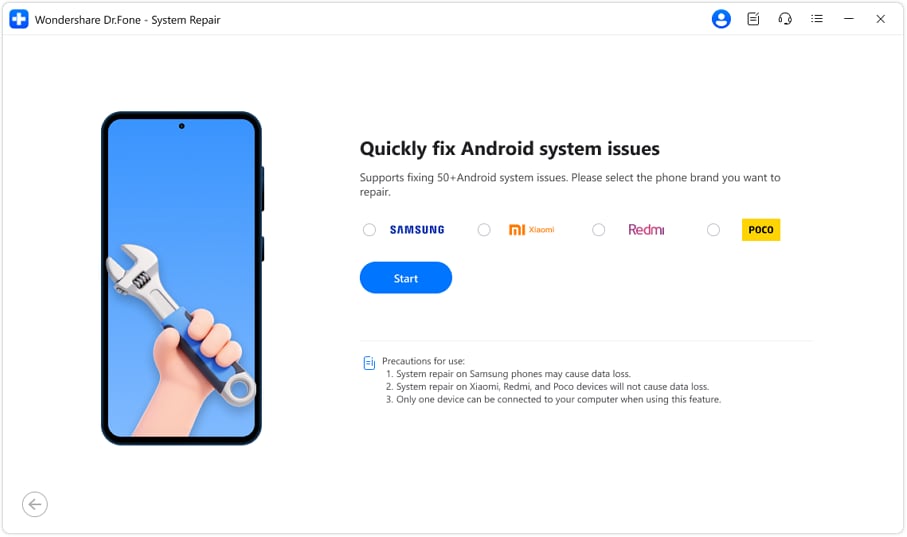
Choose Android Repair > Repair Now.
Select Samsung as the brand, then continue with Start.
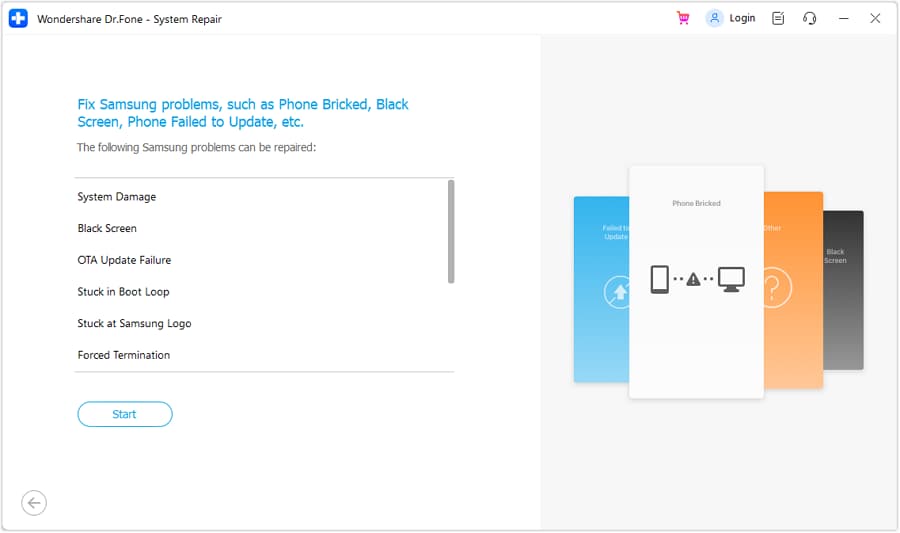
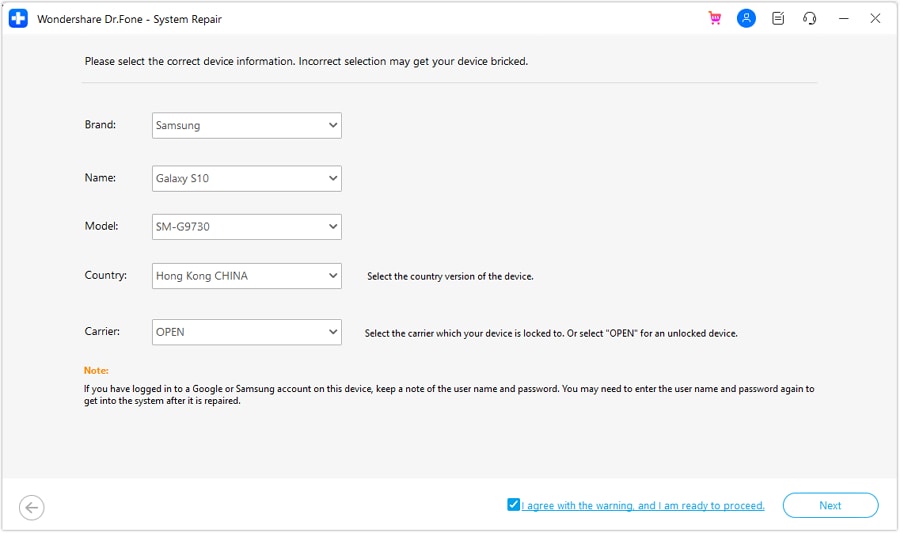
Step 2. Confirm the device and data warning. Read the supported issue list and click Start.
Confirm the Name, Model, Country, and Carrier. Select OPEN for an unlocked carrier variant only when appropriate. Read and accept the data-loss warning, then click Next; do not guess a model or firmware match.
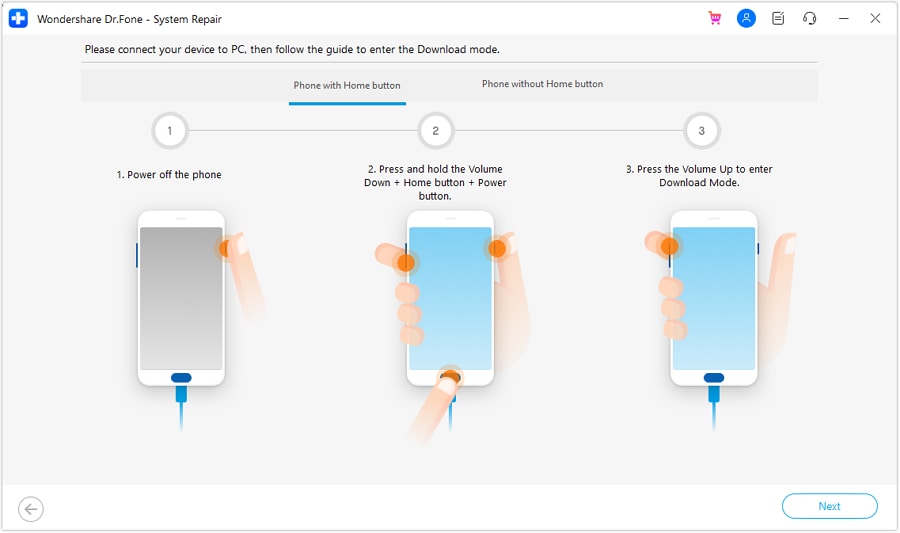
Step 3. Enter Download Mode for firmware preparation. Follow the on-screen branch matching your Samsung's physical buttons. The image below illustrates the Home-button branch, not every Samsung model. The one-click entry option requires a connected, already-unlocked device; use the applicable manual branch if that prerequisite is not met.
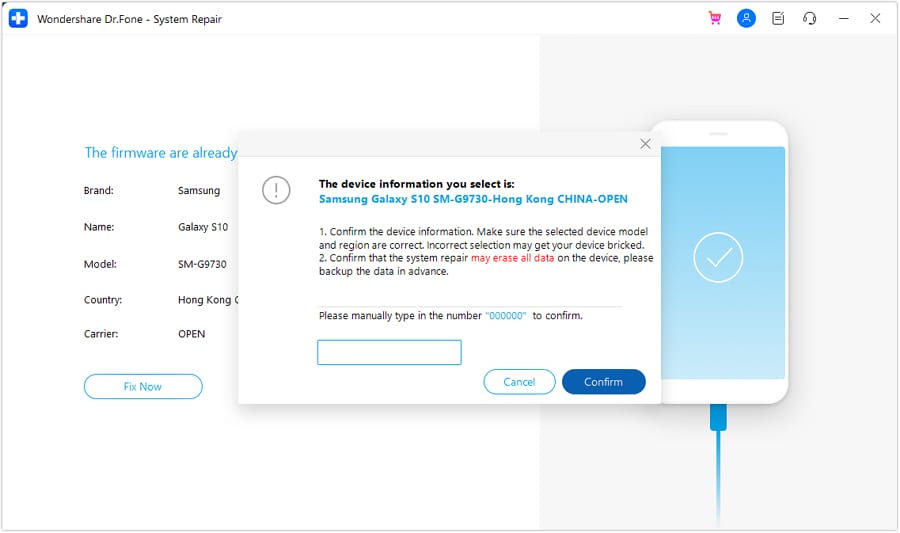
Step 4. Review the firmware and complete repair. Let Dr.Fone download and verify the matched firmware. Review the displayed details, click Fix Now, and enter 000000 only after accepting the Samsung data wipe.
Keep the device connected while repair runs. At completion, check whether Android actually starts; choose Done if it does. A completion screen alone is not proof that the recovery loop is resolved.
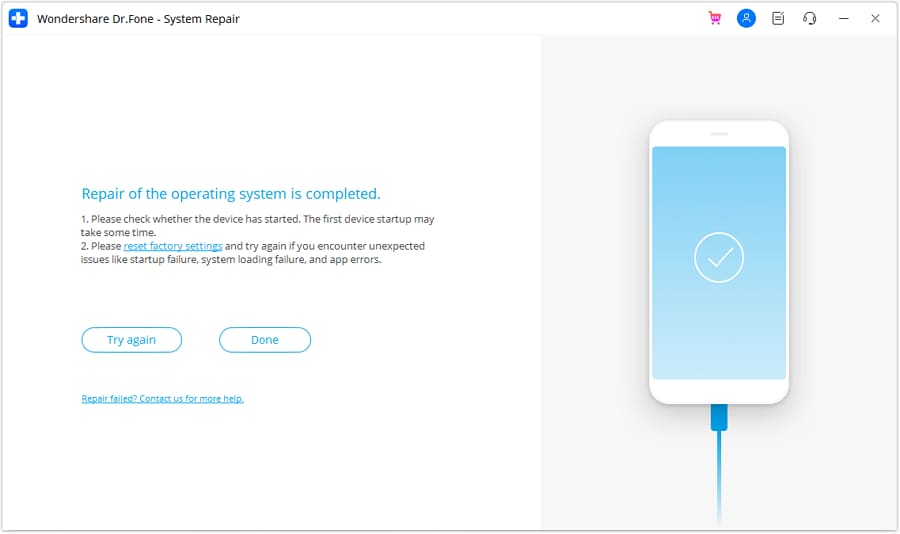
If the phone still cannot start, retain the exact error and repair result and contact support or authorized service. Do not repeatedly wipe the phone or try firmware for a different model. Guided repair reduces manual firmware work; successful recovery still depends on the device and the underlying fault.
Conclusion
When Android recovery mode will not go away, begin with Reboot system now, then check whether the screen is waiting for a command, frozen, or repeatedly returning after a restart. Use the matching device instructions and an available cache option before deciding on an erasing action.
If your phone keeps returning to the Android recovery menu or an older recovery 3e screen, use the observed symptom to choose the next action. Reboot and free mode exit do not intentionally wipe data; factory reset and the Samsung firmware-repair workflow do. System Repair (Android) offers guided firmware work on supported Windows-connected devices, while physical damage or unsupported models call for manufacturer service.
 safe & secure
4,624,541 people have downloaded it
FAQs
 Q1. What is Android system recovery mode?Q2. What does Android system recovery 3e mean?Q3. Why is my Android stuck on the recovery menu?Q4. What should I do if my phone is not entering recovery mode?


Android Issues
- Android Update
- 1. Download and Use Samsung Odin
- 2. Samsung Phone Stuck in Odin Mode
- 3. Latest Updates in Android 11
- 4. Update Android Oreo 8.1
- Android Not Working
- 1. Solution To Bricked Android Phone
- 2. Fix 'Android Phone Won't Turn On'
- 3. Flash Dead Android Phone
- 4. Fix Phone Keep Turning Off
- 5. Fix Android Bootloop Problem
- 6. Fix Android Phones and Tablets
- Android Errors
- 1. Fix Error 495 While Download Apps
- 2. Fix Error 505 in Google Play Store
- 3. Fixes For Authentication Error
- 4. Fix Error Code 963 on Google Play
- 5. Fix Error Code 920 In Google Play
- 6. Fix Encryption Error
- Screen Problems
- 1. Fix Unresponsive Fire Tablet Screen
- 2. Fix Unresponsive Android Screen
- 3. Fix Android Screen Problem
- 4. Fix Phone Is Stuck on Boot Screen
- 5. Fixes for Tablet Screen Not Working
- 6. Tools for Removing Stuck Pixels
- 7. Fix Android Black Screen of Death
- 8. Fix Android Stuck on Boot Screen
- 9. Fix Android White Screen of Death
- 10.Fix Android Blue Screen of Death
- 11.Fix ONN Tablet Screen Not Working
- 12.Fix Android Touch Screen Proble
- 13.Fix Smartphone With a Black Screen
- 14.Fix Realme Screen Not Responding
- 15.Fix Phone Screen Not Responding
- Android Problems
- ● Manage/transfer/recover data
- ● Unlock screen/activate/FRP lock
- ● Fix most iOS and Android issues
- Free Download Free Download Free Download



Daisy Raines
staff Editor
Generally rated4.5(105participated)