iPhone Ear Speaker Not Working? The Best Fixes for You

May 18, 2026 • Filed to: Device Data Management • Proven solutions
 TL;DR:
To fix an unresponsive iPhone ear speaker, confirm the hardware is functioning by making a direct test call at maximum volume, then resolve common blockages by gently cleaning the speaker grill with a dry, anti-static brush.
● Avoid using rubbing alcohol to clean the speaker grill or rice to dry a liquid-damaged device—indicated by a red or pink tab in the SIM card tray—as these methods leave harmful residue or cause permanent damage.
● Software features can interfere with call audio, so navigate to Settings > Accessibility > Audio/Visual to toggle off Phone Noise Cancellation, or use the Reset All Settings option to restore default configurations without erasing user data.
● Deep iOS system corruption can be fixed without data loss using Dr.Fone - System Repair (iOS), but note that its Verification Report tool can only inspect overall hardware health and cannot specifically test the ear speaker status.
Ask AI for a summary
 ChatGPT
 Perplexity
 Gemini
 Claude
 Grok
Grok
Dr.Fone Basic:
Better Control for Your Phone
Manage, transfer, back up, restore, and mirror your device
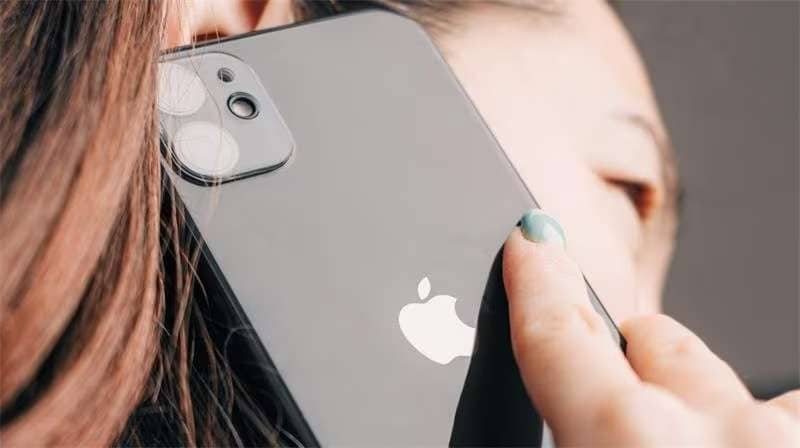
Are you having trouble hearing people during calls on your iPhone? If the sound is faint or distorted, you may need to perform an iPhone ear speaker test. A quick test can determine if the issue is a simple fix or a hardware problem, ensuring your smartphone's audio is functioning correctly.
Key Takeaways:
- Basic Tests: Start by checking volume levels, silent mode, and making a test call.
- Common Fixes: Often, cleaning the speaker grill, restarting the iPhone, or updating iOS can resolve the problem.
- Software Issues: Disabling Phone Noise Cancellation or resetting settings can fix software-related audio glitches.
- Advanced Solution: For persistent issues, a system repair tool like Dr.Fone can fix underlying iOS problems without data loss.
In this article, you’ll learn the different iPhone ear speaker tests experts use to fix this particular issue. Follow the troubleshooting tips below to fix your iPhone without hurting your wallet. However, if all the methods don’t work for you, this page will also recommend an alternative solution below. Explore the guide to learn more.
- Part 1: How To Perform iPhone Ear Speaker Test
- Part 2: How To Fix an iPhone Ear Speaker?
- Part 3: Repair Your iPhone Ear Speaker Using an Alternative
- Part 4: Check the Overall Condition of Your Phone Using Dr.Fone

Part 1: How Can You Test Your iPhone's Ear Speaker?
Before attempting any fixes, it's crucial to know how to test the ear speaker on your iPhone to confirm there's an issue. These simple diagnostic steps will help you identify the problem quickly.
Answer: The best way to perform an iPhone ear speaker test is by making a direct phone call. Additionally, you should check basic settings: ensure any protective plastic is removed, turn the volume up during the call, switch off Silent Mode, and verify the iPhone is not stuck in Headphone Mode.
Follow these steps to conduct a thorough phone ear speaker test:
- Remove the Protective Film: If your iPhone is new, it may have a thin plastic film over the screen that covers the earpiece. Peeling this off can instantly improve sound quality.
- Increase the Call Volume: During a phone call, press the Volume Up button on the side of your iPhone to its maximum level. Low volume is a common reason for poor sound.

- Turn Off Silent Mode: Locate the Ring/Silent switch on the left side of your device. Ensure the switch is pushed towards the screen, so no orange indicator is visible.

- Check for Headphone Mode: If your iPhone mistakenly thinks headphones are plugged in, the ear speaker won't work. Try restarting your iPhone or toggle Airplane Mode on and off to reset Bluetooth and audio connections.

- Make a Test Call: The most definitive iPhone earpiece test is to call someone. If you can hear them clearly, your speaker works. If the sound is muffled or absent, but the loudspeaker works, the ear speaker is likely faulty.
📱 iPhone Frozen? Fix It in 3 Steps – No Data Loss!
Struggling with a frozen iPhone screen? 🤔 Our guide covers 6 common causes, step-by-step fixes for all models (iPhone 6s to iPhone 17), and safe data recovery. 98.6% success rate! ✨
Part 2: How Do You Fix an iPhone Ear Speaker That Isn't Working?
If your iPhone ear speaker test confirmed a problem, don't worry. There are several effective solutions you can try at home before seeking professional help. These fixes address both physical blockages and software glitches.
Here are six methods to fix your iPhone ear speaker:
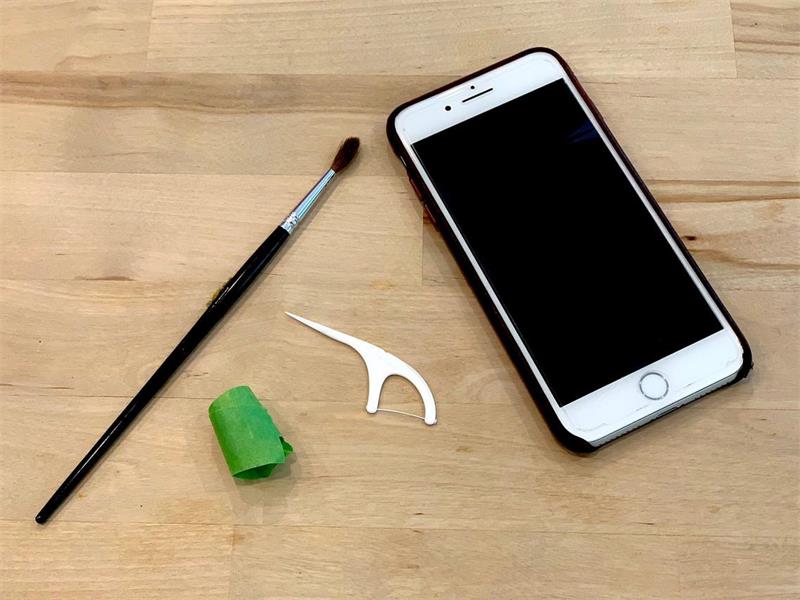
- Clean the iPhone Ear Speaker Grill: Dust and debris are the most common culprits. Gently clean the speaker grill with a soft-bristled, anti-static brush or a Q-tip. Never use liquids like rubbing alcohol, as they can cause permanent damage.
- Deactivate Phone Noise Cancellation: This feature can sometimes interfere with audio. Go to Settings > Accessibility > Audio/Visual and toggle off Phone Noise Cancellation.
- Restart Your iPhone: A simple restart can resolve many temporary software bugs. For a force restart:
- For iPhone 8 and later: Quickly press and release Volume Up, then Volume Down. Then, press and hold the Side button until the Apple logo appears.
- For earlier models: Press and hold the Home and Sleep/Wake buttons together until the Apple logo appears.
- Inspect for Water Damage: The Liquid Contact Indicator (LCI) inside the SIM card tray can reveal water damage. If the small white tab has turned red or pink, your device has been exposed to liquid, which could be the cause of the problem.
- Update Your iOS: Outdated software can cause hardware-related issues. Go to Settings > General > Software Update and install any available updates.
- Reset All Settings: As a final software troubleshooting step, you can reset your settings. Navigate to Settings > General > Transfer or Reset iPhone > Reset > Reset All Settings. This will not erase your data but will restore settings to their defaults.


For Earlier iPhone Models
Step 1: Press and hold the Home and Sleep/Wake buttons together until you see the Apple logo.

Method 4: Inspect Your iPhone for Possible Water Damage
If you can’t find any debris in the ports when performing an iPhone ear speaker test, this could indicate water damage inside your device. Use the liquid indicators on your iPhone to know whether it has suffered water damage.
Open the SIM card tray and look for a small white tab inside. The tab turns red, pink, or orange when it comes into contact with liquid. Don’t use rice to dry your iPhone if it’s liquid-damaged; it risks making matters worse by leaving harmful residue behind.
Method 5: Update Your iOS
If you’re running an older iOS software version, it may be the main reason your iPhone is experiencing issues. To update your iPhone’s iOS, go to Settings > General > Software Update and tap Download and Install when prompted.
Method 6: Reset All Settings
You should reset all the settings on your iPhone if none of the methods above fixed the issue when performing an iPhone ear speaker test. To do this, go to Settings > Reset > Reset All Settings and enter your passcode if prompted. Doing this method will erase all the existing settings on your phone and will likely fix your device if the ear speaker isn’t working.
Part 3: The Ultimate Solution: Repair Your iPhone System with Dr.Fone
How To Fix an iPhone Ear Speaker With Dr.Fone – System Repair (iOS)
If the ear speaker is still unresponsive after trying all the above phone ear speaker tests and fixes, the issue might be a deeper iOS system corruption. In this case, Dr.Fone – System Repair (iOS) can be the perfect solution.
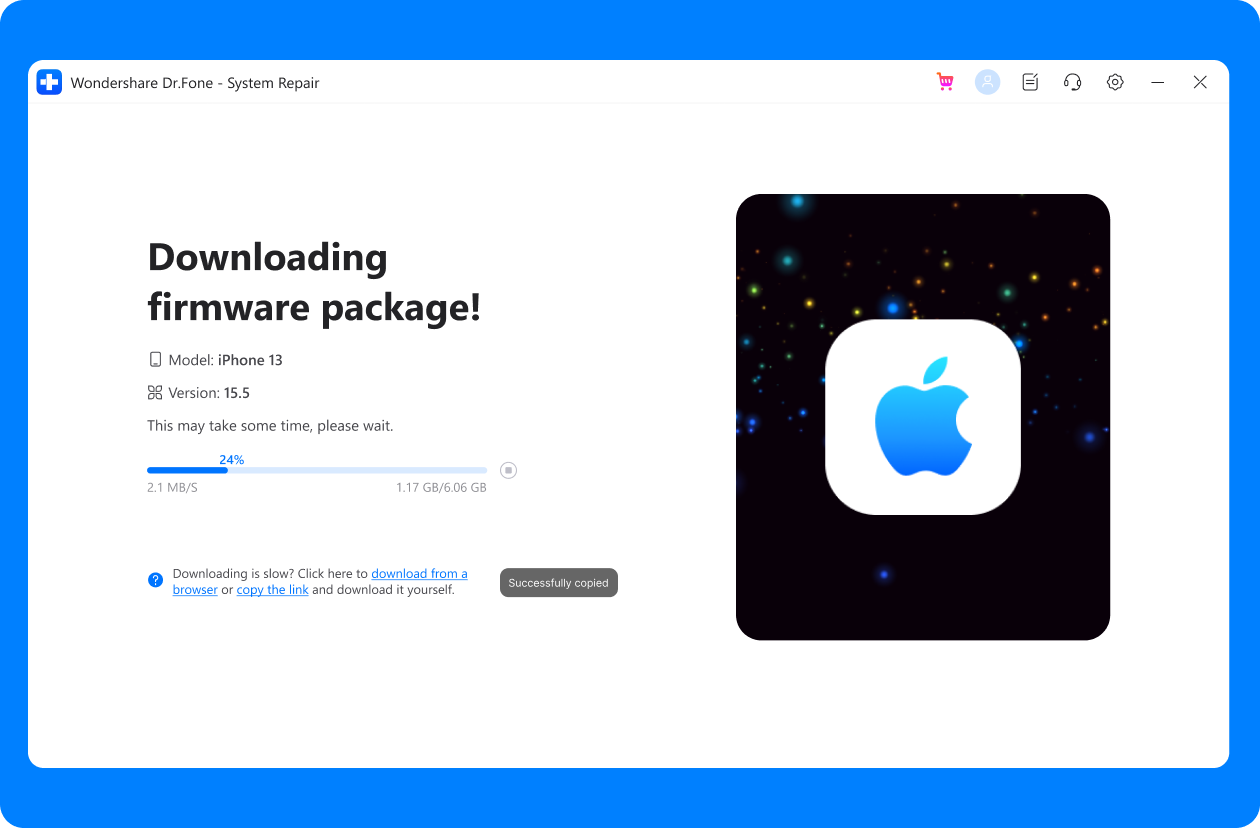
- Step 1: Download and install Dr.Fone on your computer. Launch the program, connect your iPhone, and select the "System Repair" tool.
- Step 2: Choose your iPhone model from the list to allow the software to download the correct firmware package for your device.
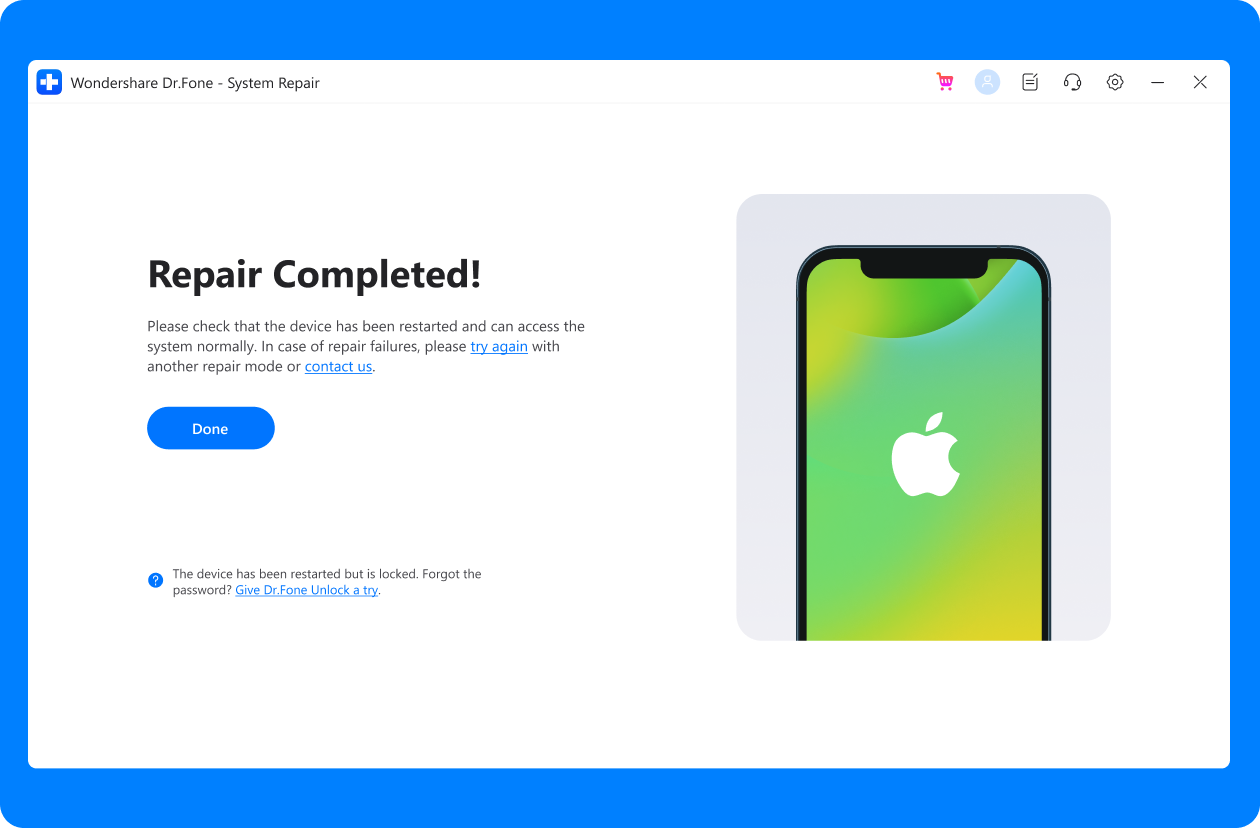
- Step 3: Follow the on-screen instructions and click Fix Now to begin the repair process. Dr.Fone will fix the system issues without affecting your personal data, and your iPhone should return to normal shortly.

Pricing
Dr.Fone – System Repair (iOS) has different price plans depending on your budget.
- Quarterly License (1-5 Mobile Devices) - $6.65/Month – With Auto Renew
- 1 Quarter License (1-5 Mobile Devices) - $7.32/Month – No Auto Renew
- 1-Year License (1-5 Mobile Devices) - $4.99/Month – No Auto Renew
- Perpetual License (1-5 Mobile Devices) - $79.95
Part 4: Check the Overall Condition of Your Phone Using Dr.Fone – Phone Verification
Now that you know how to check and resolve the ear speaker issue with the traditional methods and Dr.Fone – System Repair, you might also be eager to learn the overall condition of your iPhone. Wondershare Dr.Fone is the right tool to check the condition of your iPhone’s hardware, thanks to its handy Verification Report.

Once your iOS device is linked to the program, click on the Verification Report button to see the condition of your hardware. While it cannot check the status of your ear speaker, it can inspect the overall health of your iPhone. It can be a great indicator of problems when performing an iPhone earpiece test.

You might also interest:
Microphone Not Working? How to test mic on Android phone
How to test iPhone microphone and fix its not working issue
Unlocking the Secrets of Realme Touch Screen Test Codes
Is Your iPhone Hacked? Here's How To Test and Fix It
Dr.Fone App (iOS) & Dr.Fone App (Android)
Your One-Stop Expert for Screen Unlock, Smart Clean, Data Recovery, Change Location, and Phone Management of Mobile Devices!
- Effortlessly unlock various locks on your device.
- Instantly free up storage space by smart clean.
- Rapidly recover different kinds of lost phone data and information.
- Easily changes GPS location on Android devices.
- Easily manage cluttered and private device content.


Conclusion
When your device is malfunctioning when performing an iPhone ear speaker test, you should find out if it’s fixable under warranty. However, expect it to be an expensive repair if your iPhone isn’t covered anymore. Fortunately, there are plenty of methods you can do to fix it, many of which require only some basic troubleshooting.
Lastly, you can verify the status of your iPhone using Dr.Fone’s Phone Verification feature to make a report on the hardware. After that, you can use the System Repair function to fix your iPhone to normal if needed.
Frequently Asked Questions
Q1: How can I perform an iPhone earpiece test quickly?
The quickest way to test your iPhone earpiece is to make a phone call or listen to a voicemail. If you can hear the audio clearly through the earpiece (not on speakerphone), it is working correctly.
Q2: Why is my iPhone ear speaker volume so low?
Low volume is often caused by a clogged speaker grill. Dust, lint, and other debris can accumulate over time and muffle the sound. Gently cleaning it with a soft brush usually solves the problem. Also, check that the call volume is turned all the way up.
Q3: Is there an iPhone ear speaker test code?
No, unlike some Android devices, iPhones do not have a secret dial code for hardware diagnostics like an ear speaker test. The most reliable method is to perform the practical tests outlined in this article, such as making a call.
Dr.Fone Basic:
Better Control for Your Phone
Manage, transfer, back up, restore, and mirror your device


iPhone Problems
- iPhone Hardware Problems
- 1. iPhone Keyboard Problems
- 2. iPhone Flashing Not Working
- 3. iPhone Not Detecting Sim Card
- 4. iPhone Sim Not Supported
- 5. Touch ID Not Working
- 6. iPhone Unable to Activate Touch ID
- 7. Fix iPhone Flashlight Greyed Out
- 8. iPhone Ear Speaker Test
- 9. iPhone Ear Speaker Not Working
- 10. iPhone Backlight
- 11. iPhone Proximity Sensor by Yourself
- 12. Replace iPhone Digitizer
- 13. Accessory May Not Be Supported
- iPhone Battery Problems
- 1. iPhone Battery Percentage Not Show
- 2. Replace iPhone Battery
- 3. iPhone Battery Problems
- 4. iPhone's Battery Drains Fast
- 5. iPhone Shuts Off with Battery Left
- 6. iPhone Overheating
- iPhone Button Problems
- 1. iPhone Home Button Not Working
- 2. iPhone Volume Buttons Not Working
- 3. iPhone Silent Switch Not Working
- 4. iPhone Power Button Stuck
- 5. iPhone Volume Button Stuck
- 6. iPhone Back Tap Not Working
- iPhone Charging Problems
- 1. iPhone Charging Port Not Working
- 2. iPhone Charging Slowly
- 3. iPhone Stops Charging
- 4. Wireless Charging Not Working
- 5. iPhone Not Charging
- 6. iPhone Stuck on Charging Screen
- iPhone Headphone Problems
- Apple Pencil and Watch Issues
- 1. Apple Pencil Double Tap Not Working
- 2. Apple Pencil Keeps Disconnecting
- 3. Apple Pencil Not Charging
- 4. Apple Pencil Not Connecting/Pairing
- 5. Apple Pencil Not Working
- 6. Apple Watch Not Pairing with iPhone
- 7. Apple Watch Stuck on Apple Logo
- Other iPhone Problems
- ● Manage/transfer/recover data
- ● Unlock screen/activate/FRP lock
- ● Fix most iOS and Android issues
- Repair Now Repair Now Repair Now


Daisy Raines
staff Editor