
7 Ways to Fix iPhone Proximity Sensor by Yourself

Jun 30, 2026 • Filed to: Phone Repair Solutions • Proven solutions
 TL;DR:
A malfunctioning iPhone proximity sensor that fails to dim or un-dim the screen during calls can typically be resolved by clearing software bugs, removing physical obstructions, or correcting hardware misalignments from aftermarket repairs.
● To resolve software-induced sensor failures without data loss, sequentially force restart the device, disable Control Nearby Devices in Accessibility settings, and perform a Recovery Mode update via iTunes or Finder by specifically selecting the Update option.
● Proximity sensors that fail immediately after a third-party screen replacement require physical realignment of the internal Proximity Hold bracket or replacement of the aftermarket panel to restore accurate optical light-blocking properties.
● Executing a factory Hard Reset to clear deep iOS system corruption carries the risk of permanent data loss, making a complete iCloud or computer backup a strict prerequisite before attempting this fix.
Ask AI for a summary
 ChatGPT
 Perplexity
 Gemini
 Claude
 Grok
Grok
"After updating to iOS 16, irrespective of whether I get a phone or not, the proximity sensor is ON always. When I am using an app, if I just hover my hand over the proximity sensor, the screen blacks out. Is anyone facing this issue???"
If your iPhone proximity sensor is not working, you're likely dealing with one of these frustrating symptoms: the screen doesn't dim when you hold the phone to your ear during a call, the display blacks out the moment you hover your hand near the top of the device, or the screen stubbornly stays dark even after you pull it away from your face. These are the telltale signs of a malfunctioning proximity sensor — and they make using your iPhone for calls an exercise in frustration. Accidental taps, muted calls, apps launching mid-conversation, and even unintentional call hang-ups are all consequences of an iPhone proximity sensor that is not working properly.
The good news is that this problem is almost always fixable — often without visiting an Apple Store or a repair shop. The root cause may be software (an iOS bug, corrupted system file, or misconfigured accessibility setting) or hardware (physical misalignment, an incompatible aftermarket screen, or damage from a drop). In this guide, we'll cover everything you need to know: what the iPhone proximity sensor is, where it's located on different models including the iPhone 11, how to test if it's working, why it fails, and 7 proven methods to fix it — ordered from simplest to most advanced.
Part 1. What is the iPhone proximity sensor?
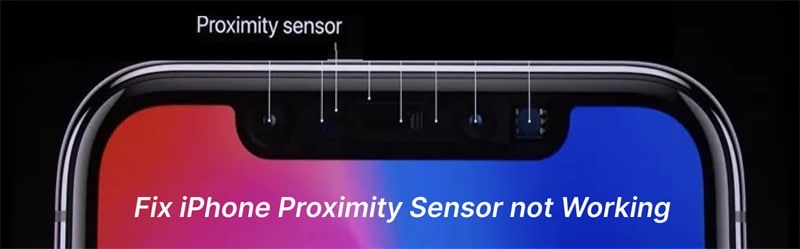
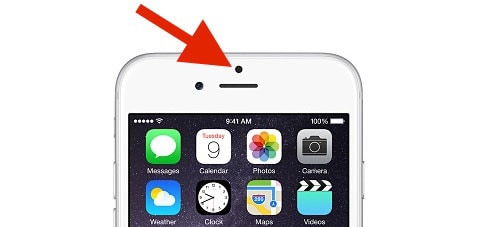
The iPhone proximity sensor is a small infrared sensor located at the top of the iPhone's front panel, just above the earpiece speaker. It functions by emitting an invisible beam of infrared light and detecting how much of that light is reflected back toward the device. When a nearby object — such as your face during a phone call — enters the sensor's detection range, the iPhone automatically turns off the display and disables the touchscreen. This prevents accidental taps, conserves battery, and ensures the phone's screen doesn't respond to unintended input while pressed against your cheek or ear.
iPhone proximity sensor location by model: On iPhone X and all later Face ID models — including the iPhone 11, iPhone 12, iPhone 13, iPhone 14, and iPhone 15 series — the proximity sensor is embedded within the TrueDepth camera module at the top of the display notch or Dynamic Island area. It shares space with the front-facing camera, flood illuminator, and dot projector. On older models with a Home button (iPhone 8, iPhone SE 2nd and 3rd generation, and earlier), the proximity sensor is a dedicated standalone component positioned directly above the earpiece grille. Knowing the exact iPhone 11 proximity sensor location — or your specific model's — is especially useful if you're troubleshooting physical damage or investigating a screen replacement issue.
How to test the proximity sensor on your iPhone: You can verify whether the proximity sensor is functioning correctly in under a minute. Make a phone call (even to voicemail), then slowly raise the iPhone to your ear while watching the screen in a mirror. The display should dim and the touchscreen should become unresponsive within 1–2 seconds as the phone approaches your face. Alternatively, during a call, hover your palm about 2–3 centimeters above the top front of the iPhone — the screen should go dark as your hand approaches. If the screen stays on when the phone is pressed against your ear, or if the screen goes dark randomly when you're nowhere near the sensor, the proximity sensor is behaving incorrectly.
What happens when the iPhone proximity sensor stops working: When the sensor fails, the practical impact during calls can be severe. Your cheek or ear may accidentally trigger the mute button, end the call, launch Siri, switch to speakerphone, or open apps — all while you're mid-conversation. In another failure mode, a stuck or hypersensitive proximity sensor keeps the screen permanently dark, making it impossible to access call controls such as the keypad or hold button. In either case, normal call usage becomes unreliable. If your screen is also behaving erratically outside of calls — freezing, not responding to taps, or flickering — this may indicate a separate but related iPhone touchscreen issue worth investigating alongside the sensor problem.
Apple's engineering standards are exceptional, and the proximity sensor is designed to operate reliably across the lifespan of the device. However, like any hardware component, it is not infallible. Physical damage can affect any phone — and if you accidentally dropped your iPhone, you can still recover data from broken iPhone and try to fix it after you get the data out of it. Internal components like the proximity sensor may be damaged even when the screen exterior appears completely intact.
The proximity sensor stops unintended actions and saves a little battery life too.
Part 2. Why is my iPhone's proximity sensor broken?
Before diving into fixes, it helps to understand why the iPhone proximity sensor stops working. Identifying the root cause dramatically narrows down which solution is most likely to work for your specific situation. Here are the five most common causes:
- Changing the screen on your iPhone – Third-party screen replacement is the single most common trigger for proximity sensor malfunctions. The proximity sensor is an extraordinarily precise component — even a fraction of a millimeter of positional shift is enough to impair its ability to detect objects reliably. When a screen is replaced, especially by a technician using non-OEM parts or who lacks experience with iPhone disassembly, the proximity sensor can be nudged out of alignment, dislodged from its retaining bracket (the "Proximity Hold"), or obscured by a stray strand of adhesive or debris. The characteristic symptom is a proximity sensor that worked perfectly before the repair and stopped working immediately afterward. If the replacement screen is an aftermarket unit with different optical light-transmission properties, it can also overwhelm the sensor even if it is positioned correctly (see Solution 7 below).
- A significant drop or physical impact – iPhones are engineered to be impact-resistant, but the interior of the device is packed with precision-mounted components connected via fragile flex cables. A hard fall onto pavement or a solid surface can cause micro-fractures in the proximity sensor's circuit, jar the sensor out of its precise mounting position, or damage the flex cable connecting it to the logic board. The distinctive aspect of impact damage is that the screen may look completely fine from the outside while the sensor is non-functional internally — leading many users to overlook the drop as the cause, especially if it happened days or weeks before the symptom appeared.
- Manufacturer defect – Though relatively uncommon given Apple's rigorous quality control processes, factory defects in iPhone proximity sensors do occur. A component may be installed slightly out of specification during manufacturing, or the sensor unit itself may be marginally defective in a way that doesn't manifest immediately but degrades over time with normal use. If your proximity sensor has behaved abnormally from the day you first activated the device, with no history of drops or repairs, a manufacturing defect is a credible explanation. In this scenario, the issue is best addressed through Apple's warranty program — contact Apple Support or visit an Apple Store to request an evaluation.
- iOS system corruption or software bug – Software-triggered proximity sensor issues are far more common than most users realize, and the user report quoted at the top of this article is a perfect real-world example. When you update to iOS 16 or any other iOS version, the system firmware that governs how the proximity sensor communicates with the OS can occasionally be flashed with corrupted data, introduce regressions in sensor driver behavior, or conflict with other iOS subsystems. The result is a sensor that behaves erratically — reporting that an object is present when it isn't, or vice versa — without any physical damage to the hardware. This type of issue is fully reversible through software-based repairs.
- iOS accessibility settings or configuration conflicts – A frequently overlooked cause of proximity sensor problems is a conflict with iOS accessibility or display configuration settings. The "Control Nearby Devices" feature (found under Settings → Accessibility → Control Nearby Devices), when enabled and configured with certain switch or scanning options, can interfere with the normal proximity-based screen management behavior. Similarly, features like AssistiveTouch, certain Switch Control configurations, or third-party screen management apps can alter how iOS responds to proximity sensor signals. If you recently changed accessibility settings before the issue appeared, or if "Control Nearby Devices" is enabled on your device, reviewing and temporarily disabling these options is a valuable first troubleshooting step that requires no technical skills.
You Might Find Them Useful:
Part 3. How to fix the iPhone Proximity Sensor issue
The following 7 solutions are arranged in order of simplicity and risk — start with Solution 1 and work through them sequentially until the proximity sensor is functioning correctly. Critical note: Solutions 1 and 2 carry no risk of data loss and are safe to try first. Solutions 3 through 7 involve either physical access to the device or complete data erasure, so you must back up your iPhone in advance before proceeding with any of them. A complete backup ensures you can restore all your data regardless of the outcome.
Solution 1. Reboot the phone
A full reboot is always the correct first step when troubleshooting any unexpected iPhone behavior — and for software-triggered proximity sensor issues, it is often all that's needed. When iOS encounters a transient glitch — a sensor driver that has stalled in memory, a process that has consumed excessive system resources, or a temporary firmware state that has gotten "stuck" — a clean power cycle flushes these conditions and allows the proximity sensor to reinitialize and operate normally. No data is affected, and no settings are changed.
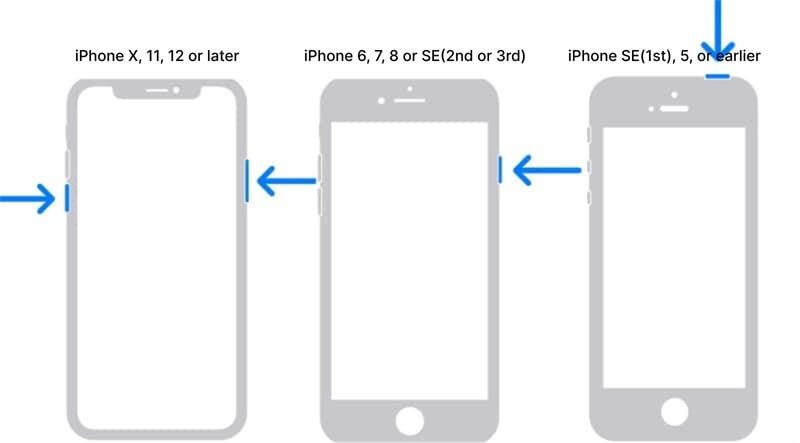
How to restart your iPhone: On iPhone X and later (including all iPhone 11–15 models), press and hold the Side button and either Volume button simultaneously until the power slider appears. Drag the slider to power off, wait at least 30 seconds, then press and hold the Side button to restart. On iPhone 8 and earlier, press and hold the Top or Side button until the power slider appears. If your iPhone is completely frozen or unresponsive, perform a force restart instead: on iPhone 8 or later, quickly press and release Volume Up, quickly press and release Volume Down, then press and hold the Side button until the Apple logo appears and release.
After restarting, make a test call and check whether the proximity sensor now dims the screen correctly when you hold the phone to your ear. If the issue persists, try a second reboot before moving on — some iOS states require more than one restart cycle to fully clear.
Simply turn off, then turn back on again.
Solution 2. Fix system errors
If rebooting doesn't resolve the iPhone proximity sensor not working issue, the problem likely lies deeper within iOS — in corrupted firmware, a failed update installation, or a conflict between system-level processes that a simple restart cannot clear. For this level of repair, a dedicated iOS system repair tool provides the most effective and least disruptive solution.
We recommend Dr.Fone - System Repair (iOS) as the most reliable tool for this scenario. Unlike a full iTunes or Finder restore — which wipes all data from the device — Dr.Fone performs a targeted firmware repair: it downloads the correct, verified iOS firmware for your specific device model and version, then reflashes only the system components that are corrupted, leaving your personal data, photos, apps, contacts, and settings completely intact. It's the cleanest way to resolve iPhone proximity sensor problems caused by iOS bugs without starting from scratch. The tool is compatible with all iPhone models (iPhone 4 through iPhone 15 series) and all iOS versions including the latest releases.

Dr.Fone - System Repair
Repair the iOS system to fix the iPhone proximity sensor issue without data loss.
- Safe, simple, and reliable.
- Fix with various iOS system issues like stuck in recovery mode, iPhone stuck on Apple logo, black screen, white screen of death, etc.
- Only fix your iOS to normal, no data loss at all.
- Fixes other iPhone errors and iTunes errors, such as error 4005, error 14, iPhone error 4013, error 1009, iTunes error 27, and more.
- Work for all models of iPhone, iPad, and iPod touch. Fully compatible with the latest iOS version.
Video guide: How to repair iOS system problems to fix the iPhone proximity sensor not working
Solution 3. Clean the display
Before escalating to software or hardware repairs, try this surprisingly effective physical fix: dirt, skin oil, screen protector adhesive residue, or debris near the top of your iPhone's screen can physically obstruct the proximity sensor's infrared beam, causing it to produce false readings. The sensor operates through a small opening in the front panel — even a thin film of oil or a misaligned screen protector edge can be enough to disrupt its performance.
How to clean properly: Start by fully removing your phone case, as some cases have an edge that overlaps and partially covers the sensor area at the top of the device. Next, remove any screen protector — especially thick tempered glass protectors that may not be cut precisely for your iPhone model, and whose edges may sit too close to the earpiece and sensor region. Using a clean, dry, lint-free microfiber cloth (the type used for eyeglasses or camera lenses), gently wipe the entire front surface of the iPhone. Focus on the area immediately above the earpiece speaker. Do not use water, alcohol sprays, or any cleaning liquids, as moisture can damage the sensor and surrounding components.
Verify the fix: After cleaning, make a test call and observe the screen in a mirror as you raise the iPhone to your ear. The display should dim automatically within 1–2 seconds as the phone approaches your face. If the problem is resolved after removing the screen protector, choose a replacement that is specifically designed for your exact iPhone model and that leaves a clear gap around the earpiece and proximity sensor opening.
Solution 4. Hard reset
A hard reset — also called erasing all content and settings — is a more comprehensive software solution than a reboot. It fully wipes the device and reinstalls a clean, factory-state version of iOS, eliminating any software corruption, problematic configuration states, conflicting iOS updates, or misconfigured accessibility settings that may be causing the iPhone proximity sensor to malfunction. This is particularly effective for cases where the sensor became erratic after an iOS update or after changing a system-level setting.
Important warning: A hard reset permanently erases all data on your iPhone — photos, apps, contacts, messages, and all personal files. You must complete a full backup to iCloud or your computer via iTunes/Finder before proceeding. This operation is the same as an iPhone factory reset and is irreversible without a prior backup.
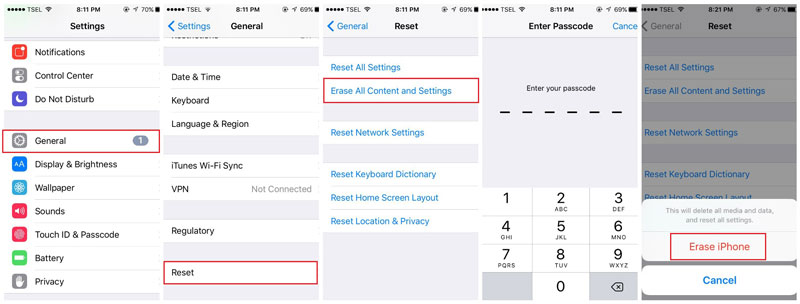
Go to Settings > General > Transfer or Reset iPhone > Erase All Content and Settings > Continue
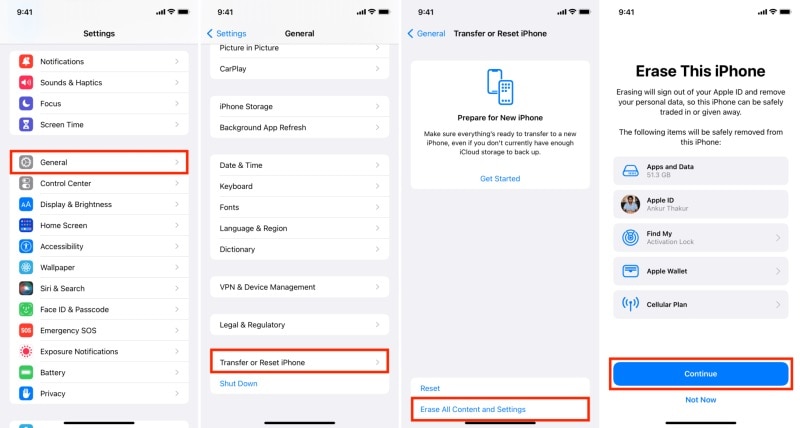
Or go to Settings > General > Reset > Erase All Content and Settings
Recommended post-reset test: Once the reset completes and the iPhone restarts to the setup screen, make a phone call and test the proximity sensor before restoring your backup from iCloud or a computer. If the sensor works correctly on the clean iOS install, the issue was definitively software-related. If the sensor still doesn't work on a completely clean system, you can rule out software entirely and focus on hardware causes — proceed to Solutions 5, 6, or 7, or consult Apple Support.
Solution 5. Put iPhone in Recovery Mode to update iPhone
If a standard factory reset doesn't fix the iPhone proximity sensor not working problem, Recovery Mode delivers a deeper level of firmware restoration. Rather than simply resetting the user data layer, Recovery Mode forces your iPhone to download and reinstall the complete, verified iOS firmware directly from Apple's servers, overwriting low-level system components that a standard reset cannot touch. This is the recommended approach when the issue was caused by a failed iOS update, a corrupted firmware partition, or an error during a previous system restore.
Step 1: Open iTunes (Windows or Mac Mojave and below) or Finder (Mac with macOS Catalina and above) on your computer.
Install the latest version of iTunes on your computer or open Finder. Connect your iPhone to the computer using a lightning cable.
Step 2: Put your iPhone into Recovery mode
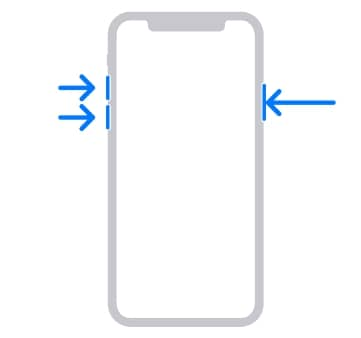
For iPhone 8 or later:
- Press and quickly release the Volume Up button.
- Press and quickly release the Volume Down button.
- Press and hold the Side (or Power) button until the "Connect to iTunes" screen appears.
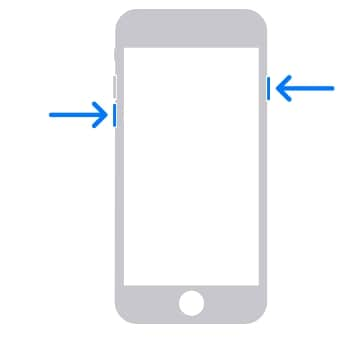
For iPhone 7 and iPhone 7 Plus:
- Press and hold the Volume Down button and the Side (or Power) button together.
- Continue holding both buttons until you see the "Connect to iTunes" screen on iPhone.
For iPhone 6s or earlier, iPod Touch (6th generation or earlier), or iPad with Home button:
- Press and hold the Home button and the Side (or Top) button together.
- Keep holding both buttons until the "Connect to iTunes" screen appears.

Step 3: Update your iPhone
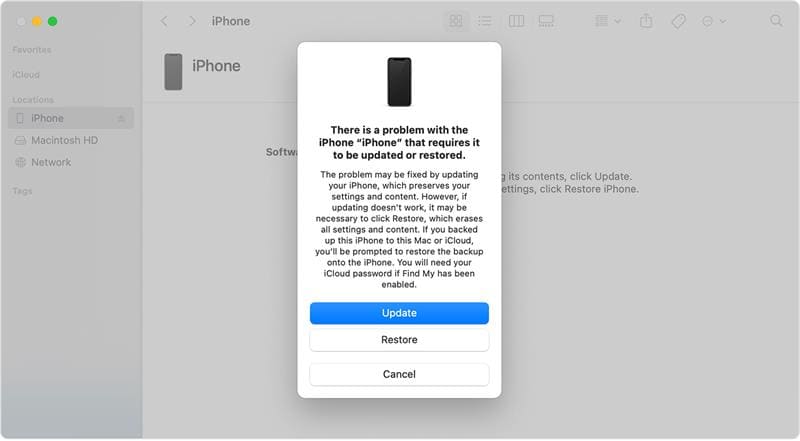
On your computer, iTunes should recognize that your iPhone is in Recovery Mode and prompt you to update it. Click "Update" to reinstall the software without data loss. If you're using Finder on macOS Catalina or later, you'll see a similar message. Note: always choose "Update" first — this reinstalls iOS while preserving your data. Only select "Restore" as a last resort, as this completely erases the device. After the update finishes, test the proximity sensor before restoring any backup to confirm the issue is resolved at the firmware level.
Solution 6. Do it yourself – align or change the proximity hold
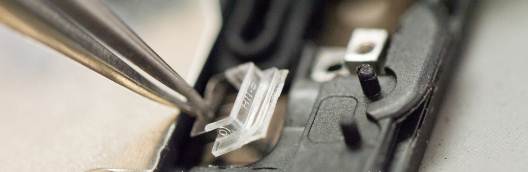
This solution is intended for users who are confident working inside an iPhone with small, precision tools. If your proximity sensor problem began immediately after a screen replacement — especially by a third-party technician or a non-Apple repair service — the most likely physical culprit is the Proximity Hold: a small rubber gasket or plastic bracket that holds the proximity sensor firmly in its correct position against the front panel.
During a screen swap, the Proximity Hold frequently falls out without the technician noticing, or it gets compressed and fails to seat the sensor at the correct height and angle. When the sensor sits even slightly out of alignment, it cannot consistently detect objects in its field of view. Here is how to inspect and correct this:
- Open the iPhone carefully: Using a pentalobe P2 screwdriver (for the bottom screws) and appropriate suction cup and spudger tools, open the iPhone's front panel. Work slowly and take care not to damage the display flex cables.
- Locate and inspect the proximity sensor housing: The proximity sensor is positioned at the top of the front panel assembly, above the earpiece mesh. Check whether the Proximity Hold gasket is present and correctly positioned. It should sit snugly in a dedicated slot and press the sensor against the opening in the display panel.
- Realign or replace the hold: If the Proximity Hold has shifted, carefully reposition it so that the sensor is flush against the correct optical aperture. If the hold is missing or damaged, replacement brackets are available from third-party iPhone parts suppliers for a few dollars. Install the new hold and ensure the sensor is firmly and squarely seated before reassembly.
- Temporary fix with tape: If a replacement bracket is not immediately available, you can apply a small, precisely cut strip of thin black electrical tape over the sensor's mounting position to keep it pressed into place. Cut two very small holes in the tape to allow the IR emitter and IR receiver to operate — do not cover the optical windows completely.
If you are not comfortable performing this disassembly yourself, bring your iPhone to an Apple Authorized Service Provider. Explain that the proximity sensor started malfunctioning after a screen replacement and ask them to inspect the sensor alignment specifically.
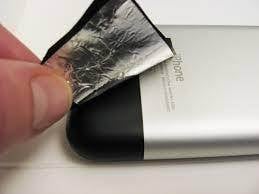
Solution 7. Problems with non-OEM screens.
If your iPhone received a screen replacement using a non-OEM (aftermarket) display panel, the screen itself may be the root cause of the proximity sensor malfunction — even if the sensor is physically undamaged and correctly aligned. The reason is optical: Apple's original display panels are manufactured with specific light-blocking layers and coatings near the proximity sensor window that control the amount of infrared and visible light that passes through the screen in that area. Many aftermarket screens are made without these precise optical characteristics, allowing too much ambient and infrared light to bleed through the screen into the sensor's field of view. This extra light overwhelms the sensor, causing it to behave as if an object is permanently close to the device — resulting in a screen that is constantly blacked out — or causing hypersensitive, erratic triggering.
DIY optical correction steps:
- Open the iPhone using the same tools described in Solution 6 and locate the inner surface of the display panel directly behind the proximity sensor opening.
- Cut a small, precise rectangle of thin black electrical tape and apply it to the back of the display panel in the proximity sensor area to block excess light transmission.
- Using a craft knife or fine-tipped scissors, carefully cut two very small holes in the tape — one for the IR emitter and one for the IR receiver. The holes should be just large enough to allow the sensor to operate normally but small enough to block excess peripheral light.
- Reassemble the iPhone, make a test call, and verify that the screen now dims correctly when held to your ear.
If the DIY correction does not fully resolve the issue, or if you prefer a permanent solution, the most reliable fix is to replace the aftermarket screen with an OEM Apple display or a high-quality OLED-equivalent aftermarket panel from a reputable supplier — one that specifically guarantees full proximity sensor compatibility for your iPhone model. Premium aftermarket screens from established suppliers replicate the original optical characteristics near the sensor area, eliminating the light interference problem entirely.
If you've worked through all 7 solutions and the proximity sensor on your iPhone is still not working, the sensor hardware itself has very likely sustained irreversible damage and needs to be physically replaced. At this point, the right course of action is to contact Apple Support or visit an Apple Store or Apple Authorized Service Provider for a professional diagnosis. Sensor replacement by Apple-trained technicians ensures the component is correctly positioned and calibrated — and any work done under AppleCare+ may be covered at reduced cost.
Other iPhone problems you may encounter:
- iPhone won't turn on? - I Tried this Guide, And Even I Was Surprised!
- iPhone screen goes black? - 2 - 3x Faster Solution to Fix this issue
- Accidently locked your iPhone? - 4 Ways to Unlock iPhone without Passcode
4,624,541 people have downloaded it
FAQs


iPhone Problems
- iPhone Hardware Problems
- 1. iPhone Keyboard Problems
- 2. iPhone Flashing Not Working
- 3. iPhone Not Detecting Sim Card
- 4. iPhone Sim Not Supported
- 5. Touch ID Not Working
- 6. iPhone Unable to Activate Touch ID
- 7. Fix iPhone Flashlight Greyed Out
- 8. iPhone Ear Speaker Test
- 9. iPhone Ear Speaker Not Working
- 10. iPhone Backlight
- 11. iPhone Proximity Sensor by Yourself
- 12. Replace iPhone Digitizer
- 13. Accessory May Not Be Supported
- iPhone Battery Problems
- 1. iPhone Battery Percentage Not Show
- 2. Replace iPhone Battery
- 3. iPhone Battery Problems
- 4. iPhone's Battery Drains Fast
- 5. iPhone Shuts Off with Battery Left
- 6. iPhone Overheating
- iPhone Button Problems
- 1. iPhone Home Button Not Working
- 2. iPhone Volume Buttons Not Working
- 3. iPhone Silent Switch Not Working
- 4. iPhone Power Button Stuck
- 5. iPhone Volume Button Stuck
- 6. iPhone Back Tap Not Working
- iPhone Charging Problems
- 1. iPhone Charging Port Not Working
- 2. iPhone Charging Slowly
- 3. iPhone Stops Charging
- 4. Wireless Charging Not Working
- 5. iPhone Not Charging
- 6. iPhone Stuck on Charging Screen
- iPhone Headphone Problems
- Apple Pencil and Watch Issues
- 1. Apple Pencil Double Tap Not Working
- 2. Apple Pencil Keeps Disconnecting
- 3. Apple Pencil Not Charging
- 4. Apple Pencil Not Connecting/Pairing
- 5. Apple Pencil Not Working
- 6. Apple Watch Not Pairing with iPhone
- 7. Apple Watch Stuck on Apple Logo
- Other iPhone Problems
- ● Manage/transfer/recover data
- ● Unlock screen/activate/FRP lock
- ● Fix most iOS and Android issues
- Repair Now Repair Now Repair Now


Alice MJ
staff Editor
Generally rated4.5(105participated)