Simplify Your Music: Discovering the iTunes Playlist Folder on Your Device

May 18, 2026 • Filed to: Device Data Management • Proven solutions
 TL;DR:
iTunes integrates your playlists directly into the local library.itl file rather than storing them as standalone files, requiring you to manage this specific database file to back up or restore your curated music collections.
● To manually restore missing or corrupted playlists, you must delete the existing library.itl file located in the Music/iTunes folder, create an empty replacement file, and allow iTunes to rebuild the structure using a previous XML backup.
● Moving iTunes playlists to Android devices or rebuilding an iTunes library directly from an iOS device bypasses standard sync limitations and is executed using the Rebuild iTunes Library function within Dr.Fone Basic - iTunes Manager.
● Native playlist collaboration is explicitly unsupported within standard iTunes software and requires users to switch to the Apple Music application to invite others to co-create or edit shared music lists.
Ask AI for a summary
 ChatGPT
 Perplexity
 Gemini
 Claude
 Grok
Grok
Dr.Fone Basic:
Better Control for Your Phone
Manage, transfer, back up, restore, and mirror your device
For many Apple users and music enthusiasts, managing playlists is an integral part of the listening experience. Whether you're curating the perfect workout mix or an ambient playlist for relaxation, knowing where to find and manage your iTunes and Apple Music playlists can significantly enhance your user experience. This post will guide you through understanding, accessing, and managing your iTunes and Apple Music playlists.
Part 1: Why You Need to Find iTunes Playlist Location
Understanding where your iTunes playlists are located can help you in several ways:
- Manage and organize your music more effectively: Knowing the exact location of your playlists allows you to keep your music library neat and well-organized, making it easier to find and enjoy your favorite songs.
- Sync playlists across devices without losing your curated selections: By pinpointing the location of your playlists, you can ensure that your carefully curated selections are synchronized across all your devices, providing a seamless listening experience whether you're at home or on the go.
- Troubleshoot issues related to missing or corrupted playlists: If a playlist goes missing or becomes corrupted, being aware of its location can help you quickly identify and resolve the issue, saving you time and preventing frustration.
Part 2: Where to Find Your iTunes Playlist Location
Contrary to what you might think, iTunes doesn’t store playlists as standalone files on your computer. Instead, they are integrated into your iTunes library. When you export and later import your iTunes library, your playlists are also included.
However, if you want to locate where iTunes stores these details, here’s a step-by-step process:
Step-by-Step Guide to Accessing iTunes Playlist Location
Step 1: Backup Your iTunes Folder: Before making any changes, it’s crucial to backup your iTunes folder. This ensures you have a restore point in case anything goes awry.
Step 2: Copy the iTunes Folder: Navigate to your backup folder and copy the entire iTunes folder to the original location to overwrite the `library.itl` file.
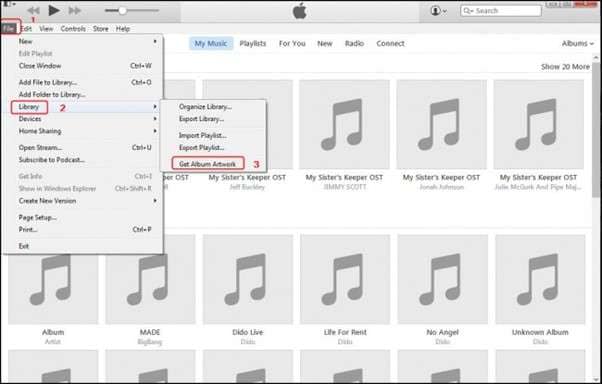
Step 3: Restore Album Artwork: Doing this might cause you to lose a few album covers. Don’t worry; you can regain them by navigating to File > Library > Get Album Artwork
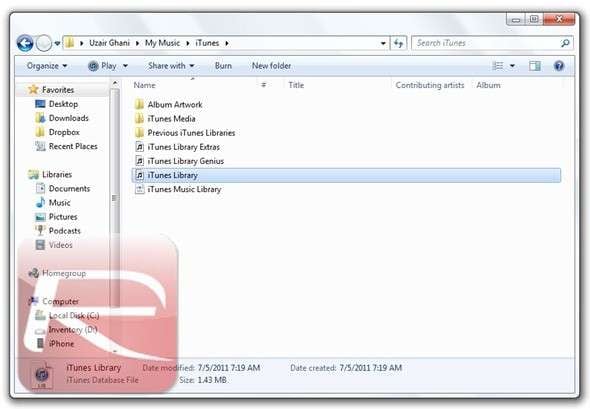
Step 4: Remove the Previous `.itl` File: Locate and remove the previous `.itl` file from: Music/iTunes/iTunes Library.itl
Step 5: Rebuild the `.itl` File: To create the `.itl` file again, go to ~/Music/iTunes/iTunes/Library.itl This will rebuild an empty `.itl` file.
Step 6: Launch iTunes: Double-click on the iTunes icon to launch it. iTunes will detect the missing `.itl` file and start rebuilding it using the previous XML file. You will see a message saying “importing iTunes music library.xml.”
Step 7: Restore Your Old Structure: After some time, this import process will restore your old library structure, including your playlists.
Part 3: Transfer iTunes Playlists with Dr.Fone Basic - iTunes Manager
For those looking to transfer iTunes playlists effortlessly to both iOS and Android devices, Wondershare Dr.Fone - iTunes Manager feature is a valuable tool. This versatile software simplifies the process of syncing your iTunes library across different platforms. With its user-friendly interface, Dr.Fone allows you to select specific iTunes music lists and transfer them directly to your device without any hassle. This ensures that your favorite music is always at your fingertips, regardless of the device you are using. Whether you are switching from iOS to Android or simply want to manage your playlists more efficiently, Dr.Fone Basic - iTunes Manager is a reliable and efficient solution to meet all your music transfer needs.
Dr.Fone - Phone Manager (iOS)
Transfer iTunes Playlists with Dr.Fone
- Transfer, manage, export/import your music, photos, videos, contacts, SMS, Apps, etc.
- Back up your music, photos, videos, contacts, SMS, Apps, etc., to the computer and restore them easily.
- Transfer music, photos, videos, contacts, messages, etc., from one smartphone to another.
- Transfer media files between iOS devices and iTunes.
- Fully compatible with the newest iOS system.


If you seek to transfer media data from iOS to iTunes with Wondershare Dr.Fone, this guide will be pretty helpful for you. Find out how Dr.Fone helps in executing this task.
Step 1: Access the iTunes Library
Open Dr.Fone on your computer and connect it to your iPhone via Wi-Fi or USB. Navigate to your iPhone's section in the left panel. From the homepage options, choose iTunes Library.

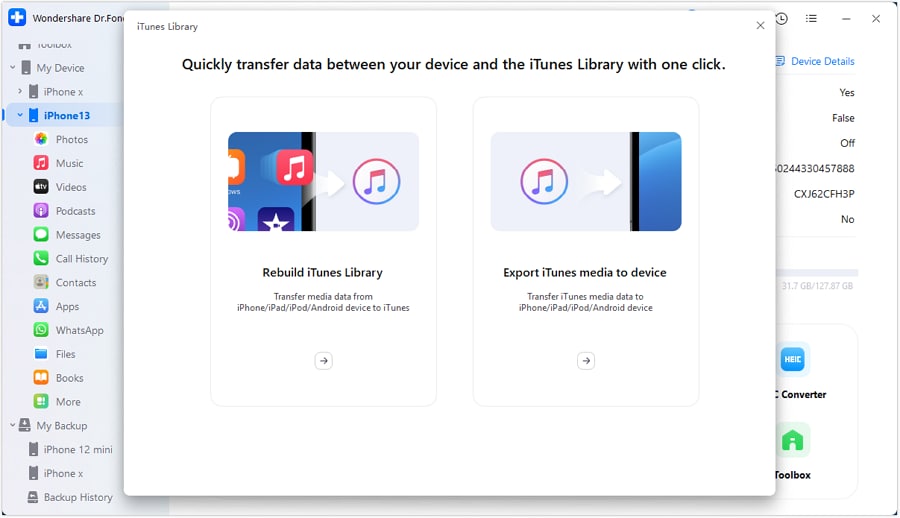
Step 2: Choose the Right Operation for iTunes
When a new window appears, select the appropriate function for your iTunes Library. Choose Rebuild iTunes Library to transfer media from your iOS device to iTunes.
Step 3: Initiate the Process
In the next window, click Start to begin copying data from your iPhone to iTunes.

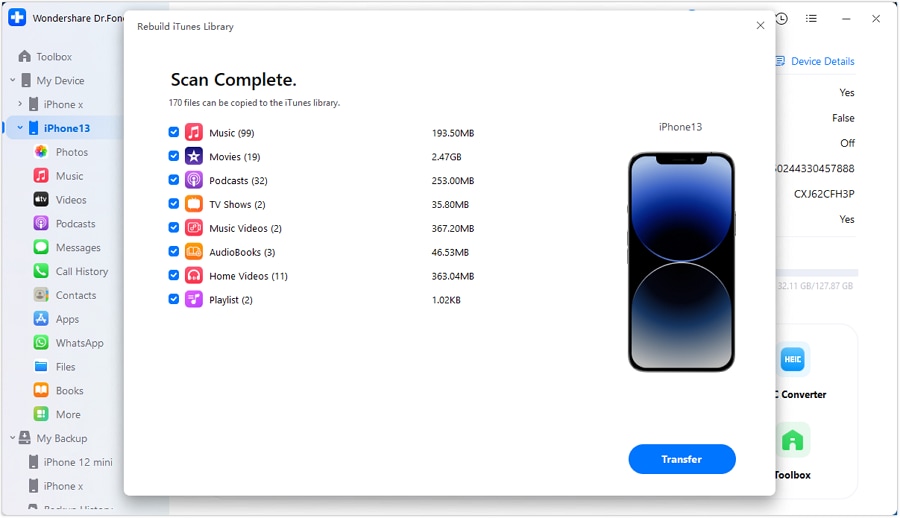
Step 4: Choose File Types and Continue
Once the iOS device scan is complete, a list of supported file types will appear in the next window. Select the data you want to transfer by checking the appropriate boxes, then click Transfer to proceed.
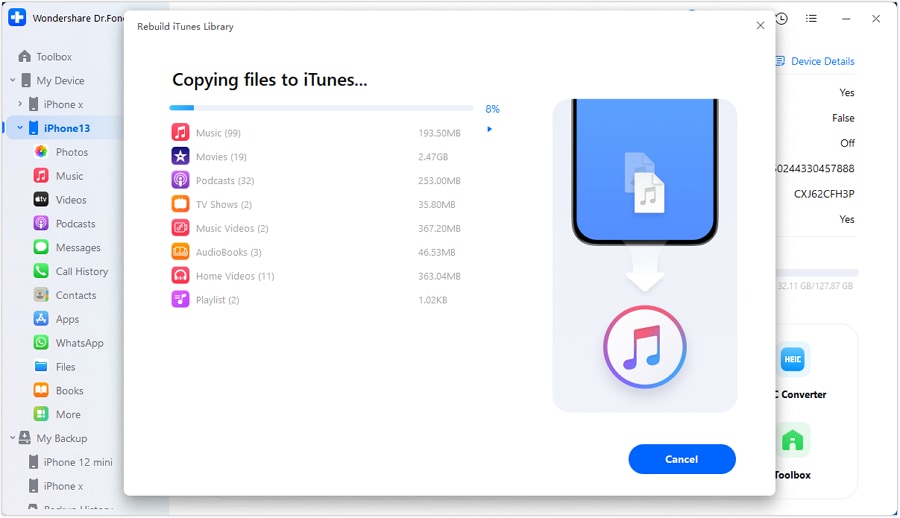
Step 5: Monitor Transfer Completion
In the upcoming window, you will see a progress bar indicating the transfer process. Please be patient as the selected data migrates from your iOS device to iTunes. If you need to halt the process, simply click Cancel to stop the transfer.
Step 6: Confirm Data Transfer Success
A confirmation window will appear indicating the process is complete. Click OK to finalize.

Part 4: Tips for Organizing and Managing iTunes Playlists
- Create Smart Playlists: Use iTunes' Smart Playlist feature to automatically organize songs based on specific criteria like genre, play count, or rating.
- Use Folders: Group similar playlists into folders for better organization. For example, create a folder named "Workout Music" and place all your workout playlists inside.
- Regularly Update: Keep your playlists fresh by regularly adding new songs and removing ones you no longer enjoy.
Conclusion
By understanding where and how iTunes manages your playlists, you can take full control of your Apple music playlist search collection, ensuring everything is organized just the way you like it.
This knowledge allows you to easily make adjustments, create new playlists, and keep your library in order. If you run into issues, the steps provided should help you troubleshoot and restore your playlists quickly and efficiently.
Whether it's a missing song or a corrupted playlist, following these guidelines will help you get back on track. For an even smoother experience, consider using Wondershare Dr.Fone to manage your iTunes playlists and resolve any issues with ease. Enjoy the seamless experience of having your favorite tunes at your fingertips.
FAQs
Dr.Fone Basic:
Better Control for Your Phone
Manage, transfer, back up, restore, and mirror your device


iTunes Manage
- iTunes Backup
- 1. Does iTunes Backup Photos
- 2. Forgot iTunes Backup Password
- 3. Fix iTunes Corrupt Backup
- 4. Fix iTunes Backup Session Failed
- 5. Change iTunes Backup Location
- 6. View Files on iTunes Backup
- 7. Backup WhatsApp Using iTunes
- 8. Top 5 iTunes Backup Managers
- 9. Top 6 Free iTunes Backup Extractor
- 10. Backup iMessage Without iTunes
- iTunes Restore
- 1. Restore Photos from iTunes Backup
- 2. Restore Data from iTunes Backup
- 3. Restore WhatsApp Using iTunes
- iTunes Rebuild
- 1. Transfer iPad Purchases to iTunes
- 2. Transfer iPad Music to iTunes
- 3. Transfer iPod Music to iTunes
- 4. Transfer Android Music to iTunes
- 5. Import Multiple Lyrics to iTunes
- iTunes Transfer
- 1. Sync iTunes Media to iCloud
- 2. Sync iTunes Media to Android
- 3. Transfer iTunes Music to iPod
- 4. Transfer iTunes Music to Flash Drive
- 5. Transfer iTunes Music to Android
- 6. Transfer iTunes Music to Google Play
- 7. Put iTunes Audiobooks to Android
- 8. Copy iTunes Playlists to Hard Drive
- 9. Move iTunes Library to PC / Mac
- 10. Export iPhone Contacts from iTunes
- 11. Export Playlist from iTunes
- iTunes Plugins/Alternatives
- 1. Top 3 iTunes Plugins
- 2. Top 20 Alternatives to iTunes
- 3. Top 3 iTunes Alternatives for Android
- 4. Top 5 iTunes Remote for Android
- iTunes Problems
- 1. Fix iTunes Error 11
- 2. Fix iTunes Error 1100
- 3. Fix iTunes Error 2005/2003
- 4. Locked Out Of iTunes
- 5. Forgot iTunes Password
- 6. Account Has Been Disabled in iTunes
- iTunes Tricks
- 1. Change the iTunes Skin
- 2. Use File Sharing in iTunes
- 3. Use Home Sharing in iTunes
- 4. Recover iPhone Data from iTunes
- 5. See iTunes Purchase History
- 6. Get Free iTunes Cards Legally
- 7. iTunes Visualizers Download
- 8. Watch iTunes Movie on Android
- 9. Update iTunes On Your Computer
- 10. Install iTunes on Windows / Mac
- ● Manage/transfer/recover data
- ● Unlock screen/activate/FRP lock
- ● Fix most iOS and Android issues
- Free Download Free Download Free Download


James Davis
staff Editor