Complete Methods: How To Convert HEIC to JPG Format on Mac

Oct 24, 2025 • Filed to: Device Data Management • Proven solutions
Dr.Fone Basic:
Better Control for Your Phone
Manage, transfer, back up, restore, and mirror your device
Many users are unaware that the photo or video they take on their new Apple device is stored as a HEIC or HEIF file, which is mainly incompatible with most applications on the market.
HEIC incorporates various advanced compression techniques, enabling the creation of significantly smaller photo files, often up to half the size of JPEG, without compromising image quality. In fact, HEIC achieves superior image quality compared to JPEG despite the reduced file size.
When this occurs, you must convert the HEIC file to a more widely used format, such as JPG. When it comes to viewing or editing photographs and movies in another program, conversion is a necessity.
In this article, we will discuss complete methods to convert HEIC or HEIF to JPG on Mac.
Part 1: Using Preview
The Mac's Preview program is a dependable PDF and picture viewer that can convert multiple HEIC files to JPG.
The program has rudimentary editing features that users may utilize to improve the quality of their images and convert them to different file types.
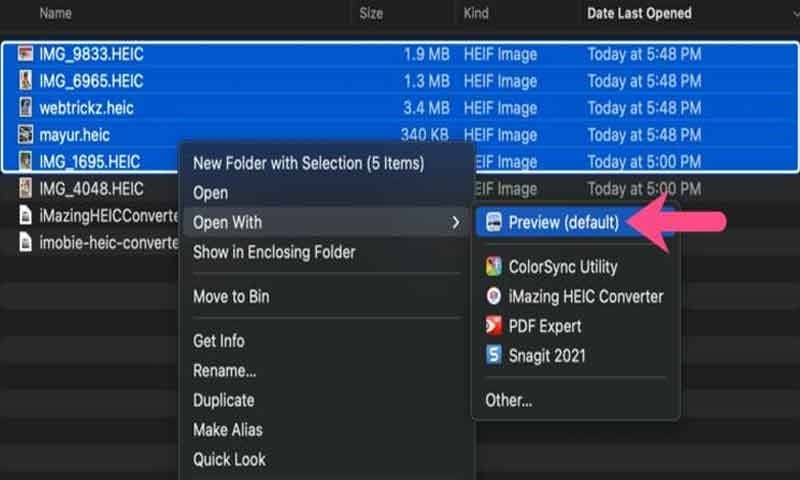
- Locating the HEIC File
Open the Finder app on your Mac computer and use the Command key to pick the "HEIC" files you want to change to JPG. Then right-click and select "Preview ".
- Opening the File with Preview
On your Mac, open the Preview app. You can do this by using Spotlight to look for "Preview" or by going to the Applications folder.
- Accessing the "Export" Option
Go to the "File" button in Preview and choose "Open." Go to the area where the HEIC file is and select the file you want to change. Click "Open" to add the file to Preview.
- Choosing the Destination Folder and Format
Once you've imported the HEIC file, go back to the "File" menu and choose "Export." There will be a pop-up box.
- Adjusting Image Quality
In the dialog box, you can change the quality of the picture and other settings if you want to. Choose the right choices based on how you want it to work.
- Saving the File as JPG
Choose the place where you want the converted file to be saved. You can make a new folder or replace the original HEIC file with a new one. Lastly, click "Save" to start the process of converting.
Part 2: Using Automator
Automator is an app that comes with macOS. It lets you schedule tasks so you don't have to do them by hand. This useful tool for getting things done can also be used to change HEIC files to JPG format.
- Opening Automator on Mac
Open Automator from the Applications folder to get started using it. You must now choose either Quick Action or Service, represented by the cog icon, depending on the version of macOS you are using. Click "Select" - Creating a New Workflow
Dropdown menus can be found on the right side. Look for the one that says Service receives selected or Workflow receives current. Pick an image - Adding the "Change Type of Images" Action
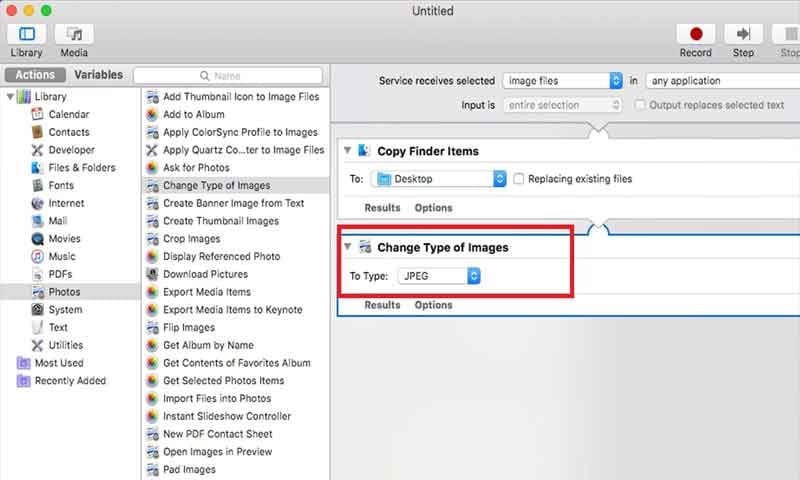
Select Library > Photos from the Actions list on the left side of Automator, then drag Change Type of Images into the gray box on the right of the screen.
You might receive a notification asking if you want your JPG files to replace your HEIC files or to be preserved alongside them. Decide whether to go forward. - Configuring the Action to Convert HEIC to JPG
Within the "Change Type of Images" action, configure the settings to convert HEIC to JPG. Choose "JPEG" as the output format. You can also adjust other settings, like image quality, if desired. - Running the Workflow and Saving the Converted File
To run the Workflow, click the "Run" button in the top-right corner of the Automator window. Select the HEIC file you want to convert and click "Choose" to initiate the conversion process. The converted JPG file will be saved in the exact location as the original HEIC file.
Part 3: Using Third-Party Converter Applications
With the release of iOS 11 and Mac OS High Sierra, Apple unveiled a new image format called HEIC. In earlier iterations of iOS and Mac, JPEG photos had enormous file sizes.
The High-Efficiency Image Format (HEIF), used by newer versions, creates images. The extension of this file may be .heif or .heic.
JPEG is being replaced by HEIC or HEIF by Apple. The user benefits from it. Compared to JPEG, this image format maintains original high quality in less storage. So you discover a smaller file size with excellent quality.
A HEIC file may include multiple images, such as iPhone live shots, bursts of images, or image sequences. Additionally, it will include the image details' metadata.
The High-Efficiency Video Compression (HEVC) or H.265 standard, already used by the iPhone, forms the foundation of HEIF. It uses cutting-edge compression algorithms to reduce the size of your photographs without sacrificing quality.
In reality, HEIC is not a format. We can define it as a container that holds several images and image data. For live shots and other dual-camera images, this is incredibly helpful.
You can use third-party converter tools like Wondershare Dr.Fone HEIC Converter to convert HEIC files to a more broadly supported format like JPG.
Using this method, you can also convert HEIF image to JPG on Mac. Here's how:
- Install the iOS version of Dr.Fone-Phone Manager. Then, open it and choose "Phone Manager" to convert HEIC to JPG.

- Your device can read if you connect it to the PC with a cable.
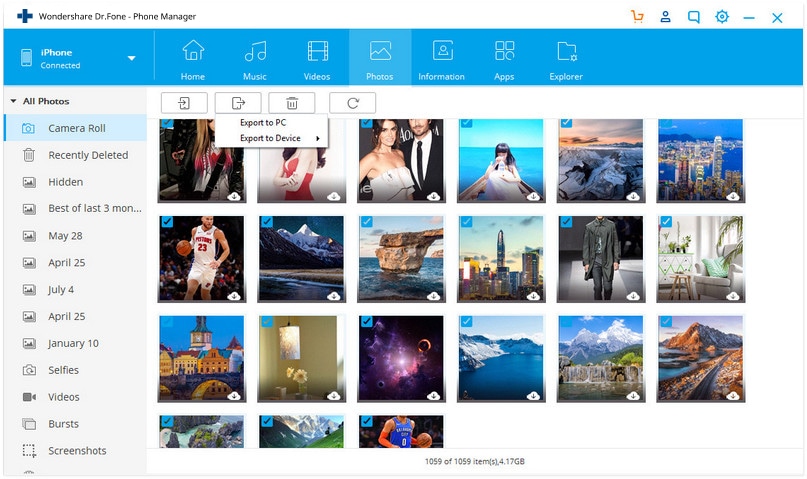
- The application will provide a review of the gadget quickly. Go to the "Photos" menu rather than choosing an easier path from the home screen.

- Now, you can check all images put away on your device. Again, the files would be isolated into various classes.
- Select the needed photos.
- You can go to the export symbol and export these photos.
- Lastly, a window will appear where you can pick where to store the chosen photographs. You can wait for the lossless conversion of your photographs to the JPG format.
Dr.Fone - Phone Manager (iOS)
Transfer Photos from Computer to iPod/iPhone/iPad without iTunes
- Transfer, manage, export/import your music, photos, videos, contacts, SMS, Apps, etc.
- Back up your music, photos, videos, contacts, SMS, Apps, etc., to the computer and restore them easily.
- Transfer music, photos, videos, contacts, messages, etc., from one smartphone to another.
- Transfer media files between iOS devices and iTunes.
- Easily convert HEIC TO JPG


Part 4: Using Online HEIC to JPG Converters
There is a straightforward online converter called HEIC to JPG. This process functions on various OS types since you can access it with any browser. How do you do that? Here's how:
- Step 1: Access the website using your favorite browser.
- Step 2: To add the HEIC file from your device, click the Add (+) button.
- Step 3: An automatic conversion will take place. To download the files, use the Download Now option.
Conclusion
To ensure compatibility and simple sharing of your image files, you must convert HEIC or HEIF to JPG on Mac. This tutorial has examined a number of efficient ways to carry out this task.
Whatever method you decide to employ, converting HEIC to JPG on your Mac assures that your image files are usable, versatile, and compatible. Enjoy seamless image sharing, editing, and viewing across a variety of platforms and devices.
Utilize the techniques covered in this book and pick the one that best suits your preferences and needs. Unlock the full potential of your image files on your Mac by easily converting your HEIC or HEIF images to JPG.
Dr.Fone Basic:
Better Control for Your Phone
Manage, transfer, back up, restore, and mirror your device


iPhone Tips
- iPhone News
- iPhone Activate
- iPhone Data Manage
- 1. Export Notes from iPhone to PC/Mac
- 2. iPhone Notes Duplicate
- 3. Print WhatsApp Messages on iPhone
- iPhone Diagnostics
- 1. Check iPhone Wi-Fi Speed
- 2. Check and Monitor iPhone Temprature
- 3. Put iPhone in Diagnostic Mode
- 4. Test iPhone Screens
- iPhone How-tos
- 1. Force Quit Frozen Apps
- 2. Find Own Phone Number
- 3. Find Blocked Numbers on iPhone
- 4. iPhone Internet Explorer Alternatives
- 5. Sync Thunderbird with iPhone
- 6. Things Can Do with iPhone on Plane
- 7. Tips for Using VLC for iPhone
- 8. iPhone Explorer for Mac and Windows
- 9. Use iPhone as Security Camera
- iPhone Location Tips
- 1. Change iPhone GPS Location
- 2. Hide iPhone/Android Location
- 3. PokeGo++ iPhone
- 4. Change Home Address on iPhone
- 5. See Someone's Location on iPhone
- 6. PGSharp for iPhone
- 7. Change App Store Country
- iPhone Track
- 1. Track iPhone by Phone Number
- 2. Track iPhone without App
- 3. Turn Off Tracking on iPhone
- 4. Spy on iPhone without Jailbreak
- iPhone Tricks
- 1. Unlink iPhones
- 2. Mirror iPhone/iPad to Windows PC
- 3. Turn On iPhone Without Home Button
- 4. Charge iPhone Without Charger
- 5. Free Unlimited Data on Verizon iPhone
- 6. Use iPhone with Broken Home Button
- 7. Use iPhone without Touch Screen
- 8. Remote Control iPhone from PC
- 9. iPhone Stuck on Apple Logo
- 10. DFU Tools for iPhone
- 11. iPhone/iTunes Error 4013
- 12. iPhone Front Camera Not Working
- 13. Download Songs on iPhone/iPod
- 14. Unlock iPhone without Passcode
- 15. Reset iPhone Without Apple ID
- 16. Transfer Photo from Android to iOS
- Find My iPhone Tips


Daisy Raines
staff Editor