Teleport your device anywhere instantly with one click.


 100% Security Verified | No Subscription Required | No Malware

 :

 ChatGPT
 Perplexity
 Gemini
 Claude
 Grok
To turn off tracking on iPhone, first identify what is sharing your location. An app's Location Services permission, Find My sharing with another person, and location-based system suggestions are different controls. Turning off one does not automatically disable the others, and changing a GPS position is not the same as revoking access.
This guide retains six approaches, from reviewing a location simulator to managing iOS privacy settings. For personal-location privacy, Apple's sharing and permission controls are the practical starting point. The older screenshots below remain useful illustrations, but current iOS versions generally use Settings > Privacy & Security rather than the older Privacy menu.
In this article
- Importance of Keeping Location Data Private
- Method 1: Switch to a Virtual Location to Stop Someone from Tracking your iPhone
- Method 2: Disable location tracking of iPhone completely
- Method 3: Disable location tracking of specific apps
- Method 4: Disable Significant Locations on iPhone
- Method 5: Disable Share My Location service
- Method 6: Disable location-based notifications or alerts
Why location privacy requires more than one switch
Location data can reveal routines, workplaces, visits, and travel patterns. Sharing can be useful when meeting someone or checking that a family member arrived, but it should remain a deliberate choice. Your address book alone does not give every contact permission to view your location: the important question is which people, apps, and account features actually have access.
- People sharing: Find My can expose your live position to people you choose. Review existing recipients instead of assuming all contacts can see you.
- App permissions: Mapping, social, delivery, and weather apps may request different levels of access. Each app's privacy policy governs what it does with information you allow it to collect.
- Routine information: System features can use frequently visited places to personalize suggestions, independently of sharing your live position with a friend.
- Notifications: Turning off a reminder can reduce interruptions without stopping the underlying location sharing or collection.
Encryption and access controls are important, but they are not a reason to grant unnecessary permissions. Nor is it accurate to say that all location information always stays on the phone: different features handle different data. Review the specific feature instead of relying on a blanket privacy claim.
If an unwanted person may react to changes, consider your immediate safety before altering sharing settings. Someone may notice that your location disappears, even when a new alert is not sent. Use a safe device or seek trusted support when account access or personal safety is in doubt; a GPS utility is not a substitute for that assessment.
Method 1: Use a virtual location for testing, not as guaranteed tracking protection
 Set your map route to simulate GPS movement.
- Set your wanted movement speed.
- HD and large map view to check location.
- Fake GPS location to anywhere.
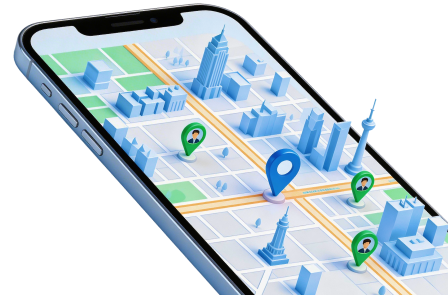
Dr.Fone - Virtual Location lets you select a simulated GPS position for a supported connected phone through a desktop map. Teleport mode can be useful when you want to test how a location-dependent app responds to a different place without physically traveling there.
That capability does not revoke another person's Find My access, remove an app's permission, change an IP address, or guarantee that every tracking service sees the simulated point. App behavior and device compatibility vary. If your goal is to stop a person receiving your location, use the sharing controls in Method 5 rather than depending on a different-looking map pin.
Step 1 Launch the desktop location module
Install the appropriate desktop edition, check support for your iPhone and iOS version, then open Dr.Fone. Choose Virtual Location on the main screen. This starts the location tool; it does not change your Apple Account sharing permissions.
Step 2 Connect the iPhone with a data cable
Attach your own iPhone using a compatible USB data cable, complete the trust prompts, and continue with Get Started if your version displays it. The correct connector depends on the phone; do not assume every iPhone uses Lightning.
Step 3 Inspect the current map position
Wait for the map to load and check its displayed position. If the point is offscreen, use the centering control. Its label or placement may differ from the supplied screenshot, so follow the controls in your installed release.
Step 4 Search in Teleport Mode
Select Teleport Mode by its label rather than a fixed icon number. Search for the desired address or coordinates and submit with the displayed button or Enter. Confirm that the returned map point is the one you intended to test.
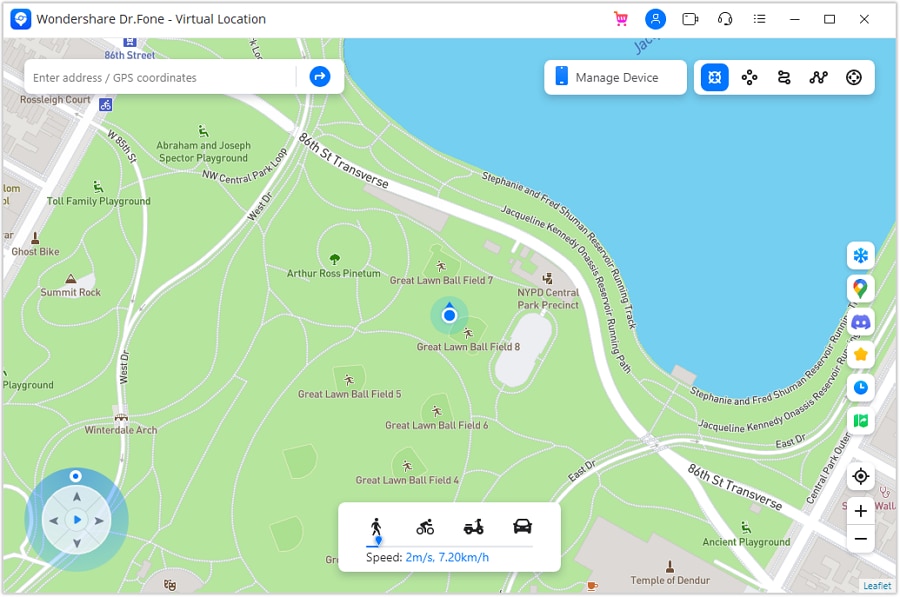
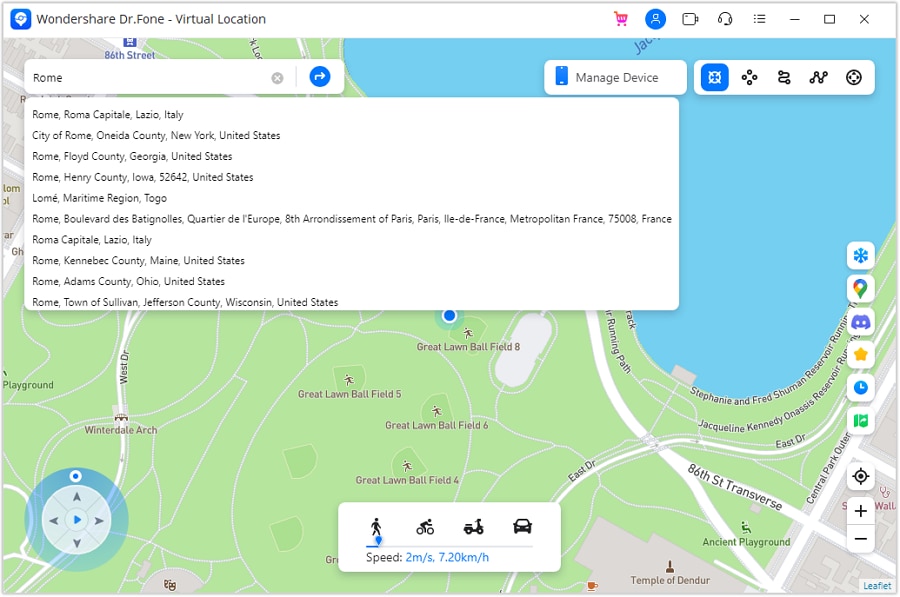
Step 5 Apply and verify the simulated location
Choose Move Here, then check an appropriate map on the connected phone. A successful map change confirms a simulated position in that context, not that every app or Find My recipient is seeing it. When finished, follow the restoration prompt; the official guide describes restarting the device to restore its actual position.
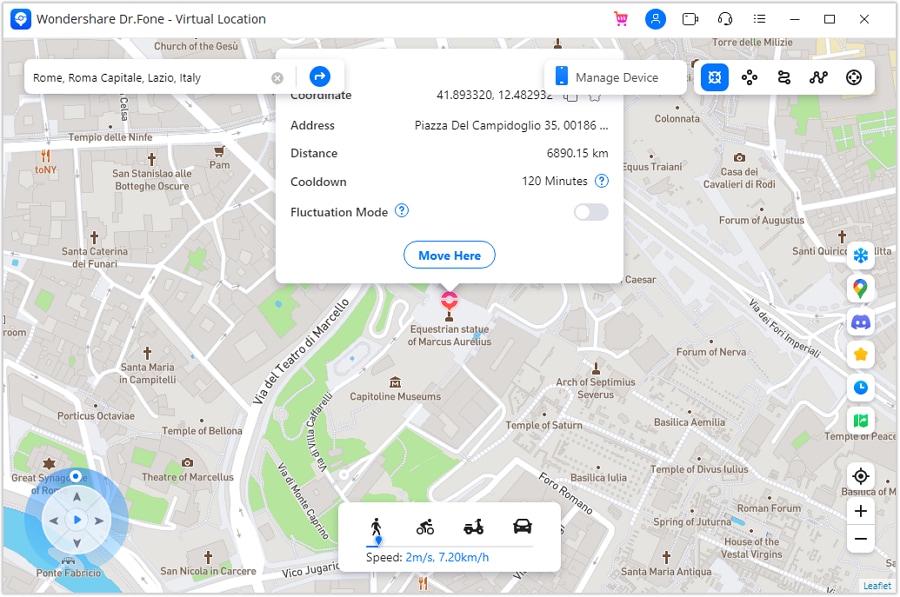
Keep real privacy decisions separate from a location test. Recheck permissions and sharing directly on the iPhone, and do not assume a simulator makes the device invisible to account holders, cellular networks, or other location sources.




Method 2: Turn off Location Services across the iPhone
The master Location Services switch prevents apps from receiving ordinary Location Services information while it is off. This is a broad choice: turn-by-turn navigation, nearby results, and other features can become less useful or unavailable. It is not a universal anti-tracking mode, and it should not be confused with disabling Find My device recovery or every form of location inference.
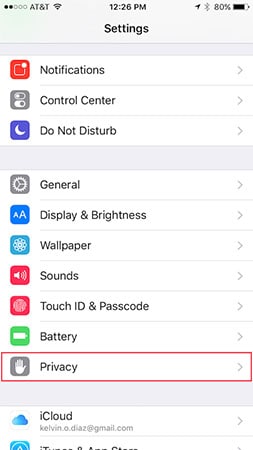
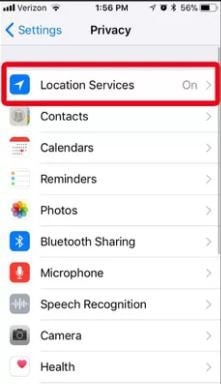
Step 1 Open the privacy menu
Enter Settings and select Privacy & Security. Older versions, including those illustrated here, may call the section Privacy.
Step 2 Open Location Services
Tap Location Services and review the current switch and listed permissions. If you only want to restrict one app, leave the master switch on and use Method 3.
Step 3 Disable the master switch
Turn Location Services off and read the confirmation. Expect location-dependent app features to be limited until you restore access.
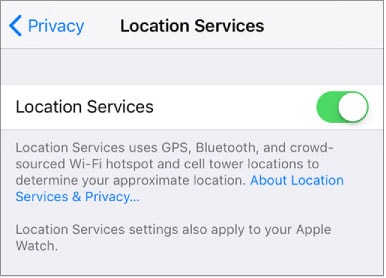
Apple notes that emergency calls may use location information to help responders regardless of this setting. Websites may also infer a broad area from an IP address. For a person who receives your Find My location, explicitly review sharing as well; do not treat one permission switch as proof that all other access has ended.
Method 3: Restrict location access for individual apps
App-by-app permissions are usually more practical when you still need Maps or a delivery app but do not want unrelated apps using your position. This preserves useful services while limiting access to the applications you select. The available choices depend on what each app requests.
Step 1 Return to privacy settings
Open Settings > Privacy & Security, or Privacy on an older iOS version.
Step 2 Keep the master service enabled
Open Location Services without switching it off. Scroll down to the app list and identify the application you want to restrict.
Step 3 Choose the app's permission
Tap its name and select an available option. Review the developer's explanation and, where offered, the Precise Location switch before leaving the screen.
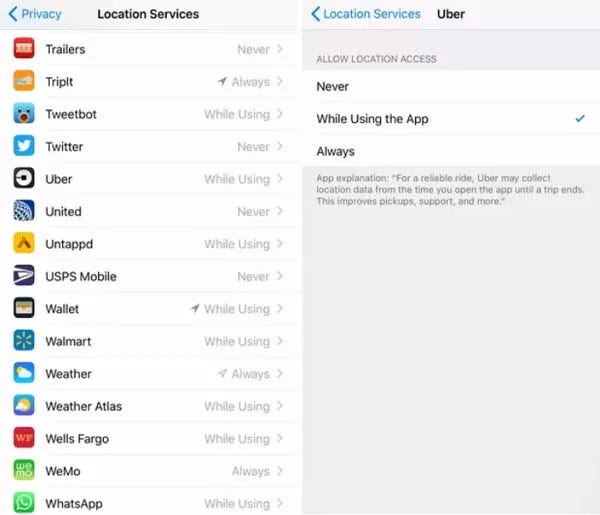
Never blocks that app's Location Services access. While Using the App permits access during use, including supported visible location activity. Always permits background access, rather than proving the app records every second continuously. Some apps also offer Ask Next Time Or When I Share.
If an app only needs a neighborhood-level result, turning Precise Location off can allow approximate access instead of your exact position. These changes do not erase locations already sent to a service. Check the app's own account and retention settings if historical information is also a concern.
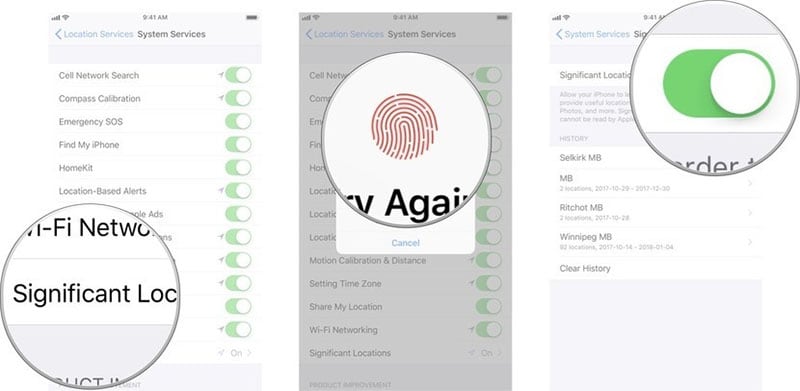
Method 4: Disable Significant Locations and review stored routines
Significant Locations supports personalized system experiences based on places you visit. It is different from continuously sharing your position with a friend. Turning it off addresses that system feature; it does not automatically turn off third-party tracking, clear every app's history, or remove people from Find My.
Step 1 Open Settings
Start from the iPhone's Settings app, using your own authorized device access.
Step 2 Open Location Services
Go through Privacy & Security > Location Services. Older layouts use Privacy instead.
Step 3 Locate System Services
Scroll to the bottom of the Location Services screen and open System Services.
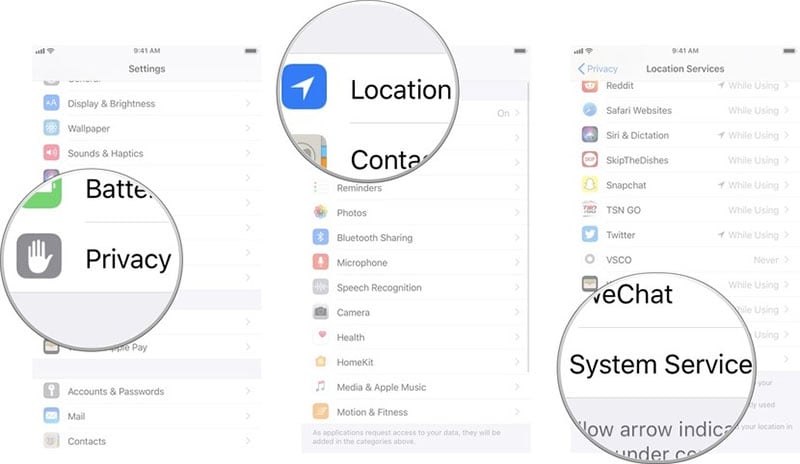
Step 4 Authenticate to view the feature
Choose Significant Locations, or the corresponding location-history label shown by your iOS version. Authenticate with Face ID, Touch ID, or your passcode when requested.
Step 5 Turn the feature off
Disable the switch. If you also want to remove stored entries and your version offers Clear History, review that separate action rather than assuming the switch deletes existing records.
Method 5: Stop sharing your location with people
For someone asking how to stop someone from tracking your iPhone through Find My, this is the relevant control. Share My Location governs personal sharing; Find My iPhone governs finding a device that is lost or stolen. They are related features, not interchangeable switches.
Step 1 Open your sharing settings
On current iOS, go to Settings > your name > Find My, or open Find My > Me. The original screenshot shows an older route through Privacy.
Step 2 Turn off Share My Location
Switch Share My Location off to stop sharing with everyone through that feature. To stop only one recipient, use Find My > People, select the person, and choose Stop Sharing My Location instead.
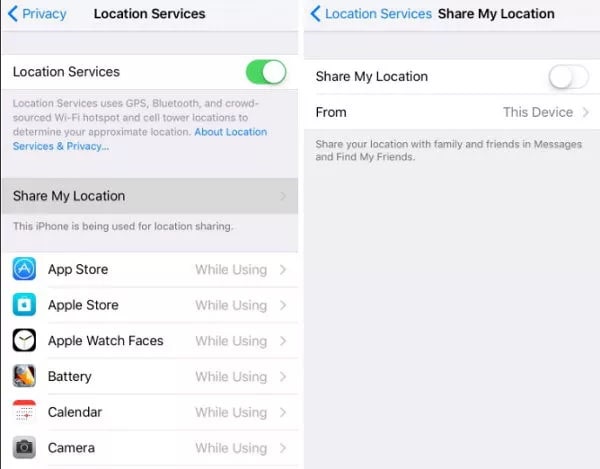
Where a supported version offers Hide Location, that temporary option resumes sharing the next day; it is not equivalent to stopping indefinitely. People may notice that sharing has ended, and older systems may show a Messages notification. Do not promise that a change will be invisible.
Review other signed-in devices and account access if someone still appears to know your position. Turning off Find My iPhone or the Find My network has different consequences, including losing device-recovery functions. A supported phone may remain findable after shutdown, so powering it off is not a universal substitute for reviewing the actual settings.
Method 6: Reduce location-based alerts and suggestions
Location-based reminders, suggestions, and related system features can be distracting even when you are comfortable using navigation. You can adjust available System Services switches without disabling every app's location access. Labels differ across iOS versions, and the original references to iAds should not be treated as a current universal menu.
Step 1 Open the privacy section
Enter Settings and choose Privacy & Security, or Privacy on an older device.
Step 2 Open System Services
Go to Location Services, then scroll to System Services.
Step 3 Adjust the available features
Review each relevant location-based alert or suggestion control and disable only what you do not need. If the issue is ordinary app notifications, review Settings > Notifications separately.
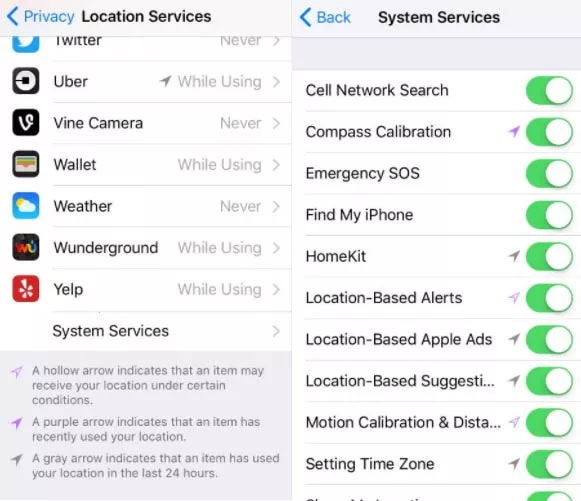
Silencing alerts does not necessarily stop a person seeing your shared location. In Find My, also review Me > Notifications About You, where available, to inspect location-change notifications related to you. Choose the setting that matches the actual problem instead of assuming fewer notifications means less tracking.
Conclusion
Choose an iPhone location control by its purpose: restrict apps through Location Services, review Significant Locations for personalized routines, and use Find My sharing controls to stop sharing with people. Keep the impact on navigation, emergency services, and lost-device recovery in mind. A simulated GPS point can support a location test but is not a complete privacy solution.
After making a change, revisit the relevant screen and confirm that the intended access is off. Review third-party accounts separately when they store or share location information outside Apple's own controls.
FAQ
1. Does turning off Location Services stop every kind of tracking?
No. It restricts ordinary Location Services access, but account sharing, IP-based inference, and emergency-location behavior require separate consideration.2. How do I stop one person seeing my Find My location?
Open Find My, choose People, select that person, and use Stop Sharing My Location. They may notice that your location is no longer available.3. Can I keep Maps working while limiting other apps?
Yes. Leave Location Services enabled and adjust each app's permission individually. Approximate location may be enough for apps that do not need an exact position.4. Is a virtual location the same as turning off Share My Location?
No. A simulator changes location data in supported contexts; Share My Location changes personal-sharing access. GPS simulation does not guarantee that Find My is hidden or frozen.
 Add Wondershare Dr.Fone as a preferred source on Google