Are Your Mac Messages Not Syncing With iPhone? Here's How to Fix

Jul 12, 2024 • Filed to: Mobile Repair Solutions • Proven solutions

It doesn’t take long to get used to a smart feature that saves time, like Apple’s Continuity. It’s safe to assume that switching between iPhone, Mac, and other iDevices is already second nature to you, but all of a sudden, you can no longer access your messages across devices.
For whatever reason, your iPhone messages are not syncing with your Mac.
It’s a frustrating issue, but we have a few solutions to help you. Let’s learn more about Apple’s no-sync issue and discuss the best ways to fix this problem.
Reasons Why Mac Messages Are Not Syncing With Your iPhone
Have you recently updated your iPhone, Mac, or both to the latest version of iOS? If the answer is yes, this update has likely triggered your no-sync problem.
iOS users started reporting that their messages were not syncing between iPhone and Mac a while back, so this is basically old news in the Apple community. With this in mind, it’s even more confusing that Apple couldn’t fix it before the latest iOS 15.
Unfortunately, nobody knows for sure what the main culprit for Mac messages not syncing with iPhone is. There are many possible reasons why this could be happening to so many Apple users. Admittedly, it’s not a small nuisance, but the problem is usually easy to fix.
Ultimate Fix for Mac Messages Not Syncing With iPhone: Repair Your Loss
And now for the ugly truth – if your messages on Mac are not syncing with your iPhone, that’s probably not the only thing wrong with your iOS devices. You can try fixing the issue with any of the hacks below – at least one will work, but the root problem will remain.
Don’t be surprised if the messages stop syncing across your devices a few days after. You’re likely dealing with a system bug that should be treated on a system level.
For this, we recommend Wondershare Dr.Fone – System Repair for iOS.
Dr.Fone – System Repair is a go-to solution for 150+ iOS system issues. If any of your iOS devices get stuck in Recovery Mode or boot loop, if they start showing the white screen of death or black screen, if they freeze or seem in any other way beyond repair, Dr.Fone will fix it.
You can use Dr.Fone – System Repair for iOS on iPhone and Mac. It is compatible with the latest iOS version. It’s also one of the most user-friendly repair tools on the market.
There are two ways to approach any iOS issue using Dr.Fone – System Repair. First, you should try to fix the issue using Standard Repair to save all your data. If this doesn’t work, you’ll need to go deeper with Advanced Repair, which will erase everything on your iPhone.
- Step 1. Download, install, and launch Fone – System Repair(iOS) on your Mac.
- Step 2.From the Toolbox section on the left, choose System Repair.

- Step 3. Connect your iPhone to the Mac using a cable connection.
- Step 4.Select iPhone to continue with the System Repair for iOS.

- Step 5. In the next window, choose iOS Repair.

- Step 6. On your first try, opt for Standard Repair. If this doesn’t work, repeat steps 1-4 and choose Advanced Repair.

- Step 7. Follow the instructions on the screen to put your iPhone into Recovery Mode.

- Step 8. Fone – System Repair will automatically search for the appropriate firmware to help fix the issue on your device. When it’s done, choose the firmware you want to install and click Download.

- Step 9.The program will now download and verify the iOS firmware.

- Step 10.Click Repair Now to flash the firmware and fix your iOS device.

Dr.Fone – System Repair will need a minute to complete the process. During this time, you can watch the progress bar on the screen. When it’s complete, simply click Done and unplug your iPhone from your Mac. Both devices should be fixed, updated, and ready to use.
How to Fix Messages on Mac Not Syncing With Your iPhone

The following easy fixes should be able to help you fix the issue. A piece of advice before we start – try them in the exact order they are described on the list below, and don’t give up until you reach the end. One of these suggestions is set to do the trick, so stay patient.
Let’s Turn the iMessage App Off and On
Turning it off and on again doesn’t always work, but it always helps determine the severity of the issue. So the first you ought to do in this type of situation is to find the off button and shut down the device. Wait a few seconds before you turn it on and check the results.
Here’s how to turn iMessage off and on your iPhone:
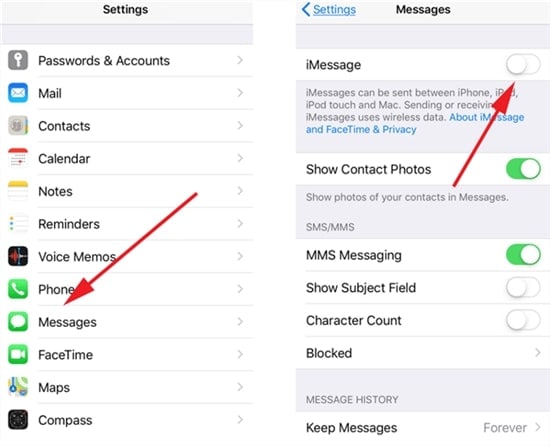
- Step 1.Go to Settings.
- Step 2. Find
- Step 3. Toggle off iMessage.
- Step 4. Toggle back on.
Now, you need to do the same for your Mac Message:
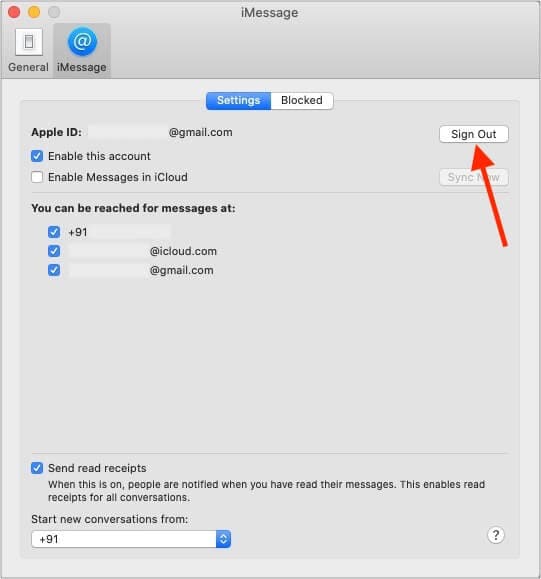
- Step 1.Launch the iMessage
- Step 2.Navigate to Preferences.
- Step 3. Click Sign Out and wait.
- Step 4. Click Sign In to go back.
If this doesn’t do the trick, it either means that one of the settings is off or that you’re dealing with a system bug. Let’s try a different approach to syncing Mac Messages.
Set Up iCloud for Messages on iPhone and Mac
Apple allows you to sync iMessages across your iOS devices. The technology that makes that possible is called iCloud. So if you wish your iPhone and Mac to sync automatically, you must ensure that iCloud for Messages is enabled on both devices. It’s a simple process:
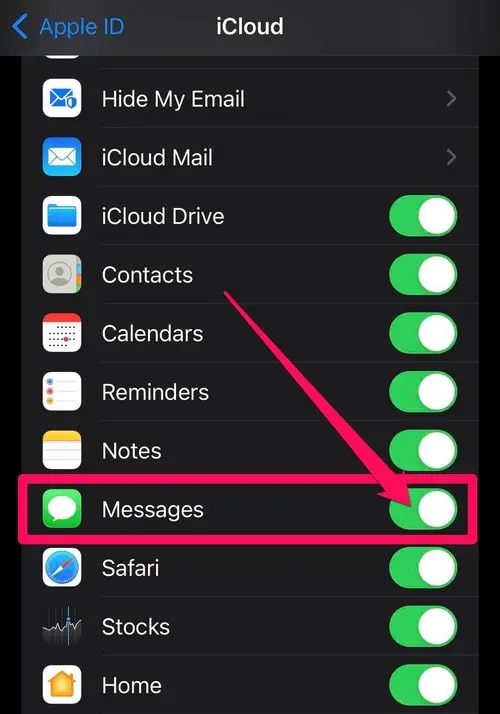
- Step 1. Grab your iPhone and go to Settings.
- Step 2.Under your name, tap on iCloud.
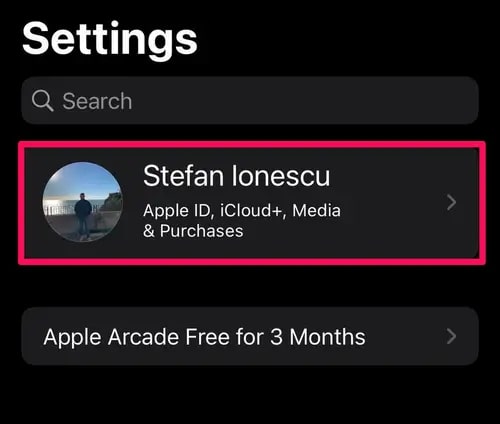
- Step 3.Tap Show All > Messages and turn on Sync this [device] or Turn on Messages.
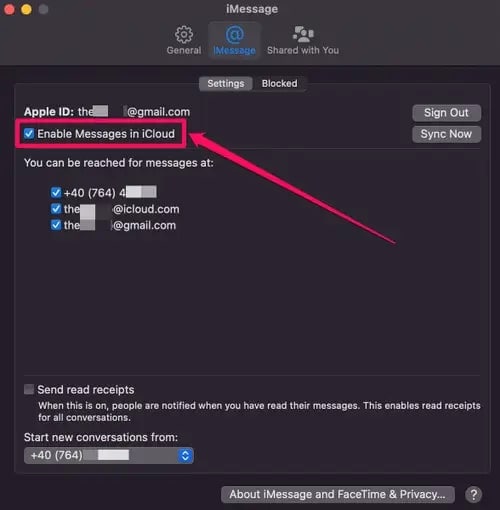
- Step 4. Switch to Mac and go to Messages.
- Step 5.Open Preferences (or Settings on MacOS Ventura).

- Step 6. Under iMessage, select Enable Messages in iCloud.
Setting up iCloud is one of three things you must do to enable automatic syncing. If everything is OK with this setting, let’s see what else could be causing a problem.
Ensure You’re Using the Same Apple ID
Continuity, a.k.a. automatic syncing via Apple ID, is one of the most convenient features in the Apple ecosystem. So naturally, if iCloud for iMessage is enabled on both your iOS devices, you’d want to check if your iPhone and Mac are connected to the same Apple ID.
If you’re not sure how to do that, just follow the steps below:
- Step 1. Sign in to apple.comto manage your Apple ID.
- Step 2. Ensure all your devices are listed under the same ID
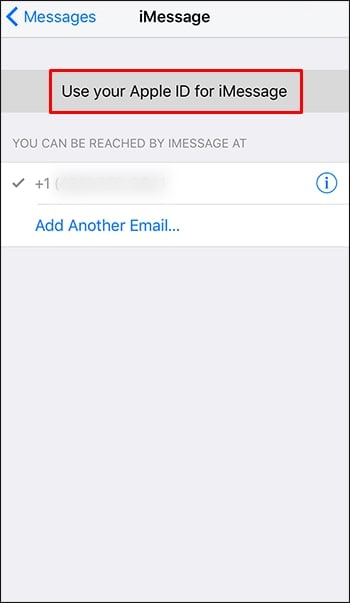
- Step 3. On your iPhone, go to Settings > Messages > Send & Receive and check if the Apple ID matches the one you’ve registered the device for.
- Step 4.From your Mac, go to Messages > Preferences > Accounts. The same Apple ID should be there as well.

No mismatches? If all is as it should be, proceed to the next fix.
Are Your Phone Number and Email Synced?
The same as your Apple ID, your mobile number and email info should match on both of your devices. You can check that under Apple ID settings for your iPhone and Mac:
- Step 1. From your iPhone, return to
- Step 2. Once again, navigate to
- Step 3. Tap Send & Receive for more options.
- Step 4. Ensure that your phone number and email info under YOU CAN RECEIVE IMESSAGES TO AND REPLY FROMand START NEW CONVERSATIONS FROM are correct.

If everything adds up, move on to the next Mac Messages fix.
Let’s Update iOS on Both iPhone and Mac
Ironically, a system update is one of the most commonly cited reasons for losing continuity between iPhone iMessages and Mac Messages. Many users have reported that their devices have stopped syncing after updating their iPhone or Mac to the latest iOS version.
In case this never happened to you and iMessage on your Mac is not syncing with your iPhone for some other reason, updating iOS could actually help fix the no-sync problem.
Updating an iPhone is simple. If this is your first time, follow the steps:
- Step 1. First, ensure your iPhone is connected to the internet via Wi-Fi. You should also plug it into a power source.
- Step 2. Go to Settings, tap General, and then Software Update.
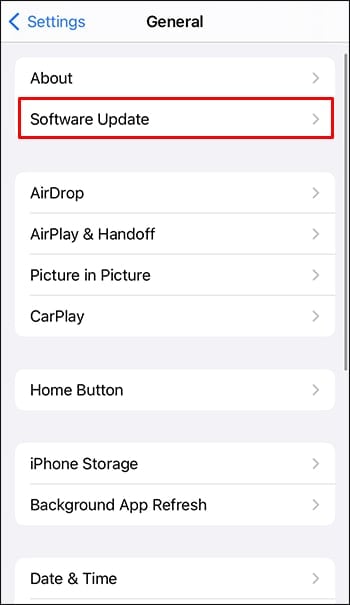
- Step 3.If any updates are available, tap Install Now or Download and Install > Install Now.
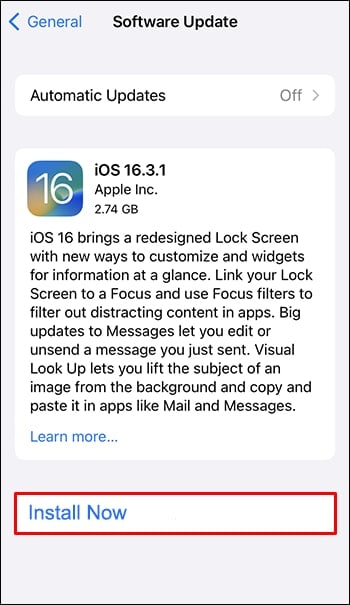
- Step 4. While there, enable Automatic Updates.
Now, let’s update iOS on your Mac. There are a couple of things to do:
- Step 1.In the Apple Menu, select System Preferences. 4
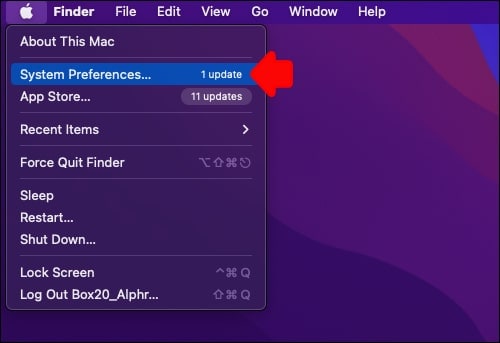
- Step 2.Find Software Update and click for available updates.

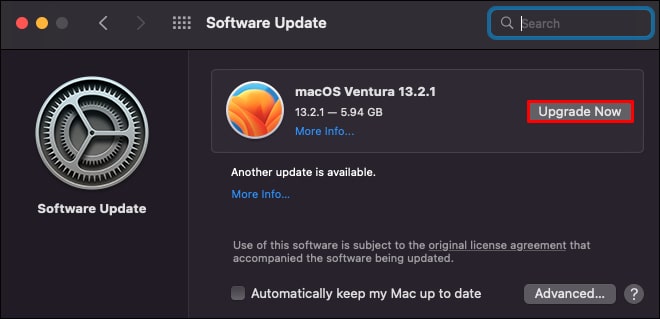
- Step 3. If there are any new updates, click Update Now.
- Step 4. If you wish to switch to the newest iOS version, click Upgrade Now.
Now, try sending an iMessage from your iPhone to see whether or not it appears on your Mac Messages. If necessary, go through iMessage, iCloud, and Apple ID settings on both devices in case something changed during the update. It still doesn’t work?
There’s one thing left to try.
Sync iMessage with Mac Messages Manually
If you’ve tried all of the above and nothing worked, it could be something wrong with your iCloud account or iCloud in general. If we’re right, this is unfortunately out of your control. The good news is, it’s probably temporary. There is one more thing you can do, though.
You can manually sync messages across your iOS devices. Here’s how:
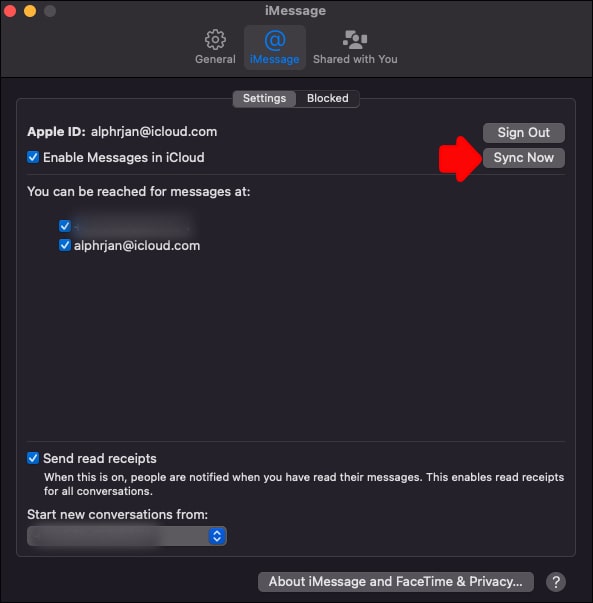
- Step 1. Go to your Mac and open the Message
- Step 2.Under Messages, select Preferences.
- Step 3. Locate the @ icon and click to open.
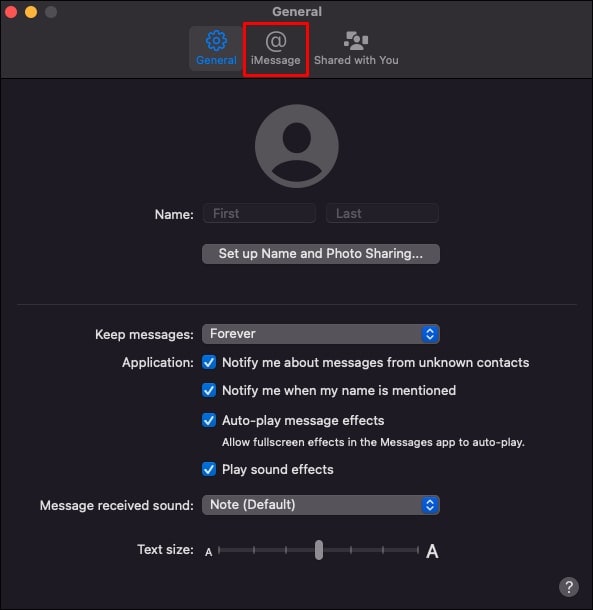
- Step 4. Is Enable Messages in iCloud checked? It should be.
- Step 5.If iCloud for Messages is enabled, click on Sync Now.
Did this work? If your answer is no, you should probably consider contacting Apple support or taking your devices to the nearest repair shop. Hopefully, it didn’t come to that.
4,624,541 people have downloaded it
Conclusion
iPhone and Mac are excellent devices; you should be able to tap into their full potential. If you want to save yourself the trouble of fixing the no-sync issue for your iOS devices repeatedly, you should go to Wondershare Dr.Fone for the ultimate system repair solution.


iPhone Messages
- Back Up iPhone Messages
- 1. Back up Messages on iPhone
- 2. Save Text Messages on iPhone
- 3. Back up Viber messages
- 4. Back up WhatsApp Data to Computer
- 5. Export WhatsApp Message from iOS
- Delete iPhone Messages
- 1. Delete iMessages on iPhone and iPad
- 2. Delete Snapchat Messages on iPhone
- 3. Delete WA for Everyone
- 4. Delete WA Message Permanently
- 5. Delete Text Messages from iPhone
- 6. Tips about WhatsApp Delete Message
- 7. Undelete Messages on iPhone
- 8. View Deleted iMessage History on PC
- Recover iPhone Messages
- 1. Recover iPhone Deleted Text Messages
- 2. Recover Deleted Viber Messages
- 3. Recover Messages on iPhone 13
- 4. Recover Deleted Message on iPhone 8
- 5. Recover Deleted Message iPhone 6
- 6. Transfer from iPhone to iPhone
- 7. Recover WhatsApp Messages Online
- 8. Restore 1-Year-Old WhatsApp Chats
- Restore iPhone Messages
- 1. Restore Kik Messages from iPhone
- 2. Restore Text Messages on iPhone
- 3. Restore Viber Messages Selectively
- 4. Restore Kik Messages to iPhone
- Transfer iPhone Messages
- 1. Transfer from Android to iPhone
- 2. Transfer from iPhone to iPhone
- 3. Transfer from iPhone to Computer
- 4. Transfer from Android to iPhone XS
- 5. WhatsApp from Android to iOS
- 6. Transfer from Android to iPhone 13
- 7. WhatsApp from iPhone to PC
- 8. Download Text Messages from iPhone
- 9. Sync iMessage between iPhone and Mac
- iPhone Messages Problems
- 1. iMessage Not Working
- 2. iMessage Keeps Crashing
- 3. iMessage Not Syncing on a Mac
- 4.iPhone won't send or receive texts
- 5. iMessage Freezing or Not Working
- 6. Why Are My iPhone Messages Green
- iPhone Message Tricks
- 1. Export Messages from iPhone to PDF
- 2. Know Who Read WA Group Message
- 3. iPhone Message Tips and Tricks
- 4. Access iMessage Online
- 5. Extract Text Messages from iPhone
- 6. Forward Text on iPhone and Android
- 7. Print Text Messages from iPhone
- 8. View iPhone Messages on PC/Mac
- 9. Tell If You Are Blocked on iMessage
Alice MJ
staff Editor
Generally rated4.5(105participated)