4 Practical Solutions to Backup WhatsApp Data on iPhone
iPhone Messages
- Back Up iPhone Messages
- 1. Back up Messages on iPhone
- 2. Save Text Messages on iPhone
- 3. Back up Viber messages
- 4. Back up WhatsApp Data to Computer
- 5. Export WhatsApp Message from iOS
- Delete iPhone Messages
- 1. Delete iMessages on iPhone and iPad
- 2. Delete Snapchat Messages on iPhone
- 3. Delete WA for Everyone
- 4. Delete WA Message Permanently
- 5. Delete Text Messages from iPhone
- 6. Tips about WhatsApp Delete Message
- 7. Undelete Messages on iPhone
- 8. View Deleted iMessage History on PC
- Recover iPhone Messages
- 1. Recover iPhone Deleted Text Messages
- 2. Recover Deleted Viber Messages
- 3. Recover Messages on iPhone 13
- 4. Recover Deleted Message on iPhone 8
- 5. Recover Deleted Message iPhone 6
- 6. Transfer from iPhone to iPhone
- 7. Recover WhatsApp Messages Online
- 8. Restore 1-Year-Old WhatsApp Chats
- Restore iPhone Messages
- 1. Restore Kik Messages from iPhone
- 2. Restore Text Messages on iPhone
- 3. Restore Viber Messages Selectively
- 4. Restore Kik Messages to iPhone
- Transfer iPhone Messages
- 1. Transfer from Android to iPhone
- 2. Transfer from iPhone to iPhone
- 3. Transfer from iPhone to Computer
- 4. Transfer from Android to iPhone XS
- 5. WhatsApp from Android to iOS
- 6. Transfer from Android to iPhone 13
- 7. WhatsApp from iPhone to PC
- 8. Download Text Messages from iPhone
- 9. Sync iMessage between iPhone and Mac
- iPhone Messages Problems
- 1. iMessage Not Working
- 2. iMessage Keeps Crashing
- 3. iMessage Not Syncing on a Mac
- 4.iPhone won't send or receive texts
- 5. iMessage Freezing or Not Working
- 6. Why Are My iPhone Messages Green
- iPhone Message Tricks
- 1. Export Messages from iPhone to PDF
- 2. Know Who Read WA Group Message
- 3. iPhone Message Tips and Tricks
- 4. Access iMessage Online
- 5. Extract Text Messages from iPhone
- 6. Forward Text on iPhone and Android
- 7. Print Text Messages from iPhone
- 8. View iPhone Messages on PC/Mac
- 9. Tell If You Are Blocked on iMessage

Jul 12, 2024 • Filed to: Manage Social Apps • Proven solutions
"From personal WhatsApp messages between you and your friends, family and loved ones, all the photos, videos, and voice note you’ve ever shared via WhatsApp, all the business conversations and important information and everything in between. How to backup them properly?"
Learning how to backup WhatsApp on iPhone is so important in the modern era, yet despite its importance, there are still far too few people who are proactive in making sure they’re doing it.
Take a moment to think about all the WhatsApp messages currently sitting in your inbox and outbox. This is only scratching the surface when it comes to the amount of data your iPhone has just in your WhatsApp account, and it doesn’t need to be said how devastating it could be if you lose it all.
However, by learning how to backup WhatsApp messages on iPhone, you can be sure you never have to worry about this being a problem again.
Today, we’re going to explore 4 essential ways you can backup WhatsApp chats on iPhone, and the easiest way possible where you have full control over everything on your WhatsApp.
- Part 1: One-Click to Backup WhatsApp Data on iPhone
- Part 2: Backup WhatsApp Data on iPhone with iTunes
- Part 3: Use iCloud to Backup WhatsApp Data on iPhone (Apple's Way)
- Part 4: Use iCloud to Backup WhatsApp Data on iPhone (WhatsApp's Way)
- Part 5: How to View WhatsApp Details in iTunes and iCloud Backups
Part 1: One-Click to Backup WhatsApp Data on iPhone
The best way to backup WhatsApp on iPhone is to use an application known as Dr.Fone - WhatsApp Transfer. This is a powerful, dual-featured restore WhatsApp backup iPhone application that handles all the backup and restoration processes on your iPhone, not just for WhatsApp, but any social app you might use.
However, Dr.Fone - WhatsApp Transfer is so much more than just a tool to help you learn how to backup WhatsApp messages iPhone. Here are five of the key advantages of using this app:
Dr.Fone - WhatsApp Transfer
One-click to backup WhatsApp chats on iPhone to PC
- Transfer WhatsApp messages between devices (any iOS or Android supported)
- Backup all WhatsApp media & attachments to PC in one click
- Individually manage what you save and don’t save from WhatsApp
- Manage multiple WhatsApp backup files from iPhone
- Works on most iPhone social apps like WhatsApp, Kik, LINE, WeChat, and Viber


A Step-by-Step Guide on How to Backup WhatsApp on iPhone
To help you get started with this fast and effective solution on how to backup WhatsApp messages iPhone, here’s a step-by-step guide with everything you need to know.
Step #1 - Acquire the Software
Download the software onto your Mac or Windows computer. Install the software onto your device using the usual method.
Step #2 - Open the Software
Once installed, open the software, so you find yourself on the main menu. Click the "WhatsApp Transfer" option, followed by the ‘Backup WhatsApp Messages’ option.

Step #3 - Connecting Your Device
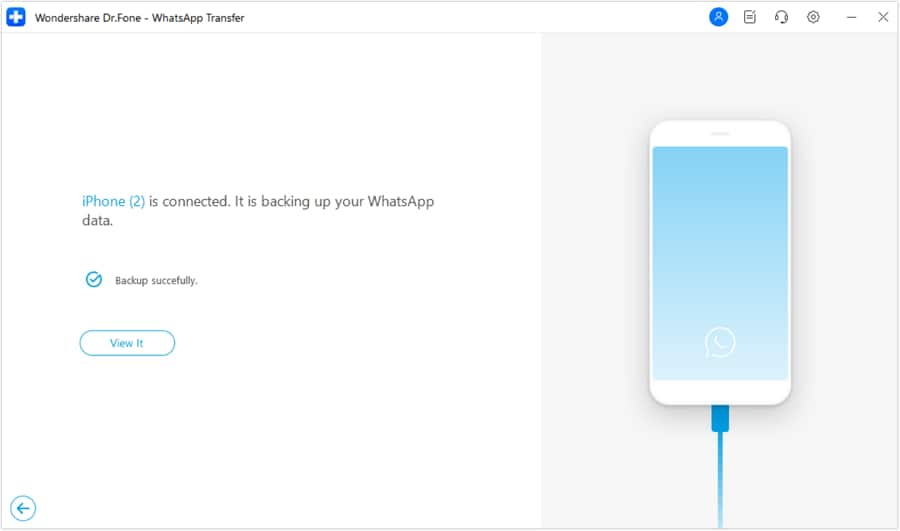
Connect your iOS device to your computer using the official cable and by following the on-screen instructions. Once the device is confirmed, the backup WhatsApp process on iPhone will begin.
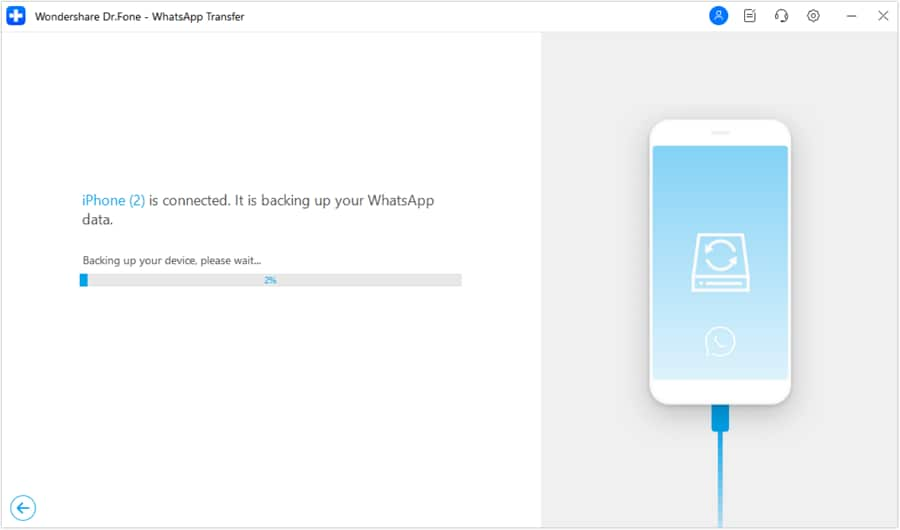
You can track the progress on the screen, and you’ll be notified when it’s complete.
Step #4 - Sorting Through Your Backup
Now you’ll have the opportunity to export your data manually and sort through it. On the screen, select the backup folder you wish to manage and click ‘View’.

You’ll now be able to go through all your WhatsApp messages and attachments, organizing what you want to keep and not keep. Of course, you can save everything on WhatsApp if you want to.
When you’re happy with your selection, click the ‘Export to PC’ button to save your iPhone WhatsApp backup for whenever you need it.
Part 2: Backup WhatsApp Data on iPhone with iTunes
The first way you may consider backing up your content is by using Apple’s main platform for managing iOS data; iTunes. While this is entirely possible, the problem is that an iPhone WhatsApp backup will simply backup all the data on your device.
With iTunes, there’s no way you can just backup only your WhatsApp information, but you’ll need to back up your entire device. There are several other disadvantages to this method which are;
- While iTunes does backup your WhatsApp data, you can’t sort through it for what you want and don’t want.
- You can’t use it to individually backup your WhatsApp app, but have to back up your entire iPhone.
- Must be connected to iTunes or iCloud for the backup process to work.
A Step-by-Step Guide on How to Backup iPhone Using iTunes
Although there are some disadvantages, here’s how to backup WhatsApp chat iPhone using iTunes;
Step #1 - Get Everything Up to Date
First, you’ll want to make sure both your iTunes program and iOS device is running the latest firmware to minimize the risk of bugs taking place. Update everything before proceeding.
Step #2 - Connect Your Device
Connect your device to your Mac or Windows computer using the official Lightning USB Cable. Open iTunes on your computer (or it will open automatically) and select the Device Icon from the left-hand side.
Step #3 - Start Backing Up
Select the ‘Back Up Now’ option and iTunes will proceed to back up your iOS device, including your WhatsApp messages. Do not disconnect your device until the process is completed. Once completed, your WhatsApp message will be backed up for when you need them.
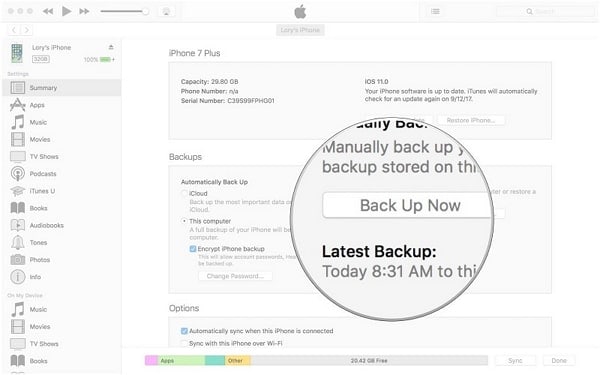
You’ll also be able to restore WhatsApp backup iPhone using the reverse technique and clicking the ‘Restore’ button, rather than the ‘Back Up Now’ button.
Part 3: Use iCloud to Backup WhatsApp Data on iPhone (Apple's Way)
Just like learning how to back WhatsApp on iPhone to your iTunes account, you can also do some iCloud settings, so the messages are backed up via iCloud automatically. The bad part is also that you have to back up the whole iPhone data, which includes WhatsApp chats.
For this, you’ll need to make sure you’re signed in to your Apple ID on your device, and the iCloud features are enabled. You’ll also want to do this on a Wi-Fi connection unless you’ve enabled backups on cellular data.
Here’s how it works to backup WhatsApp with iCloud:
For iOS 8 and above (like iOS 11/12)
On your device, navigate iPhone Settings > iCloud > and then turn iCloud ON. This way, all iPhone data will be backed up to iCloud together with your WhatsApp chats.
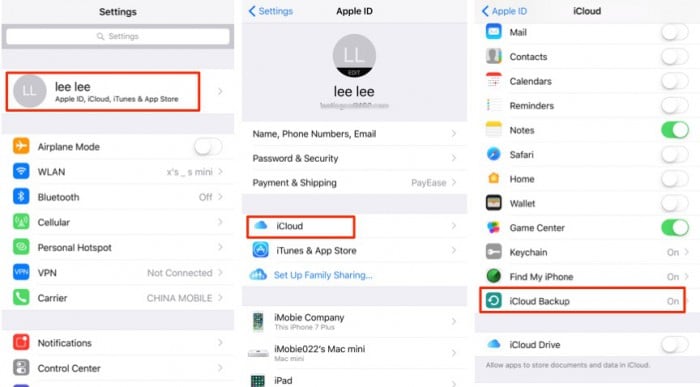
For iOS 7 or earlier
On your iPhone, navigate iPhone Settings > Documents & Data and then turn this setting on.
This will automatically backup your entire device during a scheduled period, which you can edit in the settings. You won’t be able to back up your WhatsApp individually; you will need to do your entire device.
Part 4: Use iCloud to Backup WhatsApp Data on iPhone (WhatsApp's Way)
The WhatsApp app itself also utilizes iCloud to backup WhatsApp data on iPhone, but differently from how Apple backup your iPhone with iCloud. If you have important WhatsApp conversations to back up in the way specified by WhatsApp, here is how:
On your iOS device, navigate WhatsApp > Chat Settings > Chat Backup > Backup Now.

This is all you need to do to start a WhatsApp backup on iPhone at any time.
Part 5: How to View WhatsApp Details in iTunes and iCloud Backups
Once you’ve backed up your WhatsApp messages into your iTunes account, or your iCloud account, normally this is all you can do, but it, unfortunately, doesn’t allow you to go through your WhatsApp backup, manually manage your data files, and select which individual WhatsApp conversations you want to keep.
After all, there’s probably only a handful of important WhatsApp messages, the rest can go, and this is only using up memory you don’t have spare. This is where Dr.Fone - Data Recovery (iOS) comes into help.
This is a powerful tool that allows you to open up your WhatsApp backup files from iCloud and iTunes, so you browse through and save your WhatsApp messages independently. Here’s how it works;
Step #1 - Get the Software
Download the software for either your Mac or Windows computer. Install it like you normally would, and once you’re ready, open the software, so you’re on the main menu.
Step #2 - Connecting Your iPhone to PC
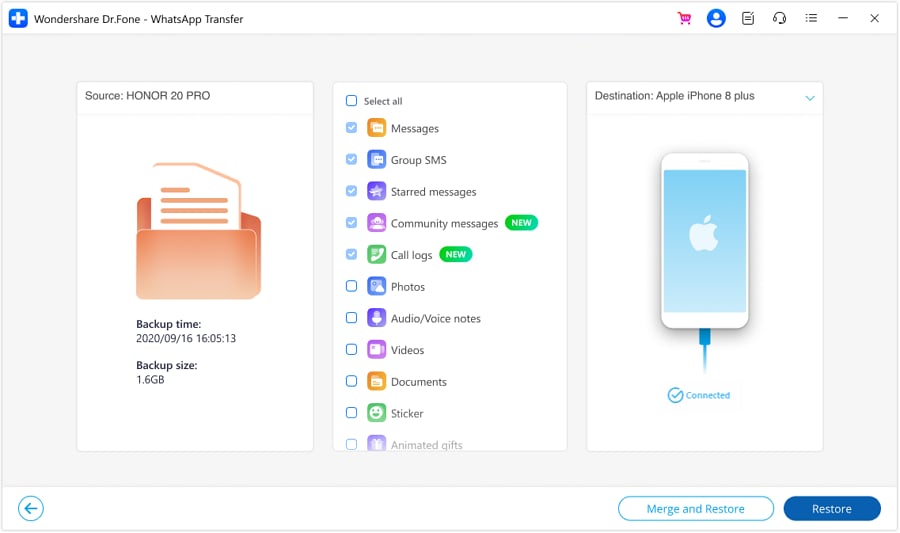
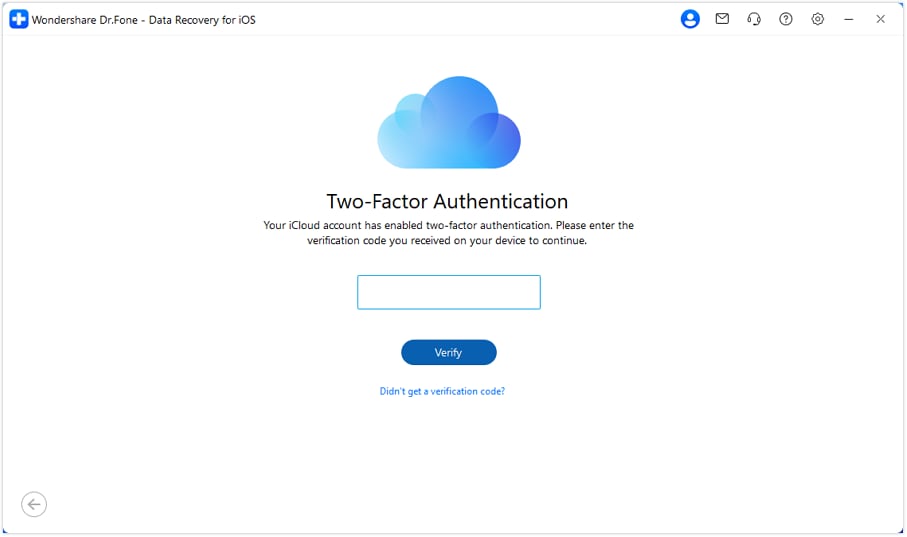
Connect up your device and click the "Data Recovery" option, followed by ‘Recover iOS Data’.

Click on the "Recover from iCloud backup file" tab. You will then need to sign in to your Apple ID account.
Note: The following takes recovering WhatsApp from iCloud backup as an example. This same way goes for recovering WhatsApp from iTunes backup.
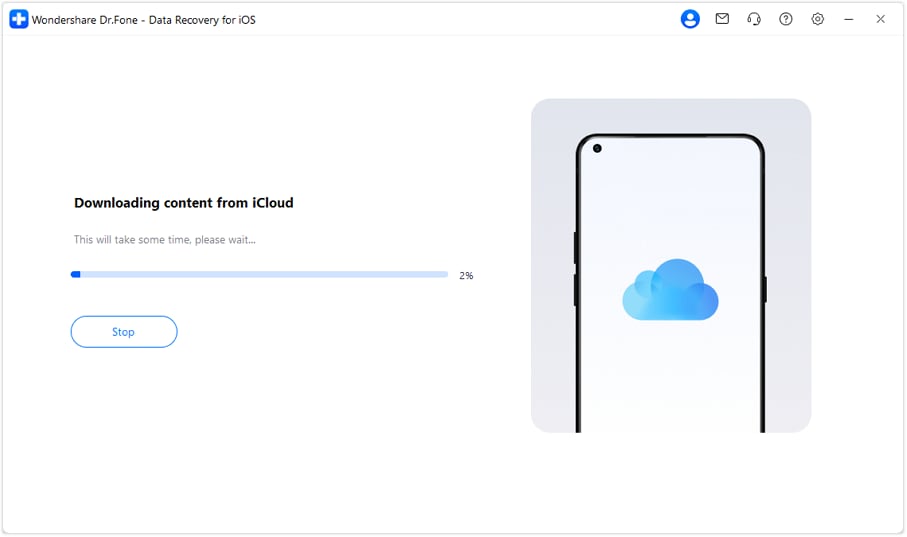
Step #3 - Extracting Your WhatsApp Messages from iCloud or iTunes
From your Apple ID account, you’ll be able to download your iOS backup file which contains your WhatsApp messages. Simply choose the backup file that you want to extract from. They are organized by date for easy searching.
Step #4 - Selecting Your WhatsApp Data
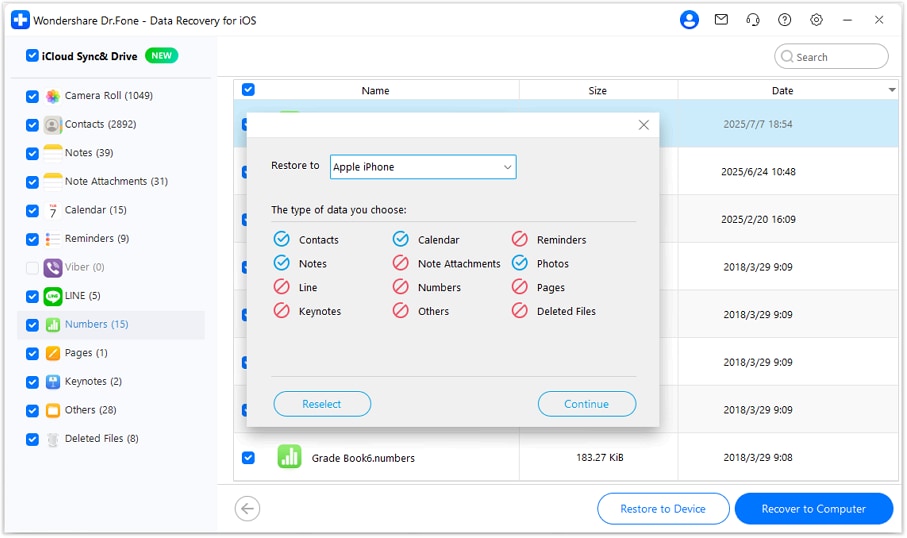
In the next window, you’ll be able to choose what file types in your iCloud backup, like WhatsApp and WhatsApp Attachments. This will prevent you from having to download the entire file, but rather just your WhatsApp chat data. Then click "Next".
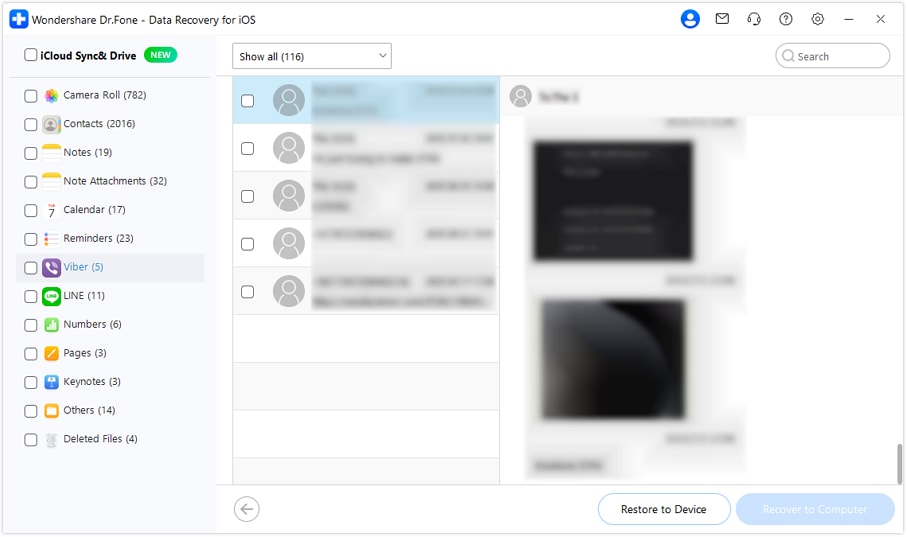
You’ll then see all your WhatsApp data files organized in a list after they have been scanned and you’ll be free to browse them and extract the wanted ones.


Bhavya Kaushik
contributor Editor