Recover photos, messages, WhatsApp, and more — no backup
needed.
Recover photos, messages, WhatsApp, and more — no backup
needed.

 100% Security Verified | No Subscription Required | No Malware

 :
: 
 ChatGPT
 Perplexity
 Gemini
 Claude
 Grok
Grok


I accidentally erased crucial conversations on my device. What is the most effective way to recover deleted data from iPhone 13, especially my texts and contacts?
Losing important digital information on your smartphone can happen in the blink of an eye. A hurried swipe or an unintended tap can permanently erase your favorite conversations, essential work chats, and valuable contact details.
We all experience that immediate wave of panic upon realizing we might never get those essential files back. However, there is no need to worry. Your seemingly vanished data isn’t gone for good. Whether you deleted them mere moments ago or several months back, we will help you get them back effortlessly!
This comprehensive guide will thoroughly explore how to recover deleted data from iPhone 13, ensuring you understand all available options in 2026. Don't have a reliable backup? We will also reveal a highly practical strategy to restore your lost chats, contacts, and media without relying on one.
Ready to reclaim your lost memories and details? Let’s dive right in!
In this article
Part 1. Can You Recover Deleted Texts and Data on iPhone 13?
Absolutely! You can swiftly retrieve messages and other data deleted within the past thirty days. Apple integrated a highly requested feature into the native Messages app starting from iOS 16 and continuing through the latest iOS updates in 2026. However, securely retrieving texts or trying to recover contacts from iPhone13 on a significantly older software version can present more technical challenges.
If your device lacks these newer folders, you will generally need to restore a comprehensive backup saved securely on your local computer or via iCloud. This restoration will include your deleted chats, contacts, and media files. Alternatively, if no backup is available, you can seamlessly recover lost messages using dedicated third-party data retrieval software designed specifically for iOS environments.
Part 2. What Types of Data Can You Recover on iPhone 13?
Modern recovery methods allow you to restore practically any type of digital file. Whether your data was accidentally erased, vanished after a routine factory reset, or lost during a malfunctioning system update, options exist. You can reliably retrieve attached photos, cinematic videos, crucial documents, voice memos, and specific app data alongside your texts. Many users also successfully use these strategies to recover phone records from iPhone systems seamlessly.
If the missing information belongs to an app rather than Messages or Contacts, follow this focused guide to recover deleted app data on iPhone.
When categorizing the recovery scope, there are primarily two distinct states of deleted texts and files you might encounter:
- Recently Deleted Data: This category encompasses any item deleted within the standard 30-day grace period. You can typically recover these directly from the native Recently Deleted folders built into your iOS apps. The official iCloud web interface serves as an excellent alternative option here.
- Permanently Deleted Data: Older messages and files are automatically purged from the Recently Deleted folder once the 30-day window expires. To extract them, you must employ a specialized data recovery tool capable of deep scanning. Otherwise, you must rely on older iTunes/Finder or iCloud backups to effectively restore your device to a previous state.
Let’s systematically explore the best methods to securely recover texts from iPhone and other essential records below.
Part 3. How to Recover Recently Deleted Messages & Attachments on iPhone 13
Having a recent backup makes retrieving your lost information highly accessible and straightforward. Restoring a comprehensive backup will seamlessly help retrieve your deleted messages and their associated attached files. We’ve thoroughly detailed several intuitive options to make this process work for your specific scenario.
Option 1. Retrieve Files from the Recently Deleted Folder
The native Recently Deleted folder is an excellent built-in utility on your iPhone 13. It securely stores all erased items for up to 30 days. These items often include your downloaded message attachments, high-resolution photos, videos, and professional documents. Be mindful, however, that it will not assist in recovering files that have been permanently erased from the device's memory.
Here’s exactly how to use this feature to regain your missing files:
-
Step 1 Open the Native Files App
Navigate to your home screen and open the Files app on your device to begin the process.
-
Step 2 Access the Browse Section
Tap the Browse tab located at the bottom or top left corner, depending on your iOS version.
-
Step 3 Locate Recently Deleted
Carefully tap on Recently Deleted located beneath the primary Locations menu.
-
Step 4 Execute the Recovery
Tap Recover All to instantly retrieve every deleted file stored here. Alternatively, handpick your desired files, tap the more options button, and select Recover.

Option 2. Recover Directly from the Messages App
Since the introduction of iOS 16, the standard Messages app includes its very own Recently Deleted folder. This powerful addition lets you instantly recover texts from iPhone 13 without complex workarounds. Remember, after the 30-day retention period, these items face permanent deletion.
Follow these quick instructions:
-
Step 1 Launch Messages
Open the primary Messages application directly on your smartphone.
-
Step 2 Access the Edit Menu
Tap the Edit or Filters button situated at the top left corner of the screen.
-
Step 3 View Deleted Items
When the contextual menu appears, gently tap Show Recently Deleted to reveal your hidden conversations.
-
Step 4 Select and Recover
Manually check the individual message threads you intend to restore. Once chosen, tap the Recover option located at the bottom right interface.

-
Step 5 Confirm Restoration
Tap the "Recover [Number] Messages" text prominently displayed on the popup confirmation to successfully restore your chats.
Option 3. Recover Using iCloud Messages Synchronization
If you find yourself still wondering how to seamlessly recover deleted data from iPhone 13, another clever solution exists. You can temporarily disable iCloud synchronization specifically for Messages, effectively forcing the device to download the previously synced, intact version from Apple's servers.
This method halts the immediate deletion command from syncing uniformly across your connected Apple devices, empowering you to safely restore the most recent, untampered version of your conversations.
Here’s the precise workflow to achieve this:
-
Step 1 Access Apple ID Settings
Go directly to your device’s central Settings. Tap your primary Apple ID name displayed at the very top.
-
Step 2 Navigate to iCloud
Tap the iCloud menu option located prominently on the subsequent screen.
-
Step 3 Expand Cloud Apps
Scroll toward the 'Apps Using iCloud' section. Tap the Show All option to reveal every synchronized service.

-
Step 4 Toggle Off Synchronization
Select the Messages in iCloud category. Next, cleanly toggle off the switch labeled Use on this iPhone.
-
Step 5 Disable and Download
A secondary prompt menu will emerge. Tap Disable and Download Messages from the provided choices to fetch your texts.

-
Step 6 Re-enable Synchronization
Patiently wait a few moments. Then, toggle back on the Use on this iPhone option to resume normal cloud activity.
-
Step 7 Verify Restored Data
Open your primary Messages application. All of your comprehensively backed-up iCloud messages will begin populating and downloading automatically.
Part 4. How to Recover Permanently Deleted Messages on iPhone 13 [With Backup]
There are instances where you might have erased important messages or contacts well over a month ago but desperately require them today. How can you get them back after the 30-day window? You can reliably overwrite your current state by restoring a full backup file generated before the exact moment you deleted those texts. Both iTunes (or Finder) and iCloud serve as robust platforms for this purpose.
Option 1. Restore Data Locally with iTunes or Finder
iTunes (and Finder on newer macOS systems) permits you to restore your comprehensive local backups and recover essentially all of your lost files. This overarching restoration will successfully include your iPhone 13’s deleted messages, media, and more. It is an excellent way to recover phone records from iPhone setups directly from your personal computer’s storage.
Let’s review the detailed process:
-
Step 1 Connect and Launch
Securely connect your iOS device to your trusted computer using a certified USB cable. Then, proceed to launch iTunes or Finder.
-
Step 2 Access Device Summary
Click on the tiny Device icon located near the top left corner of the window. Following that, select Summary from the navigation panel on the left.
-
Step 3 Initiate Backup Restoration
Scroll down to the dedicated Backups category. Identify whether your most relevant backup is situated on iCloud or stored locally on your computer. After deciding, click the prominent Restore Backup button.

-
Step 4 Select the Target Archive
A new popup window will instantly appear. Click the selection dropdown from this interface and accurately choose your preferred backup Image name based on its timestamp. Finally, click Restore. Your device will reboot, restoring all files alongside your precious text messages and contacts.

Option 2. Restore Your Full Backup via iCloud
If you have accidentally deleted critical messages but currently have no physical access to a PC running iTunes, do not worry. You can systematically perform a full factory reset directly on the device and securely restore all messages straight from your iCloud servers. A word of caution, however: this procedure will completely wipe out everything currently residing on your phone before applying the old backup.
Let’s break down exactly how to restore your lost data using this wireless method:
-
Step 1 Access General Settings
Open the primary Settings app, scroll down slightly, and tap on General.
-
Step 2 Navigate to Reset Options
Scroll to the absolute bottom of the menu and select Transfer or Reset iPhone.
-
Step 3 Initiate the Erasure
Carefully tap Erase All Content and Settings. On the subsequent informative screen, confirm by tapping Continue.
-
Step 4 Authenticate the Process
Input your device’s security passcode when prompted. Finally, tap Erase iPhone to firmly confirm the destructive action.

-
Step 5 Wait for Reboot
Patiently wait for the smartphone to finish erasing and completely reboot to the Hello screen. Then, commence the standard setup process.
-
Step 6 Reach the Data Screen
Once you navigate forward and reach the crucial Apps & Data screen, firmly select the Restore from iCloud Backup option.
-
Step 7 Sign In and Restore
Securely sign in to the corresponding iCloud account housing your older backup. Intelligently select the correct historical backup you wish to deploy and follow any remaining on-screen instructions to finalize the procedure.

So, there you have it—a comprehensive look at all the practical and manufacturer-approved ways to recover deleted data from iPhone 13, assuming you possess a timely backup. But what if you are completely without a backup file? Keep reading to discover the most effective software solution!
Part 5. How to Recover Any Deleted Data, Even Messages on iPhone 13 Without Backup
Have you definitively lost essential text conversations, valuable contacts, or crucial attachments but lack any cloud or local backup to fall back on? Don’t panic just yet. Powerful external software like Dr.Fone - Data Recovery (iOS) can effectively salvage and recover your specific files in absolutely no time!
This premium, professional-grade data recovery suite empowers you to directly and selectively recover deleted messages on your iPhone 13 along with all corresponding attachments. Strikingly, absolutely no pre-existing backup is necessary for this tool to perform its deep system extraction.
The most beneficial aspect? You maintain full control. You can precisely filter and select just the exact file type you critically need, successfully avoiding the frustrating process of overwriting all your current, existing device data. It seamlessly resolves nearly all complex data loss scenarios. Whether you severely lost your texts after an accidental deletion, a sudden debilitating system crash, or physical hardware damage, Dr.Fone will safely extract and seamlessly return them directly to your device.
Beyond standard text chats, you can confidently retrieve over 30 distinct data types—making it incredibly simple to recover contacts from iPhone13, salvage detailed call histories, extract important voicemails, or reclaim anything else. Additionally, if the situation ever demands it, Dr.Fone seamlessly helps you restore backups from iCloud and traditional iTunes archives with superior selective control.
 Recovers data after deletion, crashes, or device damage.
- Supports photos, messages, contacts, WhatsApp, and more.
- Supports all major iPhone, iPad, and iPod models.
- Preview and recover only what you need.

Are you currently wondering exactly how to leverage this advanced software to rapidly recover deleted data from iPhone 13? Let’s meticulously break down the intuitive recovery process!
-
Step 1 Install and Launch the Application
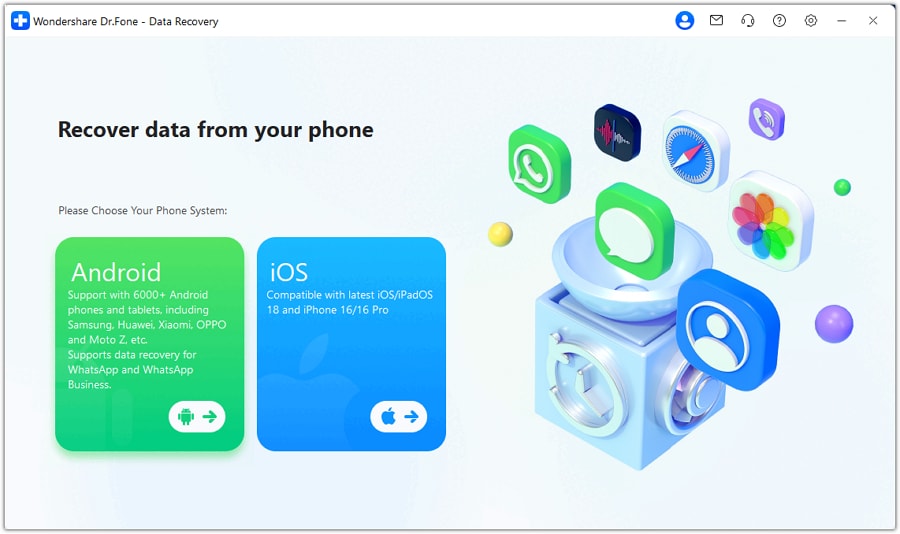
Begin by securely downloading and cleanly installing Wondershare Dr.Fone onto your PC or Mac. Launch the main application interface and purposefully select the Toolbox tab from the main left navigation menu. From there, actively choose the dedicated Data Recovery functional tool.

-
Step 2 Define Your Device Ecosystem
Promptly select iOS as your primary device type directly from the cleanly presented next window and proceed forward.
-
Step 3 Target Direct Device Recovery
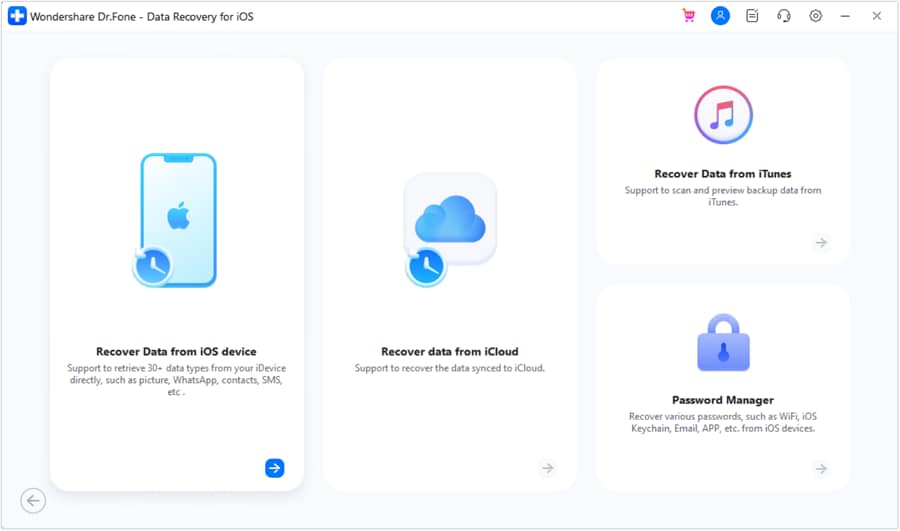
Clearly choose the specific Recover Data from iOS device modular option. This precise selection instructs the software to fundamentally retrieve lost data directly from your iPhone 13’s internal memory storage rather than an external backup archive.
-
Step 4 Connect and Scan for Data
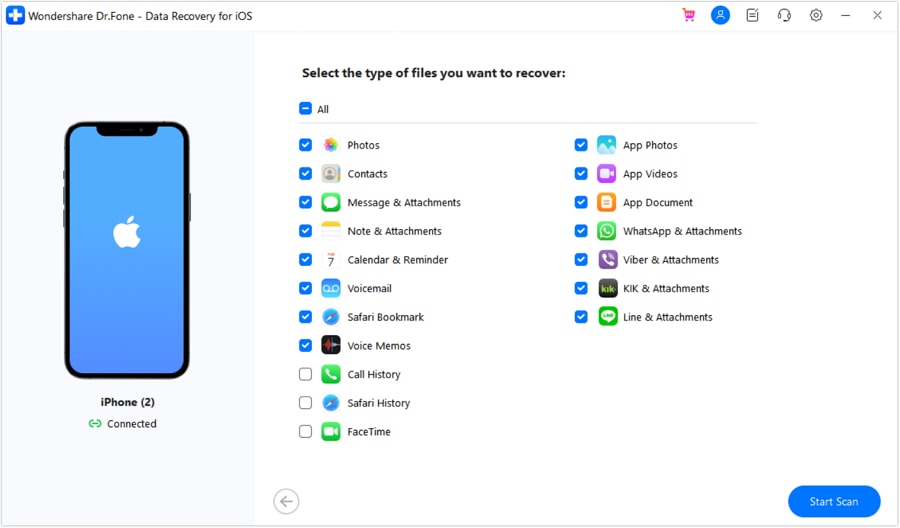
Physically link the iOS device securely to your computer utilizing a dependable USB or Lightning cable. Patiently wait a few seconds for it to be fully authenticated and detected. Subsequently, tick the specific data type checkboxes you desire to recover and firmly click the prominent “Start Scan” execution button.
-
Step 5 Preview and Extract Files
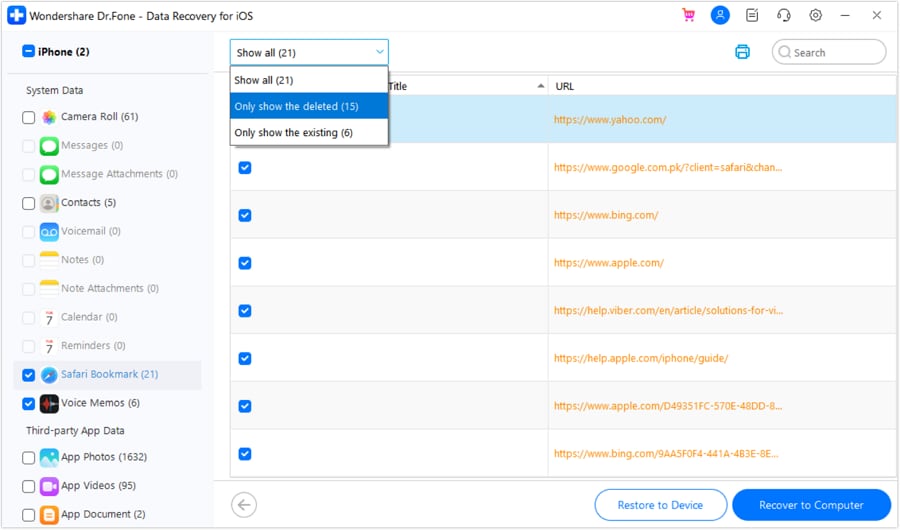
The moment the deep scan safely concludes, you can visually select and intimately preview the exact data you want to thoroughly recover. Utilize the intuitive dropdown menu situated at the top to intelligently filter the extensive results. Once verified, confidently click either “Restore to Device” or the alternative “Recover to Computer” button depending entirely on your desired save location.
-
Step 6 Confirm the Target Destination
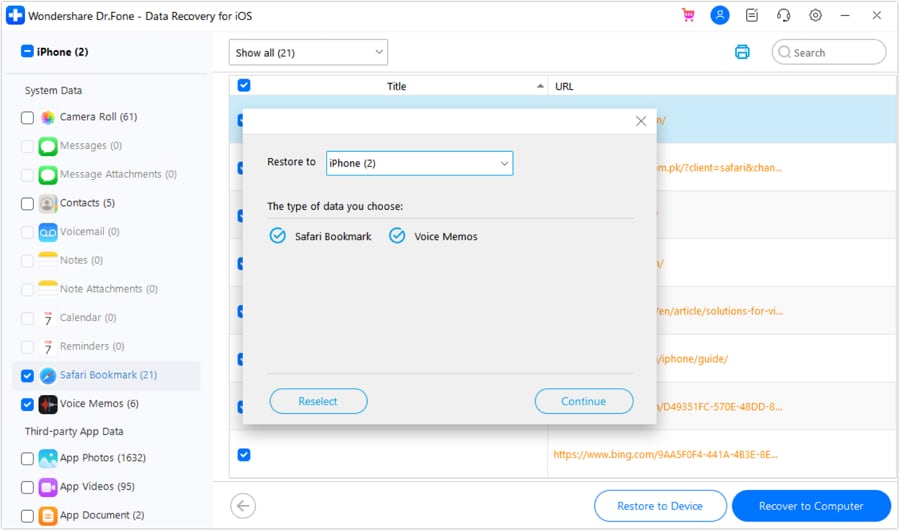
Carefully select the exact device you want to save your curated data to, provided you chose the direct device restoration option. Then, click the Continue button.
-
Step 7 Finalize the Operation
Ensure you temporarily turn off the native 'Find My' security feature on your iPhone and proceed forward. Your carefully selected data will now be successfully completely restored to your active device seamlessly.
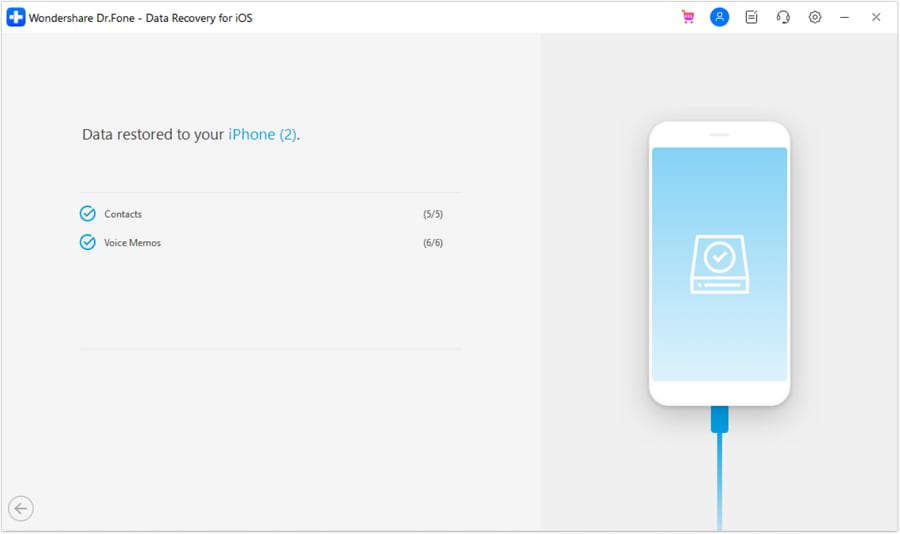
You now possess expert knowledge regarding how to efficiently retrieve deleted messages and other vital information on your smartphone! It is an incredibly seamless and stress-free process powered by Dr.Fone. Regardless of whether you have consistently maintained a backup or not, you can safely secure your messages and successfully recover phone records from iPhone hardware confidently!
Conclusion
That effectively wraps up our exhaustive guide detailing how to recover deleted data from iPhone 13. By utilizing the comprehensive instructions outlined above, you can confidently identify a highly feasible and tailored solution to recover any lost conversations, attachments, and essential contacts on your device. These detailed methods are thoroughly compatible with navigating both recently deleted accidents and far older, seemingly permanent message disappearances.
If you find yourself in the precarious position of completely lacking a recent iCloud or iTunes backup, relying on professional software like Dr.Fone - Data Recovery (iOS) is incredibly advantageous. It will swiftly and safely extract lost conversations and rich attachments straight from the bare memory of your device. This powerful, user-friendly tool explicitly supports all contemporary iOS versions operating into 2026 and consistently demonstrates a leading success rate. You can definitively rescue your critical texts and safely recover contacts from iPhone13 without facing a single technical hitch.




FAQ
-
1. Can I thoroughly recover text messages on my iPhone 13 if I don't possess a backup?
Yes, absolutely! You can still reliably restore deleted messages and diverse data even if cloud synchronization was disabled. The simplest, most effective method is to deploy dedicated iPhone data recovery software. Dr.Fone - Data Recovery (iOS) acts as the premier choice on the market for this task. It masterfully restores permanently deleted text messages by safely scanning internal memory directly, completely removing the requirement for any prior iTunes or iCloud backup. -
2. Where exactly do the deleted messages and contacts go internally on my iPhone 13?
Whenever you purposefully or accidentally delete a text thread, Apple's iOS ecosystem immediately routes those files directly into a hidden Recently Deleted folder located within the native Messages app. They remain fully stored there in a state of limbo for exactly thirty days, allowing for easy, native recovery. Following that stringent timeframe, iOS permanently and irretrievably erases them from standard device storage. -
3. How do I effectively recover severely lost texts or data on iPhone 13 once the 30-day grace period expires?
If thirty days have elapsed, deleted iPhone messages and files are permanently purged from natively accessible iOS folders. However, you can frequently still restore them by employing an advanced third-party data extraction tool. Such specialized software will execute a deep, low-level scan across your device's memory chips searching for lingering, recoverable file fragments. Once discovered, you can preview and restore them efficiently directly to your connected device. -
4. Will executing a full iCloud backup restore overwrite the current files presently on my phone?
Yes, unfortunately, it will. Restoring an older iCloud backup necessitates first performing a complete device factory wipe (Erase All Content and Settings). This severe action permanently removes all photos, new texts, and application data accumulated after the date that specific backup was generated. It essentially rolls back your smartphone to that specific historical state entirely.
 Add Wondershare Dr.Fone as a preferred source on Google