100% Security Verified | No Subscription Required | No Malware

 :
: 
 ChatGPT
 Perplexity
 Gemini
 Claude
 Grok
Grok
We all know that DFU (Device Firmware Update) Mode is a powerful state for iPhone, iPad, and iPod touch users, but many struggle with how to get out of it safely. Whether you entered DFU mode for a deep system restore or got stuck there by accident, the primary concern is always data security. In this guide, we will explore effective ways to exit the DFU screen and how to perform a backup of your iPhone after DFU mode in 2026.
A DFU backup strategy is essential because entering or exiting these deep system states can occasionally lead to data instability. By following the right protocols, you can ensure your files remain intact. Let's look at the simple steps to recover your device and secure your information.
In this article
Part 1. How to Get Your iPhone out of DFU Mode
Once your iPhone enters DFU Mode and you have completed the necessary firmware updates or repairs, you must exit this state to access your data again. Since the device doesn't load the OS in DFU mode, you cannot perform a standard sync or backup until the system reboots normally. Below are two methods to help you return to regular operation.
1-1. Using Dr.Fone - System Repair (iOS) (No Data Loss)
Using Dr.Fone - System Repair (iOS) is the most reliable way to exit DFU Mode on an iPhone, iPad, or iPod without risking your personal files. This professional tool is designed to fix various system issues, including the blue screen of death, frozen devices, and devices stuck in boot loops, all while maintaining data integrity.
 Fix iOS issues, no data loss.
- One-click repair for all iOS problems.
- Solve recovery mode, Apple logo, black screen, etc.
- Upgrade or downgrade iOS without iTunes

Follow these steps to safely bring your iPhone out of DFU Mode:
Step 1Connect and Select System Repair
Launch the Dr.Fone software on your PC and select "System Repair" from the home interface. Then, choose "iPhone" followed by "iOS Repair".

Step 2Choose Standard Repair
Connect your device to the computer via a lightning cable. To ensure your data remains safe, select "Standard Repair" from the options provided.

Step 3Download Firmware
The software will detect your device model. Verify the information and click "Download" to get the correct firmware package for your specific iOS version.

Step 4Verify Download
You can monitor the progress of the download. Once finished, Dr.Fone will verify the firmware to ensure a safe installation.

Step 5Repair and Reboot
Click "Repair Now" to begin the process. The tool will fix the system state, and your device will automatically reboot out of DFU Mode.


1-2. Using a Hard Reset (Potential Data Risk)
A hard reset is a manual way to force your iPhone out of DFU mode. While it is a common DIY fix, it can sometimes cause file corruption or data loss if the system was mid-process. Here is how to perform it:
- Connect your device to your computer and open iTunes or Finder.
- Press and hold the Power and Home buttons (or Volume Down for newer models) for about 10 seconds.
- Release the buttons and immediately press the Power button until the Apple logo appears.


Part 2. Back up iPhone Data After Exiting DFU Mode
Once your device is back to its normal functional state, performing a DFU backup (backing up data recovered after a DFU incident) is the most critical step. Wondershare Dr.Fone provides the most flexible platform to selectively back up and restore your messages, call logs, WhatsApp chats, and photos.
- Effortlessly manage data through preview, delete, export, etc.
- Transfer all data between devices.
- Robust backup solutions for reliable data protection.
- Mirror screens to PC for meetings, teaching, and control.

Use the following steps to back up your iPhone data once it has exited DFU mode:
Step 1Open My Backup
Launch Dr.Fone and connect your iOS device. Select "My Backup" from the main menu to begin the process.

Step 2Select Data Types
The software will scan your device and categorize your files. Choose the specific types of data you want to safeguard and click "Back Up Now".

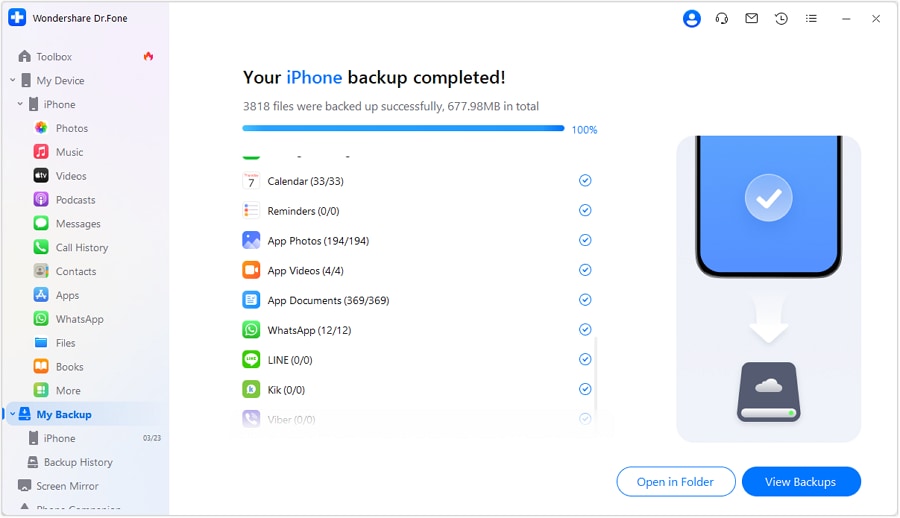
Step 3Monitor Progress
The backup process will start immediately. You can track the progress on your screen as Dr.Fone creates a secure copy on your computer.
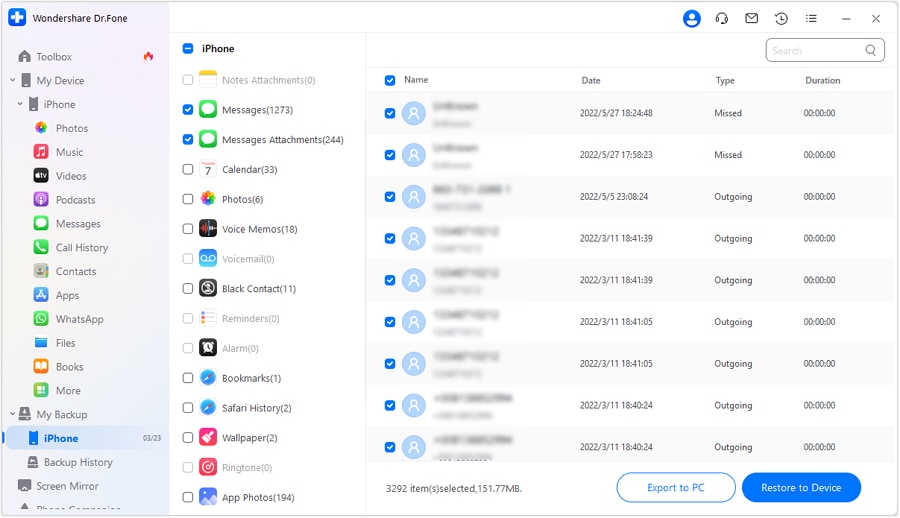
Step 4Review Backup Files
Once finished, you can view the historical backup records and see exactly what was saved.
Step 5Restore When Needed
You can preview the backed-up contents and restore them to any iOS device or export them to your PC at any time.
Conclusion
Exiting DFU mode and performing an iPhone backup are essential skills for any iOS user in 2026. While DFU mode is a useful troubleshooting state, it requires a careful exit strategy to avoid data loss. By using Wondershare Dr.Fone, you gain a dual advantage: the System Repair feature ensures a safe exit from DFU mode, while the Backup feature provides a permanent safety net for your digital life. Protect your photos, messages, and memories by choosing the most reliable tools today.
FAQ
1. Is it possible to back up an iPhone while it is currently in DFU mode?
No, you cannot back up an iPhone while it is in DFU mode. In this state, the operating system is not loaded, and the device is only capable of communicating with low-level tools for firmware updates. You must exit DFU mode first before any backup software can access your personal data.2. Will entering DFU mode delete all my data?
Simply entering DFU mode does not delete your data. However, DFU mode is usually a precursor to a factory restore. If you perform a restore while in DFU mode without a prior backup, all data will be erased.3. How is DFU mode different from Recovery mode?
Recovery mode uses iBoot to restore or upgrade the device, while DFU mode (Device Firmware Update) bypasses iBoot to allow for deeper firmware changes. DFU mode is often used for jailbreaking or fixing advanced system errors.4. What should I do if my iPhone is stuck on a black screen in DFU mode?
If your device is stuck, use Dr.Fone - System Repair. It can detect the DFU state and reinstall the system software to bring the device back to life without deleting your existing data.
 Add Wondershare Dr.Fone as a preferred source on Google