Move contacts, messages, photos, videos, app data, and more between iOS and Android.

 100% Security Verified | No Subscription Required | No Malware

 :
: 
 ChatGPT
 Perplexity
 Gemini
 Claude
 Grok
Grok
Musicians and aspiring artists around the globe are constantly seeking new ways to capture their creative sparks and write original music. Music is undeniably a cornerstone of human expression, allowing individuals to articulate emotions through dynamic melodies and profound lyrics. In 2026, songwriting is more accessible than ever before. Gone are the days when you needed a massive, expensive studio to produce a demo. As long as you have a modern mobile device and a spark of creativity, you can begin drafting your next masterpiece.
Apple devices, particularly iPhones, have revolutionized mobile music production. They serve as powerful pocket studios where you can quickly jot down lyrics, browse for musical inspiration, and lay down audio tracks. A frequent question among instrumentalists is whether they can connect a guitar to your iPhone to record authentic riffs. The answer is a resounding yes. With the right hardware, it is entirely possible to plug musical instruments into an iOS device, unlocking a world of digital amps, effects, and multi-track recording capabilities. If you have an iPhone, you hold a robust songwriting tool in your hands.
In this article
Part 1. Should You Use Your iPhone For Songwriting?
Songwriting is an intricate art form that demands dedication, time, and focus. To compose an outstanding track, you need reliable tools that do not hinder your creative workflow. This brings up an important question: is an iPhone truly a viable asset for a songwriter? Industry professionals increasingly say yes. The iOS ecosystem offers an impressive array of features designed specifically to facilitate music creation, making it a stellar companion for both amateur and professional musicians.
1. The iPhone features tailored iOS apps for the creative process.

The App Store is packed with intuitive software built for music creation. Even the native utilities, such as the default Notes app, are perfect for drafting lyrics, organizing song structures, and saving chord progressions. Additionally, the Voice Memos app allows you to instantly record melodies that pop into your head while commuting or walking. The true magic happens when you dive into Digital Audio Workstations (DAWs) like GarageBand, which allow for multi-track recording and editing directly on your phone.
2. High-fidelity built-in hardware ensures quality sound capture.

Apple has consistently upgraded its internal hardware, meaning modern iPhones boast advanced microphones and speakers that rival dedicated entry-level recording gear. While a studio mic is always preferred for final cuts, the clarity captured by an iPhone's built-in microphone is surprisingly crisp. This enables songwriters to listen back to their rough acoustic recordings with precise detail, evaluating their arrangements and vocal techniques effectively.
3. Local storage offers uncompromising privacy and security.

As a creator, your unfinished demos and lyrical concepts are highly confidential. Leaking unpolished tracks is a nightmare for any artist. Fortunately, iPhones offer robust security frameworks, including biometric authentication (Face ID) and encrypted storage. You can securely archive your rough drafts and sensitive audio files locally, ensuring that your upcoming releases remain entirely private until you choose to distribute them.
4. Seamless integration with physical musical instruments.

One of the strongest arguments for using this platform is hardware compatibility. If you're wondering whether you can plug a guitar into the iPhone, it is remarkably easy to do so. Whether you play bass, acoustic-electric, or a standard electric guitar, utilizing a proper guitar adapter for iPhone bridges the gap between your physical instrument and your digital software, guaranteeing zero-latency monitoring and pristine signal transfer.
Part 2. How to Connect the Guitar to Your iPhone?
When it comes to building chord progressions and establishing rhythmic foundations, the guitar is a producer's best friend. Because of this, it is incredibly common for musicians to bypass traditional computers and route their instruments directly into their smartphones. If you are eager to lay down some riffs on your device, follow the detailed tutorial below to establish a clean, reliable audio connection.
-
Step 1 Gather the Necessary Equipment
Before you begin, ensure you have all the required hardware on hand: your guitar, your iOS device, a standard 1/4-inch instrument cable, and most importantly, a compatible guitar adapter for iPhone (often referred to as an iOS audio interface). Selecting a high-quality interface is critical, as it directly impacts the fidelity of your recorded signal. Take the time to choose an adapter that suits your budget and connectivity needs (Lightning or USB-C, depending on your device model).

-
Step 2 Connect the Adapter to Your iPhone
Once your gear is ready, plug your chosen guitar adapter into your iPhone. Depending on the interface and the generation of your phone, this will plug into either the Lightning port, the USB-C port, or (in older setups) the headphone jack. Make sure the connection is snug and secure to avoid any audio dropouts or static interference during your recording sessions.

-
Step 3 Hook Up the Instrument Cable
Next, insert one end of your 1/4-inch guitar cable into the output jack of your guitar. Take the other end of the cable and plug it firmly into the designated instrument input on your audio adapter. Using a high-quality, shielded instrument cable is highly recommended here, as it minimizes unwanted background hums and electronic noise.

-
Step 4 Launch a Mobile Studio Application
To actually hear and record your guitar, you must process the incoming audio signal through a digital app. Download and launch a DAW such as GarageBand. Within the app, select an audio track for a guitar, configure your input settings to recognize the adapter, and apply virtual amplifiers or effect pedals. These applications are designed with intuitive interfaces, meaning you do not need a degree in audio engineering to start tracking your solos and rhythms immediately.

Part 3. How to Transfer the Guitar Audio File?
Congratulations, you have successfully recorded your guitar tracks! However, a mobile screen is sometimes too small for comprehensive mixing and mastering. You will likely need to export these high-resolution audio files to an iPad or Mac for post-production. The good news is that Wondershare Dr.Fone provides a seamless, stress-free method to move heavy media files across different devices. Follow these steps to utilize its specialized data transfer capabilities.
 Effortlessly manage data through preview, delete, export, etc.
- Transfer all data between devices.
- Robust backup solutions for reliable data protection.
- Mirror screens to PC for meetings, teaching, and control.

-
Step 1 Install the Software
First, navigate to the official website and download the Wondershare Dr.Fone desktop client. Install the application on your computer by following the prompted instructions.
-
Step 2 Connect Your Devices
Launch the software on your desktop. Using certified data cables, connect both your source iPhone (containing the recordings) and the destination iOS device (or computer) to your workstation. Ensure both devices are unlocked and set to 'Trust' the computer.
-
Step 3 Access Phone Transfer
On the left-hand navigation panel of the software interface, select Toolbox. From the main dashboard that appears, click the Phone Transfer module.

-
Step 4 Define Source and Target
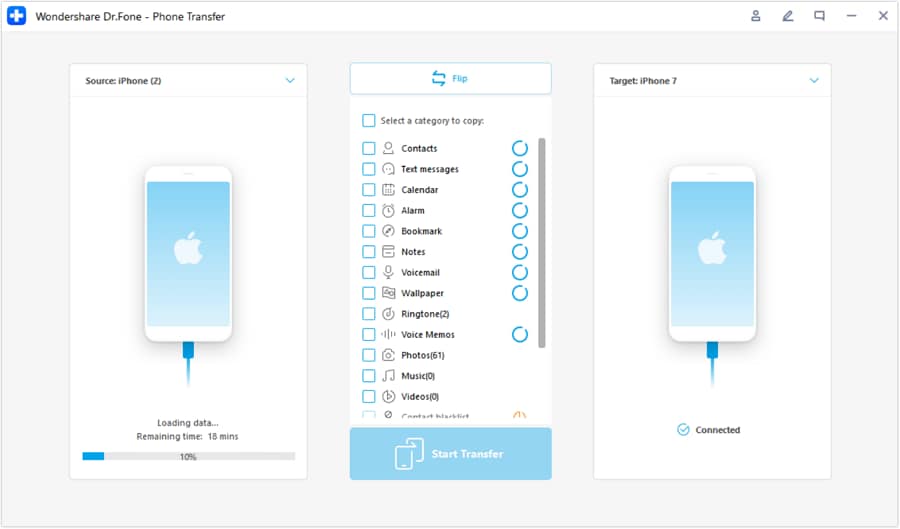
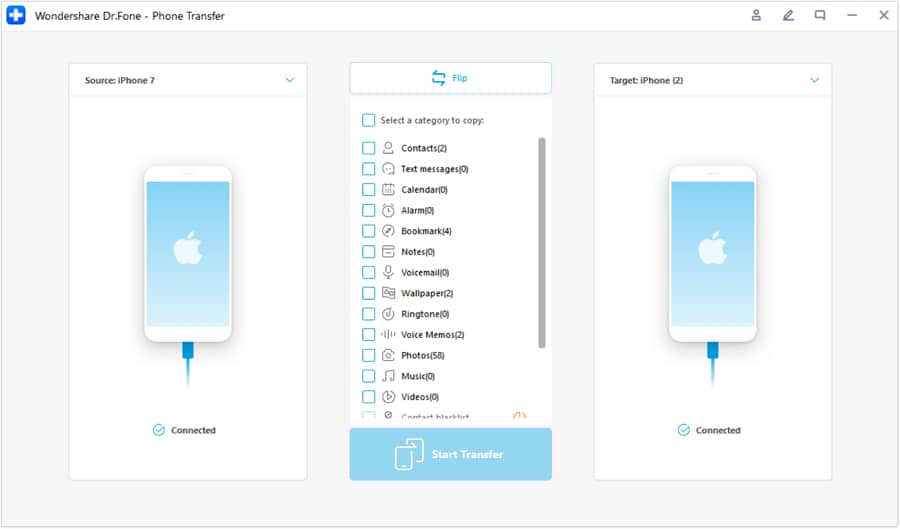
The screen will display both connected devices. Verify that your iPhone is designated as the Source and your receiving device is the Target. If they are backward, simply click the Flip button in the top center to reverse the transfer direction.
-
Step 5 Select the Audio Files
A list of data categories will be presented. Since you are moving guitar recordings, locate and check the boxes for 'Voice Memos' or 'Music', depending on where your DAW exported the files. Once selected, click the Start Transfer button.
-
Step 6 Disable Find My (If Prompted)
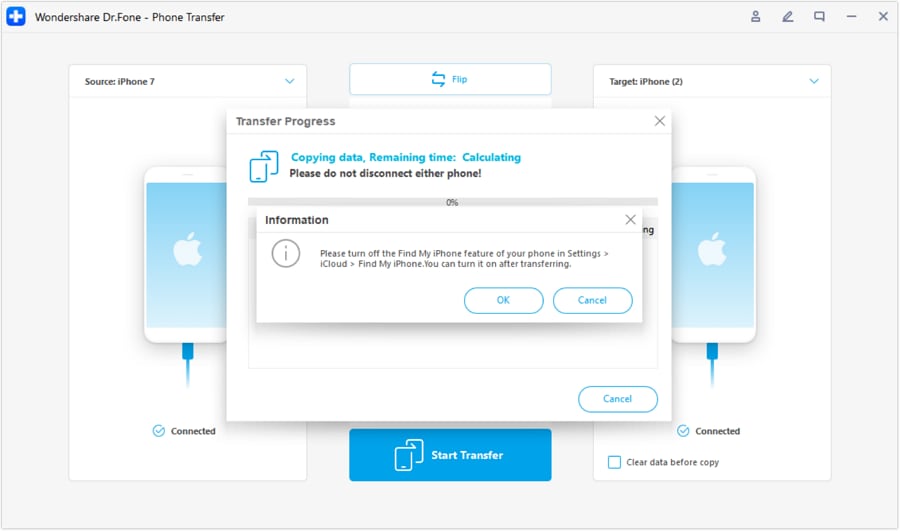
If Apple's 'Find My' security feature is active on your target device, the system will temporarily pause the transfer. Follow the on-screen instructions to turn it off in your iOS Settings app, then click OK on your computer. The transfer will immediately resume.
-
Step 7 Allow Transfer to Complete
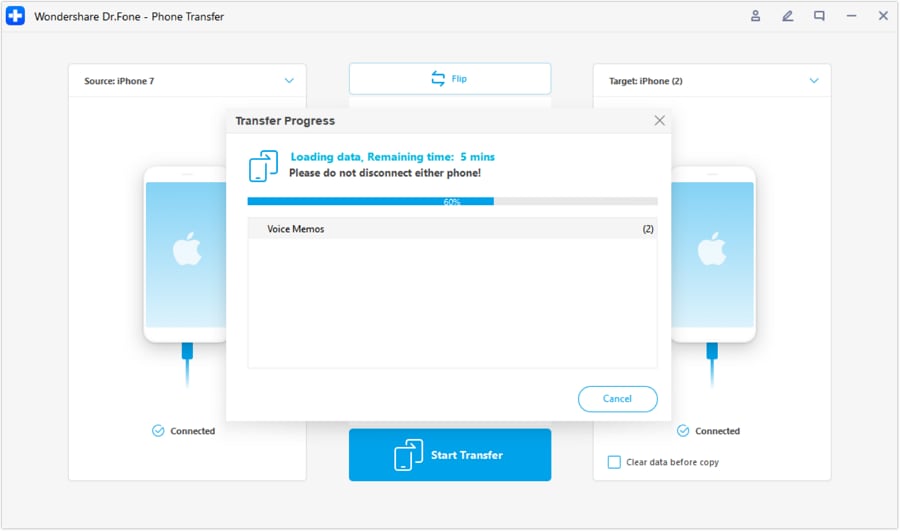
The software will now copy the files at high speed. Do not unplug the cables or use the devices during this time, as interruptions could corrupt your audio files. The entire process typically takes just a few minutes.
-
Step 8 Verify the Moved Files
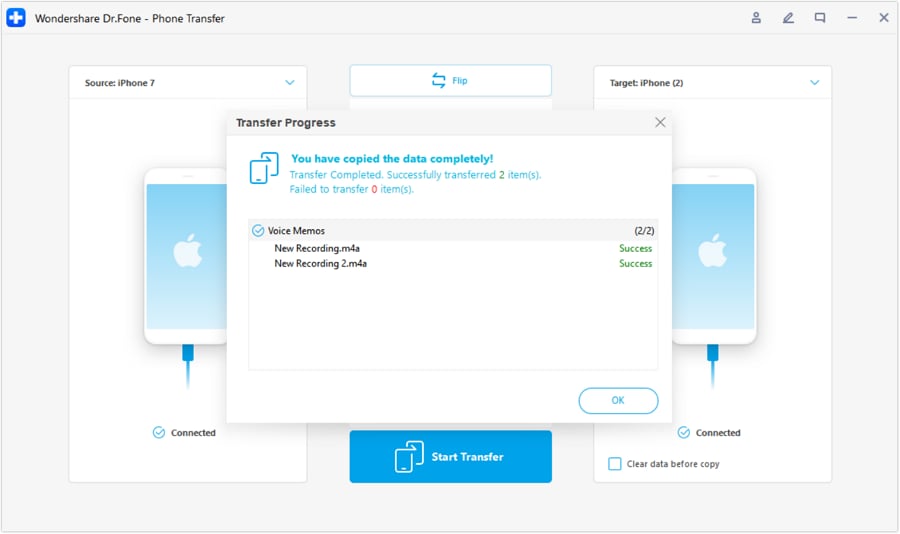
A confirmation window will appear once the migration is finished. Click OK to close the prompt, and then manually check your destination device to ensure all your precious guitar stems and recordings have arrived safely.
Part 4. Friendly Reminder: Back Up Your Guitar Recordings First
Transferring files might be incredibly straightforward, but it is always wise to exercise caution. Unforeseen software glitches or sudden cable disconnections during any data operation can result in tragic file loss. Before you begin moving your raw tracks to another machine, you should absolutely create a secure backup copy. Wondershare Dr.Fone includes an excellent backup feature that shields your music from accidental deletion. Here is how you use it to protect your art.
-
Step 1 Launch the Backup Tool
Open the Wondershare Dr.Fone software on your computer. With the program running, connect the iPhone holding your guitar audio files via a USB cable.
-
Step 2 Initiate the Backup
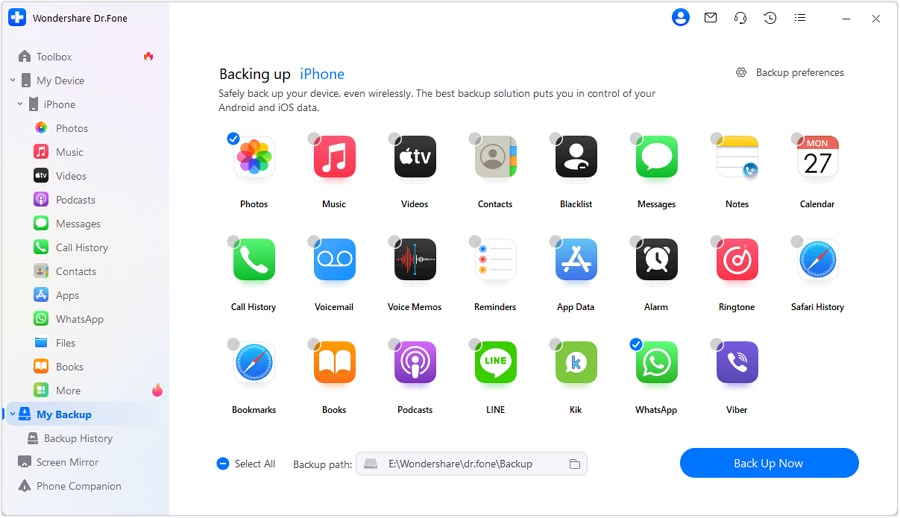
Navigate to the left panel of the interface and click on My Backup. Once the backup dashboard appears, hit the Back Up Now button to trigger the system scan and data archiving protocol.
-
Step 3 Wait for the Archive Process
The application will automatically begin cloning your device's data safely onto your local hard drive. Avoid interacting with your iPhone until the progress bar reaches 100%.

-
Step 4 Review Your Safely Stored Files
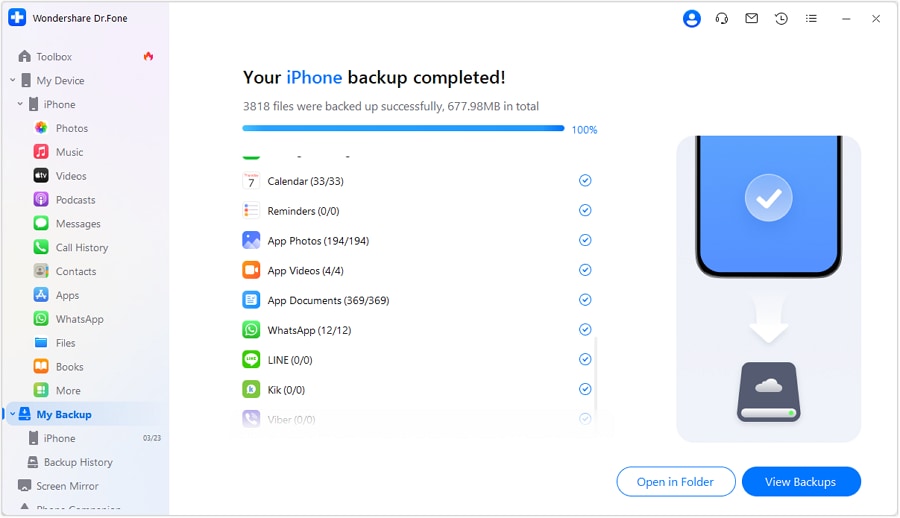
Once you see the completion message, you can verify your backed-up music. Click on View Backups or Open in Folder to inspect the saved audio files directly on your computer's storage drive.




Conclusion
Creating compelling original music is undeniably challenging, requiring extensive practice and dedication. However, the technological barriers to entry have practically vanished in 2026. Devices like the iPhone have transformed from simple communication tools into ultra-portable production powerhouses. By understanding how to properly link your instrument through a quality adapter, you can instantly turn raw riffs into studio-grade tracks. Should you ever need to maneuver those large audio files for advanced mixing, robust software like Wondershare Dr.Fone ensures your musical projects are transferred and backed up with maximum security and absolute ease.
FAQ
-
1. Can I plug my electric guitar directly into my iPhone without an adapter?
No, you cannot directly plug a standard 1/4-inch guitar cable into an iPhone's Lightning or USB-C port. You must use a dedicated guitar adapter for iPhone (an audio interface) to convert the analog guitar signal into a digital format that iOS software can process. -
2. Will connecting my guitar to an iPhone cause latency issues?
Latency (delay) is generally not an issue if you use a high-quality, modern audio interface designed specifically for iOS devices. When paired with optimized apps like GarageBand, the monitoring latency is virtually unnoticeable. -
3. What software do I need to record my guitar on an iPhone?
The most popular and accessible application is Apple's own GarageBand, which is free and offers built-in digital amps and stompboxes. Other professional alternatives available on the App Store include Cubasis, FL Studio Mobile, and Bias FX for advanced guitar tones. -
4. Are USB-C and Lightning guitar adapters interchangeable?
No, they are hardware-specific. Newer iPhone models (like the iPhone 15 series) utilize USB-C ports, while older models rely on Lightning. Ensure that you purchase an adapter that matches the specific input port of your particular iPhone model, or utilize a verified dongle.
 Add Wondershare Dr.Fone as a preferred source on Google