Switch Cards Between iPhones Will Move All Phone Services?
Oct 24, 2025 • Filed to: Data Transfer Solutions • Proven solutions
Dr.Fone Basic:
Better Control for Your Phone
Manage, transfer, back up, restore, and mirror your device
The existence of SIM cards is the fundamental source of all cellular network connections. With their use from the inception of smartphones, SIM cards are associated with every significant cellular operation. All major functions, such as cellular calling, messaging, and cellular internet, are obtained through SIM cards. Whether you are using an iPhone or an Android, using a SIM card is standard.
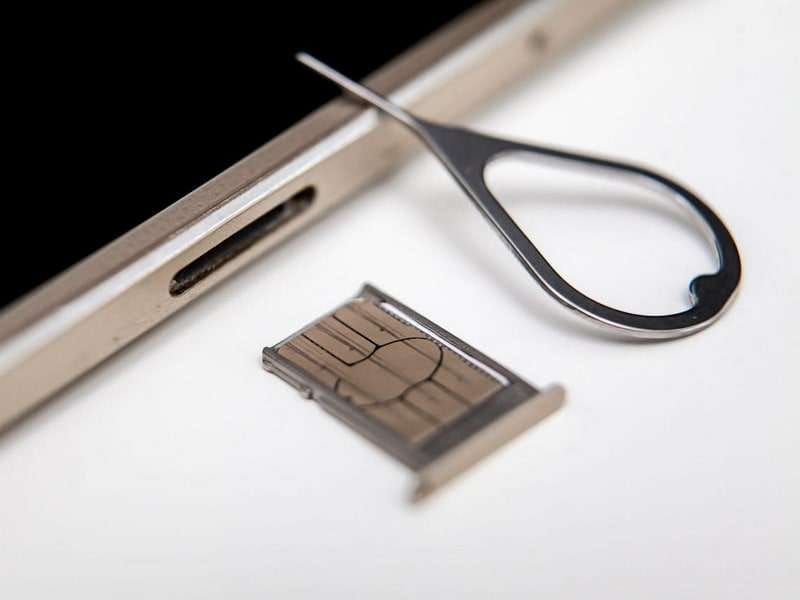
If you are seeking to change your iPhone, you will have to shift everything, including the SIM cards. For that, the article discusses a guide explaining how to switch SIM cards in iPhones properly. Look through the discussion for better awareness of switching SIM cards between iPhones. The implications of shifting SIM cards and other details will be focused on throughout the discussion.
- Part 1: Things To Know Before Switching SIM Cards in iPhone
- Part 2: What Happens If You Switch Two SIM Cards in iPhone
- Part 3: How To Switch SIM Card to New iPhone Safely
- Part 4: What Happens If You Switch to An iPhone Locked to A Specific Carrier?
- Part 5: How To Switch All Data to New iPhone in One Click

- FAQs
Part 1: Things To Know Before Switching SIM Cards in iPhone
Whenever you consider switching your SIM card to iPhone, you must keep a few things in mind. Considering these points will help you in avoiding all forms of discrepancies that can occur on your iOS device:
- Compatibility of SIM Card: You have to ensure that the SIM card is compatible with your iPhone. Some SIM cards do not operate on iPhones since they are incompatible.
- Unlocked iPhone: If you have an unlocked iPhone, you can utilize third-party SIM cards for this purpose. An unlocked iPhone is a best-case scenario for using such SIMs.
- Backup iPhone Data: Although there is no direct involvement of iPhone data in the process, it is best to back up the data. It includes all essential contacts and media that might get physically damaged while changing SIM cards.
- Turn Off iPhone While Switching SIM Cards: It is best to turn off your iOS device during such processes. To avoid any software anomaly, turning off the device can save you the drill.
Part 2: What Happens If You Switch Two SIM Cards in iPhone
On switching a SIM card to a new iPhone, there are multiple consequences that occur against it. The provided details explain the possible situations that can arise if you consider switching SIM cards in iPhone:
- SIM cards usually contain contacts from the previous device it is contained in. There is a possibility that the contacts present in the SIM card might be transferred into the new iPhone. On attaching the SIM card to the iPhone, the contacts will be automatically transferred.
- The cellular network, along with other cellular packages, will be in operational use as the SIM card will be attached to the iPhone. You will be paying according to the packages offered by your SIM carrier.
- If the SIM card is not compatible with the iPhone, the network operations will malfunction and not operate properly. Different connectivity issues will be reported across the scale.
- On switching your SIM card, you will have to reactivate iMessage and FaceTime under the cellular settings of the new SIM card. The previous settings for both services will be removed upon removing the SIM card.
Part 3: How To Switch SIM Card to New iPhone Safely
Once you have learned the implications of switching your SIM card to your new iPhone, you will need to understand the operability involved in the process. To know how to switch SIM cards iPhone perfectly, follow the step-by-step process provided below:
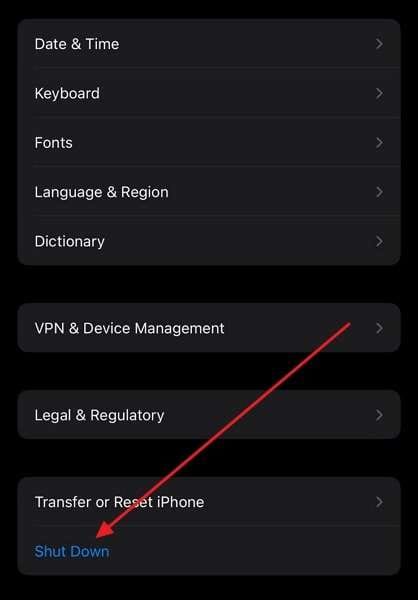
Step 1: Turn off your iPhone to remove the current SIM card from your device. For that, lead into the "Settings" and look for the "General" section. Follow through the screen and scroll down to find the option of "Shut Down" to turn off your iOS device.
Step 2: As the device turns off, use a proper pin to open the SIM tray on your iPhone, which completely depends on your model. For the latest and newest iPhones, the SIM tray is present on the bottom-left side of the device. Remove the old SIM card and replace it with the new one according to the position. Re-insert the SIM tray back into the device.

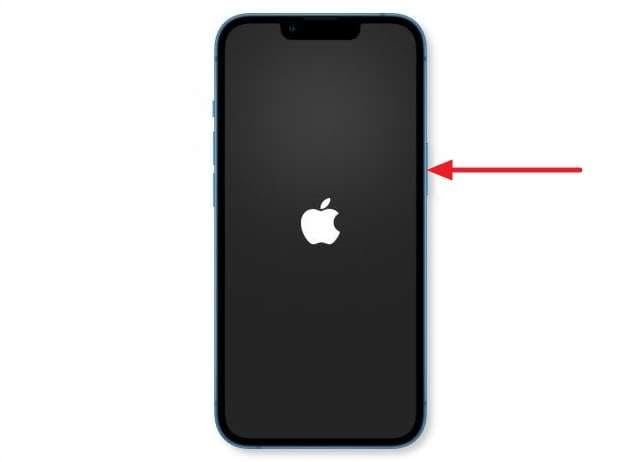
Step 3: Use the “Power” button on your iOS device to turn it on. Once it turns on, you will find the cellular operations working according to the new SIM card.
Part 4: What Happens If You Switch to an iPhone Locked to A Specific Carrier?
If you switch to an iPhone locked to a specific carrier, you might encounter several complications. These could prevent the device from functioning with your desired network provider. In such instances, the iPhone's functionality could be limited. It hinders your ability to use certain features or services on the device. This issue is particularly prevalent when trying to use a SIM card from a different carrier than the one the iPhone is locked to.
To address this concern, you can use Dr.Fone - Screen Unlock (iOS), a cutting-edge solution. It is designed to unlock SIM locks and enable the use of the iPhone with any compatible carrier. Dr.Fone provides a reliable and user-friendly method to unlock various locks. This also includes SIM locks on iPhones, allowing you to switch between carriers.

Dr.Fone - Screen Unlock (iOS)
Best SIM Unlock for iPhone.
- Simple, click-through, process.
- Fix SIM unlock with a few clicks.
- Supports almost all carriers, from Vodafone to Sprint.
- No tech knowledge required, everybody can handle it.
- Supports iPhone 5S to iPhone X, which are running between iOS 12.0 and iOS 14.8.1

Steps To Remove iPhone SIM Lock via Dr.Fone - Screen Unlock (iOS)
The following are the steps you need to follow to remove the iPhone SIM lock with the help of Wondershare Dr.Fone:
Step 1: Access Screen Unlock Within Wondershare Dr.Fone
Start installing and launching Wondershare Dr.Fone on your computer and selecting "Toolbox." From the main interface, click "Screen Unlock" and identify "iOS" as your device. Now, tap "Remove SIM Locked" from the "Screen Unlock" menu and connect your iPhone.

Step 2: Jailbreak Your iDevice
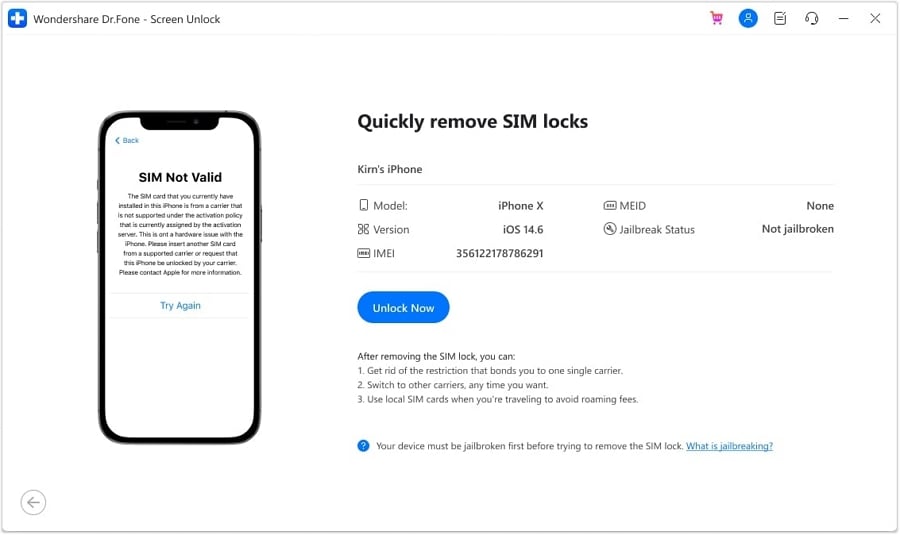
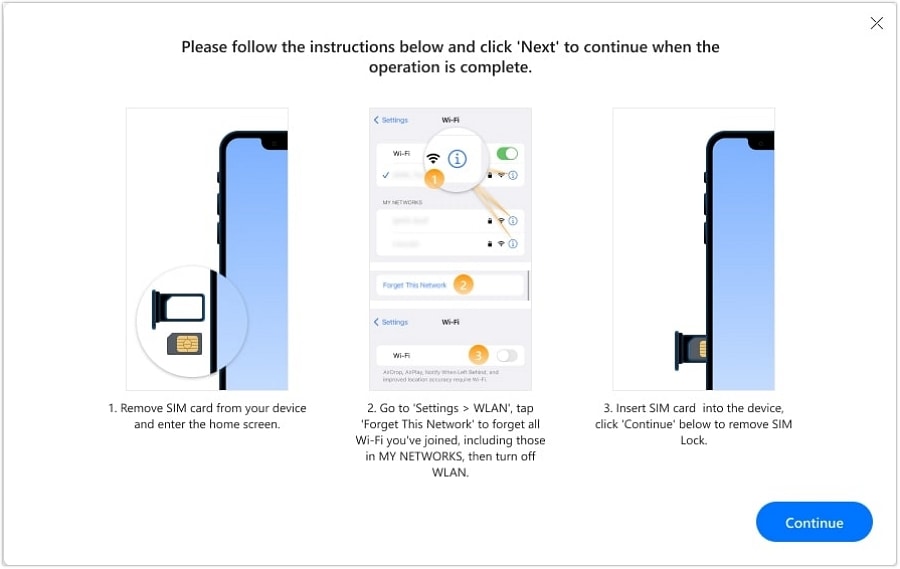
On the following screen, tap "Start" and follow it by clicking "Unlock Now" as Wondershare Dr.Fone recognizes your device. Now, you will need to jailbreak your device, for which the instructions are given on the screen. Remove the SIM card from the phone and access "WLAN" through device Settings.
Step 3: Complete the SIM Lock Removal Process
Go to the Wi-Fi network you are connected to and choose "Forget This Network." Then, move to each saved Wi-Fi network in "My Networks" and remove all of them. Reinsert the SIM card to the device and press "Continue" on the screen. It will initiate the SIM lock removal process, which will be finished in a few moments.
Part 5: How To Switch All Data to New iPhone in One Click
Whenever you consider changing your SIM card on your new iPhone, there are certain things you must look out for. Maintaining all the data is one appropriate consideration that can be effective for your operations. Keeping data backups under such circumstances is the best-case scenario to avoid discrepancies. Although you are switching SIM cards between iPhones, what if you are required to shift data?
If you have bought a new iPhone and need to switch all data along with the SIM card, you will need a proper direction. For this, Dr.Fone - Phone Transfer (iOS) is the savior. This particular platform is known for making operations of data transfer easier. While Dr.Fone replicates multiple features and functions, it offers some extensive characteristics. An overview of these features is presented as follows:
- You can transfer various data between devices, ranging between 8 to 15. It entirely depends on the nature of the transfer between devices.
- The process of transferring data is straightforward. You are not required to put in any effort to transfer data.
- The results provided in the data transfer are incredibly high. Dr.Fone reports concluding proceedings within 3 minutes.
Steps To Switch Data to New iPhone With Dr.Fone - Phone Transfer
As you seek to know the steps to switch data to a new iPhone with Dr.Fone - Phone Transfer, follow the steps as provided next:
Step 1: Open Dr.Fone and Select Phone Transfer
Launch Wondershare Dr.Fone after downloading and installing it on your device. Continue to select “Phone Transfer” from the available options. Following this, connect your old and new iPhones to your device.

Step 2: Set Source and Destination
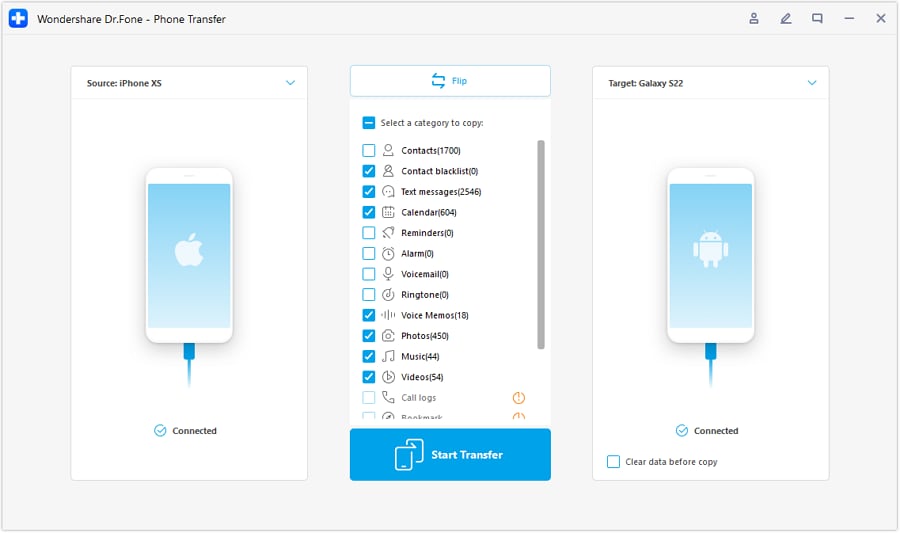
As you connect both devices in the transfer process, define the source and destination. Set your old device as the "Source" and the new iPhone as the "Target." To change the devices, use the “Flip” button.
Step 3: Select File Types and Transfer
Select the file types that you wish to transfer from the center section. Select “Start Transfer” to initiate the process. The data will be successfully transferred in a few minutes.

Frequently Asked Questions
Here are answers to some of the FAQs available on the internet regarding how to change a SIM card on an iPhone.
- Can I use the same eSIM card to switch between different iPhones?
Yes, you can use the same eSIM card to switch between different iPhones, provided that the specific carrier supports eSIM technology and allows the transfer of the eSIM between devices. With eSIMs, the process of switching between devices is typically smoother compared to physical SIM cards. The reason is it involves digital activation and can be done remotely without the need to swap cards physically.
- Is there a difference between switching physical SIM cards and using eSIM for transferring phone services between iPhones?
Physical SIM cards are tangible, removable chips that need to be inserted into a SIM card tray, whereas eSIMs are integrated directly into the device's hardware. Swapping physical SIM cards involves physically removing and inserting the card into the new device, whereas transferring an eSIM between devices can be done remotely. Physical SIM cards can store limited contact information and some network settings, whereas eSIMs can store multiple network profiles.
Conclusion
This article has provided a valuable overview of switching SIM cards to new iPhones. With a proper understanding of the repercussions involved in the process, a guide has been discussed. Along with its thorough discussion, you have also figured out how to transfer data to a new iPhone. For that, Dr.Fone - Phone Transfer is the best option in the market.
Dr.Fone Basic:
Better Control for Your Phone
Manage, transfer, back up, restore, and mirror your device
iPhone Transfer
- Data Transfer
- 1. Video from iPhone to External Drive
- 2. Transfer MP4 to iPhone
- 3. Put Wallpapers on iPhone
- 4. Move Photos to SD Card
- 5. Best Apps to Transfer from iPhone to Android
- iPhone to PC
- 1. Transfer Pictures From iPhone to PC
- 2. Transfer From iPhone to Computer
- 3. Transfer Album from iPhone to PC
- 4. Transfer Data from iPhone to PC
- 5. Copy Voice Memo from iPhone to PC
- 6. iPhone Camera Roll to Computer
- 7. Podcasts from iPhone to Computer
- 8. Transfer Notes from iPhone
- 9. Techniques Used in Mobile Phone Forensics
- 10. Facing Please Unlock iPhone Photos Error
- iPhone to Mac
- 1. Voice memos from iPhone to Mac
- 2. Synce Notes from iPhone to Mac
- 3. Export iBooks to PC and Mac
- 4. Transfer Photos from iPhone to Mac
- 5. Transfer Music from iPhone to Mac
- Computer to iPhone
- 1. AirDrop From Mac to iPhone
- 2. Use AirDrop from Mac to iPhone
- 3. Transfer Data from PC to iPhone
- 4. Transfer Videos from PC to iPhone
- 5. Unsync iPhone from Computer
- 6. Sync iPhone with Multiple Computers
- Transfer to iPhone
- 1. Switch Cards Between iPhones
- 2. Facetime for Android to iPhone
- 3. Transfer Data from Motorola to iPhone
- 4. Samsung to iPhone Transfer
- 5. Transfer iPhone Apps to iPhone
- 6. Clone iPhone/iPad to iPhone
- Transfer from iPhone
- 1. Transfer Video from iPhone to Laptop
- 2. Transfer Data from iPhone to Laptop
- 3. Transfer Notes from iPhone to iPad
- 4. Transfer Data from iPhone to Android
- 5. Switch from iPhone to Google Pixel
- 6. Switch from iPhone to Samsung S10
- 7. Switch from iPhone to Samsung
- 8. Transfer from iPhone to Samsung S20
- iPhone Transfer Tips
- 1. Ford Sync iPhone
- 2. Sync iCal with iPhone
- 3. iPhone Calendar Not Syncing
- 4. iPhone Transfer Software
- WhatsApp Transfer
- 1. WhatsApp from iPhone to iPhone
- 2. WhatsApp from iPhone to Android
- 3. WhatsApp from iPhone to Samsung S10
- 4. WhatsApp Messages to iPhone
- 5. WhatsApp from iPhone to Samsung S9
- iTunes Transfer
- ● Manage/transfer/recover data
- ● Unlock screen/activate/FRP lock
- ● Fix most iOS and Android issues
- Transfer Now Transfer Now Transfer Now


Alice MJ
staff Editor