How to Transfer Photo Albums from iPhone to PC?
Oct 24, 2025 • Filed to: Device Data Management • Proven solutions
Dr.Fone Basic:
Better Control for Your Phone
Manage, transfer, back up, restore, and mirror your device
If your iPhone’s memory is almost full and you are probably in confusion where to keep those photo albums stored securely, then this article is for you.
You will find out how to transfer albums from iPhone to pc.
Capturing life's precious moments through photography is a great way to preserve memories, from milestone events like school farewells and college parties to everyday snapshots. As a photography enthusiast, you likely have a treasure trove of beautiful and meaningful photos that evoke nostalgia and sentiment.
We will discuss in detail different methods to help you transfer albums from iPhone to PC.
Part 1: Transfer Photo Album From iPhone To PC At Once Using Dr.Fone
Effortlessly transfer your iPhone photo albums to PC with Dr.Fone Phone Manager (iOS), a cutting-edge software solution that prioritizes security and reliability. This innovative tool empowers you to manage and transfer data with ease, ensuring a seamless experience. Plus, Dr.Fone also facilitates phone-to-phone data transfer, making it a versatile and indispensable utility for iPhone users seeking to safeguard and share their cherished memories.
Also, this amazing software is adaptable on every device, so sit back and relax, Dr.Fone will help you to transfer pictures from iPhone to PC at just one click.
So, the biggest question is how to transfer albums from iPhone to computer using a file transfer tool.

Dr.Fone - Phone Manager (iOS)
Your must-have iOS phone transfer, between iPhone, iPad, and computers
- Transfer, manage, export/import your music, photos, videos, contacts, SMS, Apps, etc.
- Backup your music, photos, videos, contacts, SMS, Apps, etc. to computer and restore them easily.
- Transfer music, photos, videos, contacts, messages, etc from one smartphone to another.
- Transfer media files between iOS devices and iTunes.
- Fully compatible with iOS 7, iOS 8, iOS 9, iOS 10, iOS 11, iOS 12, iOS 13 and iPod.
Method-1
Step 1: The first step is to connect your iPhone to the computer system. Then, install and activate or launch Dr.Fone on your PC. Now, select the option of "Phone Transfer" from all the functions. Next, choose the "Transfer Device Photos to PC" option.

Step 2: After executing step 1 successfully, a new window pops up, asking you to provide the destination or location where you want the backup to be stored. Next, select "Ok" to initiate the process of the backup. Then, all your photos will be transferred to the destination you have provided.

Method-2
Selective Transfer
How do you send an album on iPhone to PC selectively? Dr.Fone is a one-stop solution for all your problems. Read further to learn about importing albums from iPhone to PC selectively.
Step 1: First, you need to connect the iPhone to your PC and launch Dr.Fone Phone Manager on the computer system. Then, go to the section of "Photos" to start the process.
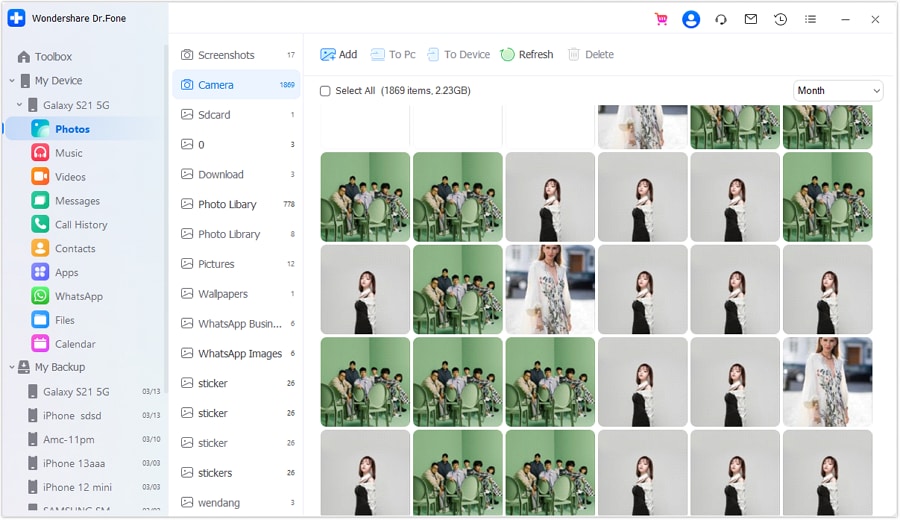
You will find that all your photographs have been arranged in different albums.
So, now from these different albums, you can conveniently choose only the photos that you want to transfer, then select the "Export" option. After this, click on the option of "Export to PC".
Step 2: Another way is that you can choose the pics directly. Then right-click and click on the "Export to PC" option. If you want to transfer all the photos that are of identical type or in simple words, you want to send a full album (the photos of the same type are kept in the same album in the left panel), choose the album, and right-click. Now, you have to select the "Export to PC" option and continue a similar process.
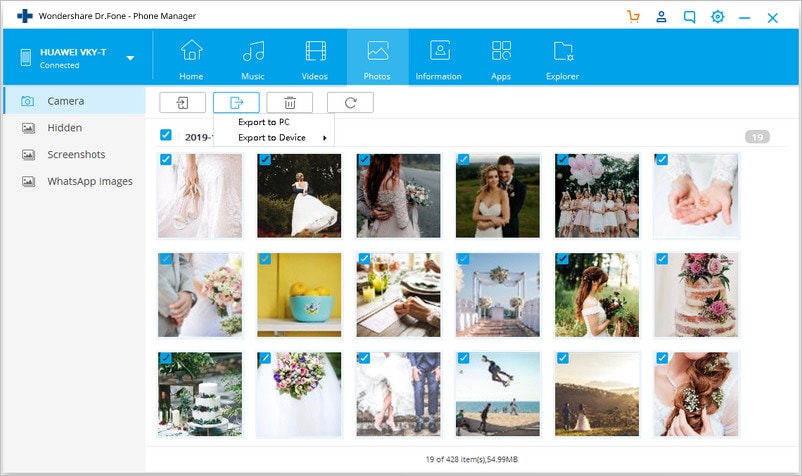
Sending photos from the iPhone to the computer has never been so simple and easy before. Also, note that with Dr.Fone, you can even transfer music from your phone to PC.
Part 2: Copy Photo Album From iPhone to PC with iTunes
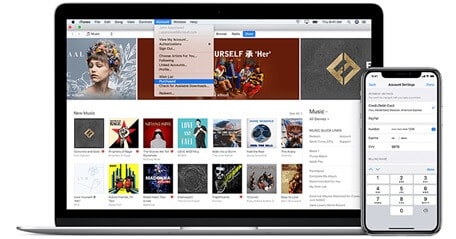
Another method to transfer photo albums from iPhone to the computer is that you can copy albums from iPhone to pc.
iTunes is a tool that is used to handle the data between iOS devices and PC easily.
iTunes is a versatile media player that allows users to seamlessly play music and watch movies on their computers. As a flagship product developed by Apple Inc., iTunes also features an online digital store where users can browse and download a vast array of content, including songs, films, TV shows, apps, and more.
Now we will learn in detail about how to transfer albums from iPhone to computer using iTunes.
Step 1: Go to the official website of Apple Inc. Then, download iTunes and install it on your PC. You must ensure that you have the newest version of iTunes.
Step 2: After installing iTunes successfully on your PC, connect your iPhone to the computer system using a USB cable, and launch iTunes.
Step 3: You will see a device icon in iTunes, click on that icon.

Step 4: Adjoining Sync Photos, click the box.
Step 5: A drop-down menu appears, select the photos you want to sync from.
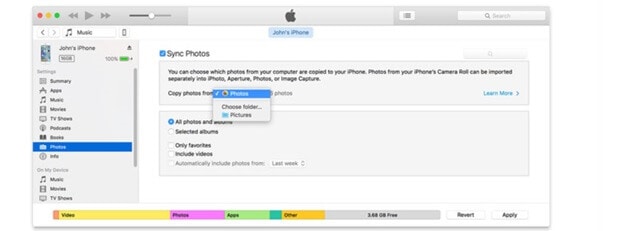
Step 6: You may choose to sync all your photos, or you can select a particular album.
Step 7: Click on the "Apply"' option.
Step 8: After the sync is done successfully, you can delete those photos from your iPhone to release space, as your photos have been transferred now to the computer system.
Part 3: Import Photo Album From iPhone to PC Through iCloud
What is iCloud?
iCloud is Apple's comprehensive cloud-based service, offering a range of features including email, contact and calendar syncing, lost device location, and cloud music storage. By leveraging cloud technology, iCloud allows users to store data remotely on a cloud server, freeing up device storage and enabling seamless access from any internet-connected device. The best part? iCloud is free to set up, with an initial 5GB of storage space provided at no cost. This means you can easily get started with iCloud without incurring any expenses, and upgrade your storage capacity as needed to enjoy the full benefits of Apple's cloud-based ecosystem.
How to import albums from iPhone to pc with the help of iCloud?
To know how to transfer iPhone albums to pc, go through these two methods.
In the first method, we use the iCloud Photo Library, and in the second method, we use iCloud Photo Stream.
Firstly, you are required to download the iCloud on your computer system.
1. By using iCloud Photo
Step 1: Go to the "settings" app. You will see your "Apple ID", look for the "iCloud" option and select it. Then click on the "Photos" button. After that, open the "iCloud Photo Library".
In this way, you can import albums from iPhone to PC through iCloud.
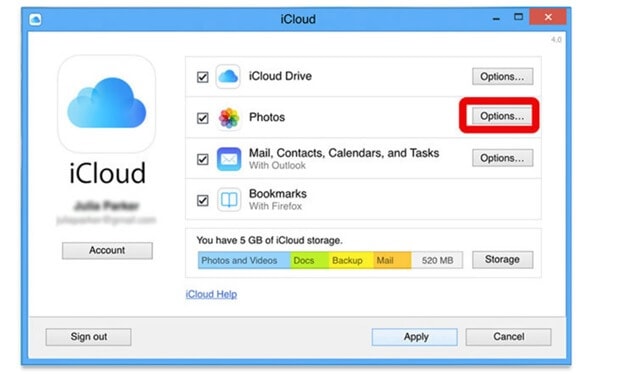
Step 2: Set-up iCloud on your computer and sign in your account as you did with your iPhone. You will see a checkbox button of "Photos", tick that.
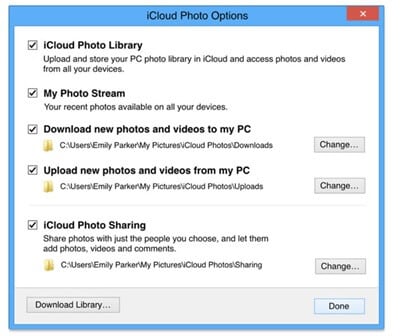
Below the "Photos Options", choose "iCloud Photo Library" and "Download new photos and videos to my PC".
Step 3: Now on your PC, open "Computer" or "This PC" option. After that, you have to double-click on "iCloud Photos". Open the "Download" folder to see the photos from your iPhone.
2. iCloud Photo Stream
To know how to import an album from iPhone to pc using iCloud Photo Stream,
Follow these steps given below.
Step 1: Go to the "settings" app. You will see your "Apple ID", look for the "iCloud" option and select it. Then click on the "Photos" button. Now open "Upload to My Photo Stream".
Step 2: Open iCloud on your computer, then after signing in your account, tick "Photos".
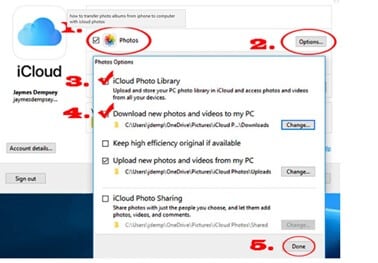
Choose "'My Photo Stream" and select "Done". The album with the name of "Camera Roll" will get saved in Photo Stream automatically.
Comparison Table of These Three Method
| Dr.Fone | iTunes | iCloud |
|---|---|---|
|
Pros-
|
Pros-
|
Pros-
|
|
Cons-
|
Cons-
|
Cons-
|
Conclusion
In the end, it is easy to deduce that Dr.Fone is the best software if you want to transfer photo albums from iPhone to PC. This software is free to use, the interface is user-friendly, you can easily download it on your PC, and after that, you need to connect your iPhone, once done you can quickly transfer the photos right away. This software works with iOS7 and beyond. Dr.Fone is free to use and comes with several other features like sending pictures, videos, and other media content. In case, if you have any query, you can quickly resolve by directly connecting the company via their 24*7 email support.
Apart from Dr.Fone, there are several other ways to import photo albums from iPhone to PC; you can try based on the complexity of the steps.
If you tried any of these methods, we would like to hear your opinion in the comment section of this blog post!
Dr.Fone Basic:
Better Control for Your Phone
Manage, transfer, back up, restore, and mirror your device
iPhone Transfer
- Data Transfer
- 1. Video from iPhone to External Drive
- 2. Transfer MP4 to iPhone
- 3. Put Wallpapers on iPhone
- 4. Move Photos to SD Card
- 5. Best Apps to Transfer from iPhone to Android
- iPhone to PC
- 1. Transfer Pictures From iPhone to PC
- 2. Transfer From iPhone to Computer
- 3. Transfer Album from iPhone to PC
- 4. Transfer Data from iPhone to PC
- 5. Copy Voice Memo from iPhone to PC
- 6. iPhone Camera Roll to Computer
- 7. Podcasts from iPhone to Computer
- 8. Transfer Notes from iPhone
- 9. Techniques Used in Mobile Phone Forensics
- 10. Facing Please Unlock iPhone Photos Error
- iPhone to Mac
- 1. Voice memos from iPhone to Mac
- 2. Synce Notes from iPhone to Mac
- 3. Export iBooks to PC and Mac
- 4. Transfer Photos from iPhone to Mac
- 5. Transfer Music from iPhone to Mac
- Computer to iPhone
- 1. AirDrop From Mac to iPhone
- 2. Use AirDrop from Mac to iPhone
- 3. Transfer Data from PC to iPhone
- 4. Transfer Videos from PC to iPhone
- 5. Unsync iPhone from Computer
- 6. Sync iPhone with Multiple Computers
- Transfer to iPhone
- 1. Switch Cards Between iPhones
- 2. Facetime for Android to iPhone
- 3. Transfer Data from Motorola to iPhone
- 4. Samsung to iPhone Transfer
- 5. Transfer iPhone Apps to iPhone
- 6. Clone iPhone/iPad to iPhone
- Transfer from iPhone
- 1. Transfer Video from iPhone to Laptop
- 2. Transfer Data from iPhone to Laptop
- 3. Transfer Notes from iPhone to iPad
- 4. Transfer Data from iPhone to Android
- 5. Switch from iPhone to Google Pixel
- 6. Switch from iPhone to Samsung S10
- 7. Switch from iPhone to Samsung
- 8. Transfer from iPhone to Samsung S20
- iPhone Transfer Tips
- 1. Ford Sync iPhone
- 2. Sync iCal with iPhone
- 3. iPhone Calendar Not Syncing
- 4. iPhone Transfer Software
- WhatsApp Transfer
- 1. WhatsApp from iPhone to iPhone
- 2. WhatsApp from iPhone to Android
- 3. WhatsApp from iPhone to Samsung S10
- 4. WhatsApp Messages to iPhone
- 5. WhatsApp from iPhone to Samsung S9
- iTunes Transfer
- ● Manage/transfer/recover data
- ● Unlock screen/activate/FRP lock
- ● Fix most iOS and Android issues
- Transfer Now Transfer Now Transfer Now


Alice MJ
staff Editor