How To Transfer Photos From iPhone to Mac With and Without USB
Oct 24, 2025 • Filed to: Device Data Management • Proven solutions
Dr.Fone Basic:
Better Control for Your Phone
Manage, transfer, back up, restore, and mirror your device
Transferring photos from your iPhone to your Mac is important for a few key reasons. Firstly, it keeps your memories safe in case something happens to your phone. If you're getting a new iPhone or replacing your current one, transferring photos ensures you don't lose any memories during the switch.
Photo transfer to Mac also helps free up space on your iPhone. No more worrying about running out of storage when taking more pictures. Plus, organizing and editing photos is easier on Mac.
Now, the question arises: how to transfer photos from iPhone to Mac? Rest assured, we've got you covered. This article has outlined various methods to suit different preferences, whether you prefer a wireless approach or using a USB cable.
Part 1: How To Transfer Photos From iPhone to Mac Wirelessly
For those who wonder, “How to transfer photos from iPhone to Macbook?” you’ll be relieved that the process is actually easier than you think. If you prefer wireless methods, there are four different ways to do it: using iCloud, AirDrop, Finder, and Dropbox.
Each option offers unique advantages, giving you the flexibility of choosing the method that best suits your preferences and needs.
Method 1: Using iCloud
One of the widely used and efficient methods of how to transfer iPhone photos to a Mac computer is through iCloud, Apple's cloud-based service. iCloud provides seamless integration across Apple devices, allowing users to sync and access their photos and videos effortlessly.
How do I transfer photos from iPhone to Mac computer? Find the answer in the step-by-step guide below:
Step 1: Make sure you have synced iCloud photos on your iPhone.
On your iPhone Settings, go to your profile and tap iCloud. Then, select Photos and turn on the switch next to “Sync this [device].” Alternatively, you can also go to iCloud settings > iCloud Drive and switch on “Sync this iPhone.”

Step 2: Set up your iCloud for Windows.
Open iCloud for Windows and make sure you're signed in with your Apple ID. Next to Photos, select Options > iCloud Photos. Click “Done” and “Apply” to save the changes and close the window.

Step 3: Keep iPhone photos on PC.
Open iCloud Photos and select the images you want to transfer to your PC. Right-click and select "Always keep on this device" from the menu. You are done!
Method 2: Using AirDrop
If you're seeking a convenient and quick method to transfer files from your iPhone to a Mac, AirDrop is typically the optimal choice. AirDrop employs an innovative approach to file transfer between devices, using Bluetooth on your iPhone to establish connections, followed by point-to-point Wi-Fi for the data transfer.
Therefore, you only need to ensure that both your Mac and iPhone have Wi-Fi and Bluetooth enabled to use AirDrop.
How to transfer photos from iPhone to Mac using AirDrop:
Step 1: Confirm that Wi-Fi and Bluetooth are activated on both your Mac and iPhone.
Step 2: Open your iPhone’s Photos and select the pictures you want to send.
Step 3: Tap Share > AirDrop from the drop-down menu.
Step 4: Choose the Mac’s profile to which you want to transfer the files.

Method 3: Using iTunes
Next, if you have an iPhone or iOS device with a color display, you can manage your digital media on your Mac and sync it using iTunes. While you may think iTunes is for organizing and playing your music and video, this built-in tool can also work to synchronize your photos.
When using iTunes, you usually need a USB cable to connect your devices. But it’s also possible to do it wirelessly by connecting your devices to the same Wi-Fi network.
Now, how do I transfer iPhone photos to Mac using iTunes? Follow the steps below.
Step 1: Connect your device to your computer on the same Wi-Fi network.
Step 2: Open iTunes on your PC, click the Device button at the top left and select Photos.
Step 3: Select "Sync Photos" and pick an album or folder from the menu. If you don't see "Sync Photos," it means you're already using iCloud Photos, and you don't need to sync through iTunes.

Step 4: Decide whether to sync all folders or just the selected ones, and click Apply. After syncing your photos, remember to eject your device before disconnecting it from your computer for safety reasons.
Method 4: Using Dropbox
Dropbox is a cloud storage solution for sharing large files. It offers 2GB of free storage space for photos, videos, or any other files. You can also use Dropbox as a convenient option for transferring photos from your iPhone to your Mac.
How do I transfer pics from iPhone to Mac with Dropbox? First, you need to set up an account and upload your photos to Dropbox first.
Step 1: Launch Dropbox on your iPhone and give access to your Photos when prompted.
Step 2: Tap the + button and select "Upload Photos" from the menu.
Step 3: Select the iPhone images you wish to transfer.
Step 4: Proceed by tapping Next and select the designated Dropbox folder to store the photos. Tap "Upload" and wait until it finishes uploading.
Now, you can download the photos to transfer them to your Mac.
Step 1: Go to dropbox.com and log in.
Step 2: Select the photos or you can choose a whole folder.
Step 3: Click "Download" to save the photos to your Mac. You can usually find them in the Downloads folder on your Mac.

Part 2: How to Transfer Photos from iPhone to Mac with USB
In addition to transferring photos from iphone to Mac wirelessly, you can also do so with a USB cable using Dr. Fone's Export All Data feature. This method is a good alternative in case it’s impossible or hard to make a wireless connection between your devices.
Plus, establishing a USB connection could accelerate the transfer speed and eliminate the need to configure credentials. We are using Dr. Fone for its enhanced security through encryption, providing a swift and secure photo transfer from your iPhone to your Mac.

Dr.Fone Basic
Backup & Restore iOS Data Turns Flexible.
- One-click to back up the whole iOS device to your computer.
- Preview and selectively restore files to any device with simplicity.
- Export what you want from the backup to your computer.
- Your device's data remains intact during the restore process.
- Supports iPhone, iPad, iPod touch, and the latest iOS version.
How do you transfer iPhone photos to your Mac using a USB cable? Here are the steps you can follow.
Step 1: Launch Dr.Fone and connect your devices with a USB cable.
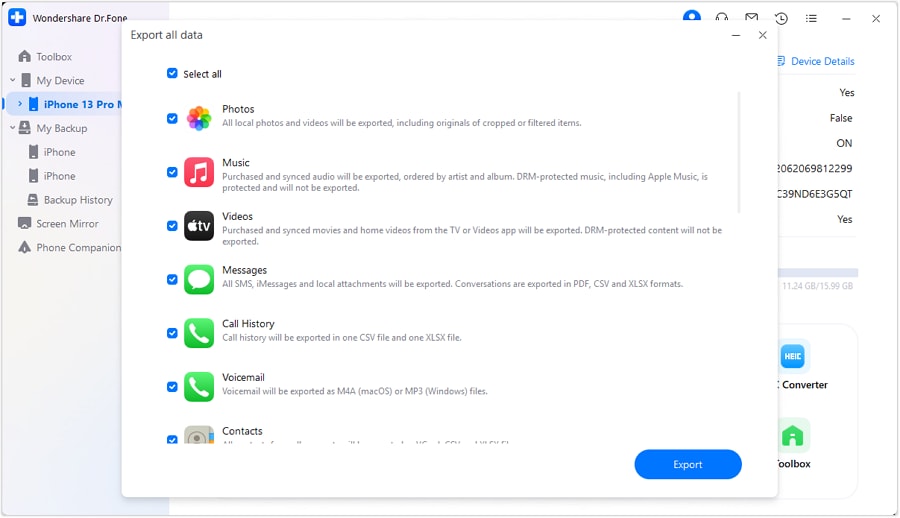
Start by Image nameing your iPhone device to the computer via a USB connection. Launch Dr.Fone and select "Export all data" in the My Device section.

Step 2: Choose file types for export
When a new window appears, select the specific file types you wish to transfer. Besides Photos, you can also transfer videos, voice notes, messages, and more. Then, click "Export" at the bottom of the screen to initiate the process. Choose the preferred location on your Mac to save the exported data.

Step 3: Make a password for the backup file
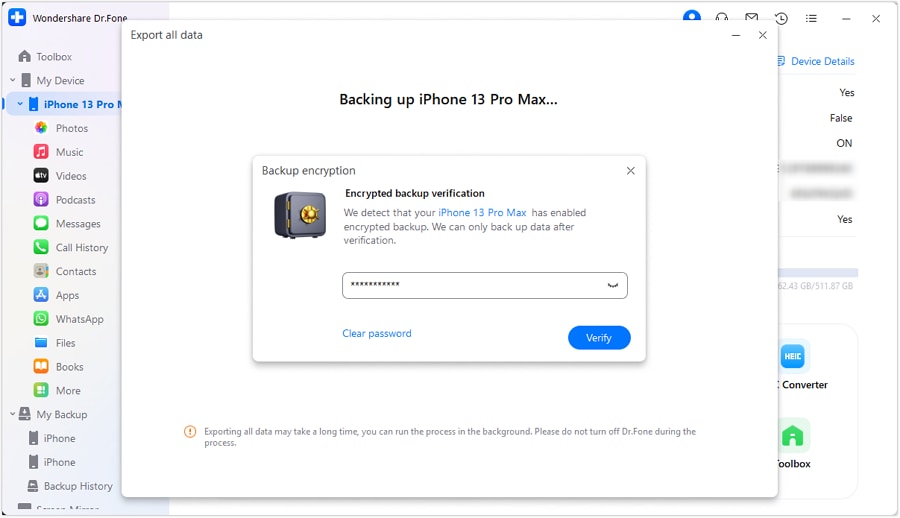
Next, you will be asked to create an encrypted password for the backup file to be stored on the computer. Set a password, confirm it, and click "Done" to execute the process.

Step 4: Monitor the progress
Your iPhone will start exporting its data to the computer through Dr.Fone. You can wait and monitor the progress on the screen.

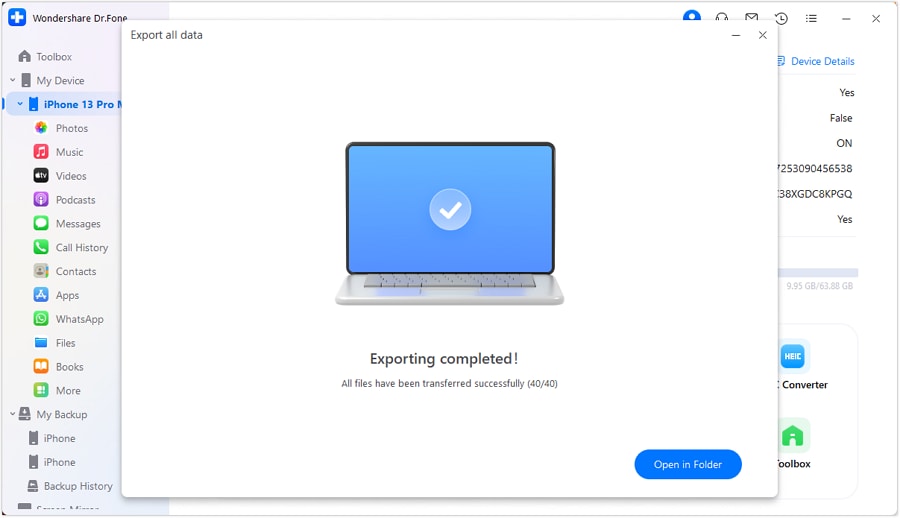
Step 5: Successful export of data to the computer
After successful completion of exporting the data, a window will appear on your computer screen. Click "Open" to review the exported data at the specified location.

Part 3: How To Manage Photos from iPhone to Mac
Now, it’s also possible to manage and sync photos from your iPhone or other iOS devices to your Mac using Finder. This can be done either from the Photos app or a specific folder on your computer. So, whenever you synchronize your iOS device with your computer, the images and videos on your device will be updated to mirror the albums on your computer.
Here's how to manage and sync iPhone Photos to Mac using Finder:
Step 1: Open Finder and connect your device with a USB cable.
Step 2: Locate your device in the sidebar and click on it.
Step 3: Navigate to the Photos tab below your device's information. Then, check the box beside "Sync photos to your device from" and choose either Photos or a folder on your Mac.
Step 4: Decide whether to sync all photos and albums or only selected ones. You can also opt to sync only favorites and choose whether to include videos.
Step 5: Click “Apply” to confirm the changes. If synchronization doesn't start automatically, click the Sync button.

Now, whenever you want to manage your iPhone Photos, you can go to Finder and find all of your photos there.
FAQ
1) Will transferring photos to Mac delete them from my iPhone?
No, transferring photos from your iPhone to your Mac using standard methods like iCloud, iTunes, or the Photos app should not delete them from your iPhone. These methods are designed to copy the photos from your iPhone to your Mac while keeping the original files on your phone intact.
However, it's always a good practice to double-check your settings and ensure you have a backup of your data before performing any transfer to avoid accidental data loss.
2) Why can't I transfer photos from iPhone to Mac?
If you're having trouble transferring photos, start by checking your USB cable. Sometimes, faulty cables or loose connections can cause transfer issues. Then, make sure that you have updated both your iPhone and Mac to the latest software versions. You can also restart devices if needed.
If issues persist, consider alternative transfer methods like using third-party software or seeking help from Apple support.
Conclusion
Learning how to transfer iPhone pics to a Mac computer is important. You can safeguard memories during device changes, create more space on your iPhone, and simplify photo organization on your Mac.
In this guide, we have covered a range of methods, including wireless options like iCloud, AirDrop, iTunes, and Dropbox, as well as a secure USB approach with Dr.Fone. Whatever method you choose, the goal remains the same–ensuring a seamless and secure transfer process.
Dr.Fone Basic:
Better Control for Your Phone
Manage, transfer, back up, restore, and mirror your device
iPhone Transfer
- Data Transfer
- 1. Video from iPhone to External Drive
- 2. Transfer MP4 to iPhone
- 3. Put Wallpapers on iPhone
- 4. Move Photos to SD Card
- 5. Best Apps to Transfer from iPhone to Android
- iPhone to PC
- 1. Transfer Pictures From iPhone to PC
- 2. Transfer From iPhone to Computer
- 3. Transfer Album from iPhone to PC
- 4. Transfer Data from iPhone to PC
- 5. Copy Voice Memo from iPhone to PC
- 6. iPhone Camera Roll to Computer
- 7. Podcasts from iPhone to Computer
- 8. Transfer Notes from iPhone
- 9. Techniques Used in Mobile Phone Forensics
- 10. Facing Please Unlock iPhone Photos Error
- iPhone to Mac
- 1. Voice memos from iPhone to Mac
- 2. Synce Notes from iPhone to Mac
- 3. Export iBooks to PC and Mac
- 4. Transfer Photos from iPhone to Mac
- 5. Transfer Music from iPhone to Mac
- Computer to iPhone
- 1. AirDrop From Mac to iPhone
- 2. Use AirDrop from Mac to iPhone
- 3. Transfer Data from PC to iPhone
- 4. Transfer Videos from PC to iPhone
- 5. Unsync iPhone from Computer
- 6. Sync iPhone with Multiple Computers
- Transfer to iPhone
- 1. Switch Cards Between iPhones
- 2. Facetime for Android to iPhone
- 3. Transfer Data from Motorola to iPhone
- 4. Samsung to iPhone Transfer
- 5. Transfer iPhone Apps to iPhone
- 6. Clone iPhone/iPad to iPhone
- Transfer from iPhone
- 1. Transfer Video from iPhone to Laptop
- 2. Transfer Data from iPhone to Laptop
- 3. Transfer Notes from iPhone to iPad
- 4. Transfer Data from iPhone to Android
- 5. Switch from iPhone to Google Pixel
- 6. Switch from iPhone to Samsung S10
- 7. Switch from iPhone to Samsung
- 8. Transfer from iPhone to Samsung S20
- iPhone Transfer Tips
- 1. Ford Sync iPhone
- 2. Sync iCal with iPhone
- 3. iPhone Calendar Not Syncing
- 4. iPhone Transfer Software
- WhatsApp Transfer
- 1. WhatsApp from iPhone to iPhone
- 2. WhatsApp from iPhone to Android
- 3. WhatsApp from iPhone to Samsung S10
- 4. WhatsApp Messages to iPhone
- 5. WhatsApp from iPhone to Samsung S9
- iTunes Transfer
- ● Manage/transfer/recover data
- ● Unlock screen/activate/FRP lock
- ● Fix most iOS and Android issues
- Transfer Now Transfer Now Transfer Now


Alice MJ
staff Editor