How to Transfer Music from iPhone to Mac Without Errors
Oct 24, 2025 • Filed to: Device Data Management • Proven solutions
Dr.Fone Basic:
Better Control for Your Phone
Manage, transfer, back up, restore, and mirror your device
Many iPhone users need to organize music without changing its original location. Managing playlists on an iPhone can feel limited. Music is much easier to access and back up when synced to a Mac. But transferring music isn’t as simple as sharing photos or videos. Apple’s restrictions can make it tricky.
Within this guide, you will learn how to transfer music from your iPhone to your Mac. It explains simple and reliable methods. You can keep your songs safe and accessible. Make space available, create a backup of your music, or listen to tunes on your Mac. The proposed ways in this guide will help you make the process quick and easy.
- Method 1: Syncing Apple Music from iPhone to MacBook Wirelessly
- Method 2: Transfer Music from iPhone to Mac Using Finder
- Method 3: Using iTunes to Copy Purchased Music from iPhone to Mac
- Method 4: Moving Music from iPhone to Mac via AirDrop
- Method 5: Wireless Music Transfer Using Google Drive
- Method 6: Makes Music Transfer from an iPhone to Mac Quite Easy Using Wondershare Dr.Fone

- Tip: Determining the Best Method to Transfer Music from iPhone to Mac
Method 1: Syncing Apple Music from iPhone to MacBook Wirelessly
Transferring Apple songs from your Mac to iPhone, or vice versa, has never been easier. All you need is an Apple Music subscription, and compatibility between the two devices is achieved without a manual transfer machine. This process is quite simple; it only requires synchronization or the use of the same iCloud account on both devices. Your library will load on both devices when these features are activated.
Step 1: Subscribe to Apple Music
- Locate the Music app on your iPhone. After you've clicked on "For You," go to "Sign Up on Family Plan."
- Click on one of the available packages and input your Apple ID. Review your billing and complete the subscription.
Step 2: Re-enter your login information for your Mac.
- Depending on your Mac, launch either the Apple Music App or iTunes.
- sign in by selecting the sign-in button after clicking on the 'Account' tab.
- Enter your Apple ID to log in.
Step 3: Activate the Sync Library or iCloud Music Library.
- Regarding the iPhone: Navigate to Settings, choose Music, and activate the Sync Library or Music Library.
- Regarding the Mac: Launch the Apple Music App, go to Music, and hit the Preferences option on the options menu. Within the "General" button, select "Sync Library" or "iCloud Music Library," and then hit "OK."

Method 2: Transfer Music from iPhone to Mac Using Finder
Finder is a music transfer application that was designed for the macOS Catalina to replace the iTunes app and make it easy to transfer music from iPhone to Mac. It permits you to transfer music content from your iPhone to a Mac device that supports the latest version of macOS. This section outlines how to move songs from an iPhone using the Mac Finder.
Step 1: Link your Mac and iPhone together.
You will need to pair your iPhone to your Macbook through either a USB cable or a Wi-Fi connection.
Step 2: Start the Finder Application And Find Your iPhone
- Open the Finder Application on your Mac.
- On the sidebar of your Mac, under Finder, scroll down to the Locations section to where it says iPhone and click it.
Step 3: Navigate to the Music Tab
- After selecting your iPhone, locate and click on the "Music" tab in the top menu.
- Your iPhone's music collection will be shown as a result.
Step 4: Select and Sync Music
- For automatic music synchronization, tick the "Sync music onto [device name]" box.
- Choose whether you want to sync your entire music library or only specific songs.
- After selecting your preference, click "Apply" to start the syncing process.
Step 5: Locate Transferred Music in Finder
Once the syncing is complete, your transferred songs will appear in the music folder within Finder.
Step 6: Safely Eject Your iPhone
Always remember to eject your iPhone in Finder before physically unplugging the device from your system. In order to prevent any data loss or corruption, simply click on the ‘Eject’ button located beside the name of the device in the sidebar when ready to disconnect.

Method 3: Using iTunes to Copy Purchased Music from iPhone to Mac
If you have bought songs on Mac via iTunes store, then you need iTunes to transfer the songs from your iPhone to Mac. However, this only works if you possess macOS Catalina or earlier. This method is ineffective if you want to upload songs you downloaded from an alternate source.
Step 1: Link Your Mac and iPhone
Make sure both your Mac and iPhone have been turned on before connecting them using a USB cord.
Step 2: Authorize Your Mac in iTunes
- Boot up your Mac and log in to iTunes.
- You will find the option ‘Authorize This Computer’ – click that, but first find the account on the menu, “Authorizations.”
- Lastly, enter your Apple ID and password that you set for the authorization.
Step 3: Get Your Paid Music on Your Mac
- Lastly, to copy the purchased songs, look for the “File” menu in iTunes – select it, and then press “Devices”.
- By the end, you need to click the "Transfer Purchases from [your device]" button.
- Navigate to the "File" menu in iTunes and then choose "Devices."
- Initiate the transfer by selecting "Transfer Purchases from [your device]."

Method 4: Moving Music from iPhone to Mac via AirDrop
Another convenient method is using AirDrop, especially with mp3s, to transfer downloaded files from the internet from an iPhone to a Mac.
Step 1: Enable AirDrop on Both Devices
- To enable AirDrop on a Mac, launch Finder, go to the sidebar, and choose "Everyone."
- To enable AirDrop on an iPhone, head to the Settings app, then hit General.

Step 2: Choose an iPhone Music File
- Find the song in your music app or Files.
- With a tap and hold on file, pick "Share," and then pick "AirDrop."
Step 3: Select Your Mac as the Final Destination
- Make sure your Mac is selected as the destination device in the AirDrop menu.
Step 4: Approve the Mac file
- Select "Accept" to open the file on your Mac.
- Launch your preferred music app and listen to the transferred songs.

Method 5: Wireless Music Transfer Using Google Drive
If you've ever wanted to know, "How do you sync music from iPhone to Mac without cables?" a good answer is to employ a cloud storage service, such as Google Drive. This approach transfers any type of music file from your iPhone to your Mac.
Step 1: Install Google Drive on Your iPhone
- Download and install the Google Drive app from the App Store.
- Log in with your Google account credentials.
Step 2: Upload Music from Your iPhone
- Open Google Drive on your iPhone.
- Tap the "+" icon, select "Upload," and choose the music files you want to transfer.
Step 3: Access Google Drive on Your Mac
- Open a web browser on your Mac and visit Google Drive's website.
- Sign in using the same Google account.
Step 4: Download Music Files to Your Mac
- Locate the uploaded music files.
- Download them to your Mac for offline use.
Method 6: Makes Music Transfer from an iPhone to Mac Quite Easy Using Wondershare Dr.Fone
If the previous methods of transferring music from iPhone to Mac feel overwhelming, here's an alternative that simplifies the process—Wondershare Dr.Fone. This powerful third-party software offers an intuitive solution for managing and transferring your music library effortlessly. Its user-friendly interface and feature-rich design make it one of the best options for anyone looking to move music from iPhone to MacBook without relying on iTunes.
If the aforementioned methods of transferring music from iPhone to Mac seem complicated, here is an alternative that renders the entire process easy-Wondershare, Dr.Fone. It is such a powerful third-party software with a simple weigh-and-transfer music library management application. The user-friendly interface combined with a feature-laden design makes it one of the ideal solutions for anyone who needs to move music from an iPhone to a MacBook without iTunes.

Wondershare Dr.Fone
Makes Music Transfer from an iPhone to Mac Quite Easy!
- Transfer, manage, export/import your music, photos, videos, contacts, SMS, Apps, etc.
- Back up your music, photos, videos, contacts, SMS, Apps, etc., to the computer and restore them easily.
- Transfer music, photos, videos, contacts, messages, etc., from one smartphone to another.
- Transfer media files between iOS devices and iTunes.
- Fully compatible with the newest iOS system.
Follow these steps to transfer music from iPhone to Mac quickly.
Step 1: Start Dr.Fone and Connect Your Devices to It
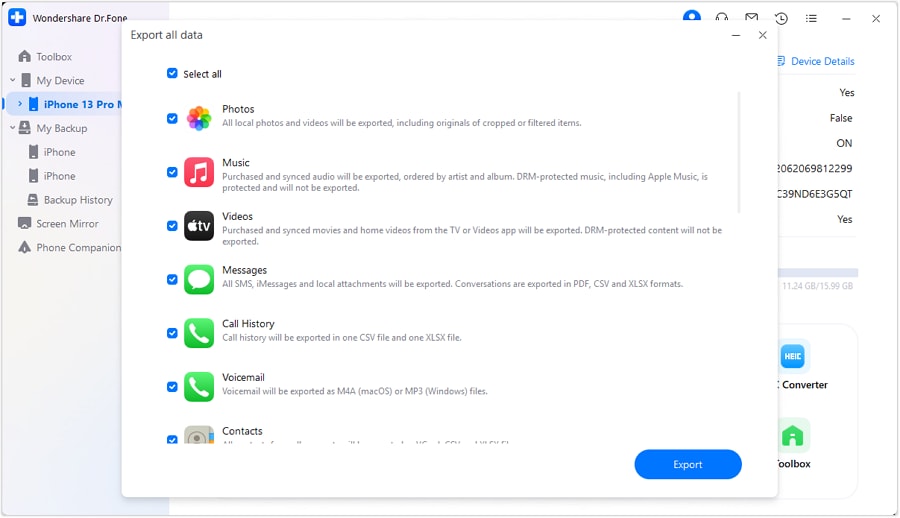
Open the program once Dr.Fone has been successfully installed on the Mac and choose the option "Export All Data" from the front menu. Use a USB cable to connect or link iPhone with Mac.

Step 2: Choose the Music Files for Transfer
When a new window appears, you will be prompted to select the type of files you want to transfer. Choose “Music” as your desired file type and then click on "Export." Specify a destination folder on your Mac where the exported music files will be saved.

Step 3: Create a Password for Encrypted Backup
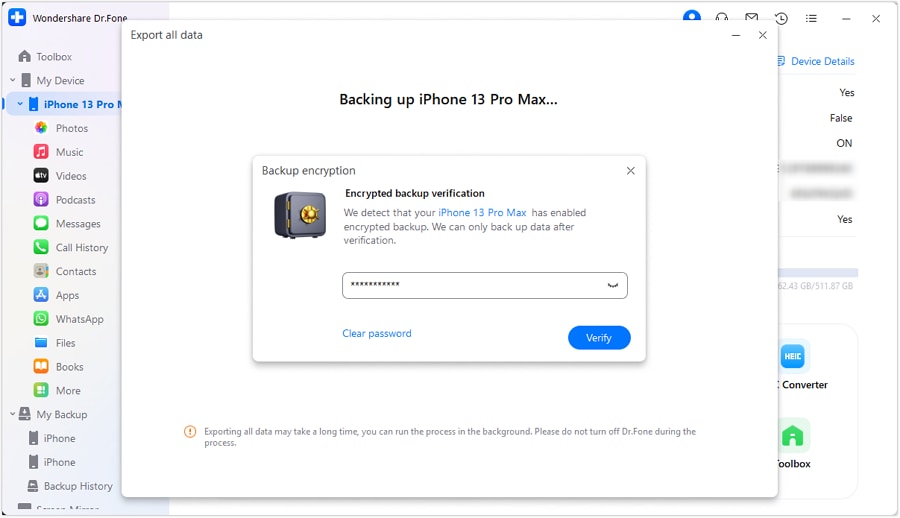
For added security, Dr.Fone will prompt you to generate an encrypted password. Create a password, re-enter it for verification, and then click "Done" to secure the backup process. This ensures your data remains private and protected during the transfer.

Step 4: Monitor the Transfer Progress
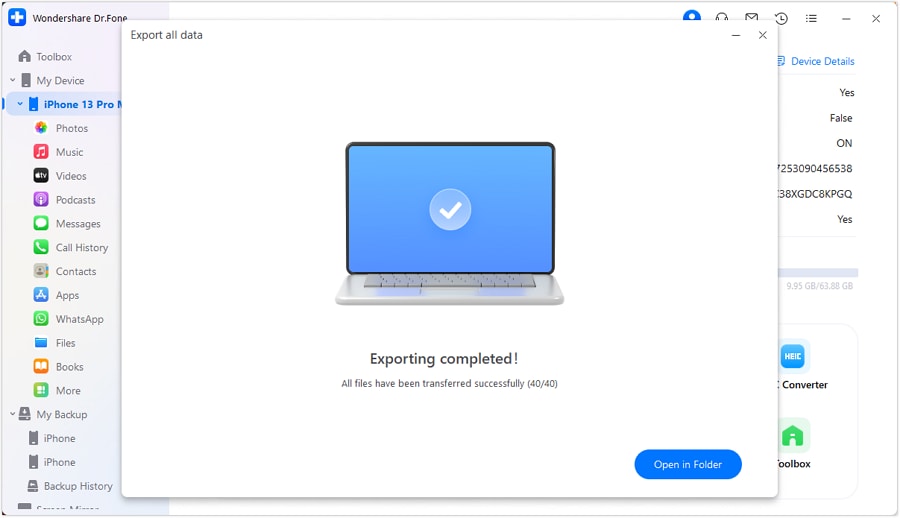
Once the transfer begins, you can watch the progress on the screen. Dr.Fone provides real-time updates, allowing you to track how much of the music data has been exported to your Mac.

Step 5: Access the Exported Music on Your Mac
When the export is complete, click on "Open" to navigate directly to the folder where your music files have been saved. You can now access the transferred music files on your Mac with ease.

Tip: Determining the Best Method to Transfer Music from iPhone to Mac
To make it easier for you to decide on the most suitable method for transferring music from your iPhone to your Mac, here is a comprehensive comparison of the six options. Each method is evaluated based on its advantages and limitations, helping you choose the one that fits your needs best.
|
Methods |
Advantages |
Limitations |
| Apple Music Sync | ● Automatic sync ● No manual transfers ● Seamless across devices |
● Requires Apple Music subscription ● Limited to synced libraries |
| Finder | ● Direct and simple ● Works with macOS Catalina and later |
● Only works with newer macOS versions ● Limited features |
| iTunes | ● Good for transferring purchased music ● Straightforwardly for iTunes users |
● Limited to purchased music ● No support for downloaded tracks |
| AirDrop | ● Wireless transfer ● No need for cables or external tools |
● Cannot transfer entire libraries ● Manual and time-consuming for many files |
| Google Drive | ● Wireless and convenient for small file sizes ● Works with any file type |
● Requires an active internet connection ● Slower for large libraries |
| Wondershare Dr.Fone |
● User-friendly interface ● Supports all file types ● Highly versatile ● No limitations |
● Requires software installation ● May involve a cost for advanced features |
Conclusion:
Transferring music from your iPhone to your Mac doesn’t have to be complicated. This guide provides you with a variety of reliable methods, from using Apple Music and Finder to leveraging cloud storage or third-party solutions. Each approach ensures that your music remains accessible, organized, and secure on your Mac.
Among the options, tools like Wondershare Dr.Fone stand out for their simplicity and comprehensive features, making it easier to transfer music from iPhone to Mac without any hassle. Whether you’re managing a few tracks or your entire library, these methods ensure smooth music transfer and backup for your convenience.
Dr.Fone Basic:
Better Control for Your Phone
Manage, transfer, back up, restore, and mirror your device
iPhone Music
- Download Music to iOS
- 1. Download Music to iPhone
- 2. Download Songs on iPhone/iPad/iPod
- 3. Download Free Music on iPhone
- 4. Download on iPhone without iTunes
- Make iPhone Ringtones
- 1. Set Voice Memo a Ringtone on iPhone
- 2. Ringtone Apps to Download Ringtones
- 3. Add Custom Ringtones to iPhone
- 4. iPhone Ringtone Apps
- 5. Ringtone Maker Apps for iPhone
- 6. Change iPhone Alarm Volume
- 7. Set A Ringtone on iPhone
- 8. Set MP3 As Ringtone iPhone
- 9. Set Ringtone iPhone
- 10. Make Custom Text Tones for iPhone
- 11. Websites for Free iPhone Ringtones
- 12. Move Ringtone from iPhone to Android
- 13. Popular iPhone Ringtone Remix
- Transfer Audio Media to iPhone
- 1. Send Ringtone from iPhone to iPhone
- 2. Transfer MP3 to iPhone
- 3. Transfer Audiobook from PC to iPhone
- 4. Transfer Songs from CD to iPhone
- 5. Put Ringtones on iPhone
- Transfer Music from iPhone
- 1. Transfer Music from iPhone to computer
- 2. Transfer Music from iPhone to iCloud
- 3. Transfer Music from iPhone to Android
- 4. Transfer Music from iPhone to iPod
- 5. Put Music on iPhone from Computer
- 6. Add Music to iPhone from Computer
- 7. Sync Apple Music Library
- Transfer Music from iTunes
- 1. Transfer Music from iTunes to iPhone
- 2. Transfer Music from Mac to iPhone
- 3. Transfer Music from Laptop to iPhone
- Transfer Music to iPhone
- 1. Transfer Music from Computer to iPhone
- 2. Transfer Music from Mac to iPhone
- 3. Transfer Music from Mac to iPhone
- 4. Music from PC to iPhone
- 5. Music from PC to iPhone without iTunes
- 6. Transfer Music from Android to iPhone
- 7. Transfer Music from iPad to iPhone
- 8. Transfer Music from iPod/iPhone
- 9. Transfer Music from iPhone to iPhone
- 10. Transfer Music from External Hard Drive
- 11. Transfer to iPhone without iTunes
- 12. Transfer Music to Jailbroken iPhone
- 13. Transfer Music to iPhone
- Transfer Music to iTunes/PC
- 1. Transfer Music from iPhone to iTunes
- 2. Transfer Music from iPhone to PC
- 3. Transfer Music from iPhone to Mac
- 4. Transfer Music between PC and iPhone
- 5. Transfer Music from to PC without iTunes
- iPhone Music Problems
- 1. Song Missing After iOS Update
- 2. Music Won't Play on iPhone
- 3. iPhone Plays Music by Itself
- 4. Apple Music Song Is Not Available
- 5.Fix Apple Music Library Not Syncing
- iPhone Music Tips
- ● Manage/transfer/recover data
- ● Unlock screen/activate/FRP lock
- ● Fix most iOS and Android issues
- Transfer Now Transfer Now Transfer Now


Daisy Raines
staff Editor