5 Flexible Ways to Transfer Voice Memos from iPhone to Computer
Oct 24, 2025 • Filed to: Device Data Management • Proven solutions
Dr.Fone Basic:
Better Control for Your Phone
Manage, transfer, back up, restore, and mirror your device
“Can someone tell me how to transfer voice memos from iPhone to computer? I recorded some voice memos on my iPhone X and now I can’t seem to transfer them to my PC.”
If you have been using iPhone for a while, then you might already be familiar with the function of voice memos. The app lets us record voice notes of different kinds that can serve all sorts of purposes. Though, sometimes users wish to transfer voice memos from iPhone to PC or Mac to work on these audio files. If you have a similar query about the transfer of voice memos from iPhone, then you have come to the right place. In this guide, I will let you know how to transfer voice memos from iPhone to computer in a jiffy.

- Part 1: Is it Difficult to Transfer Voice Memos from iPhone to Computer
- Part 2: How to Transfer Voice Memos from iPhone to Computer with Dr.Fone – Phone Manager [Easiest Method]
- Part 3: How to Transfer Voice Memos from iPhone to Mac via AirDrop
- Part 4: Email Voice Memos from iPhone to Yourself
- Part 5: How to Transfer Voice Memos from iPhone to Computer via iTunes
- Part 6: Transfer Voice Memos from iPhone to PC via Dropbox
Part 1: Is it Difficult to Transfer Voice Memos from iPhone to Computer
A lot of people think that it is a bit complicated to transfer voice memos from iPhone, which is not the case. You can use a desktop application like Dr.Fone or iTunes to transfer voice memos from iPhone to PC. Alternatively, you can message or mail them to yourself or anyone else as well. To perform a wireless transfer, you can use a cloud-based service or try AirDrop on Mac. In this post, I will discuss how to transfer voice memos from iPhone to laptop in detail.
Part 2: How to Transfer Voice Memos from iPhone to Computer with Dr.Fone – Phone Manager [Easiest Method]
If you are looking for the simplest way to transfer voice memos from iPhone to PC or Mac, then try Dr.Fone – Phone Manager (iOS). It can help you move all kinds of data from your iPhone to computer or vice versa. Not just that, you can also use it to learn how to transfer voice memos from iPhone to iPhone or Android.
The application is extremely easy to use and supports all kinds of data transfer. Apart from voice memos, you can use it to move your photos, videos, songs, contacts, and so on. You can also use it to move data between your iPhone and iTunes without using iTunes. To learn how to transfer voice memos from iPhone to computer using Dr.Fone, follow these steps:
Step 1: Connect your iPhone to the system
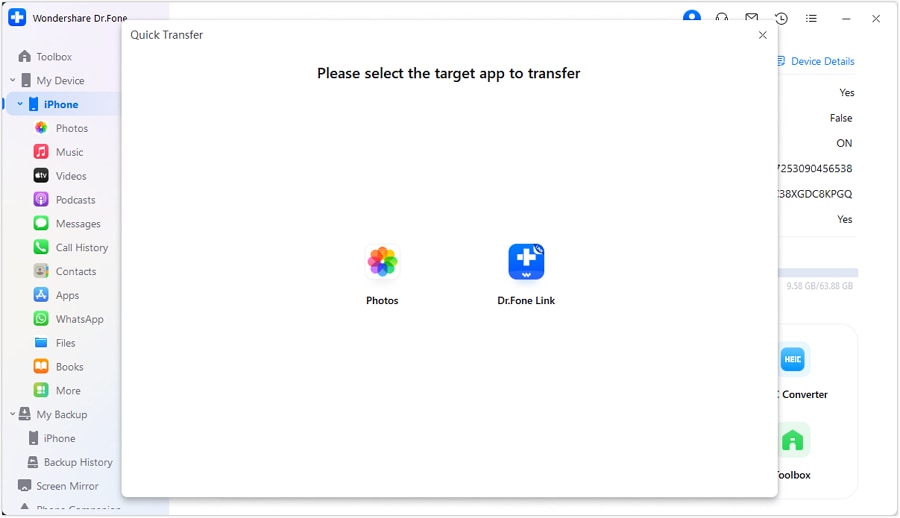
To start with, just connect your iPhone to your computer and launch the Dr.Fone toolkit on it. From the provided options on its home, you can go to the “Phone Manager” feature.

In no time, the application will automatically detect the connected iPhone and will display its snapshot as well.

Step 2: Transfer voice memos from iPhone to PC/Mac
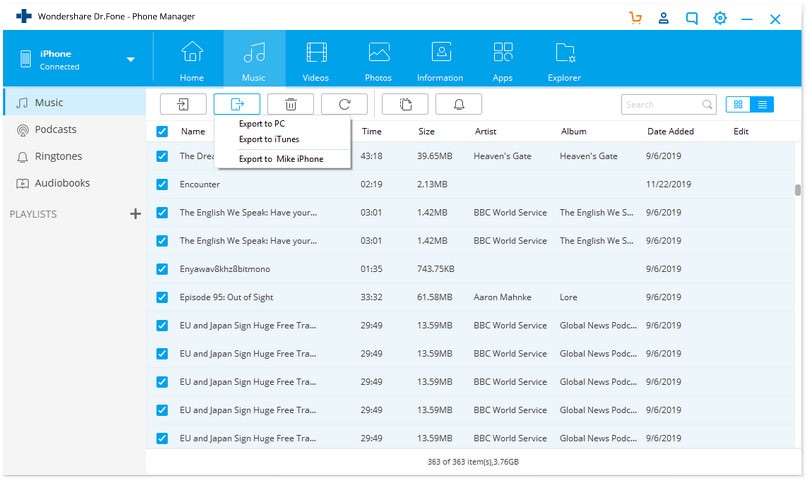
Once your device is detected, you can go to the Music tab on the interface. This will automatically display all the saved audio files on your device under different categories.

Just go to the Voice Memos section and select the audio files you wish to transfer. You can select multiple audio files from here as per your requirements. Afterward, click on the Export icon on the toolbar and choose to export the selected voice memos to your computer or any other connected device.

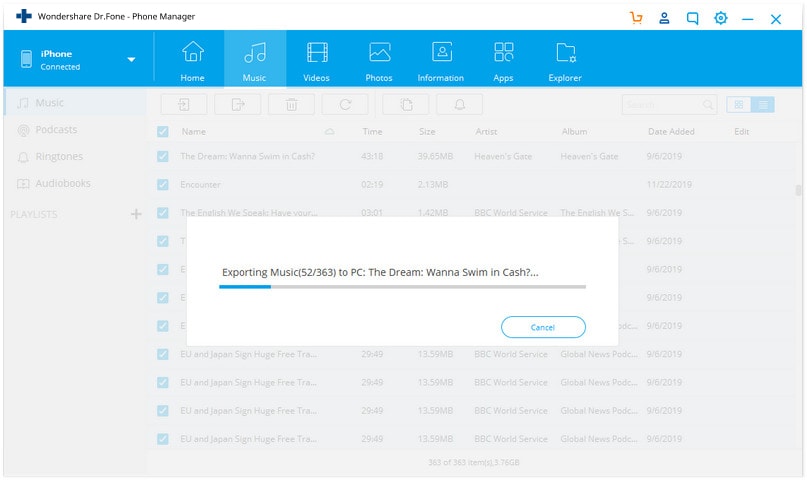
You can further select a target location where your voice memos would be saved. Simply wait for a while as your voice memos would be moved to the selected destination.

Part 3: How to Transfer Voice Memos from iPhone to Mac via AirDrop
While AirDrop doesn’t work on Windows systems, you can use this feature on Mac. The technology is developed by Apple that lets us transfer data between different devices wirelessly. Before you proceed, make sure that your iPhone and Mac are placed nearby. Also, their WiFi and Bluetooth features should be enabled in advance. To learn how to transfer voice memos from iPhone 5/6/7/8/X to Mac, you can follow these steps:
Step 1: Enable AirDrop on both iPhone and Mac
At first, just go to your iPhone’s Settings > AirDrop and turn this feature on. You can also go to its Control Center to enable it. Also, maintain its visibility as everyone so that you can easily connect it to your Mac.

Similarly, you can open the AirDrop application on your Mac and turn it on. Here also, you can set its visibility to everyone for a while. You can see the availability of your iPhone from here.

Step 2: AirDrop voice memos to Mac
Now, go to the Voice Memos app on your iPhone and select the files you wish to move. Afterward, tap on the share icon and under the AirDrop section, select the available Mac. You can just accept the incoming data on your Mac to complete the transfer of voice memos.

Part 4: Email Voice Memos from iPhone to Yourself
In case you only wish to transfer a handful of voice memos, then you can just email them to yourself. Also, the same process can be implemented to learn how to transfer voice memos from iPhone to iPhone. Though, if you have a lot of voice memos to move, then this won’t be an ideal approach.
Step 1: Select and share your voice memos
At first, just open the Voice Memos app on your iPhone and select the audio files to move. You can select multiple voice memos and then tap on the share icon here.

Step 2: Email the selected voice memos
As you will get different options to share the voice memos, simply select Mail. This will open the default email interface so that you can send the voice memos to yourself. Later, you can access your email on your computer to download the voice memos. Similarly, you can message your voice memos to any other contact from here.

Part 5: How to Transfer Voice Memos from iPhone to Computer via iTunes
This is another smart solution to transfer voice memos from iPhone to PC or Mac. Since iTunes is developed by Apple, it lets us manage our iOS devices easily. Using it, you can sync your voice memos between your iPhone and iTunes. Later, your voice memos would be available in your iTunes Music Library that you can easily access. You can follow these easy steps to learn how to transfer voice memos from iPhone to Mac or PC via iTunes.
Step 1: Connect your iPhone to iTunes
Simply use a working lightning cable to connect your iPhone to your computer and launch iTunes on it. If you are connecting it for the first time, then you need to trust the computer on iPhone. Once your iPhone is detected, you can go to the devices section, and select it.

Step 2: Sync voice memos with iTunes
After selecting your iPhone, go to the Music section on the sidebar. From here, you can turn on the option to sync music. Make sure that the option to include voice memos is enabled before you click on the “Apply” button.

Part 6: Transfer Voice Memos from iPhone to PC via Dropbox
Lastly, you can also take the assistance of any cloud-based service like Google Drive or Dropbox to transfer your voice memos. In this, we would first take a backup of voice memos to Dropbox and would later download them on a computer. Since Dropbox only provides 2 GB of free storage, make sure that you have enough space on your account beforehand.
Step 1: Upload voice memos to Dropbox
Firstly, just open the voice memos app on your iPhone and select the audio file to move. Tap on the three-dot icon to get more options and choose to save the file to your Dropbox account.

Step 2: Save voice memos on your computer
Once your voice memos are saved in Dropbox, you can access its desktop application or go to its website. Now, just select the voice memos, click on the three-dot icon, and choose to download them to your computer instead.

There you go! After following this guide, you would be able to transfer voice memos from iPhone to PC or Mac in minutes. The easiest solution of them all would be Dr.Fone – Phone Manager (iOS) that can move all kinds of data from one source to another. If you want, you can give it a try and explore the wide range of features it offers. Also, if you found this guide helpful, then share it with your friends to teach them how to transfer voice memos from iPhone to computer as well.
Dr.Fone Basic:
Better Control for Your Phone
Manage, transfer, back up, restore, and mirror your device
iPhone Transfer
- Data Transfer
- 1. Video from iPhone to External Drive
- 2. Transfer MP4 to iPhone
- 3. Put Wallpapers on iPhone
- 4. Move Photos to SD Card
- 5. Best Apps to Transfer from iPhone to Android
- iPhone to PC
- 1. Transfer Pictures From iPhone to PC
- 2. Transfer From iPhone to Computer
- 3. Transfer Album from iPhone to PC
- 4. Transfer Data from iPhone to PC
- 5. Copy Voice Memo from iPhone to PC
- 6. iPhone Camera Roll to Computer
- 7. Podcasts from iPhone to Computer
- 8. Transfer Notes from iPhone
- 9. Techniques Used in Mobile Phone Forensics
- 10. Facing Please Unlock iPhone Photos Error
- iPhone to Mac
- 1. Voice memos from iPhone to Mac
- 2. Synce Notes from iPhone to Mac
- 3. Export iBooks to PC and Mac
- 4. Transfer Photos from iPhone to Mac
- 5. Transfer Music from iPhone to Mac
- Computer to iPhone
- 1. AirDrop From Mac to iPhone
- 2. Use AirDrop from Mac to iPhone
- 3. Transfer Data from PC to iPhone
- 4. Transfer Videos from PC to iPhone
- 5. Unsync iPhone from Computer
- 6. Sync iPhone with Multiple Computers
- Transfer to iPhone
- 1. Switch Cards Between iPhones
- 2. Facetime for Android to iPhone
- 3. Transfer Data from Motorola to iPhone
- 4. Samsung to iPhone Transfer
- 5. Transfer iPhone Apps to iPhone
- 6. Clone iPhone/iPad to iPhone
- Transfer from iPhone
- 1. Transfer Video from iPhone to Laptop
- 2. Transfer Data from iPhone to Laptop
- 3. Transfer Notes from iPhone to iPad
- 4. Transfer Data from iPhone to Android
- 5. Switch from iPhone to Google Pixel
- 6. Switch from iPhone to Samsung S10
- 7. Switch from iPhone to Samsung
- 8. Transfer from iPhone to Samsung S20
- iPhone Transfer Tips
- 1. Ford Sync iPhone
- 2. Sync iCal with iPhone
- 3. iPhone Calendar Not Syncing
- 4. iPhone Transfer Software
- WhatsApp Transfer
- 1. WhatsApp from iPhone to iPhone
- 2. WhatsApp from iPhone to Android
- 3. WhatsApp from iPhone to Samsung S10
- 4. WhatsApp Messages to iPhone
- 5. WhatsApp from iPhone to Samsung S9
- iTunes Transfer
- ● Manage/transfer/recover data
- ● Unlock screen/activate/FRP lock
- ● Fix most iOS and Android issues
- Transfer Now Transfer Now Transfer Now


Alice MJ
staff Editor