
Does iTunes Backup Text Messages? How to Restore?
iPhone Messages
- Back Up iPhone Messages
- 1. Back up Messages on iPhone
- 2. Save Text Messages on iPhone
- 3. Back up Viber messages
- 4. Back up WhatsApp Data to Computer
- 5. Export WhatsApp Message from iOS
- Delete iPhone Messages
- 1. Delete iMessages on iPhone and iPad
- 2. Delete Snapchat Messages on iPhone
- 3. Delete WA for Everyone
- 4. Delete WA Message Permanently
- 5. Delete Text Messages from iPhone
- 6. Tips about WhatsApp Delete Message
- 7. Undelete Messages on iPhone
- 8. View Deleted iMessage History on PC
- Recover iPhone Messages
- 1. Recover iPhone Deleted Text Messages
- 2. Recover Deleted Viber Messages
- 3. Recover Messages on iPhone 13
- 4. Recover Deleted Message on iPhone 8
- 5. Recover Deleted Message iPhone 6
- 6. Transfer from iPhone to iPhone
- 7. Recover WhatsApp Messages Online
- 8. Restore 1-Year-Old WhatsApp Chats
- Restore iPhone Messages
- 1. Restore Kik Messages from iPhone
- 2. Restore Text Messages on iPhone
- 3. Restore Viber Messages Selectively
- 4. Restore Kik Messages to iPhone
- Transfer iPhone Messages
- 1. Transfer from Android to iPhone
- 2. Transfer from iPhone to iPhone
- 3. Transfer from iPhone to Computer
- 4. Transfer from Android to iPhone XS
- 5. WhatsApp from Android to iOS
- 6. Transfer from Android to iPhone 13
- 7. WhatsApp from iPhone to PC
- 8. Download Text Messages from iPhone
- 9. Sync iMessage between iPhone and Mac
- iPhone Messages Problems
- 1. iMessage Not Working
- 2. iMessage Keeps Crashing
- 3. iMessage Not Syncing on a Mac
- 4.iPhone won't send or receive texts
- 5. Message Blocking Is Active
- 6. Why Are My iPhone Messages Green
- iPhone Message Tricks
- 1. Export Messages from iPhone to PDF
- 2. Read Others WA Messages
- 3. iPhone Message Tips and Tricks
- 4. Access iMessage Online
- 5. Extract Text Messages from iPhone
- 6. Forward Text on iPhone and Android
- 7. Print Text Messages from iPhone
- 8. View iPhone Messages on PC/Mac
- 9. Tell If You Are Blocked on iMessage
- ● Manage/transfer/recover data
- ● Unlock screen/activate/FRP lock
- ● Fix most iOS and Android issues
- Free Download Free Download Free Download

Jun 30, 2026 • Filed to: Data Recovery Solutions • Proven solutions
 TL;DR:
iTunes fully backs up and restores iPhone text messages, but performing a restore via iTunes will completely overwrite all current data on your device with the backup contents.
● Wondershare Dr.Fone provides a local backup alternative (compatible with iOS 13) that allows you to preview files and selectively restore text messages without overwriting your existing data.
● iCloud serves as a wireless alternative that backs up SMS, iMessages, and multimedia communications when manually enabled in the device settings.
● When restoring data, update your iPhone to the latest iOS version to prevent incompatibilities and keep the device disconnected from Wi-Fi during the process to avoid complications.
Ask AI for a summary
 ChatGPT
 Perplexity
 Gemini
 Claude
 Grok
Grok
Dr.Fone Basic:
Better Control for Your Phone
Manage, transfer, back up, restore, and mirror your device
Does iTunes backup text messages? The answer is "Yes."
In fact, iTunes offers a comprehensive solution to backup and restore messages along with all other data on your iPhone. This powerful feature ensures that your text messages, contacts, photos, and app data are safely stored.
When you need to restore your iPhone, the backups saved through iTunes are easily accessible on your computer, allowing you to quickly recover your data. It’s crucial to understand that restoring your iPhone from an iTunes backup will replace all current data on the device with the contents of the backup. This process ensures a complete backup and restore of messages and other important files, making it an essential step for safeguarding your iPhone’s information.
This article explains how to backup and restore iPhone text messages using iTunes.
Part 1: How To Backup and Restore Text Messages With iTunes
Backing up and restoring messages using iTunes is a simple and reliable process. Many users are already familiar with iTunes as their primary platform for purchasing apps, music, and books from the Apple Store, making it a convenient choice for managing their iPhone data. With iTunes, you can effortlessly backup and restore messages.
How to Back Up Text Messages With iTunes
Utilizing iTunes backup text messages is a basic process. Here is how to do it:
- Connect your iPhone to your computer using a USB cable and open iTunes.
- Click on the iPhone icon in the top left corner of the iTunes window.
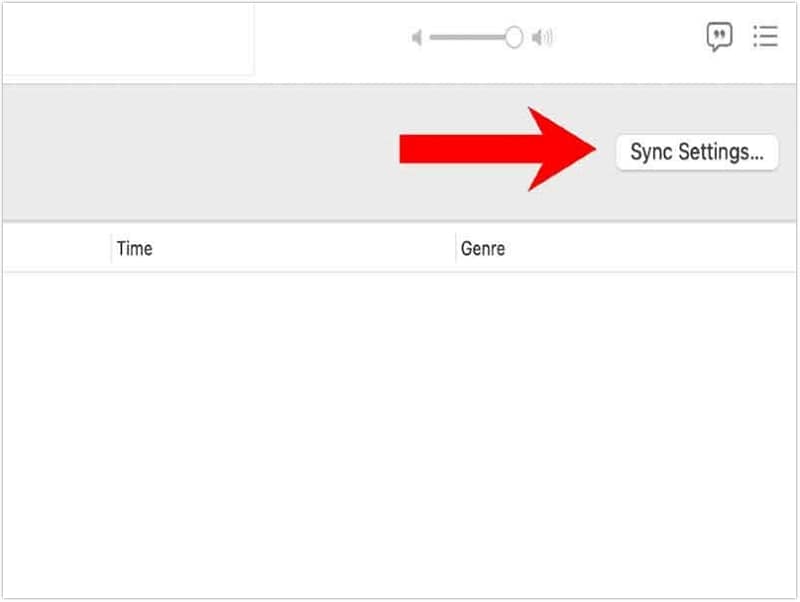
- Under the "Backups" section, select "This computer" and click "Back Up Now" to create a backup of your iPhone data, including your text messages.

- Once the backup is complete, disconnect your iPhone from your computer.
How to Check if Messages Are Backed Up on iTunes
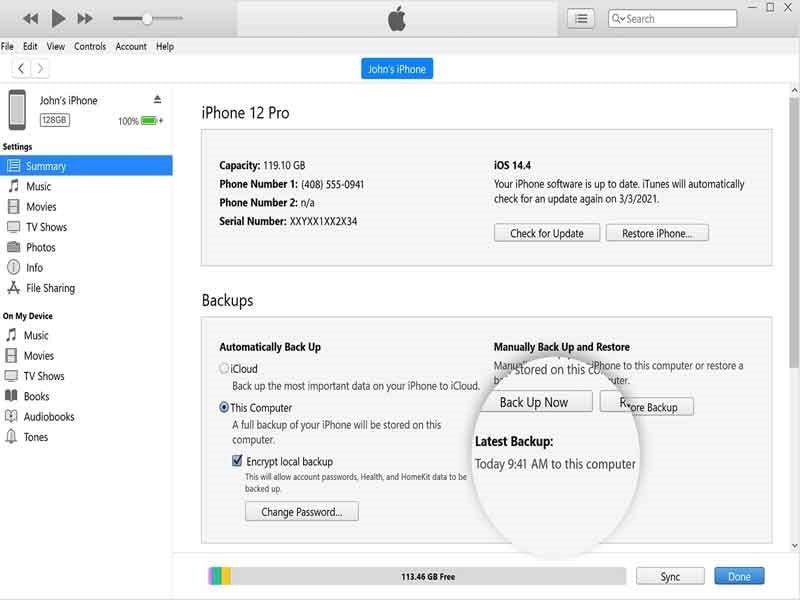
Follow these steps if you've backed up your iPhone using iTunes and want to see if your messages were saved:
- Open iTunes and connect your iPhone to your computer.
- Click on the iPhone icon in the upper left part of the iTunes window.
- Look for the "Latest Backup" area under "Backups" and check the date and time of your most recent backup. It will let you know if your messages were backed up.
How to Restore Messages From iTunes
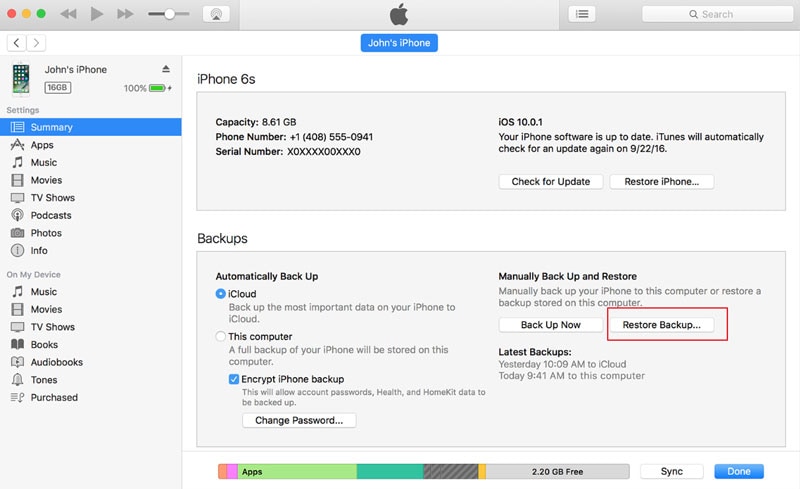
Apart from using iTunes backup messages, you may also use iTunes to restore iPhone texts to your iPhone. Here's how you can do it:
- You have to connect your iOS device to your computer before you can recover your iTunes backup.
- Then, start iTunes if it doesn't start itself. Click the 'Summary' button when your iOS device shows up in iTunes.
- Click "Restore Backup..." under the "Backups" menu.
Part 2: How To Backup and Restore Messages With 2 Alternative Ways
Using iTunes to back up text messages remains one of the most reliable methods to safeguard your conversations. However, alongside iTunes, there are two additional effective options available for backing up and restoring messages, providing users with flexible alternatives.
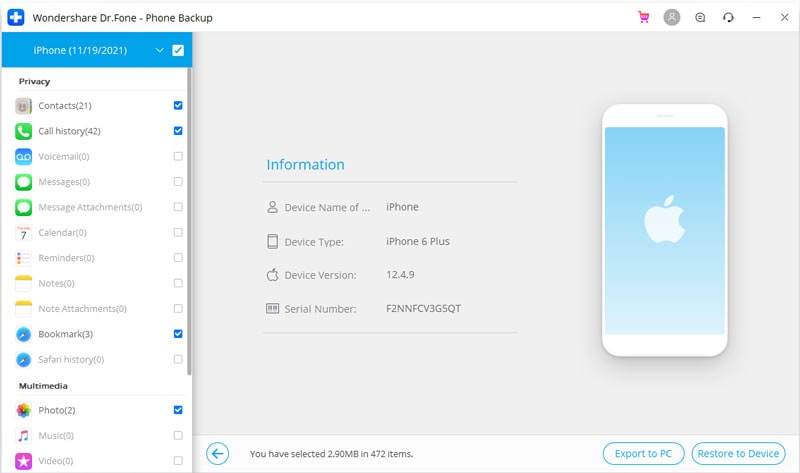
Method 1: Back Up and Restore Messages With Wondershare Dr.Fone
Wondershare Dr.Fone is a trusted solution for backing up and restoring messages and other data from your mobile device to your computer. In case of unexpected data loss, you can quickly restore your backed-up messages and files. This versatile software supports a wide range of file types, ensuring comprehensive data protection and easy recovery.
Using Dr.Fone to back up and recover your phone has these benefits:
- An easier alternative to iTunes for text message backup.
- Allows to preview iTunes and iCloud backups for free and selectively restored.
- Existing data is not overwritten after the restoration.
- Compatible with all iPhone, iPad, and iPod touch models (iOS 13 supported).
- The best alternative to iTunes and iCloud is to back up iDevice locally.
Steps to use Dr.Fone to back up your messages:
- Step 1:Get Dr.Fone and put it on your computer.
- Step 2:Open Dr.Fone and then connect your iPhone to your computer.
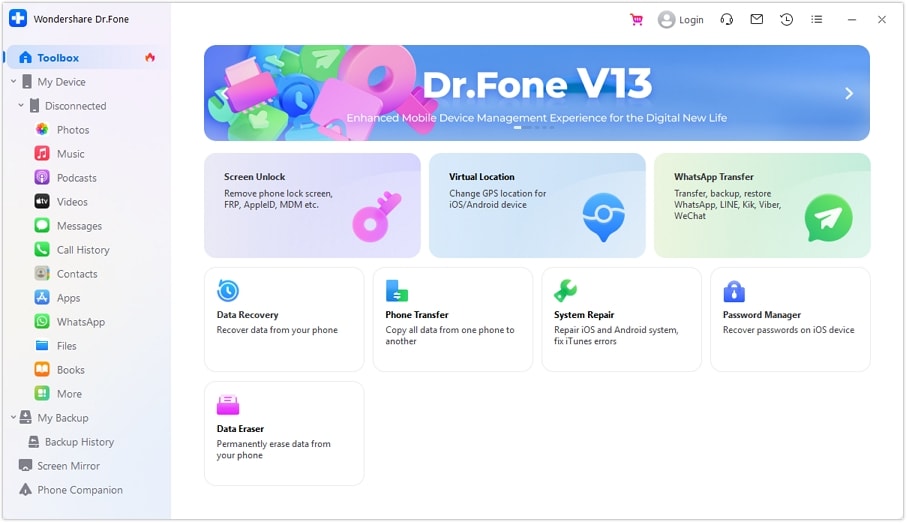
- Step 3:Click "Data Backup & Restore" and choose "Messages" from the list of data types.
- Step 4:Choose the messages you want to save and click "Backup."
- Step 5:Dr.Fone will start saving your messages on your computer as a backup.
Method 2: Back Up and Restore Text Messages With iCloud
There is a significant number of people who are uncertain as to whether or not iCloud can back up the texts that are stored on their iPhones. The answer that should be provided is "yes."
This feature will back up all of the text messages, iMessage, and multimedia communications sent or received on your iPhone. If you need further explanation, you can refer to the list provided below.
- Step 1:Open the iPhone's Settings menu. In the menu that appears, tap the iCloud icon.
- Step 2:Log in with your iCloud credentials. Check to see if your Wi-Fi is active.
- Step 3:Select an iCloud icon from the many available (Contacts, Notes, etc.) on the iCloud screen. If you wish to backup them as well, turn them on. Afterwards, select the Merge option.
- Step 4:Select the Storage & Backup menu item.
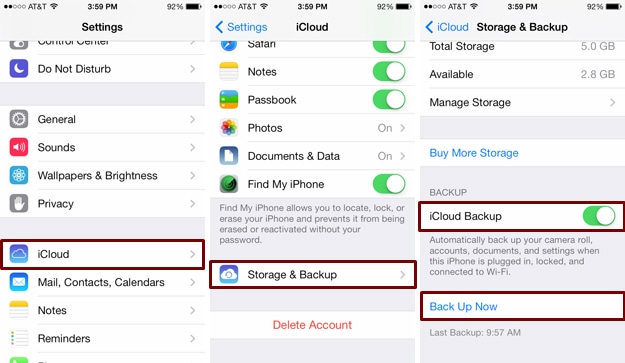
- Step 5:To activate iCloud backup, select Back Up Now.
- Step 6:Stay patient while your iPhone backs up your text messages.
Part 3: Tips for Successful Text Message Restoration
Having the ability to restore deleted text messages is crucial for recovering important conversations or seamlessly transferring data to a new device. Effective backup and restore solutions ensure your messages are safe and accessible when needed.
Listed below are some ideas for recovering deleted text messages:
- Having a recent backup of your communications is the best way to guarantee a successful restoration, so make sure to back them up often.
- Keep a regular backup of your communications, either with iTunes or an alternative program like Dr.Fone.
- Make sure you have the most recent iOS version installed on your iPhone before performing a restore. That way, you won't have to worry about incompatibilities during the restoration.
- It is essential that your iPhone not be connected to Wi-Fi while it is being restored. It can help avoid any complications or delays that may arise throughout the restoration process.
- Do not disrupt the restore process by using your iPhone or computer. It can lessen the likelihood of malfunctions and delays.
- It may take some time to restore your data, so please be patient. It's best to wait for the procedure to finish without interfering.
You May Also Like:
How to Backup iPhone in Recovery Mode
How to Take A Full Backup of Android Phone With/Without Root
The Best Way for Backup Broken Screen Android Phone[Step-by-Step Guide]
Conclusion
In the end, iTunes backup text messages provide a straightforward method for accessing your text messages and notes stored in backup files. However, Wondershare Dr.Fone is an even simpler and more dependable solution that can be used to retrieve essential data.
Wondershare prioritizes your privacy and ensures your personal data is protected. With Dr.Fone, you can easily select and restore individual files from your backups, making message recovery simple and efficient.
Dr.Fone Basic:
Better Control for Your Phone
Manage, transfer, back up, restore, and mirror your device


Alice MJ
staff Editor