100% Security Verified | No Subscription Required | No Malware

 :
: 
 ChatGPT
 Perplexity
 Gemini
 Claude
 Grok
Grok

I accidentally deleted all the photos from my Samsung Galaxy S7 Edge while cleaning up storage. Is there any way to perform data recovery and get them back?
A concerned Samsung User
The Samsung Galaxy S7 and S7 Edge, despite being reliable devices, are not immune to data loss. An accidental tap, a system crash, or physical damage can lead to your precious photos, contacts, and messages disappearing in an instant. This sudden loss of data can be incredibly stressful.
Fortunately, losing your files doesn't have to be permanent. This comprehensive guide details several effective Samsung S7 data recovery methods. We will explore solutions that use existing backups and a powerful technique that can recover data even if you never made a backup. Read on to find the best solution for your situation.
In this article
Common Causes of Data Loss on Samsung S7
Even with its advanced processor and robust operating system, the Samsung S7 can experience data loss. Before we dive into the recovery solutions, it's helpful to understand the common reasons this happens. Knowing the cause can help prevent future issues.
Accidental Deletion
This is the most frequent cause of data loss. With a simple slip of the finger, important contacts, messages, or cherished photos can be deleted. It's estimated that user error accounts for over 30% of all data loss incidents on mobile devices.
Factory Reset
Performing a factory reset, whether intentionally to fix an issue or by accident, will erase all data on your device, returning it to its original state. While effective for troubleshooting, it results in complete data loss if you don't have a backup.
Physical Phone Damage
If your Samsung S7 suffers from water damage, a cracked screen that makes it unresponsive, or simply won't turn on, accessing your data becomes impossible through normal means. The internal storage might be intact, but the device is inaccessible.
Interrupted Data Transfer
Losing connection while transferring files between your phone and a computer can lead to data corruption or incomplete transfers. Always ensure a stable USB or network connection during the entire process.
Virus or Malware Infection
Malicious software can corrupt or delete files on your Galaxy S7. Viruses can compromise your device's security and lead to significant data loss if not addressed promptly.
Failed OS Upgrades
An operating system update that gets interrupted or fails can sometimes corrupt the file system, making data unreadable or causing your device to get stuck in a boot loop. This is why backing up before any major OS update is crucial.
How to Recover Lost Data on Galaxy S7/S7 Edge
Have you recently lost critical files from your Samsung Galaxy S7? Don't panic. Below are four proven Samsung Galaxy S7 Edge data recovery techniques you can use to restore your files. The first three methods require a pre-existing backup, while the fourth can work even without one.
Method 1: Restore Files via Samsung Smart Switch
Samsung Smart Switch is a versatile application designed for managing data on Samsung devices. While its primary function is to transfer data to a new phone, it also includes powerful backup and restore features. If you previously used Smart Switch to back up your S7 to a PC or Mac, you can easily restore that data.
-
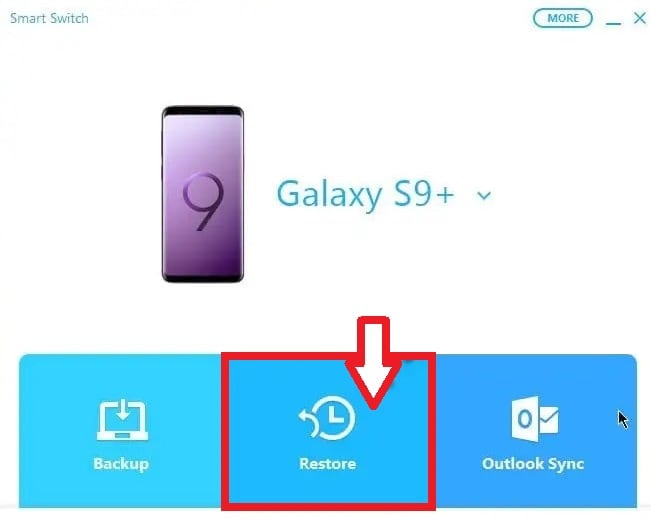
Step 1 Connect Your S7 and Launch Smart Switch
Open the Smart Switch application on your Windows or Mac computer. Connect your Samsung Galaxy S7 to the computer using a compatible USB cable.
-
Step 2 Select the Restore Option
Once your device is recognized by the software, click on the Restore option from the main interface.
-
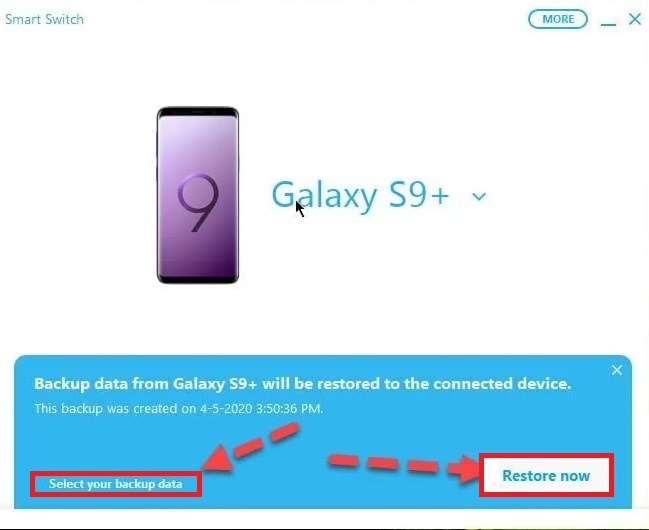
Step 3 Choose Your Backup and Initiate
The application will automatically detect the latest backup. If you need to use an older one, click "Select a different backup." Otherwise, click Restore now to begin the process.
-
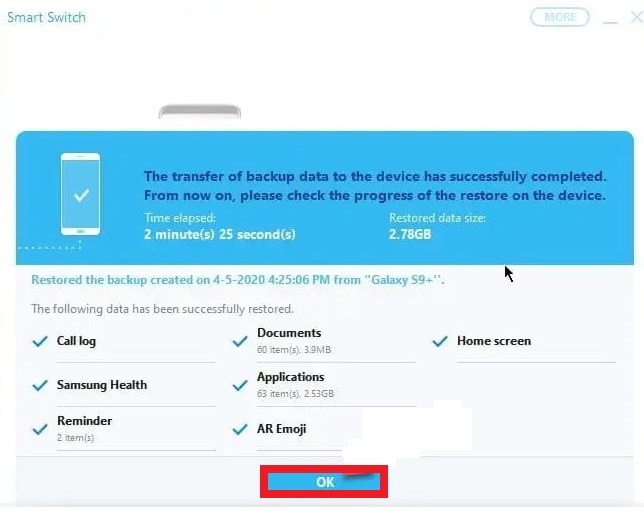
Step 4 Complete the Restoration
Wait for the process to finish. The duration will depend on the size of your backup. Once completed, a summary of the restored data will be displayed. Click OK to finalize.
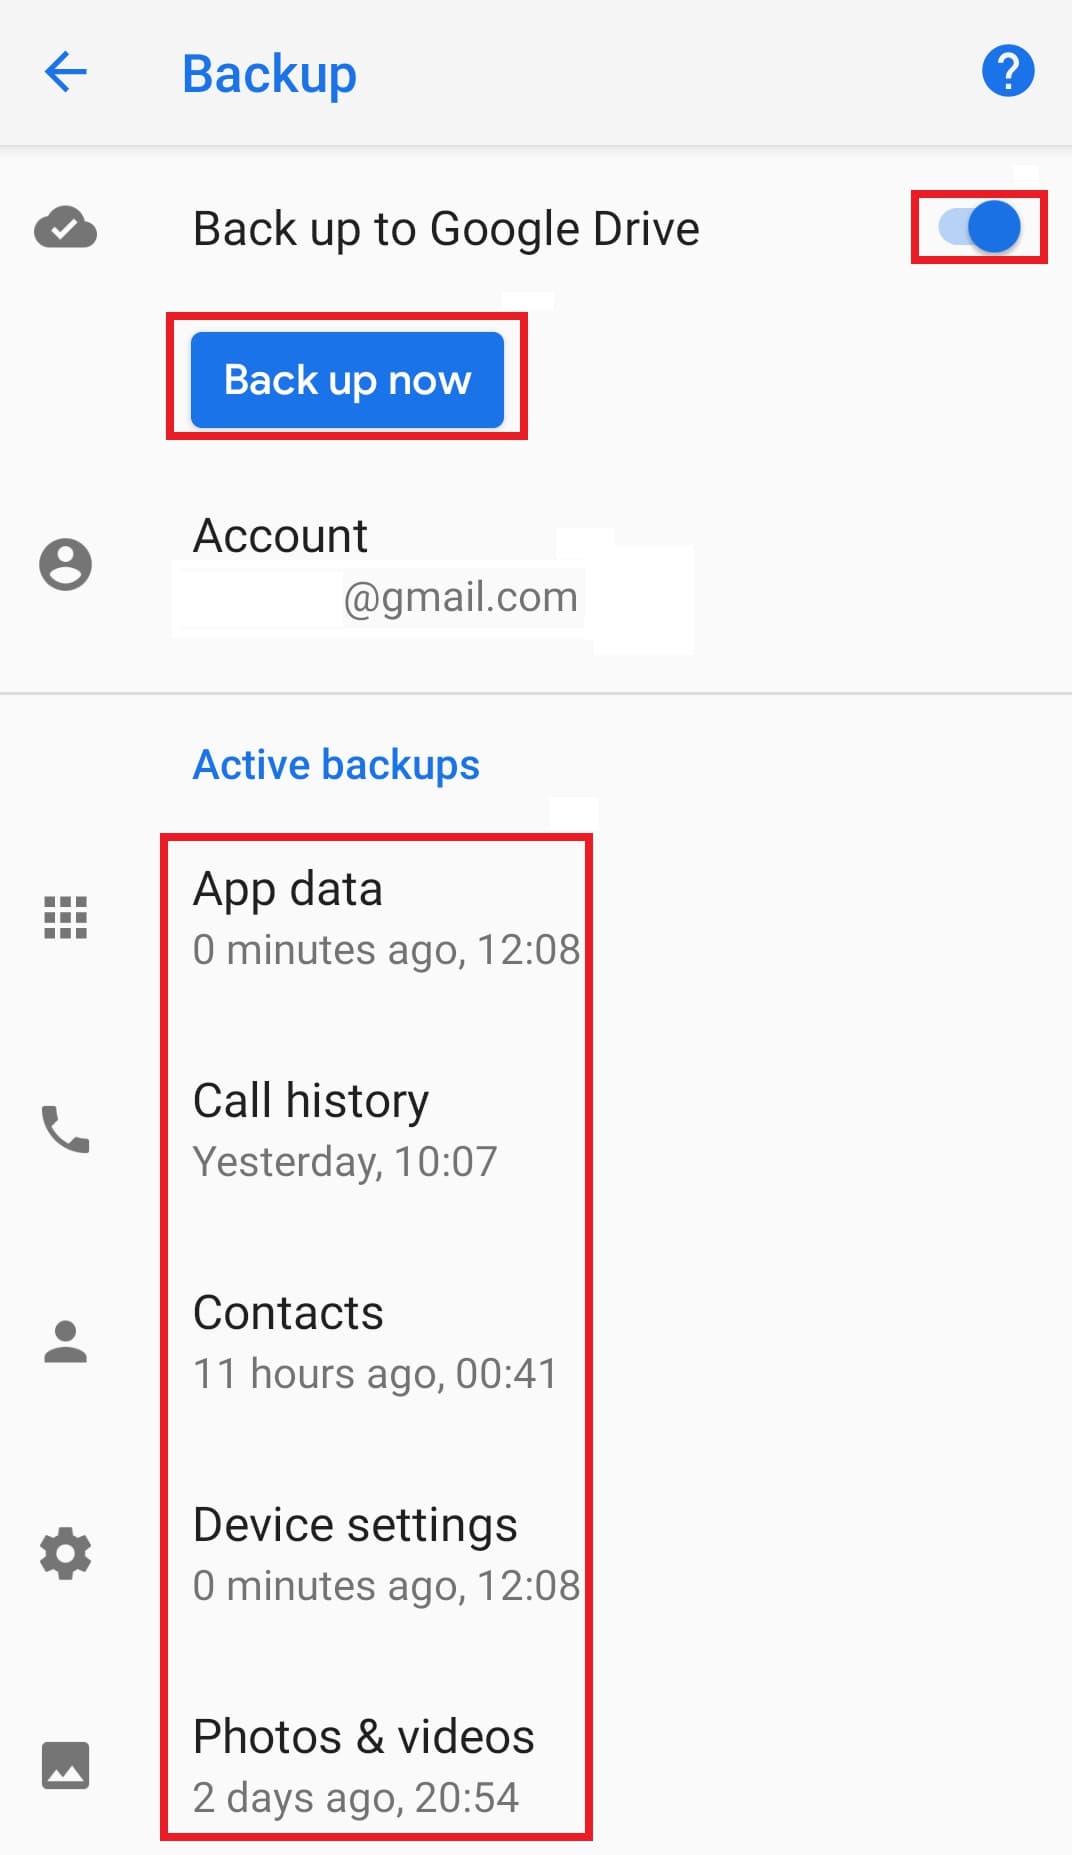
Method 2: Retrieve Data from Samsung Cloud
Samsung Cloud is an integrated cloud storage solution that automatically backs up your device data, including contacts, call logs, photos, and settings. If you had this feature enabled on your Galaxy S7, restoring your data is straightforward.
-
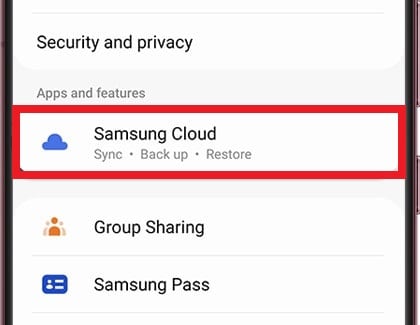
Step 1 Access Samsung Cloud Settings
Open the Settings app on your Samsung S7. Tap on your Samsung account profile at the top, then select Samsung Cloud.
-
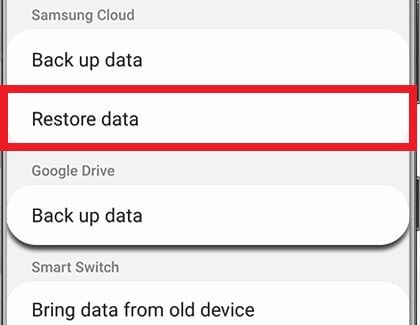
Step 2 Choose to Restore Data
In the Samsung Cloud menu, tap on the Restore data option to proceed.
-
Step 3 Select Device and Content
Choose the correct device backup from the list. You can then select the specific types of content (e.g., Contacts, Messages, Gallery) you wish to restore to your phone.

-
Step 4 Start and Complete the Restore
Tap Restore. If prompted, you may also need to tap Install to restore backed-up applications. The download will begin. Once it's finished, tap Done.
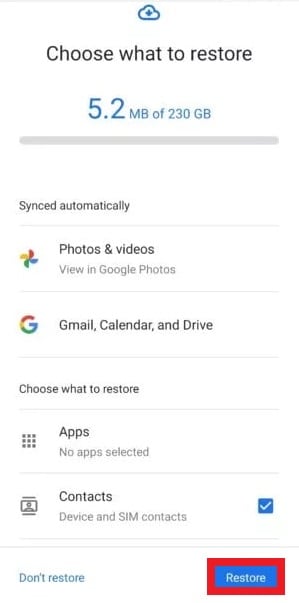
Method 3: Recover from Your Google Account Backup
Your Google account also provides a powerful backup service for Android devices. It syncs data like contacts, app data, and calendar events. While this method is most commonly used when setting up a new phone, you can also use it after a factory reset on your S7.
-
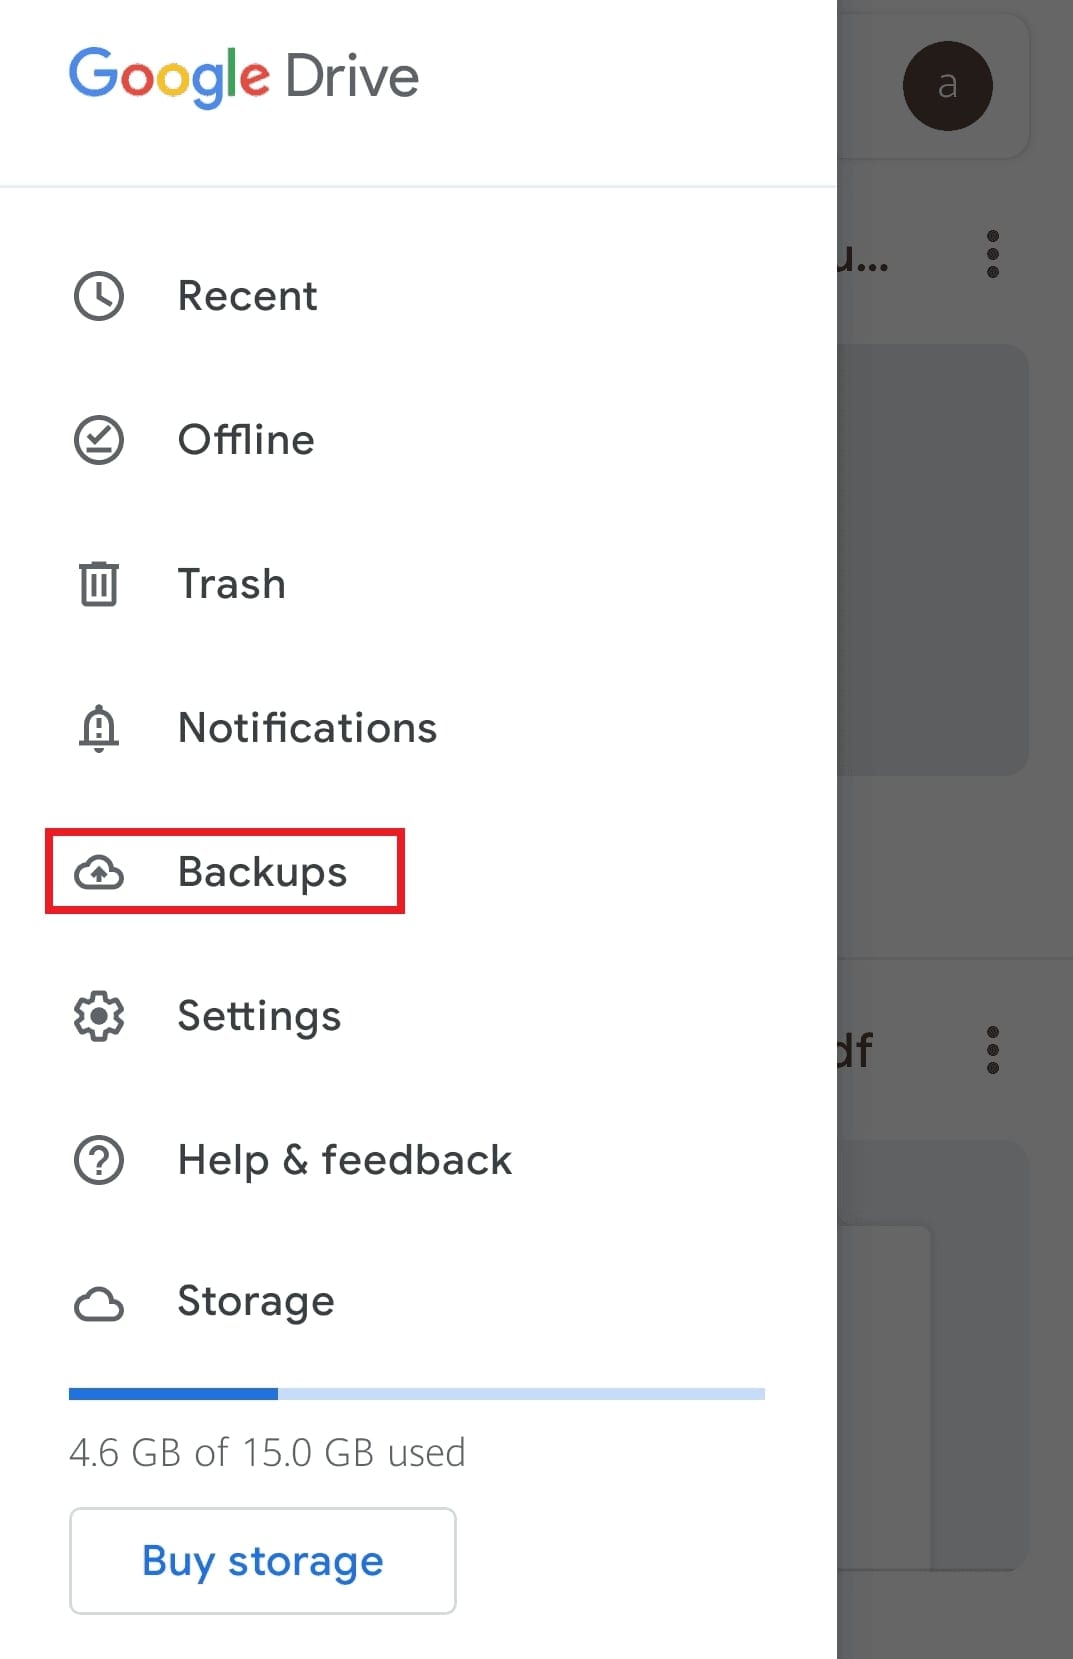
Step 1 Access Backups in Google Drive
On your device, open the Google Drive app. Tap the hamburger menu icon (three horizontal lines) in the top-left corner and select Backups.
-
Step 2 Verify Your Backup
You will see a list of devices backed up to your Google account. You can tap on your Samsung S7 backup to see details like the last backup date and which apps' data is included.
-
Step 3 Restore During Device Setup
To restore this data, you typically need to perform a factory reset. During the initial setup process, sign in with the same Google account. You will be prompted to restore data from a backup. Select your S7 backup, choose the content to restore, and tap Restore.

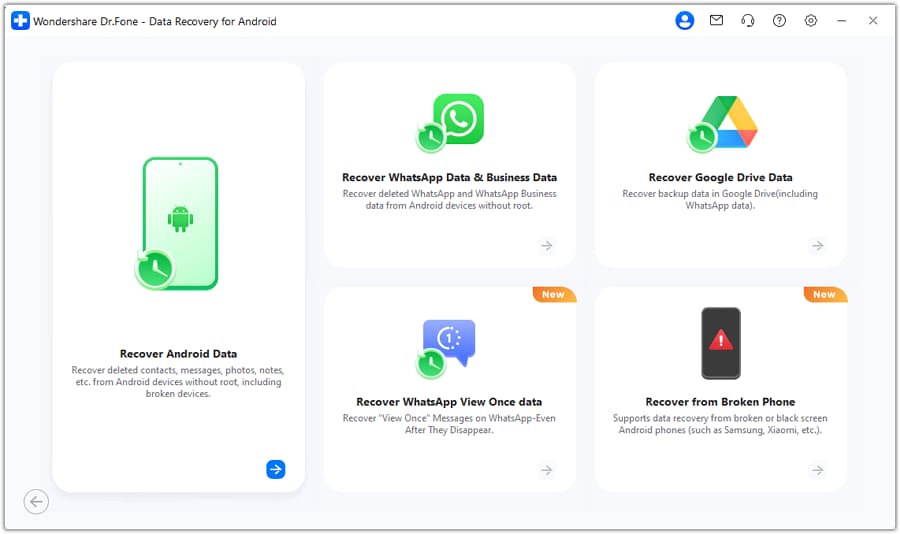
Method 4: Perform Deep Recovery with Dr.Fone (No Backup Needed)
What if you don't have a backup? The methods above won't work. In this scenario, your best option is a professional data recovery tool. Wondershare Dr.Fone - Data Recovery (Android) is specifically designed to scan your device's internal memory for recoverable files that have been deleted but not yet overwritten.
 Scan Android phones and tablets directly.
- Preview and recover only what you want.
- Supports WhatsApp, photos, videos, contacts, and more.
- Works with 6000+ Android devices.
-
Step 1 Install and Launch Dr.Fone
Download and install Wondershare Dr.Fone on your computer. Open the program and navigate to Toolbox > Data Recovery.

-
Step 2 Select Android Recovery Mode
In the next window, choose Android as your device type. Then, select Recover Android Data from the available options.
-
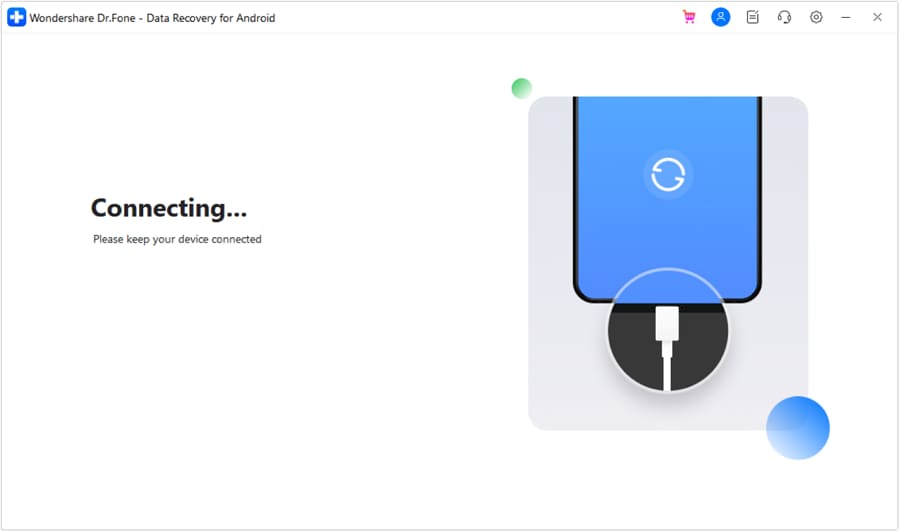
Step 3 Connect Your Samsung S7
Connect your Galaxy S7 to the computer via USB. You may need to enable USB Debugging on your phone by following the on-screen instructions.
-
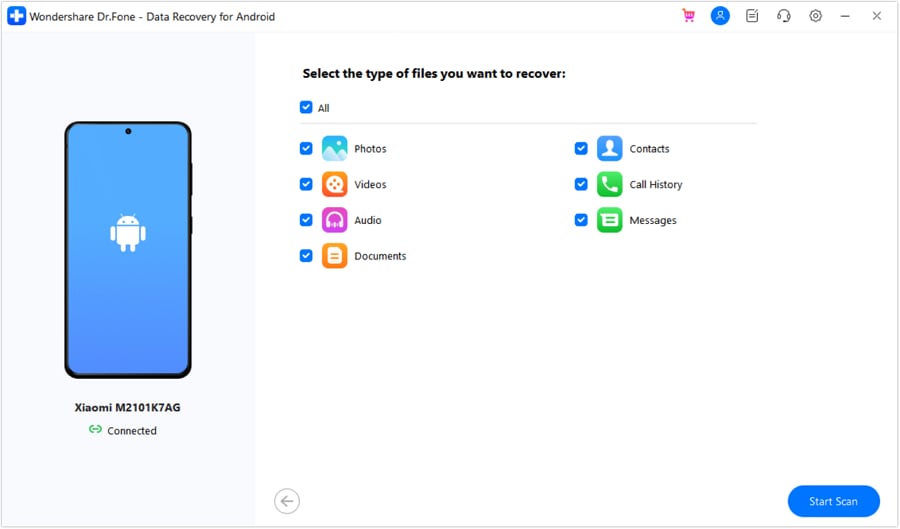
Step 4 Choose File Types and Scan
Select the types of files you want to recover (e.g., Photos, Contacts, Messages). Click Start Scan to allow Dr.Fone to begin analyzing your device's storage for lost data.
-
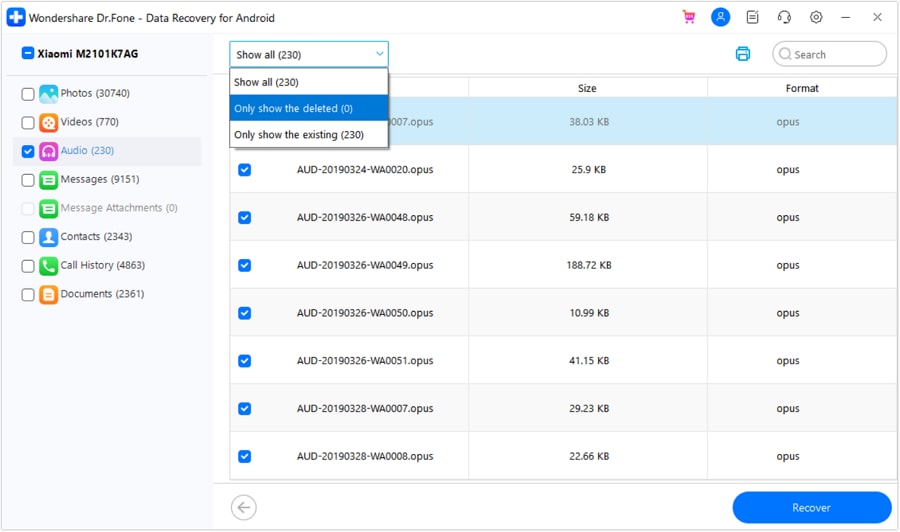
Step 5 Preview and Recover Your Data
Once the scan is complete, you can preview all the recoverable files. Select the items you wish to restore, click Recover, and choose a location on your computer to save them.
Comparison of Samsung S7 Data Recovery Methods
Choosing the right method depends on your situation, primarily whether you have a backup. Here's a quick comparison to help you decide.
| Method | Requires Prior Backup? | Recovers Deleted Files? | Ease of Use | Best For |
|---|---|---|---|---|
| Samsung Smart Switch | Yes | No (Restores backups) | Moderate | Restoring a full device backup from a computer. |
| Samsung Cloud | Yes | No (Restores backups) | Easy | Quickly restoring settings and data directly on the phone. |
| Google Account | Yes | No (Restores backups) | Easy (Requires reset) | Restoring data after a factory reset or to a new phone. |
| Dr.Fone - Data Recovery | No | Yes | Easy | Recovering accidentally deleted files without a backup. |
Pro Tip: How to Back Up Your Samsung S7 to Prevent Data Loss
While recovery tools are powerful, the best strategy is prevention. Regularly backing up your Samsung Galaxy S7 ensures your data is safe and can be easily restored whenever needed. For a comprehensive and flexible backup solution, Wondershare Dr.Fone offers a dedicated Phone Backup feature.
This tool allows you to selectively back up and restore data between your S7 and computer, giving you full control over what is saved. It's a simple, click-through process that provides peace of mind.
-
Step 1 Connect S7 and Select Backup
Launch Dr.Fone and connect your Galaxy S7. From the main screen, go to My Backup. Click the Back Up Now button to begin.

-
Step 2 Monitor the Backup Process
The software will begin backing up all supported data from your phone to your computer. You can watch the progress on screen. Ensure your phone remains connected throughout the process.

-
Step 3 View the Completed Backup
Once finished, you will receive a confirmation message. You can click Open in Folder to see the backup file on your computer or View Backups to manage it within the Dr.Fone interface.


Conclusion
Data loss on your Samsung Galaxy S7 or S7 Edge can be distressing, but it's often a reversible problem. For users with backups, Samsung Smart Switch, Samsung Cloud, and Google provide reliable ways to restore your device. However, for the common and stressful scenario of accidental deletion without a backup, a specialized tool is essential.
Wondershare Dr.Fone - Data Recovery (Android) stands out as the most powerful and versatile solution, offering a high chance of recovering your lost photos, contacts, and more directly from your device. To safeguard your data for the future, proactive and regular backups are highly recommended.
Frequently Asked Questions
-
1. Can I recover data from a physically damaged or broken Samsung S7?
If the phone does not turn on but is recognized by a computer, Dr.Fone - Data Recovery might be able to access the internal storage. It has a specific mode for recovering data from broken Android devices, which can be effective if the storage chip itself is not damaged. However, success is not guaranteed for severe physical damage. -
2. Does a factory reset permanently erase all data on the S7?
A factory reset makes data inaccessible through the phone's operating system. The data is not immediately wiped but is marked as free space to be overwritten. Until new data overwrites it, recovery software like Dr.Fone has a chance to retrieve it. The sooner you attempt recovery after a reset, the higher the success rate. -
3. How can I increase my chances of successful data recovery?
To maximize your chances, stop using your Samsung S7 immediately after you notice data loss. This prevents new data (like new photos, app installations, or messages) from overwriting the deleted files. The less you use the phone, the better the odds of a successful recovery. -
4. Can I recover specific files instead of a full restore?
Yes, this is a major advantage of using Wondershare Dr.Fone. Unlike backup solutions which often perform a full restore, Dr.Fone allows you to scan your device and then preview all recoverable files. You can selectively choose exactly which photos, contacts, or messages you want to recover.
 Add Wondershare Dr.Fone as a preferred source on Google