How to Recover Text Message from a Broken Samsung Device
Nov 20, 2025 • Filed to: Data Recovery Solutions • Proven solutions
Data loss can be a real headache for all Android users as it entails not only the loss of valuable data but also the expenditure of time and money in the recovery process.
There are a bunch of sneaky culprits behind data loss, like accidental deletion, virus attacks, formatting errors, and physical damage – the most severe of all. Instances like shattered screens, water damage, and similar situations can lead to a broken phone. If you don’t back up your data when it happens, you may lose all of it.
So, here in this article, we have compiled a list of highly efficient methods that offer a smooth and practical solution on how to retrieve data from broken phones. As a bonus, we will share valuable tips and tricks to ensure successful data recovery on Android.
Part 1: How To Access Samsung Phone With a Broken Screen
As a Samsung user, you might have experienced various unfortunate situations with your phones, such as broken screens, locked devices, water damage, etc. If your Samsung phone is still responsive, the simplest method to recover data from your Samsung device is by using File Explorer.
Connect your phone to a computer, and you will gain access to its internal storage. From there, you can transfer folders and files from your phone to the computer to access and save your data.
Here are the detailed steps for Samsung broken screen data recovery:
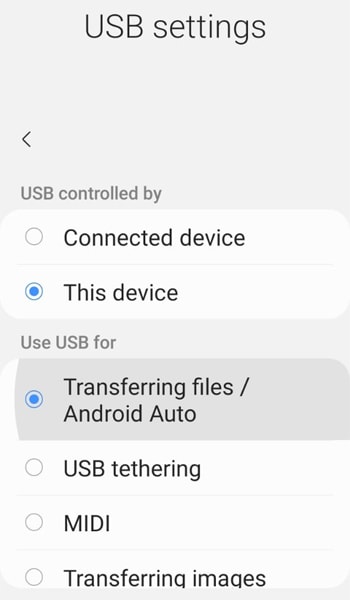
- Step 1: Connect the Samsung device to your PC, then allow the computer to access its internal storage. Select “Transferring files” from the lists in the USB settings.
- Step 2: Locate "This PC" > [your Samsung device name] > "Internal shared storage."
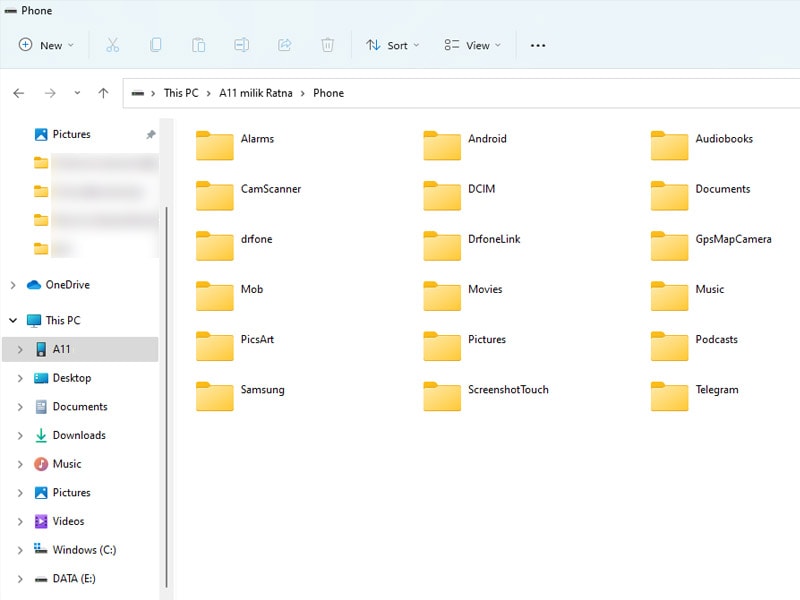
- Step 3: Select the files from your phone to store on your computer. You can drag-and-drop or employ the copy-and-paste method to relocate them.
Now your phone data is securely stored on your computer. Once you have your phone screen fixed, you can transfer it back to your device.
Part 2: How to Retrieve Data from Broken Screen Android
If you wish to ensure the safety of your data before seeking professional assistance, understanding how to retrieve your data is important.
The methods for recovering data from an Android phone with a broken screen may differ depending on your device's current state. For a phone with a more severe condition, you can rely on Wondershare Dr.Fone to resolve this problem. Dr.Fone offers more advanced solutions to recover data from your dead phone.
Dr.Fone - Data Recovery (Android)
World's 1st Android smartphone and tablet recovery software.
- Recover Android data by scanning your Android phone & tablet directly.
- Preview and selectively recover what you want from your Android phone & tablet.
- Supports various file types, including WhatsApp,Messages & Contacts & Photos & Videos & Audio & Document.
- Supports 6000+ Android Device Models & Various Android OS.
Moreover, its user-friendly steps will also diagnose and fix the problem without hassle. Now, follow the step-by-step guide below for broken Android data recovery:
- Step 1: Launch Data Recovery Tool
Begin the Android data recovery process by opening Wondershare Dr.Fone on your computer. Navigate to Toolbox > Data Recovery.

- Step 2: Select Android For Recovery
In the newly opened window, choose "Android" as your device type since you are recovering data from an Android device. Once a new screen appears, select "Recover from broken phone" from the available options.
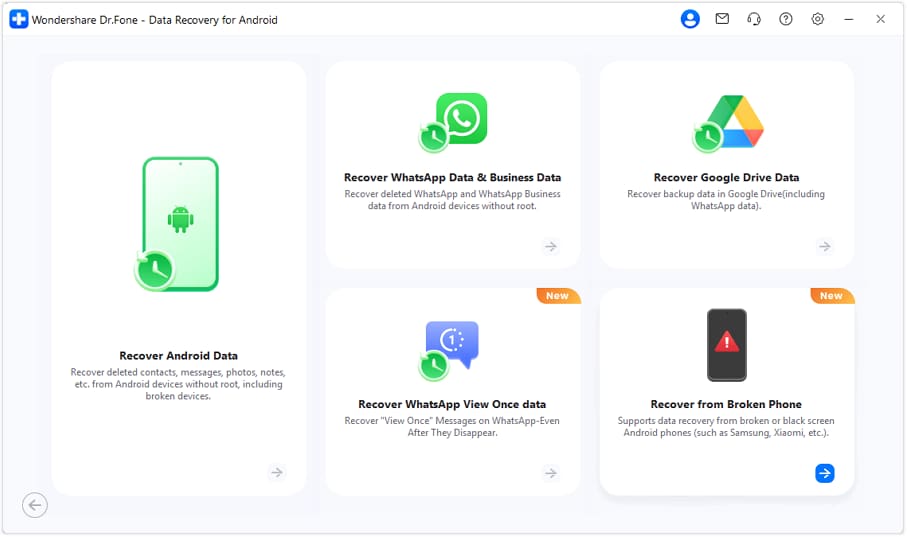
- Step 3: Choose your Android problem
During this step, Dr.Fone provides the option to select the particular issue you are encountering with your Android device. If your phone is unresponsive and has a black or broken screen, select “black/broken screen.” Then, proceed by clicking the "Next" button.

- Step 4: Enter device details and continue
Now, you'll see a new screen where you need to pick your exact Device Name and Device Model that match your phone. Don't forget to check the "I agree with the warning" option at the bottom-right of the screen and click "Next" to continue.

- Step 5: Confirm data recovery for your device
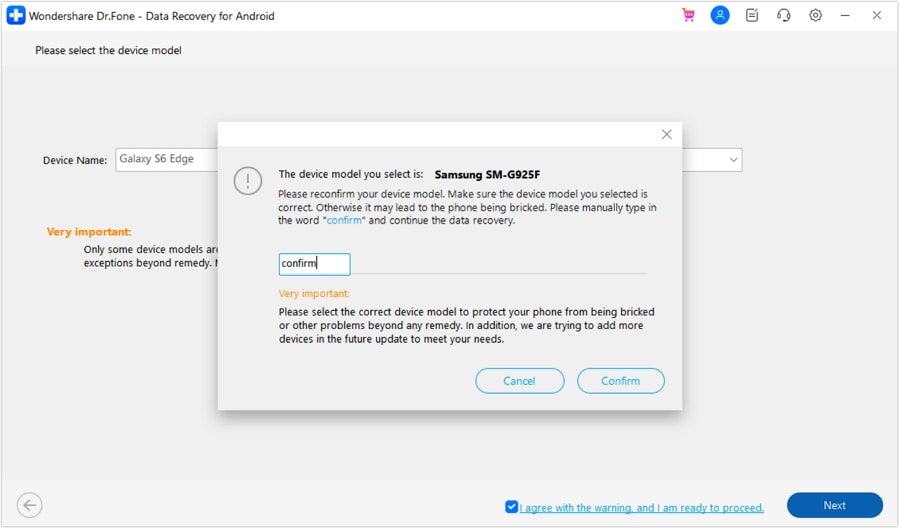
Next, Dr.Fone will ask you to verify the data recovery process. Follow the instructions and type “confirm.” Then, click "Confirm" to proceed.
- Step 6: Activate download mode on your Android
On the next screen, follow the provided instructions to put your device into Download Mode. Once you've successfully activated Download Mode, click "Next" to proceed with the data recovery process.

After successfully enabling Download Mode, you'll have the option to preview the recovered data or organize it into different categories. Select the specific category or data type you want to recover, and decide whether you want to restore it to your device or save it to your computer.

Now you are done!
Part 3: Tips for Successful Recovery on Android
Remember that while these tips can significantly increase the likelihood of successful broken Android data recovery, there's no guarantee of 100% recovery, especially if the data has been overwritten or the storage medium is physically damaged. Therefore, it's crucial to take preventive measures like these tips below:
Tip 1: Act quickly
Acting fast is crucial when you accidentally delete or lose data on your Android device. Data is not immediately erased from the device's storage when deleted. Instead, the space it occupied becomes available for new data.
If you continue using your device or save new files, there's a higher chance that the new data will overwrite the deleted data. If so, it would be more difficult or even impossible to recover.
Tip 2: Backup regularly
Regularly backing up your Android device is one of the best preventive measures against data loss. Creating backups and storing them on external devices like a computer, an external hard drive, or a cloud service can ensure you have a recent copy of your data.
If you ever encounter data loss, you can restore your Android device to the state of the last backup. It can minimize the impact of the loss.
Tip 3: Check for cloud backups
Some Android devices offer built-in features for automatic data backups to cloud services like Google Drive. Check if your device has such a feature enabled. Should you have enabled cloud backups, you could restore your lost data from the cloud, reducing the need for complex data recovery procedures.
Tip 4: Use reputable recovery software
Data recovery software plays a crucial role in the recovery process. Using reputable and well-known recovery tools is essential to maximize your chances of successful data retrieval. Trusted software like Wondershare Dr.Fone is often updated to support various Android devices and file systems, making them more effective at recovering lost data.
Tip 5: Keep the device charged
Data recovery processes can be time-consuming, especially if you're using recovery software on a computer to scan your Android device. Keep your Android device adequately charged or connected to a power source to ensure the process completes successfully. If your device's battery runs out during recovery, it could interrupt the process and potentially lead to data corruption or loss.
Conclusion
Data loss is a significant concern for Android users, causing the potential loss of valuable data and incurring time and money in the recovery process. Various factors can lead to data loss, such as accidental deletion, virus attacks, and formatting errors, and among these factors, physical damage poses the most critical threat.
Understanding how to retrieve data from an Android phone with a broken screen is essential to mitigate this risk.
Dr.Fone Data Recovery tool offers a reliable solution for retrieving data from Android devices, even with a broken screen. Regardless of your issue, Dr.Fone aims to provide user-friendly assistance, allowing users to quickly diagnose and regain access to their data and phone without hassle.
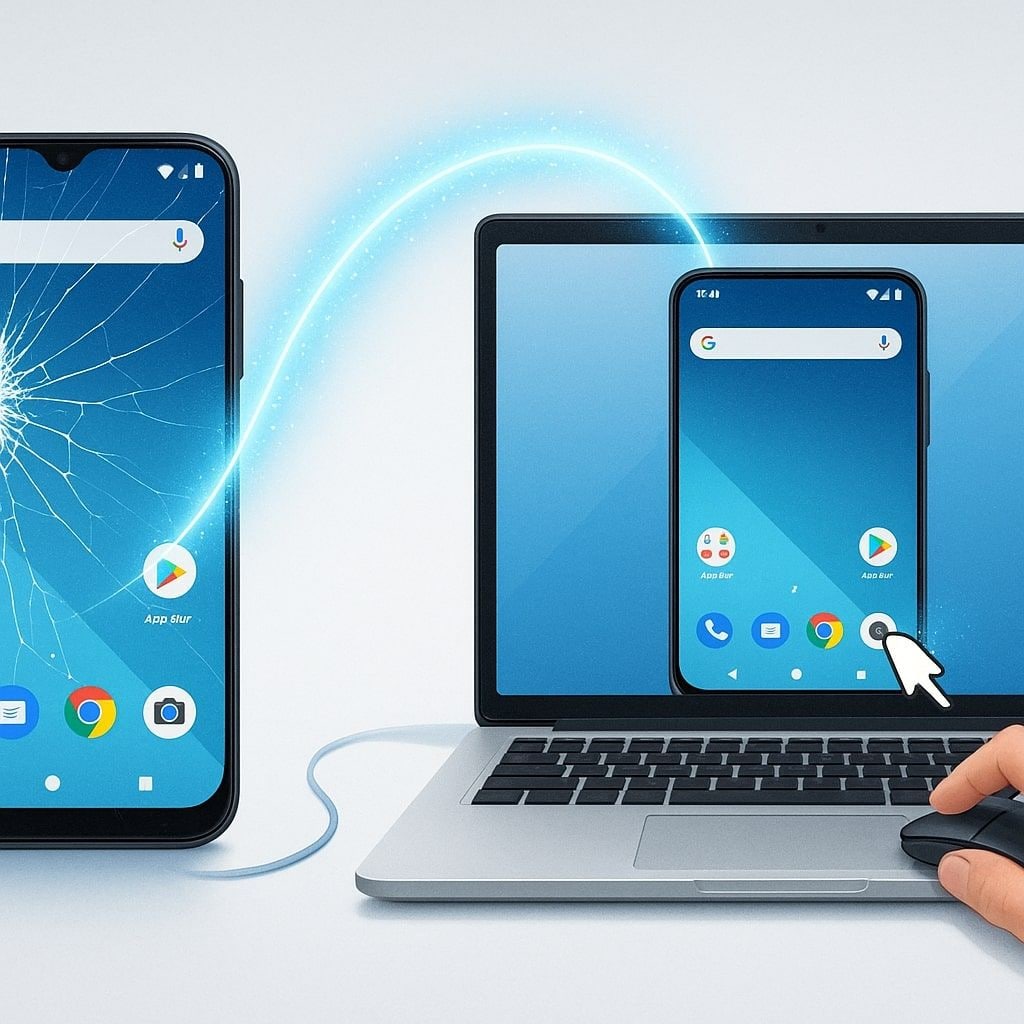
💥 Recover & Control Your Broken Android from PC — No Root Required
Got a cracked screen but can still see the display? Dr.Fone - Data Recovery (Android) lets you extract data and even control your phone directly from your PC. Access your messages, photos, and apps with your mouse and keyboard — even when the touch screen doesn’t respond. Supports all major brands including Samsung, Xiaomi, OPPO, and Vivo.
No Root | No USB Debugging | No Tech Skills Needed
FAQs
Yes, you can transfer data from one Samsung phone to another, even if your old phone is broken. Samsung provides several methods to transfer data between devices, some of which don't require your old phone to be functional.
You can use Samsung Smart Switch, restore data from Samsung Cloud or Google Account, or transfer data stored on MicroSD cards (photos, videos) into your new Samsung phone. In case of severe damage or non-functional old phones, you can use data recovery services like Wondershare Dr.Fone.
Samsung Recover
- Recover from Broken Samsung
- Samsung Contacts Recover
- Samsung Data Recover
- 1. Recover Data from Dead Phone
- 2. Recover Data from Internal Memory
- 3. Top 9 Data Recovery Apps
- 4. Recover Data from Samsung J7
- 5. Recover Data From Samsung S22
- 6. Recover Data on Samsung Galaxy S7
- 7. Recover SMS from Samsung S8
- 8. Retrieve WhatsApp Messages
- Samsung Messages Recover
- 1. Recover Messages from Samsung
- 2. Recover Messages on Samsung S6
- 3. Recover Messages on Samsung S7
- Samsung Photos Recover
- Samsung Recover Tips
- 1. Recover Lost Data from Samsung
- 2. Recover File on Samsung
- 3. Samsung Password Recovery
- 4. Use Samsung Recovery Mode
- 5. Top 5 Samsung Recovery Tools
- 6. Recover Data from SD Card
- 7. Recover Files from Samsung
- Samsung Useful Tricks
- 1. Fix Samsung Brick
- 2. Flash Samsung with Odin
- 3. Remove Google Account Bypass
- 4. Factory Reset Samsung Galaxy
- 5. Samsung Root Software
- 6. Transfer Files from Samsung to PC
- 7. Best Samsung Kies Alternatives
- 8. Samsung Smart Switch Solutions
- 9. Bypass Lock Screen Pattern
- 10. 2 Ways to Unlock Samsung
- 11. Transfer Whatsapp Messages
- 12. Samsung Auto Backup
- ● Manage/transfer/recover data
- ● Unlock screen/activate/FRP lock
- ● Fix most iOS and Android issues
- Manage Now Manage Now Manage Now



Selena Lee
chief Editor