Comprehensive Guide: How to Restore Files on Samsung Galaxy
Dec 10, 2025 • Filed to: Data Recovery Solutions • Proven solutions
Hey there, Samsung Galaxy users! If you're reading this, chances are you've experienced that sinking feeling when you accidentally lose important files on your device. It could be cherished photos, vital documents, or memorable videos. Nonetheless, the loss of data can be frustrating and disheartening. This is why you should back up your data.
Today, we'll walk you through the step-by-step process of how to restore files on Samsung. By the end of this guide, you'll be able to rescue your data and put your worries to rest.
Part 1: Restoring Files from the Recycle Bin on Samsung Galaxy Devices
The first method for file restoration on your Samsung Galaxy device is through the Recycle Bin. As you may know, when you delete files on your device, they are typically sent to the Recycle Bin.
Recycle Bin acts like a "trash" that temporarily holds your deleted files for a specific duration, often 30 days, before they are gone for good. It can be your data lifesaver.
How to restore files from Recycle Bin on Samsung Galaxy:
- Step 1: Access the Recycle Bin on File Manager
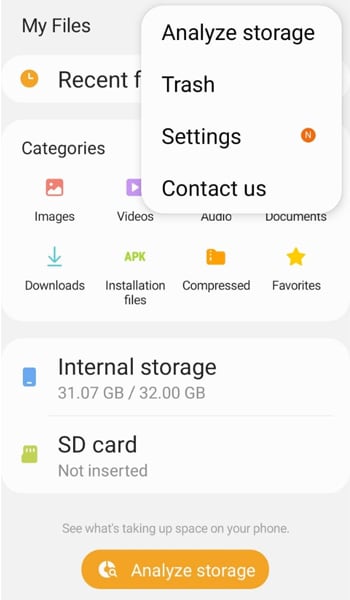
To begin the process of restoring files on your Samsung Galaxy, open the File Manager app. Then, tap the three-dot menu > "Trash." It will take you to the Recycle Bin.
- Step 2: Select files to restore
In the Recycle Bin, you'll find a list of files that have been recently deleted. To select a file, press and hold the picture you want to recover.
- Step 3: Start the restoration process
Once you’ve selected your desired pictures, tap "Restore." Your file restoration will begin shortly.
While using the Recycle Bin to restore files on your Samsung Galaxy device is convenient, it's essential to consider its limitations.
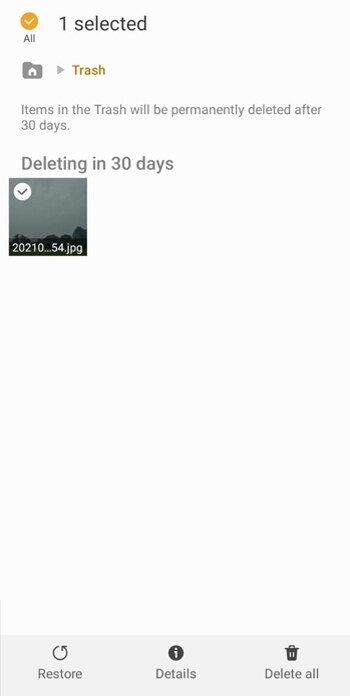
As mentioned earlier, the Recycle Bin temporarily stores deleted files for a specific duration, which is typically around 30 days. After this period, the files are gone, and you can’t recover them through the Recycle Bin.
Part 2: How to Restore Files Using Data Recovery Software for Samsung Galaxy Devices
If previous attempts to retrieve deleted files from the recycle bin have been unsuccessful, we also have an alternative solution for restoring files on your Samsung Galaxy. That is, to use a third-party app like Wondershare Dr.Fone.

Dr.Fone - Data Recovery (Android)
World's 1st Android smartphone and tablet recovery software.
- Recover Android data by scanning your Android phone & tablet directly.
- Preview and selectively recover what you want from your Android phone & tablet.
- Supports various file types, including WhatsApp,Messages & Contacts & Photos & Videos & Audio & Document.
- Supports 6000+ Android Device Models & Various Android OS.
Wondershare Dr.Fone offers a reliable data recovery tool known for its effectiveness in retrieving lost files. With Dr.Fone, you can cater to more comprehensive data recovery needs.
How to restore files on Samsung with Dr.Fone Data Recovery tool:
- Step 1: Launch Dr.Fone and connect your samsung device
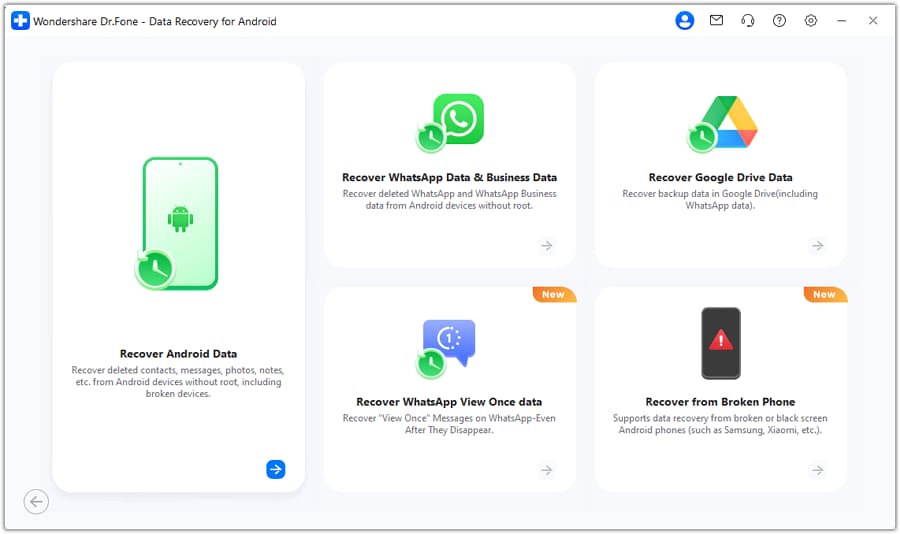
Start by running the Dr.Fone software on your computer and connect your Samsung Galaxy device. Upon successful connection, navigate to the "Toolbox" section and select "Data Recovery" to proceed.

- Step 2: Specify the device type
In the Data Recovery section, choose the "Android" device type since you're recovering data from your Samsung Galaxy phone. Select "Recover Android Data" to continue with the recovery process.
- Step 3: Choose File Types to Recover
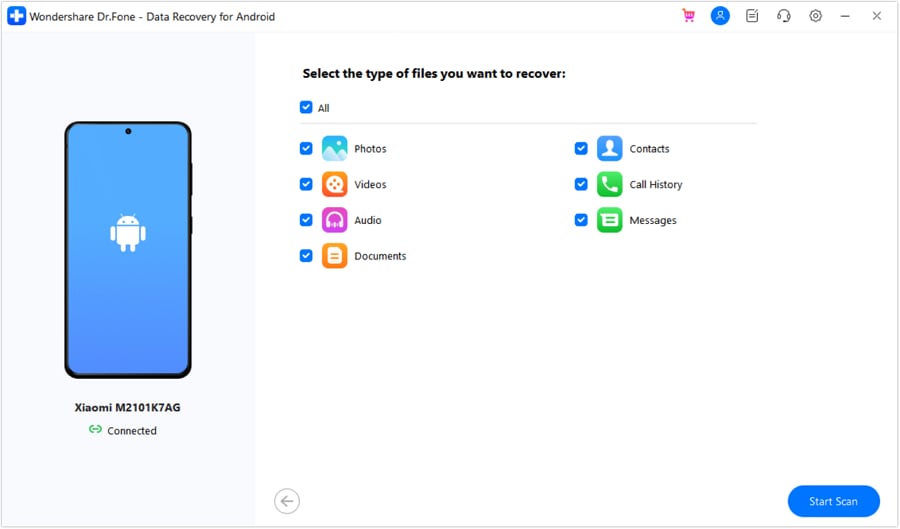
Dr.Fone will present a list of all recoverable file types. To streamline the scanning process, you can select specific file types you want to recover or exclude unnecessary ones. After that, click "Start Scan."
- Step 4: Preview and Restore Deleted Photos
After the scanning process is complete, Dr.Fone will display a preview of all the recoverable data. Review them and select the files you wish to restore.
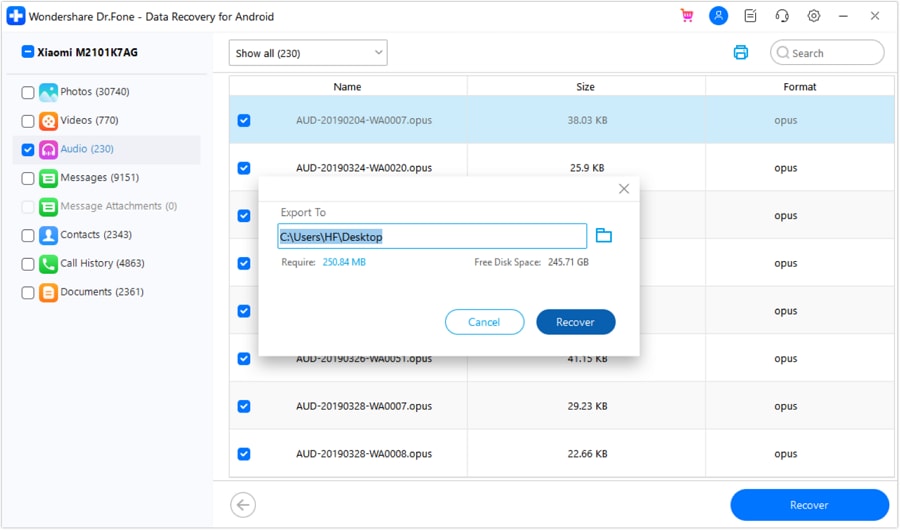
Once you've made your selections, click the "Recover" button. Dr.Fone will prompt you to choose a location on your computer where you want to export the recovered files. Select the desired file location and click "Recover" again to finalize the restoration process.
Tip: For the best chances of successful data recovery, it is crucial to initiate the process as soon as you realize data loss. Avoid extensive usage of your Samsung device after data deletion to prevent overwriting the deleted files. This could render them unrecoverable.
Part 3: How to Choose The Best Data Recovery Software
In some situations, users may find the need to use data recovery software to restore their lost files. Third-party data recovery software often performs more in-depth scans and can recover a wider range of file types.
Now that you know how data recovery software can offer extensive solutions for recovering your data, selecting the best one requires considering various factors. This ensures a successful and reliable recovery process for your valuable data.
- Compatibility and supported devices
Check if the software supports your Samsung device and the Android version running on it. It will help to avoid any compatibility issues during the recovery process. Different software may have varying levels of support for different devices, brands, and versions.
- Recovery capabilities and file types
Evaluate the software's recovery capabilities and the types of files it can retrieve. Look for software that offers various data recovery options.
- User-friendly interface
A simple and intuitive interface will result in a smoother and more accessible recovery process, even for users with minimal technical expertise. Look for software that guides you through each step and provides helpful instructions to avoid any confusion during the recovery process.
- Scan and preview functionality
An effective data recovery software should offer both a thorough scan and a preview feature. The scan should be capable of deep scanning the storage to find as many recoverable files as possible. The preview feature allows you to see a list of recoverable files before initiating the actual recovery.
- Security and privacy
Prioritize data recovery software that prioritizes security and privacy. Usually, recovering lost data involves accessing sensitive information. You need to be sure that the software handles your data securely. Look for software that uses encryption and takes necessary measures to protect your recovered data.
The bottom line is, before making a final decision, take the time to read reviews and user feedback about the data recovery software you are considering. Reviews from other users can give you insights into the software's performance, reliability, and all aspects above. Look for software that has positive reviews and a good track record so you won't be disappointed later.
Conclusion
Data recovery is a process that enables individuals and businesses to retrieve lost or deleted information from digital storage devices. It could be deleted files, corrupted data, hardware failures, or other unforeseen circumstances.
Throughout this guide, we've explored a few methods on how to restore files on Samsung. These include using the Recycle Bin and employing third-party software like Wondershare Dr.Fone. Each method has its strengths and limitations. It highlights the importance of selecting the most suitable approach based on the specific data loss scenario.
Data recovery serves as a vital safety net in our digital lives. Prevention, however, is equally important. Backing up data to secure storage locations is the best proactive measure against data loss.
Samsung Issue
- Samsung Phone Issues
- 1. Fix Samsung Camera Failed
- 2. Fix Samsung Phone Hang
- 3. Samsung Phone Not Displaying Incoming Calls
- 4.Fix a Bricked Samsung
- 5. Downloading Do Not Turn Off Target
- 6. Fix Samsung Stuck in Download Mode
- 7. Fix Samsung S5 Won't Turn On
- 8. Fix Samsung Pay Not Working
- 9. Samsung ROM Download & Install
- 10. Samsung Firmware Download
- 11. Fix Samsung Sudden Death
- 12. Fix Samsung Stuck on Boot Screen
- 13. Fix Samsung Frozen on Startup
- 14. Full Guide to Fix 'Samsung Galaxy Phone Keeps Restarting'
- 15. Fix Samsung S3 Won't Turn On
- 16. Fix Samsung J7 Problems
- 17. Fix Samsung S10 Gone Dead
- 18. Fix Samsung S10 Won't Turn On
- 19. Fix Samsung Galaxy S7
- Samsung Screen Issues
- 1. Fix Unresponsive Touchscreen
- 2. Fix Black Screen After Dropping
- 3. Resolve Screen Stuck on Boot Issue
- 4. Fix Samsung Fold Screen Issues
- 5. Fix Samsung Black Screen
- 6. Fix Samsung Screen Not Working
- 7. Fix Half of Screen Not Working
- 8. Fix Samsung Stuck on Bootloop
- 9. Fix Samsung Screen Blacked Out
- 10. Fix Screen Blacked During a Call
- 11. Fix Samsung Stuck on the Screen
- 12. Solve Samsung TV Blackout
- 13. Fix Samsung Flip Screen Not Working
- 14. Fix Screen Won't Respond
- Samsung Tablet Issues
- 1. Fix Samsung Tablet Problems
- 2. Fix Samsung Stuck on Logo
- 3. Fix Samsung Tablet Won't Turn On
- 4. Fix Touch Screen Not Working
- Samsung Update
- 1. Flash a Samsung phone
- 2. Samsung Mobile Software Update
- 3. Update Samsung Kies for Mac
- 4. Update Samsung to Android Oreo
- 5. Update Samsung Kies on PC
- 6. Update Android 6.0 for Samsung
- Samsung Useful Tricks
- 1. Remove Google Account Bypass
- 2. Hard/Factory Reset Samsung
- 3. Samsung Root Software
- 4. Transfer Files from Samsung to PC
- 5. Top 5 Samsung Kies Alternatives
- 6. Bypass Samsung Lock Screen Pin
- 7. SIM Network Unlock PIN
- 8. Transfer Whatsapp to iPhone
- 9. Samsung Auto Backup
- 10. Recover File on Samsung



Selena Lee
chief Editor