100% Security Verified | No Subscription Required | No Malware

 :
: 
 ChatGPT
 Perplexity
 Gemini
 Claude
 Grok
Grok
Accidentally deleted photos from your Samsung device? Whether it's a slip of the finger or a sudden system glitch that wipes your device's memory, recovering lost photos can become an urgent priority. Losing that perfect shot—where every element like the smile, lighting, and motion was perfectly captured—can be devastating. If you find yourself desperately searching for solutions like ‘Samsung photo recovery’ or ‘recover deleted photos from Samsung phones and tablets’, do not panic. Fortunately, there are highly effective ways to retrieve those precious memories intact.
In this article
Part 1. Why Is It Possible to Recover Photos from Samsung Devices?
Wondering exactly how a Samsung photo recovery tool works after your precious pictures are supposedly erased? Your photos are typically stored in one of two places on your Android phone: the internal storage (similar to a computer's hard drive) or an external SD card. Depending on your phone's specific storage settings, your photo recovery options and success rates may vary.
When you delete a photo from your Samsung smartphone or tablet, it is not instantly or permanently wiped from the drive. The deletion process actually happens in two sequential steps. First, the file system pointer indicating the photo's location is removed. Second, the physical memory sectors holding the photo are wiped out. However, when you tap 'delete,' only the first step happens immediately. The phone marks those storage sectors as 'available' so they can be overwritten by new files. Because the actual visual data remains intact for a while, photo recovery tools can locate and restore it.
The initial step of deleting a file pointer is extremely quick, but wiping the actual memory sectors takes significantly more time and processing power—almost equal to writing an entirely new file. To maintain seamless device performance and battery efficiency, the OS only wipes those sectors when new data actively needs that storage space. Therefore, even if you think you've permanently deleted a photo, it remains fully recoverable until those specific memory sectors are overwritten.
Part 2. Must-Follow Instructions After Samsung Photo Deletion
If you have just realized that important photos are gone, immediate action is required to maximize your chances of a successful Samsung photo recovery. Any misstep could cause the deleted files to be permanently overwritten.
- Stop adding or deleting any data on your device. Capturing new photos, installing apps, or downloading files will actively overwrite the "available" memory sectors. Once overwritten, the old photos are gone forever.
- Turn off connectivity options such as Bluetooth and Wi-Fi. Many background applications tend to download updates or media automatically when connected to the internet. Disable these connections instantly.
- Avoid using the phone until the recovery process is complete. To absolutely ensure no new system data gets loaded onto your internal storage, your best strategy is to put the device aside and stop using it entirely until you run the recovery software.
- Use a dedicated Samsung photo recovery tool immediately. With a professional desktop tool like Dr.Fone - Android Data Recovery, retrieving those hidden deleted files becomes highly achievable.
Part 3. How to Recover Deleted Photos from Samsung Devices
Sure, proactive prevention is always key—utilizing auto-backups and reliable antivirus tools is a must. But realistically, even the most careful users make mistakes. Devices get dropped, unexpected power spikes occur, and background auto-backup failures happen silently. These widespread issues make dedicated Android photo recovery specialists essential for retrieving lost data effectively.
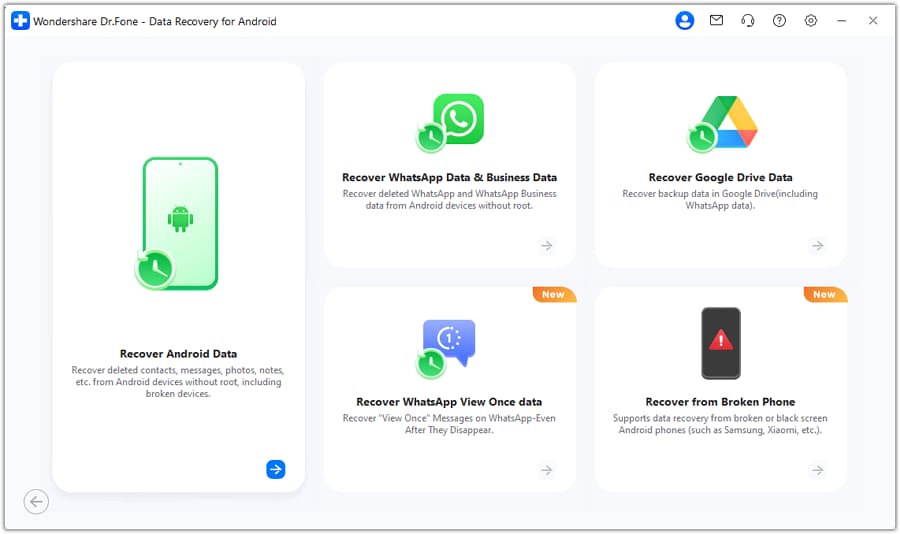
Dr.Fone - Data Recovery (Android) is an industry-leading specialist. In fact, it is widely regarded as the most reliable software for the recovery of deleted photos from Samsung devices. Let us dive into the backend of this seemingly magical data restoration act step by step. If you have thoroughly checked your gallery and trash folders and are certain the pictures are permanently deleted, it is time to leverage Dr.Fone.
 Scan Android phones and tablets directly.
- Preview and recover only what you want.
- Supports WhatsApp, photos, videos, contacts, and more.
- Works with 6000+ Android devices.
Follow these straightforward steps to scan and retrieve your missing memories from your Samsung phone or tablet.
-
Step 1 Connect Your Samsung Device
First, download and launch Dr.Fone on your computer. From the main interface, select the Data Recovery option and connect your Samsung device to your PC or Mac using a high-quality USB cable.

-
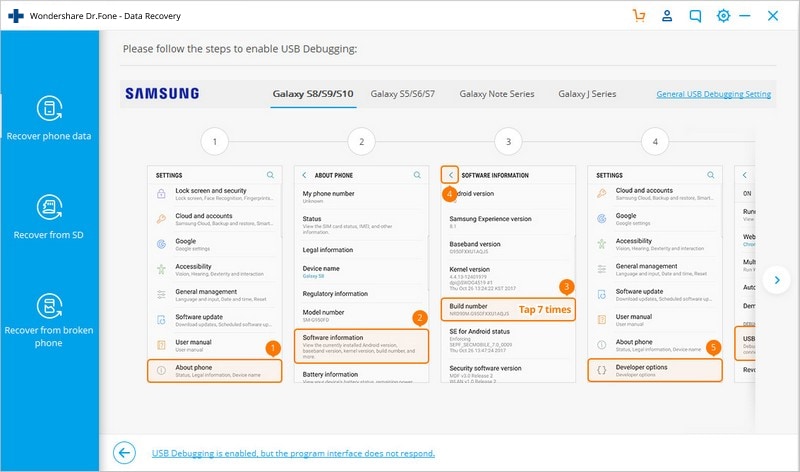
Step 2 Enable USB Debugging
The program will require that you enable USB debugging on your device before the deep scanning can begin. If prompted, simply follow the visual instructions displayed in the window to navigate your phone's settings and allow USB debugging.
-
Step 3 Select the File Types to Scan
Once the debugging process is completed, Dr.Fone will instantly detect your device. You can then choose the specific file types you want to scan for in the upcoming window to save time. Since we are focusing on how to recover deleted photos from Samsung phones, simply select the "Gallery" option.
-
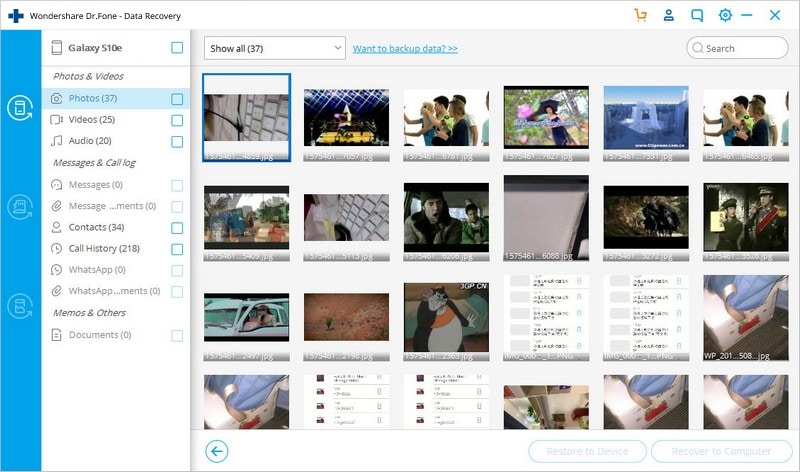
Step 4 Preview and Recover Your Photos
Click on "Next" and the software will initiate a comprehensive scan for your lost pictures. Depending on the storage size, this might take a few moments. Once the scan is complete, all recoverable image files will be displayed in an organized gallery format. Browse through, check the boxes next to the ones you want to restore, and click on "Recover" to save them directly to your computer.
This illustrates just how simple it is to execute a successful Samsung photo recovery using the robust Dr.Fone toolkit. Even if you consider yourself entirely non-technical, the intuitive user interface makes this process as easy as 1-2-3.


Part 4. Tips to Prevent Important Photos from Being Deleted
Even if an impressive digital magician like Dr.Fone - Android Data Recovery is readily available at the tap of your fingers, it is significantly better to adopt safe data management habits. Following standard best practices ensures that your valuable photos are systematically protected from unexpected data loss.
To secure your media, the following three backup routines should be undertaken on a regular basis:
- Take back-up your photos by manually connecting your Samsung device to your laptop and syncing the files securely.
- Save duplicates directly to a dedicated external memory card or microSD slot to create physical redundancy.
- Leverage the built-in auto-backup cloud features available in almost all modern Samsung smartphones and Android tablets (like Google Photos or Samsung Cloud).
Conclusion
In conclusion, losing valuable photos from your Samsung device can be an extremely frustrating experience, but permanent data loss is avoidable if you act quickly. Because deleted files remain hidden in the storage sectors until overwritten, reliable software gives you a strong chance of restoration. With professional desktop tools like Dr.Fone - Data Recovery (Android), you can securely scan your system and easily retrieve deleted photos, whether they were housed on your internal drive or an SD card. Whether the incident occurred due to an accidental finger slip, a software crash, or unforeseen issues like malware, following a meticulous, step-by-step recovery strategy will help you bring back your cherished digital memories safely.
FAQ
-
1. Can I recover deleted photos from my Samsung phone without a computer?
Yes, if you have a recent backup on Google Photos, Samsung Cloud, or Microsoft OneDrive, you can restore them directly from your phone. Additionally, you can check the "Trash" or "Recently Deleted" folder in your Samsung Gallery app, which temporarily stores deleted images for up to 30 days before permanently erasing them. -
2. Does rooting my Samsung device guarantee better photo recovery results?
While rooting your Android device grants recovery tools deeper access to the file system, thereby increasing the likelihood of retrieving permanently deleted files, it does not guarantee 100% success. Furthermore, rooting can void your warranty and expose your phone to security risks, so it should be approached with caution.• Rooted Devices: Deeper scan capacity and higher probability of recovering fragmented files.• Non-rooted Devices: Limited to standard scanning protocols; may miss deeply overwritten media. -
3. How long do deleted photos stay in the internal storage before being overwritten?
There is no fixed time limit. Deleted photos remain in the internal storage until the specific memory sectors they occupy are overwritten by new data. If you continue using your phone to take pictures, download apps, or browse the web, the sectors could be overwritten within minutes. That is why it is crucial to stop using the device immediately after data loss. -
4. Are photos deleted from an SD card easier to recover than internal storage?
Generally, yes. SD cards operate similarly to traditional hard drives, and you can easily remove the card and connect it directly to a computer using a card reader. This allows desktop recovery software to perform a thorough, unimpeded scan without navigating Android's internal security restrictions or requiring root access.
 Add Wondershare Dr.Fone as a preferred source on Google