How to Transfer Music from Computer to iPad With and Without iTunes

May 18, 2026 • Filed to: Device Data Management • Proven solutions
 TL;DR:
Transfer music from a PC or Mac to an iPad using Dr.Fone - Phone Manager (iOS) to copy files across multiple computers without data loss, or use iTunes for standard single-library syncing.
● Dr.Fone - Phone Manager (iOS) bypasses the single-computer sync limitation, retains your existing device data during transfers, and automatically converts incompatible audio files into supported MP3 formats.
● Using iTunes requires checking "Prevent iPods, iPhones, and iPads from syncing automatically" before connecting, and it will erase your current iPad data if you try to sync music from a secondary or untrusted computer.
Ask AI for a summary
 ChatGPT
 Perplexity
 Gemini
 Claude
 Grok
Grok
Dr.Fone Basic:
Better Control for Your Phone
Manage, transfer, back up, restore, and mirror your device
"I have bought a new iPad recently and would like to enjoy my music collection on iPad when I am out of home. But I don't know how to transfer music from computer to iPad. How can I achieve it?"
As we all know, users can transfer music from computer to iPad with iTunes. But if you want to transfer music to iPad from different computers, iTunes won't work as it can only sync music from one computer. So Here, we will provide two solutions in details how to transfer music from computer to iPad with iTunes and without iTunes.
Part 1. How to Transfer Music from Computer to iPad without iTunes
What You Will Need:- Dr.Fone - Phone Manager (iOS)
- A PC or Mac which has a music collection to transfer music
- Your iPad and its USB cable
Dr.Fone - Phone Manager (iOS)
Transfer Music from Computer to iPad without iTunes
- Transfer, manage, export/import your music, photos, videos, contacts, SMS, Apps etc.
- Backup your music, photos, videos, contacts, SMS, Apps etc. to computer and restore them easily.
- Transfer music, photos, videos, contacts, messages, etc from one smartphone to another.
- Transfer media files between iOS devices and iTunes.
- Support all iPhone, iPad, and iPod touch models with any iOS versions.


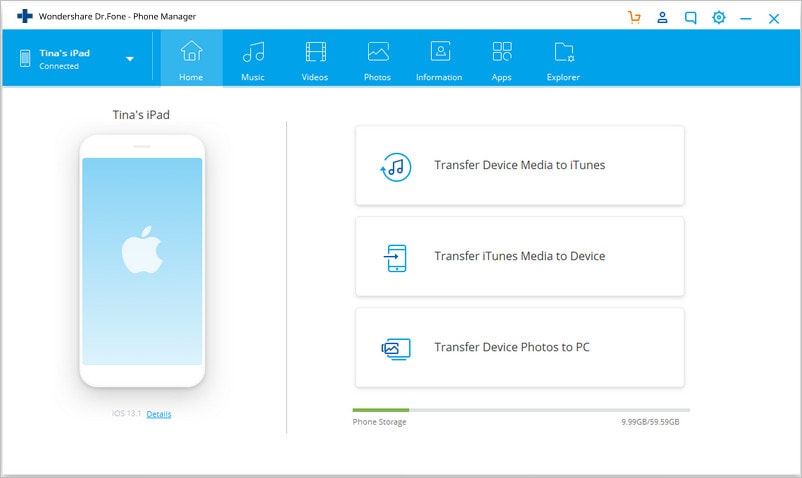
Step 1. Run Dr.Fone on Your Computer
Download, install and launch Dr.Fone on your computer. Choose "Phone Manager" from all the functions and connect your iPad to computer with the USB cable. You can see the connected iPad as soon as it has successfully connected to the computer.
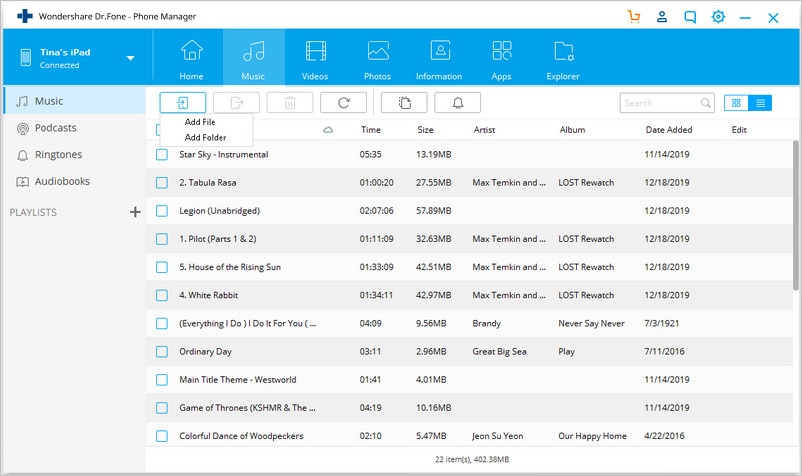
Step 2. Add Music
Click Music icon on the top, and you'll see the music library on your iPad. Click the "+Add" button and from the drop down list select "Add File" or "Add Folder" to add music files from your computer. If you only want to select some music file, then click Add File; if you want to tranfer all the music in one folder, then click Add Folder. Here we click Add File for example.
Step 3. Select Location and Transfer Songs from Computer to iPad
A new window will pop up and let you select a location to save the songs on your computer.
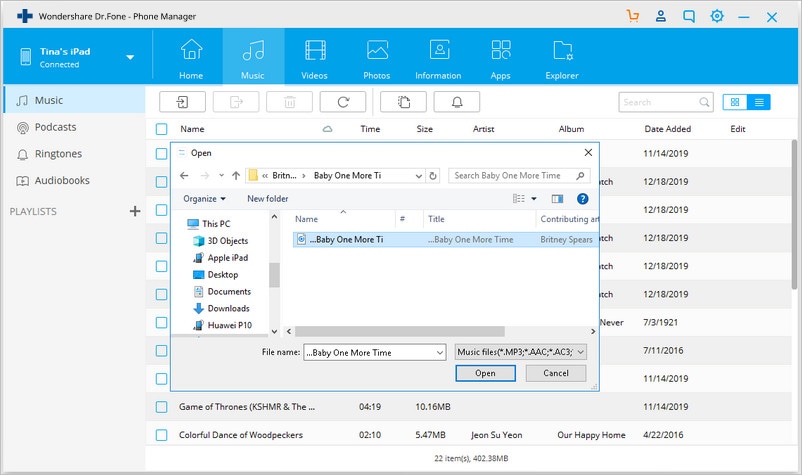
After selecting music files and location to save it, Dr.Fone will start transferring music from computer to iPad. If you have files which are incompatible with your iPad, Dr.Fone will convert them and then transfer.
Note. Convert Music to iPad-Compatible Format Automatically
iTunes and iOS devices don't support all kinds of audio formats, and only limited formats such as MP3, M4A and so on are supported. But if you transfer music from computer to iPad with Dr.Fone, the software will automatically convert the imcompatible files to MP3 and then transfer them to iPad.
Benefits of Transferring Music from Computer to iPad With Dr.Fone - Phone Manager (iOS)
- Transfer music from computer to iPad without any limits.
- No data will be erased during the transfer process.
- Transfer music between different iDevices and computers with ease.
- It's very fast and easy to use for the users to copy music from computer to iPad.
Part 2. How to Transfer Music from Computer to iPad with iTunes
What You Will Need- An iPad
- A PC or Mac which has a music collection to transfer music with iTunes installed
- A USB Cable for your iPad
Steps to Transfer Music from Computer to iPad
Step 1. Download, install and launch your iTunes Library on your computer, and select Edit > Preferences > Devices, then check "Prevent iPods, iPhones, and iPads from syncing automatically". With this item checked, your iPad won't sync with iTunes automatically.

Step 2. Connect iPad to computer with the USB cable, iTunes will detect the iPad automatically. You can click the triangle beside iPad and then tap Music, then you can see the existing music files on the iPad..

Step 3. Click File at the upper left corner of iTunes, and choose Add File to Library or Add Folder to Library. Then select the music files which you want to transfer from computer to iPad.

Step 4. Click the iPad icon at the top middle in iTunes, and your iPad library appears in the left sidebar. Then you should select Music in the sidebar and click Sync Music at the top of iTunes, select "Remove and Sync" from the pop-up window.


Step 5. Check "Entire music library" or "Selected playlists, artists, albums, and genres". If you have selected the latter option, you can select the songs in the box below to transfer. Then Click Apply at the right bottom to start to transfer music from computer to iPad with iTunes.

Using iTunes to transfer music from computer to ipad is very easy, and it's the most widely used application for the users to manage their iOS devices. However, you should bear these rules in mind before using it to transfer music from computer to iPad: Your iTunes can only trust 5 devices on one computer. Otherwise, iTunes will erase your iPad data when adding music from your computer to your iPad. It means: don't switch computers, don't sync your iPad with other people's computers, don't snap songs directly on the Internet via your iPad, etc. Or you'll suffer from data loss.
Part 3. Comparison Table between Dr.Fone - Phone Manager (iOS) and iTunes
| Dr.Fone - Phone Manager (iOS) | iTunes | |
|---|---|---|
| Transfer Speed | Fast | Normally Fast. Slow when Transferring Many Files |
| Erase Data During Sync | No | Yes |
| Stability | Stable | Stable |
| Fix Music Info | Automatically | No |
| Get Music | Transfer Music from PC, iTunes, iDevices | Apple Music & iTunes Store |
| Compatibility | Compatible with All iOS Devices | Compatible with All iOS Devices |
Dr.Fone Basic:
Better Control for Your Phone
Manage, transfer, back up, restore, and mirror your device


iPad Tips
- iPad Manage
- 1. Download Movies on iPad
- 2. Download Music on iPad
- 3. Delete Duplicate Photos on iPad
- 4. Use iPad as An External Hard Drive
- 5. Delete Device Management on iPad
- 6. iPad Remote Management Software
- 7. Send Text Messages from iPad
- 8. Download WhatsApp on iPad
- 9. Change Weather Location on iPad
- iPad Backup
- 1. Ways to Restore iPad Without iTunes
- 2. Restore iPhone from iPad Backup
- 3. Backup iPhone/iPad in DFU Mode
- iPad Erase
- 1. Clear iPad data effectively
- 2. Delete Bookmarks on iPhone/iPad
- 3. Delete Browsing History on iPad
- 4. Ways to Delete Movies from iPad
- 5. Clear Cookies on iPad
- 6. Permanently Delete Emails from iPad
- 7. Wipe your iPad and Erase Everything
- 8. Clear System Data on iPad Storage
- iPad Mirror
- 1. Screen Recorders for iPad
- 2. Mirror iPad to Fire TV Stick
- 3. Screen Share Mac to iPad
- 4. Screen Mirror iPad Display
- 5. Share iPad Screen with PC
- 6. Screen Mirroring iPhone to iPad
- 7. iPad Mirror to PC without Lagging
- 8. Mirror iPad to Mac without Lagging
- iPad Recover
- 1. Recover Deleted Files on iPad
- 2. Recover Data from Broken iPad
- 3. Recover Deleted Safari Bookmarks
- 4. Recover Deleted Notes from iPad
- iPad Reset
- 1. Hard Reset/Factory Reset iPad 2
- 2. Reset iPad Air / Air 2
- 3. 5 Tactics to Reset Your iPad Mini
- 4. Factory Reset Your iPad Air/Pro
- 5. Factory Reset Your iPad 2023
- 6. Reset iPad, iPad Pro, and iPad Mini
- 7. Reset iPad Network Settings
- 8. Factory Reset iPad without Password
- iPad Tricks
- 1. Block People in Facebook on iPad
- 2. 25+ Cool Tips and Tricks on iPad
- 3. Play PC Games on iPad
- 4. Detect Spyware on iPhone
- 5. iPad Mini Jelly Scroll Issue
- 6. Fix Apple Keyboard Trackpad
- 7. iCloud Unlock without Passcode
- 8. Restore iPad from DFU Mode
- 9. Bypass Activation Lock on iPad
- 10. Photo Transfer Apps for iPad
- 11. Remove MDM from iPad Like a Pro
- 12. Reset iPad without Password
- ● Manage/transfer/recover data
- ● Unlock screen/activate/FRP lock
- ● Fix most iOS and Android issues
- Manage Now Manage Now Manage Now Manage Now


Bhavya Kaushik
contributor Editor