Ever happened to be scrolling through your Android gallery, then suddenly you realize the photos that you liked the most have vanished? It’s common with everyone. Inadvertently removing them or due to some problem in your device results in a severe headache for losing treasured memories. However, this is not the end of the world! Recovering deleted photos on Android is possible, particularly with proper tools. This tutorial will outline various recovery methods, including employing the mighty Wondershare Dr.Fone, other options to be considered, and important tips that can help prevent data loss in the future.
In this article
Part 1. Understanding Photo Deletion on Android
When a photo is erased from an Android device, it may appear to have disappeared forever. Nevertheless, Android devices come with built-in safety measures that prevent permanent data loss, allowing one more chance of retrieving these photographs before they are gone for good.
How Android Deals with Deleted Photographs
In the previous systems, deleting a file was synonymous with removing it entirely from the storage device, but modern Android platforms are handling picture erasure more prudently. If you remove a photo, this action will not immediately affect your device’s primary memory. Instead, such photos are moved by Android to a special holding location called “Recently Deleted.” This approach ensures that unplanned deletions do not terminate all your cherished memories.
Introduction to the "Recently Deleted" Folder
The "Recently Deleted" folder is a temporary trash can for your photographs. When you remove photos, they go to this folder rather than being deleted at once. It stays there for about 30 days, so you have enough time to recover if necessary. This safety net helps prevent permanent loss from accidental deletions.
Photos Are Not Permanently Deleted Immediately
The “Recently Deleted” folder lets you retrieve your photos before they are finally wiped off. Upon deleting a photo, it remains on the device. The place where it remains is in this folder, meaning that if you mistakenly erred, you can get it back.
Why This Matters for Photo Recovery
Understanding how Android treats deleted photos is crucial in their recovery process. Because pictures do not get lost right away, one has time within which to act and recover them from the “Recently Deleted” folder before they vanish for good.
Part 2. Recovering Deleted Photos with Wondershare Dr.Fone App
When photographs are no longer found in the “Recently Deleted” folder, it’s time to use a more robust approach. An all-in-one tool specialized for recovering lost data from Android devices is Wondershare Dr.Fone.
Dr.Fone App - Android Data Recovery
Get Back Your Valuable Data from Android Devices with Ease.
- Supports multiple data types: contacts, photos, videos, audios, and files.
- Compatible with over 6000+ Android brands.
- Recovery history available for review.
- High efficiency and success rate.
Why Choose Dr.Fone?
Dr.Fone is a reputable product for rescuing erased images, movies, addresses, and other data from an Android device. Dr.Fone has an interface designed to be user-friendly and comes with strong recuperation abilities meant to make the recovery process easier than ever.
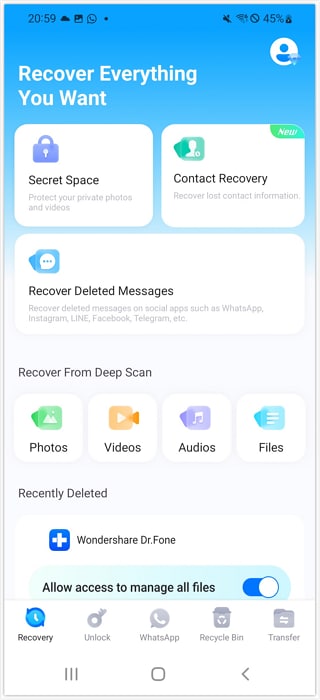
Step 1: Launch Dr.Fone and Access Data Recovery
Launch your phone’s Dr.Fone application. Click on “Recovery > Photo,” which can be found on the main screen of this app.
Step 2: Grant Necessary Permissions
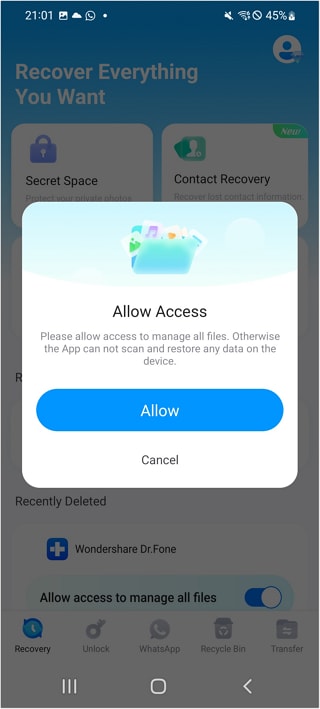
The program will require permission to access your device’s data. Follow the prompts on your screen to enable Dr.Fone to perform a scan for recoverable files.
Step 3: Select the Photos You Want to Recover
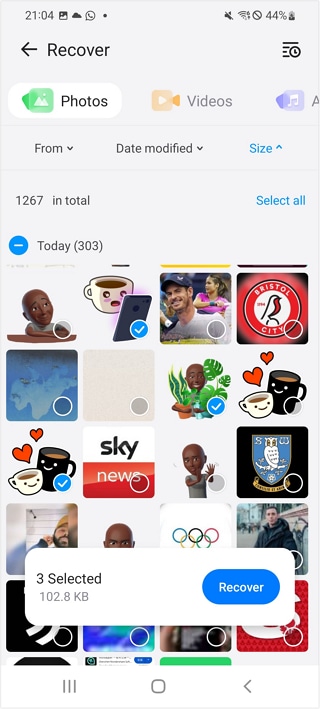
After scanning all recoverable files, Dr.Fone will show them according to their type. Navigate to photos/videos/audio, select the pictures you want back, then press ‘Recover.’
Step 4: Choose a Save Location
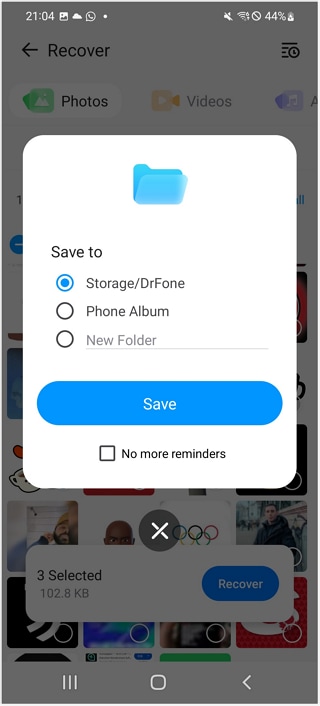
Decide where these photos will be saved: in a particular folder, phone memory, or a new folder. Tap “Save”.
Part 3. Alternative Methods for Photo Recovery
To do it without third-party apps like Dr.Fone, there are other options you can try if you want to know how to recover deleted photos from Android phones. This comprehensive guide shows how Google Photos and local backups are used in photo recovery
Method 1: Recovering Photos via Google Photos
It is an Android cloud storage service popular among many people for automatically backing up photos and videos on their devices. However, recovering deleted photos becomes easy if Google Photos Backup has been turned on.
Step 1: Open Google Photos App
Start your Android device and run the Google Photos app. Just make sure you are logged using the Google account you used to back up.
Step 2: Access the Trash Folder
When you open up your Google Photos app, you will find the phrase “Library” on the bottom right side of the display. From here, select “Trash”. The deleted photos get stored in the Trash folder for 60 days.
Step 3: Restore Deleted Photos
Check out the deleted items in the Trash. After locating the photo(s) that you wish to restore, press and hold them to choose them. Tap on “Restore” after completing your selection. Your restored pictures will return to your library in google photos and any album they were part of before this occurrence.
Advantages of Using Google Photos:
- Automatic Back Up: This ensures that your photos are always backed up.
- Extended Storage Period: Deleted pictures remain in the trash folder for 60 days, thus leaving enough time for recovery.
- Access from Other Devices: Any device connected to your Google account can view retrieved images.
Method 2: Recovering Photos from Local Backups
Regularly creating local backups of your Android may recover the deleted pictures from either internal memory or an external SD card. Here’s how:
Step 1: Locate the Backup File
Use your device's file manager to locate the backup file. Backups are usually saved in internal storage under folders like “Backup," "DCIM," or an external SD card.
Step 2: Access the Backup Folder
Find the folder with your backups. Depending on your backup settings, your photos might be arranged according to their types or dates.
Step 3: Restore Photos
When you locate the backup folder with the deleted pictures, just move or copy it back to your device's main storage/gallery folder
Advantages of Local Backups:
- No Internet Needed: Unlike cloud recovery, local backups do not require an internet connection.
- Immediate Restoration: Your photo may be restored straight from a backup file.
- Manage Store Locally: Local backups give you control over how you store data and where it resides physically.
Importance of Regular Backups
Regardless of what method of recovery is employed, regular backups are crucial. Consistently backing up your photos through Google Photos or local storage ensures that these files can be retrieved through multiple avenues in case they are ever lost. Here’s why:
- Peace of Mind: Regular backups ensure that your memories remain secured
- Various Modes for Recovery: When you have backups in place, you can select the one that suits you best as far as recovery is concerned
- Prevent Data Loss: Backups help prevent accidental deletions by safeguarding against problems such as device failures and corrupt data.
Part 4. Preventing Future Data Loss
Though knowing how to recover deleted photos is vital, being proactive in data loss prevention is even more significant. Doing this will secure your photographs and keep them accessible in case of any misfortune.
1. Enable Automatic Backups with Google Photos
One effective method to protect your photographs is enabling automated backups via Google Photos. The cloud-based solution ensures that every photograph you shoot gets saved automatically in the cloud.
How to Enable Automatic Backups:
Step 1: Open the Google Photos app on an Android device.
Step 2: Touch your profile picture or initials at the top right corner, then choose “Photos settings.”
Step 3: Go to “Backup & sync” and toggle the switch for automatic backup.
Step 4: Select a preferred upload size. Choose “Original quality” for full-resolution backups or “Storage saver” for smaller file sizes and reduced storage consumption.
Advantages of Google Photos Backup
- Real-Time Protection: No moment slips away since every picture taken is automatically backed up immediately after it has been captured.
- Cross-Device Access: Your backup pictures can be reached from any device connected to your Google account, thus making it easier to view or share memories from anywhere.
- Peace of Mind: When automatic backups are activated, you don't have to worry about manually saving your photos or losing them due to issues with the device.
2. Utilize Dr.Fone’s Backup Feature
Also, Dr. Fone offers a complete backup facility, which acts as an additional layer of protection for your data. This is particularly useful if you want more control over what and where gets backed up.
Conclusion
Your android photos can disappear without having any worries. With the right tools and knowledge, you can easily retrieve deleted photos and protect your memories from future losses. Wondershare Dr.Fone App provides a dependable and simple way of recovering lost pictures, while regular backups using Google Photos and Dr.Fone's backup assure peace of mind.
FAQ
-
Q: How long do I have to recover recently deleted photos?
A: For some Android gadgets, when you delete photos, they go to the "Recently Deleted" folder and stay there for one month. This window allows users to restore the pictures simply from this location. Nonetheless, at the end of 30 days, these photographs are commonly erased permanently and cannot be retrieved through the “recently deleted” file.
-
Q: Will Dr.Fone work on all Android devices?
A: Dr.Fone is compatible with several Android devices, including major brands like Samsung, Google, Huawei, LG, Sony, and others. The tool supports diverse Android versions, enabling old and new device owners to recover lost data. However, checking the latest compatibility list on Dr. Fone's website is always advisable to see whether your particular device is supported.
-
Q: Can I recover photos without a computer?
A: No computer can still get back images by using the Dr.Fone app directly on your Android device. The mobile version of Dr.Fone is an all-inclusive data recovery solution that lets you retrieve lost or deleted photos with other files directly from your phone memory card. This makes it favorable for persons who want or have to recover data without gaining entry into computers.







Daisy Raines
staff Editor
Generally rated4.5(105participated)