Blurry or out-of-focus images can be incredibly frustrating. Whether caused by a shaky hand, a fast-moving subject, incorrect focus settings, or simply the limitations of your camera hardware, a lack of sharpness can ruin what would otherwise be a perfect shot. Fortunately, advanced
AI-powered photo enhancers are now available that can effectively rescue blurry images. These tools utilize sophisticated algorithms to analyze and intelligently sharpen images, restoring lost details and clarity. In this guide, we'll explore how these tools work and, as an example, how you can leverage the Dr.Fone App - AI Photo Enhancer to fix out of focus pictures.
In this article
Part 1: Causes of Out-of-Focus Photos
Understanding why your photos are out of focus is the first step in preventing the issue in the future and knowing when AI tools can help. Here are some of the most common culprits:
Motion Blur

This occurs when either the camera or the subject is moving during the exposure. The longer the exposure time (shutter speed), the more likely motion blur is to appear. This is especially common in low-light conditions where the camera needs to use a slower shutter speed to capture enough light. Even a slight tremor in your hand can cause motion blur.
- Example: Photographing a sporting event where athletes are moving quickly or taking a handheld shot at night with a slow shutter speed.
Shallow Depth of Field
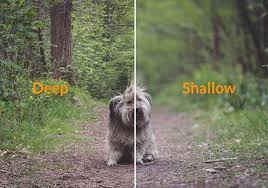
Depth of field is a range of distance within a photo image that appears sharp. When a shallow depth of field is present, only a small part of a picture is sharp, while the rest is blurred toward the front and back. This is often used intentionally for artistic effect (e.g., portrait photography), but it can also lead to unintended blurriness if the focus is not precisely placed on the desired subject.
- Example: Taking a portrait with a wide aperture (e.g., f/1.8) to blur the background but accidentally focusing on the subject's ear instead of their eye.
Incorrect Focus

Simply missing the focus can cause blurriness. Complex scenes or low-contrast subjects can sometimes fool autofocus systems. Manually focusing can also be challenging, especially on small screens.
- Example: The camera focuses on a tree behind your subject instead.
Hardware Limitations

The quality of your camera lens and sensor plays a significant role in image sharpness. Lower-quality lenses may produce softer images, and smaller sensors (common in smartphones) can struggle to capture fine details, especially in challenging lighting conditions.
- Example: An older smartphone camera might produce noticeably softer images compared to a newer model with a better lens and larger sensor.
Camera Shake

This is similar to motion blur but specifically caused by the photographer's unsteady hand.
Part 2: Manual Fixes Before Using AI Tools

Before resorting to AI-powered solutions, try these simple manual adjustments, especially if the blur is minor:
- Cropping: If only a portion of the image is important, cropping out the blurry areas can improve the overall composition and perceived sharpness. While this doesn't actually fix the blur, it can make the image more visually appealing.
- How-to: Most photo editing apps (including built-in phone editors) have a cropping tool. Select the area you want to keep and discard the rest.
- Adjusting Sharpness: Most photo editing apps have a "Sharpness" or "Clarity" slider. Subtly increasing sharpness can sometimes bring out details and reduce the appearance of blur.
- Caution: Be careful not to over-sharpen, as this can create unwanted artifacts and make the image look unnatural or grainy. Small, incremental adjustments are best.
- Contrast Adjustments: Increasing contrast can sometimes help to define edges and make an image appear sharper.
- How-to: Experiment with the "Contrast" slider in your photo editor.
- Using Built-in "Focus" or "Clarity" Features: Some smartphone photo editors have specific tools designed to enhance focus or clarity. These often use basic algorithms to sharpen the image.
- Example: Google Photos has a "Clarity" slider under its "Adjust" settings.
- Live Photo Editing (iOS): If you captured the image as a Live Photo on an iPhone, you might be able to select a different frame that is slightly sharper.
These manual adjustments can be helpful for minor blur issues, but they often fall short when dealing with significant out-of-focus problems. That's where AI enhancers come in.
Part 3: Using Dr.Fone App - AI Photo Enhancer for Out-of-Focus Images
AI-powered photo enhancers offer a more sophisticated approach to fixing blurry images. These tools use complex algorithms trained on vast datasets of images to intelligently analyze and sharpen photos, often producing impressive results. Dr.Fone app is one such tool.
Note: Before proceeding, ensure you have downloaded and installed the Dr.Fone app on your iOS or Android device.
Here's how to enhance focus using Dr.Fone:
Dr.Fone App - AI Photo Enhancer (iOS & Android)
100% Automatic Photo Enhancement: 1-Click Fixes
- Sharpen Blurry Images
- Denoise & Enhance Low-Light Photos
- Naturally Enhance Portrait Details
- User-Friendly & Beginner-Perfect
01of 03Upload Your Photo
- From the main menu, locate and tap the "AI Photo Enhancer" button.
- Select the blurry photo you want to fix from your gallery. You can preview the image before proceeding to ensure it's the right one.
02of 03Choose the Enhancement Feature

- Navigate to the AI-powered tools section and select the enhancement feature designed for fixing blurry images.
- Depending on your needs, choose between modes like AI Photo Enhancer and Old Photo Restoration.
- After processing, view a side-by-side comparison of the original and enhanced images to assess improvements in clarity and focus.
03of 03Save the Enhanced Image

- If you're satisfied with the results, tap the "Save" button to store the enhanced photo in your device's gallery.
- Your newly focused image is now ready for sharing, printing, or any other use.
Dr.Fone's AI algorithms analyze the image, identify blurry regions, and intelligently sharpen them while attempting to preserve natural details and textures. The specific features and performance may vary depending on the version of the app and the device you are using.
Part 4: Recommendations by Device
Different devices offer various tools and techniques for fixing blurry photos. Here are some device-specific recommendations:
For iPhones:
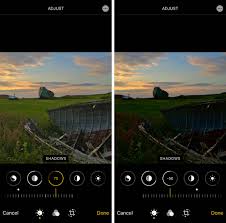
- Live Photo Editing: As mentioned earlier, if you used Live Photo, swipe to find the clearest frame.
- Combine with Dr.Fone: Use the basic editing tools in the Photos app (sharpness, contrast) before using Dr.Fone to potentially enhance the results further.
For Android devices:
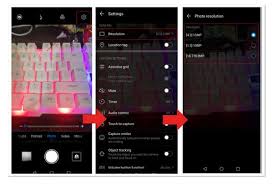
- Google Photos: Use Google Photos' "Clarity" and other adjustment tools before using Dr.Fone.
- Device-Specific Editors: Some Android manufacturers include their own enhanced photo editing tools.
- Combine with Dr.Fone: Utilize the built-in features for initial adjustments, then use Dr.Fone for more significant sharpening.
For PCs (Windows/Mac):
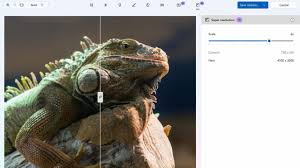
- Dedicated Software: For the best results on PCs, use dedicated AI photo enhancement software. Options include:
- AVCLabs Photo Enhancer AI: This is a dedicated AI photo enhancer that offers various modes, including sharpening.
- Topaz Photo AI: A powerful tool specifically designed for image enhancement, including noise reduction and sharpening.
- Other Options: Search for "AI photo enhancer" to find the latest and most effective software.
- Workflow:
- Import: Import the blurry photo into the software.
- Select Sharpening Mode: Choose the appropriate "Sharpen" or "Focus" enhancement mode.
- Adjust Parameters: Adjust parameters as needed (if available). Some software allows you to fine-tune the sharpening strength, noise reduction, and other settings.
- Preview: Preview the enhanced image.
- Save: Save the enhanced image.
Conclusion
Blurry photos can be frustrating, but they don't have to be permanent. Whether your images are out of focus due to motion blur, incorrect settings, or camera limitations, there are plenty of ways to restore clarity and sharpness. While manual edits like cropping, sharpening, and contrast adjustments can improve minor blurriness, they often fall short when dealing with heavily out-of-focus photos.
That's where AI-powered tools like Dr.Fone come in. With advanced algorithms designed to intelligently analyze and sharpen images, these tools can rescue even the blurriest of shots—bringing back lost details with just a few taps. Whether you're enhancing photos on your smartphone or using professional software on your PC, AI technology makes photo restoration easier and more accessible than ever.
Don't let a blurry shot ruin your favorite memories! By understanding the causes of blurriness and using the right tools, you can transform your out-of-focus images into crisp, high-quality photos that are worth sharing. Try Dr.Fone App - AI Photo Enhancer today and see the difference for yourself!









Jane Lunes
staff Editor
Generally rated4.5(105participated)