Grainy photos are a common frustration for photographers and casual users alike. Whether caused by low light, high ISO settings, or camera limitations, graininess can ruin an otherwise perfect shot. If you've ever wondered how to fix grainy photos or how to make a photo less grainy, modern technology offers effective solutions.
AI-powered tools like Dr.Fone App - AI Photo Enhancer have revolutionized photo editing by providing quick and automatic fixes for grainy images. Unlike traditional editing methods that require manual adjustments, AI tools use advanced algorithms to remove noise while preserving essential details. This guide will explore the causes of grainy photos, quick fixes, and how to use AI tools like Dr.Fone to restore your images effortlessly.
In this article
Part 1: Why Do Photos Become Grainy?

Graininess, also known as digital noise, often occurs due to several technical factors. Understanding these causes can help you avoid grainy photos in the future and improve your photo-taking skills.
Low Light Conditions
One of the most common reasons for graininess is shooting in low-light environments. When there isn't enough light, your camera compensates by increasing its ISO setting, which amplifies the sensor's sensitivity. While this helps brighten the image, it also introduces noise in the form of specks or grains.
High ISO Settings
ISO measures your camera sensor's sensitivity to light. Higher ISO settings are useful for capturing images in dim lighting but often result in increased noise. For example:
- An ISO of 100 produces clean images but requires more light.
- An ISO of 3200 or higher may capture details in low light but adds significant grain.
Camera Limitations
Older cameras or smartphones with smaller sensors tend to struggle with noise reduction compared to newer models with advanced image processing capabilities. Even modern devices can produce grainy photos if their sensors are pushed beyond their limits.
Post-Processing Errors
Over-editing photos using traditional software can sometimes introduce or amplify noise. For example, enhancing an image too much will often make the grain stand out more.
With knowledge of these reasons, you can do something to help reduce graininess when taking photographs. But when prevention solutions are not feasible, post-processing solutions like AI photo enhancers are priceless.
Part 2: Quick Fixes for Grainy Photos
Prior to getting into the more sophisticated solutions with AI, I suggest looking into some basic and realistic tweaks you can make while taking a photo or even changing your camera settings to make graininess lessened or eliminated altogether. If you want to enhance the quality of images, especially while in the process of taking them, these tweaks will give you more power over the outcome.
Adjust Camera Settings:
Optimizing your camera settings is a fundamental step in preventing grainy photos.

- Lower the ISO: ISO measures your camera's sensitivity to light. Higher ISO settings are useful in low light situations, but they amplify the sensor's signal, which also amplifies noise.
- Explanation: When shooting in well-lit conditions, always use the lowest possible ISO setting (typically ISO 100 or ISO 200). This will minimize noise and produce cleaner images. Only increase the ISO when necessary, such as when shooting indoors or in dimly lit environments.
- Practical Tip: Be mindful of the trade-off between brightness and noise. Experiment with different ISO settings to find the sweet spot where you can capture enough light without introducing excessive grain.
- Use a Tripod: A stable tripod allows you to use slower shutter speeds without introducing motion blur, reducing the need for high ISO settings.
- Explanation: When using slow shutter speeds, any camera movement can result in blurry images. A tripod eliminates this movement, allowing you to capture sharp photos even in low light.
- Practical Tip: Use a remote shutter release or your camera's self-timer to further minimize camera shake when using a tripod.
- Increase Aperture Size: A wider aperture (lower f-number) lets more light into the camera, reducing the need for ISO amplification.
- Explanation: Aperture refers to the opening in your camera's lens that allows light to pass through. A wider aperture (e.g., f/2.8 or f/1.8) lets in more light than a narrower aperture (e.g., f/8 or f/11).
- Practical Tip: Keep in mind that wider apertures also result in a shallower depth of field, meaning less of the image will be in focus. Choose an aperture that balances light gathering with the desired depth of field for your subject.
- Use Flash: Adding artificial light can help brighten your subject and eliminate the need for high ISO settings.
- Explanation: Flash provides a burst of intense light that can illuminate your subject, even in very dark conditions. This allows you to use lower ISO settings and capture cleaner images.
- Practical Tip: Be mindful of the potential for harsh shadows and unnatural-looking lighting when using flash. Experiment with different flash settings, such as fill flash or bounce flash, to achieve more balanced and natural-looking results.
Improve Lighting Conditions:
Optimizing your shooting environment can dramatically reduce the need for noise reduction in post-processing.
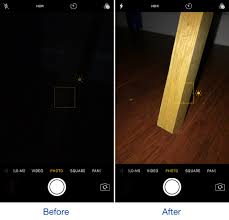
- Shoot in Well-Lit Environments: Whenever possible, shoot in well-lit environments.
- Explanation: Ample light reduces the need to increase ISO or use slow shutter speeds, both of which can contribute to graininess.
- Practical Tip: Take advantage of natural light during the daytime or use controlled studio lighting for indoor shots. If shooting outdoors, try to shoot during the "golden hour" (shortly after sunrise and before sunset) for soft, warm light that is ideal for photography.
Use Built-In Noise Reduction:
Many cameras and smartphones have built-in noise reduction settings that automatically minimize graininess during image capture.

- Explanation: These settings use algorithms to detect and reduce noise in real time, often at the expense of some fine detail.
- Practical Tip: Check your device's settings for options like "Noise Reduction" or "HDR Mode." Experiment with these settings to see how they affect the image quality. Be aware that aggressive noise reduction can sometimes result in a loss of sharpness and detail, so use it sparingly. Some smartphones also offer a "Night Mode," which automatically applies noise reduction and image stacking to improve low-light photos.
While these quick fixes are helpful during photography, they may not always eliminate grain, especially in very low-light situations or with older cameras. For existing grainy photos or more comprehensive noise reduction, AI-powered tools provide a more powerful and versatile solution. These tools can intelligently remove noise while preserving important details, resulting in cleaner, sharper images.
Part 3: Using AI Tools Like Dr.Fone App - AI Photo Enhancer
AI technology has transformed photo editing by offering automatic noise reduction with minimal effort. Tools like Dr.Fone AI Photo Enhancer are designed to fix grainy photos quickly while preserving image quality. Before proceeding, download and install Dr.Fone App from the App Store (iOS) or Google Play Store (Android) on your device. Here's how you can use this tool:
Dr.Fone App - AI Photo Enhancer (iOS & Android)
100% Automatic Photo Enhancement: 1-Click Fixes
- Sharpen Blurry Images
- Denoise & Enhance Low-Light Photos
- Naturally Enhance Portrait Details
- User-Friendly & Beginner-Perfect
01of 03Upload Your Grainy Photo
Open the app and tap on "AI Photo Enhancer."
Select the grainy photo from your gallery or drag it into the app interface.
You can upload multiple photos for batch processing if needed.

02of 03Enhance Your Photo with AI
Choose the "Enhance" button within Dr.Fone.
The app's AI will automatically analyze your photo and remove noise while retaining important details.
You can preview the enhanced version before saving it.

03of 03Save or Share Your Enhanced Photo

Once satisfied with the results, tap "Save" to store the enhanced photo on your device.
Dr.Fone app's powerful algorithms ensure that even heavily grainy photos are restored to near-original quality without requiring manual adjustments.
Part 4: Device-Specific Recommendations
While the core techniques for fixing grainy photos using AI tools are universal, the specific steps and available options can vary depending on the type of device you're using. This section provides tailored recommendations for iPhones, Android devices, and PCs (Windows/Mac) to help you achieve the best possible results with minimal effort.
For iPhones
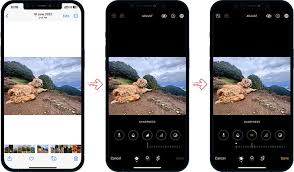
Apple's Photos app offers a range of basic editing tools that can be a good starting point for addressing minor graininess or complementing AI-powered enhancements.
- Leveraging Built-In Adjustments: Before turning to third-party apps, open the Photos app, select your grainy image, and tap "Edit." Experiment with subtle adjustments to Brightness, Contrast, and Sharpness. Reducing contrast and slightly increasing brightness can sometimes help to soften the appearance of grain.
- Subtlety is Key: Be careful not to over-sharpen the image, as this can actually accentuate the noise and make the graininess more noticeable.
- Combining with AI: After making initial adjustments with the built-in tools, use a third-party AI-powered app like Dr.Fone AI Photo Enhancer for more advanced noise reduction and detail restoration. This layered approach can often yield superior results.
For Android Devices

Similar to iPhones, many Android phones come equipped with built-in photo editing apps that offer basic noise reduction capabilities.
- Exploring Google Photos: If your Android device uses Google Photos, open the app, select your grainy image, and tap "Edit." Navigate to "Adjust" and look for the "Denoise" or "Noise Reduction" option. Experiment with the slider to find a balance between reducing noise and preserving detail.
- Device-Specific Editors: Certain smartphone brands develop their own photo editing software with distinctive attributes and bundle it with the device. Look into the app drawer and check if there are any editing applications available, and assess their noise cancelling features.
- Third-Party Alternatives: For more powerful noise reduction and advanced features, consider using Dr.Fone or other third-party apps available on the Google Play Store. Many of these apps offer AI-powered noise reduction that can significantly improve the quality of your grainy photos.
For PCs (Windows/Mac)
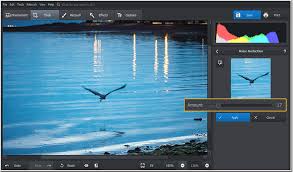
Unleashing the Power of Desktop Editing
- Professional Software: On desktops and laptops, you have access to professional-grade photo editing software like Adobe Photoshop and Lightroom, which offer a wide range of advanced tools and features for noise reduction. However, these programs can have a steep learning curve.
- AI-Powered Plugins and Standalone Tools: A growing number of AI-powered plugins and standalone tools are available for both Photoshop and Lightroom, as well as independent applications like AVCLabs Photo Enhancer AI and VideoProc Converter AI. These tools simplify the process of noise reduction by using AI algorithms to automatically analyze and fix grainy photos.
- Workflow Recommendation: A common workflow is to use Photoshop or Lightroom for initial color correction, exposure adjustments, and other basic edits. Then, apply an AI-powered noise reduction tool as a final step to eliminate graininess and restore detail.
- Key Advantages: PC-based solutions often provide more advanced customization options, allowing you to fine-tune the noise reduction process and achieve highly specific results. They also typically support larger image files and offer faster processing speeds compared to mobile apps.
Important Considerations for All Devices:
- Preview and Zoom: Always zoom in and carefully preview the results of any noise reduction adjustments to ensure that you're not sacrificing too much detail.
- Non-Destructive Editing: When possible, use non-destructive editing techniques (e.g., adjustment layers in Photoshop) to avoid permanently altering your original image. This allows you to easily revert to the original if you're not satisfied with the changes.
- Experimentation is Key: Don't be afraid to experiment with different settings and tools to find what works best for your specific image and device. Every photo is unique, and the optimal approach to noise reduction will vary depending on the severity of the graininess and the desired outcome.
By following these device-specific recommendations and experimenting with different tools and techniques, you can effectively fix grainy photos and restore them to their former glory, regardless of the device you're using.
Conclusion
Grainy photos no longer have to be a source of frustration, thanks to modern advancements in AI technology. Whether caused by low light or high ISO settings, tools like Dr.Fone AI Photo Enhancer offer quick and effective solutions for restoring image quality effortlessly. With just a few taps, you can transform noisy images into clear visuals without losing essential details.
For those who prefer built-in options, both iPhones and Android devices provide basic editing features that work well for minor adjustments. On PCs, professional software combined with AI-powered tools offers even greater flexibility for fixing grainy photos at scale.
No matter what device you use, there's now a solution tailored to your needs. Start enhancing your photos today with Dr.Fone App and enjoy crystal-clear memories that last a lifetime!


![How to Effortlessly Fix Grainy Photos Using AI Technology [2026]](https://images.wondershare.com/drfone/article/2025/03/fix-grainy-photos-1.jpg)







Daisy Raines
staff Editor
Generally rated4.5(105participated)