

Are you tired of cluttered photo backgrounds ruining the aesthetic of your presentations? Imagine crafting slides that look sleek and professional, all without needing expensive software like Photoshop. The good news is that PowerPoint offers a built-in tool to help you achieve just that! With its intuitive features, you can remove background from picture in PowerPoint effortlessly, transforming your slides into captivating visual experiences.
Visuals are crucial in presentations, they grab attention, emphasize key points, and create a lasting impression. However, distracting backgrounds can dilute their impact. That's why learning how to remove a background from a picture in PowerPoint can be a game-changer for your slides. This guide will walk you through the process step-by-step, explore advanced features like transparency adjustments, and even introduce tools that can help remove a picture from powerpoint background and enhance your image's quality further.
In this article
Part 1: Why Removing Backgrounds Matters for Better Visuals
When it comes to creating engaging presentations, visuals play a crucial role in capturing the audience's attention and conveying your message effectively. One key aspect of enhancing these visuals is ensuring that the images used are clean and focused. This is where the process of removing backgrounds becomes essential. Let's explore why this matters and how you can achieve it using PowerPoint's built-in tools.

The Importance of Clean Images
Removing image backgrounds serves several purposes:
- It focuses attention on the subject of the image.
- It enhances the overall design and professionalism of your presentation.
- It allows seamless integration of visuals into your slide's theme.
PowerPoint's Built-In Tools
Unlike complex software, PowerPoint simplifies this process with its Remove Background feature. This tool automatically detects the subject and removes unwanted areas with precision. Let's dive into how it works and explore why it's so powerful for presentation design.
Part 2: How to Remove Background from Picture in PowerPoint
Removing the background from images in PowerPoint is a simple yet powerful way to enhance your presentations. By isolating the subject of an image, you can create cleaner visuals that draw attention to key elements. Whether you're working on a professional project or a creative design, mastering this feature will help elevate your slides and make them more engaging. Below is a step-by-step guide tailored for beginners.
Beginner-Friendly Steps
Step 1: Open your PowerPoint slide and click "Insert" > "Pictures" to add your desired image.

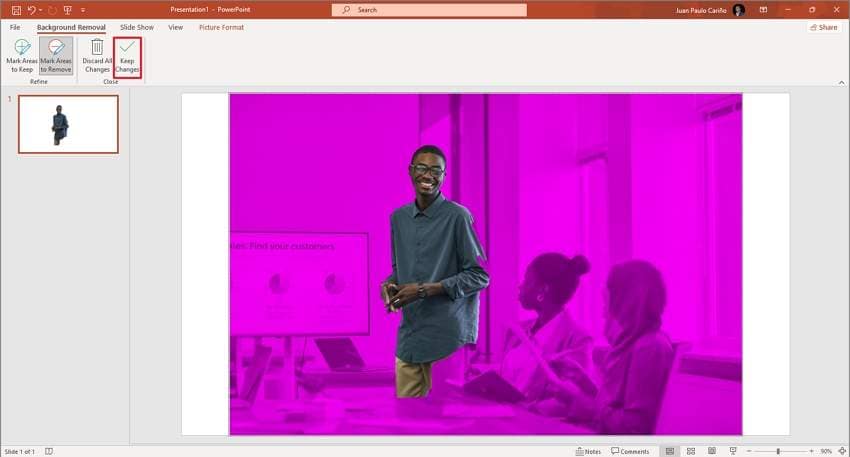
Step 2: Select the image and navigate to the "Picture Format" tab in the top ribbon. Click "Remove Background." PowerPoint will highlight areas for removal in magenta automatically.

Step 3: Use "Mark Areas to Keep" and "Mark Areas to Remove" for precision. For example, if parts of hair or intricate details need preservation, draw over them carefully.

Step 4: Once satisfied, click "Keep Changes." Your image now has a clean background!
Pro Tips for Better Results
- Use High-Resolution Images: High-quality images yield cleaner edges during removal, making your final result look more professional.
- Zoom In for Precision: Zoom in on tricky areas like corners or overlapping objects to ensure precise adjustments.
- Experiment with Selections: Don't be afraid to try different selections until you achieve perfection. Practice makes perfect!
Part 3: How Do I Make a Picture Transparent in PowerPoint?
Transparency in PowerPoint helps make presentations more engaging. It lets you make images see-through, which can improve slide designs and backgrounds. You can use it to add watermarks, blend images, or put text over pictures, making your presentations more versatile and visually appealing.
Step-by-Step Guide
Step 1: Select your image and go to the "Picture Format" tab.

Step 2: Click "Transparency" and choose preset levels or adjust manually using the slider.

Step 3: Preview changes directly on your slide for alignment and design consistency.
Creative Use Cases
- Overlay Text on Images: Place text over images without obstructing visibility, creating a seamless blend of content and visuals.
- Create Subtle Backgrounds: Use transparent images to create subtle backgrounds that enhance your slide's theme without overpowering it.
- Design Logos Within Presentations: Seamlessly integrate logos into your slides by adjusting their transparency, ensuring they blend perfectly with your design.
Part 4: Bonus Tip: Elevate Your Images with Dr.Fone App - AI Photo Enhancer
While PowerPoint is powerful, enhancing image quality beforehand can make a significant difference. Enter Dr.Fone App - AI Photo Enhancer—an advanced tool that restores old photos, sharpens resolution, and improves clarity using AI technology.
Dr.Fone App - AI Photo Enhancer (iOS & Android)
100% Automatic Photo Enhancement: 1-Click Fixes
- Sharpen Blurry Images
- Denoise & Enhance Low-Light Photos
- Naturally Enhance Portrait Details
- User-Friendly & Beginner-Perfect


How to Use Dr.Fone App's AI Photo Enhancer
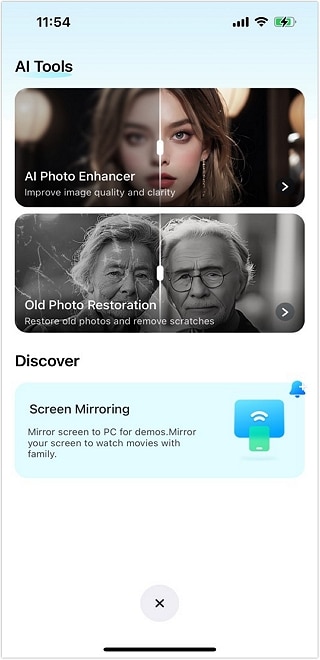
Step 1: Download and launch the app on your iOS or Android device, ensuring it is updated to the latest version for optimal functionality. Open the app and navigate to the "AI Tools" section. From there, choose the "AI Photo Enhancer" option to access its features.
Step 2: Upload a photo from your gallery or take a new one. Dr.Fone's AI will analyze the image automatically.

Step 3: Click "Enhance" to begin the process. The AI will adjust brightness, sharpness, resolution, and reduce noise for improved clarity and quality.

Step 4: Once the enhancement is complete, save the image to your device. You can use it in presentations, such as inserting it into PowerPoint for stunning results, or share it online.

By combining Dr.Fone with PowerPoint's tools, you'll master how to remove background from picture in PowerPoint while ensuring top-notch quality that will impress your audience.
Part 5: Unleashing Creativity with Background-Free Images in PowerPoint

Now that you've mastered the art of removing backgrounds in PowerPoint, it's time to explore the creative possibilities this skill unlocks! With clean, background-free images at your disposal, you can take your presentations to new heights of visual appeal and professionalism.
Layering and Composition
One of the most exciting aspects of working with background-free images is the ability to create stunning layered compositions. Imagine overlapping multiple images to tell a visual story or convey complex ideas. For instance, you could:
- Create a collage of team members for an organizational chart, with each person's image seamlessly blending into the next.
- Design a product showcase where items appear to interact with each other, free from distracting backgrounds.
- Craft an infographic where images of concepts or data points float in a custom-designed space.
Dynamic Animations
Background-free images open up a world of animation possibilities in PowerPoint. Without a background to worry about, you can:
- Make objects or characters appear to move across the slide independently.
- Create the illusion of depth by animating foreground and background elements separately.
- Design eye-catching transitions where images morph or blend into one another.
Custom Illustrations
Who says you need to be a graphic designer to create custom illustrations? With background removal techniques, you can:
- Combine parts of different images to create unique hybrid visuals.
- Extract elements from photos to use as building blocks for your own designs.
- Create custom icons by simplifying and stylizing parts of more complex images.
Branding and Consistency
Maintaining a consistent brand image across your presentation becomes much easier when you can remove and replace backgrounds at will. You can:
- Place product images on backgrounds that match your brand colors.
- Create a unified look for speaker or team member photos by removing varied backgrounds.
- Incorporate your logo or other branding elements more seamlessly into various images.
Conclusion
From the basic built-in tools to advanced techniques and third-party solutions, you now have a comprehensive toolkit. Remember, practice makes perfect – don't be afraid to experiment with different images and techniques to refine your skills in how to remove a background from a picture in PowerPoint. As you continue to explore the world of image editing in PowerPoint, consider incorporating tools like the Dr.Fone App - AI Photo Enhancer to take your visuals to the next level.
FAQ
-
Q: How do I remove background online when working with PowerPoint OneDrive?
A: Select marked areas on your slides using "Remove Background" under Picture Format tools. This feature works seamlessly across all PowerPoint platforms.
-
Q: How can I make a picture transparent?
A: Insert the image, go to "Picture Format," select "Transparency," and adjust levels as needed. Preview your changes to ensure they align with your slide design.
-
Q: Can I use vector files for background removal?
A: No, vector files like SVG or Adobe Illustrator graphics are unsupported by PowerPoint's Remove Background tool. Stick to raster images like JPEG or PNG for best results.
-
Q: How do I ensure high-quality images for background removal?
A: Use high-resolution images and enhance them with tools like Dr.Fone AI Photo Enhancer before removing backgrounds for the best results.


Julia Becker
staff Editor
Generally rated4.5(105participated)