How to Delete Browsing History on Android?

Jul 12, 2024 • Filed to: Data Wipe Solutions • Proven solutions
Clearing history from any Android phone may seem to be a very simple task. However, things will get very irritating if the history is left unnoticed and gets stacked up. This happens because a large amount of browsing data can hamper the device's performance. Your device can face frequent and disturbing glitches as the browsing history data takes a lot of space on your Android’s internal storage. Furthermore, records state that hackers often use these history file data to invade into Android devices. It is therefore always safe to keep cleaning your browsing history at frequent intervals. Although this is a very easy process, many people have questions about how to clear history on Android and that’s nothing to be worried about. If you too are doubtful about how to delete history on Android then this is the perfect article for you.
Part 1: How to clear Chrome Browsing History on Android?
In this part, we will show you how to delete browsing history on Android when using Google Chrome. Let’s have a look at the step-by-step guide for the process. It is a very simple process. Just follow the simple steps given below
• Step 1 – open Google Chrome and go to the settings menu. You can find it on the top right side with three dots.

Now, the settings menu will appear in front of you.
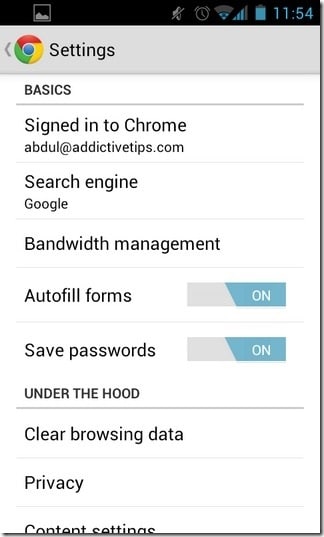
• Step 2 – after that, click on the “History” option to view your browsing history.

• Step 3 – Now you can see all your browsing history in one place. Check at the bottom of the page and you can find “Clear Browsing Data”. Tap on this option.
• Step 4 – Upon clicking on the option, you can see a new window as follows
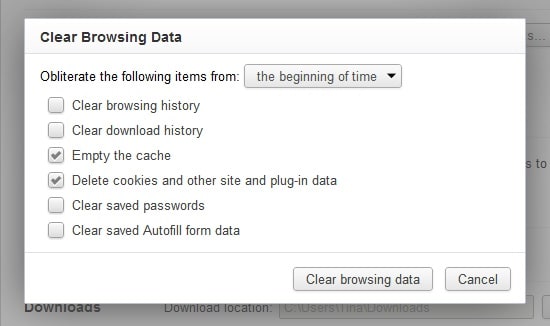
• Step 5 - From the drop-down menu at the top, you can select the duration of which you want to clear history. The available options are past hour, past day, past week, last 4 weeks, or beginning of time. If you want to delete the data from the beginning of time, select that option and click on “Clear Data”.
Now, your data will be deleted in a while. This is the easiest process to clear all the browsing data from Google Chrome history on Android.
Part 2: How to clear Firefox browsing history on Android?
Firefox is one of the most popular browsers for Android. There are several users who use Firefox in their daily use. In this part, we’ll discuss how to clear history on Android using Firefox.
Step 1 - Open Firefox. Then click on the three dots at the top right corner of the app.
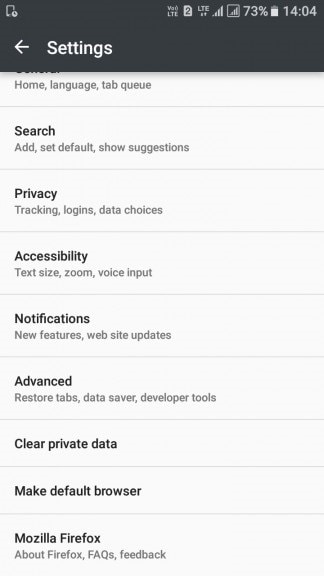
Step 2 - Now click on “settings”. You can find the below screen.
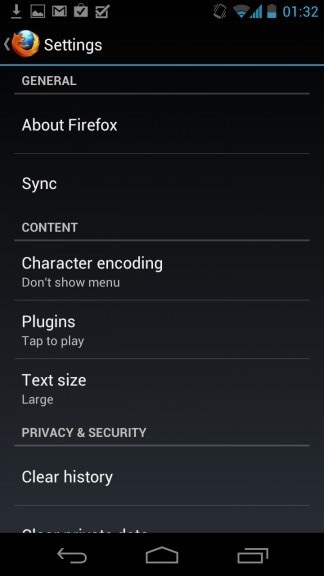
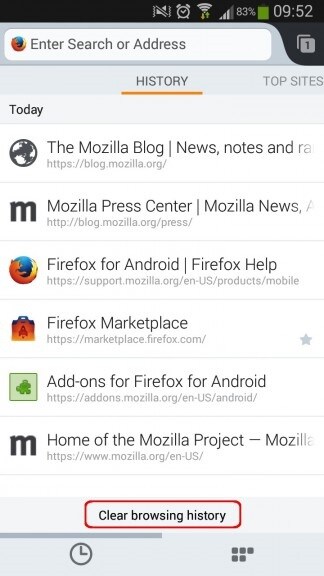
Step 3 - Scroll down at the bottom to find the “Clear Browsing Data” option. Tap on it.
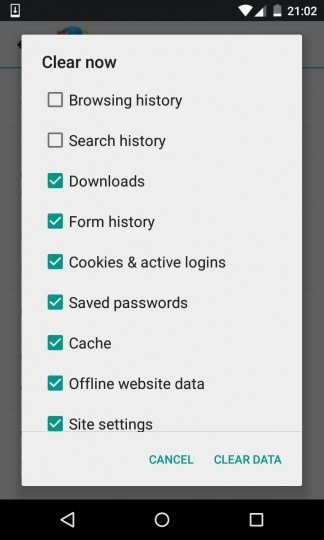
Step 4 – Now choose what you like to clear. By default all the options (open tabs, browsing history, search history, downloads, form history, cookies and active logins, cache, offline website data, site settings, sync tabs, saved logins).
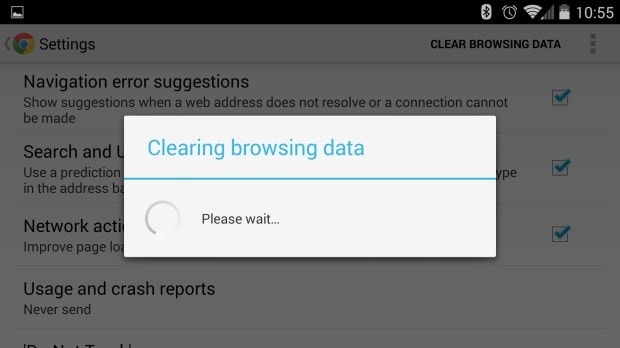
Step 5 – Now click on Clear data and your all the history will be deleted in a while. Also, you’ll be confirmed with a message like the below.
In this browser, users can’t delete history by timeline. The only available option is to delete all the history all at once.
Part 3: How to Clear Search Results in Bulk?
The users can also delete all the search results and all the activities in bulk as per their wishes. For this, they just have to follow the below steps.
Step 1 - First of all, go to the Google “My Activity” page and log in with your Google id and Password
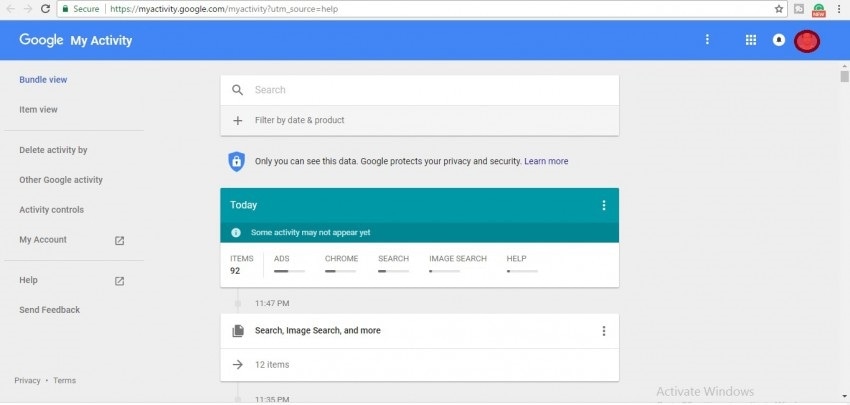
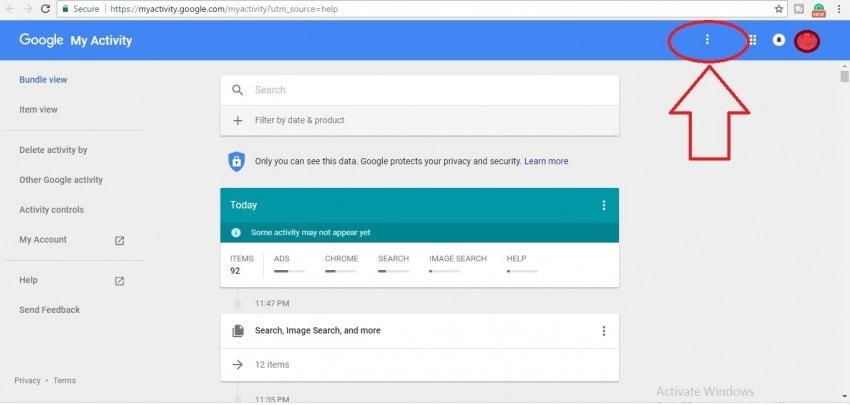
Step 2 – Now, tap on the three-dot at the top right corner to reveal the options.
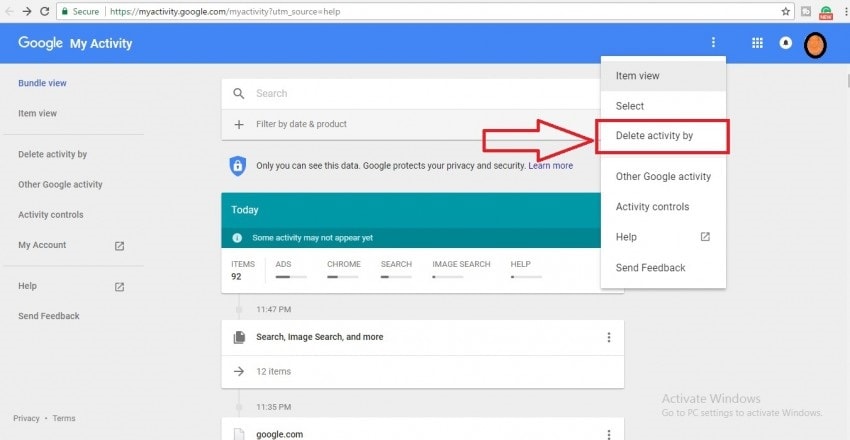
Step 3 - After that, Select “Delete Activity By”.
Step 4 – Now, you have the option to select the time frame from Today, yesterday, Last 7 days, Last 30 days, or all time. Select “All time” and tap on the “delete” option.
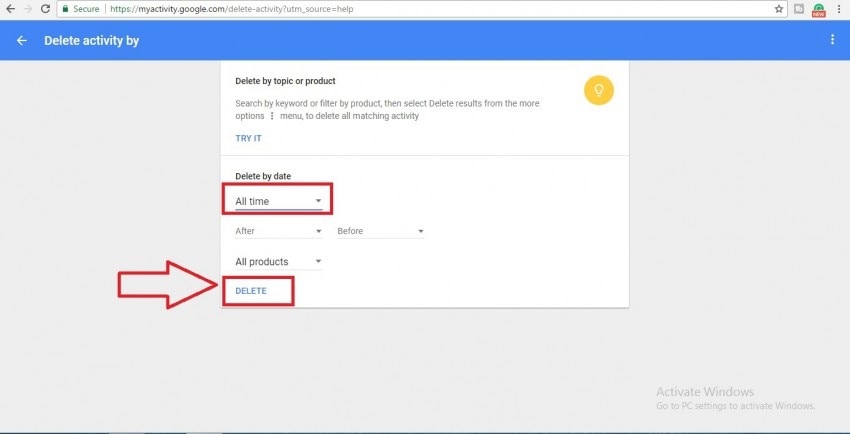
After this, you will be asked to confirm this step again. While you confirm, all your activities will be deleted within a moment.
This is the easiest process to wipe all history from the Android Google account in one click. Now, we will discuss how to delete all the data including browsing history from the device permanently without any trace of any data.
Part 4: How to Permanently Clear History on Android?
Simply deleting the data or using a factory reset doesn’t help to permanently wipe Android. The data be easily recovered with the help of the restoration process and it has been proved by Avast. Dr.Fone - Data Eraser ensures that your privacy is safely protected by permanently clearing deleted files, clearing browsing history and caches, and protecting all your private information.
Dr.Fone - Data Eraser
Fully Erase Browsing History on Android and Protect Your Privacy
- Simple, click-through process.
- Wipe your Android completely and permanently.
- Erase photos, contacts, messages, call logs and all private data.
- Supports all Android devices available in the market.


Follow the simple steps given below to permanently delete history on Android using Android Data Eraser
Step 1 Install Android Data Eraser on a Computer
First of all, install the Android Data Eraser on your PC and open it. When the following window appears, click on “Data Eraser”

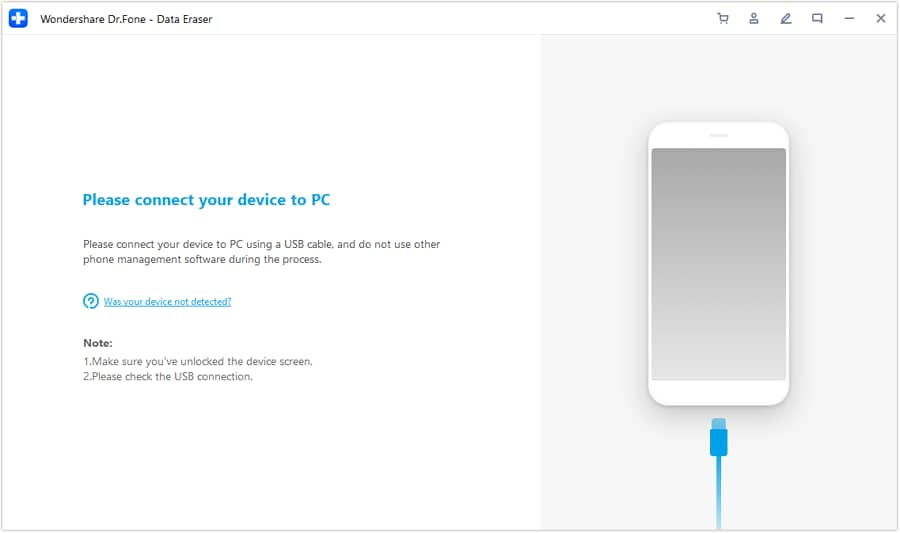
Step 2 Connect Android Device to PC and Turn on USB Debugging
In this step, connect your Android device with your PC via a data cable. Make sure to confirm the USB debugging if prompted. Your device will be recognized by the Toolkit automatically.
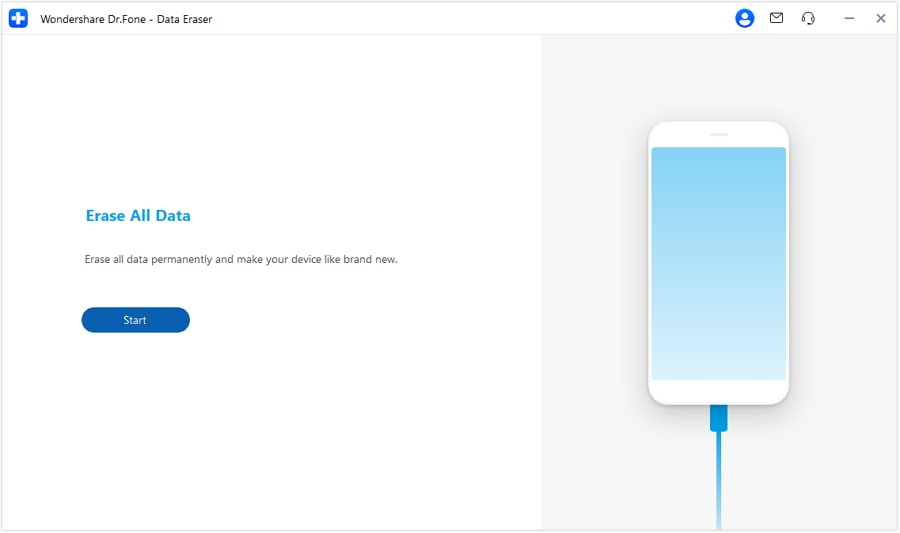
Step 3 Select Erasing Option –
Now, as the device is connected, you can see the ‘Erase all Data” option. This toolkit will ask for your confirmation by entering ‘delete” word on the given box. After confirmation, click on ‘Erase now” to start the process.
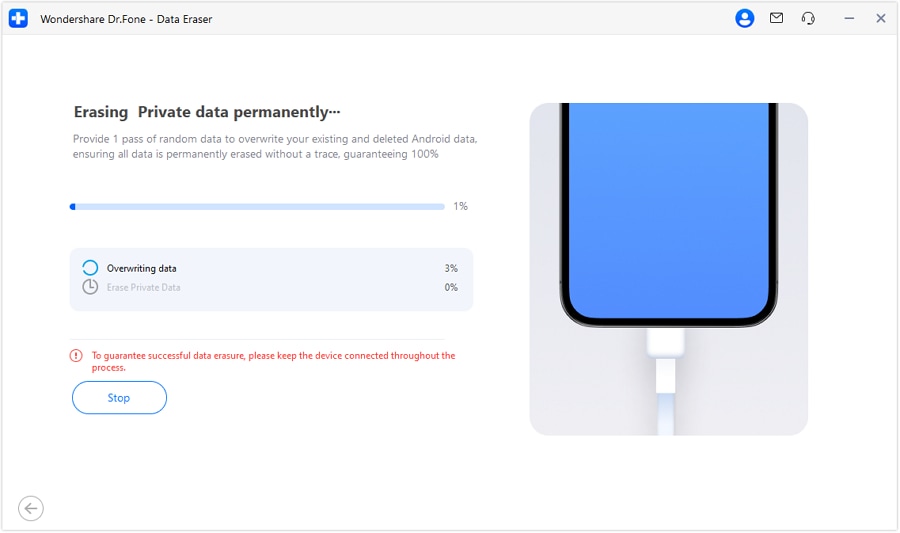
Step 4 Begin to Erase Your Android Device Now
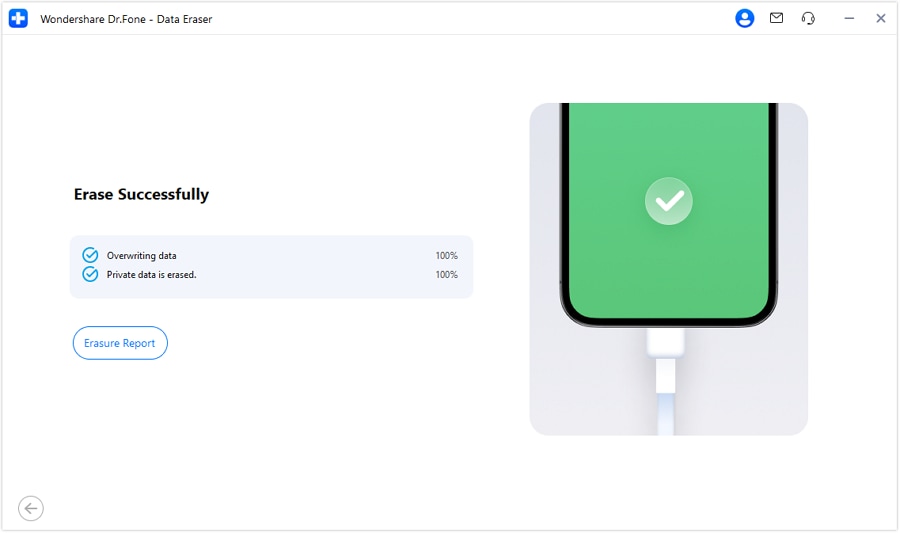
Now, erase your device is started and you can see the progress on the window. Kindly be patient for a few minutes as it will be completed soon.
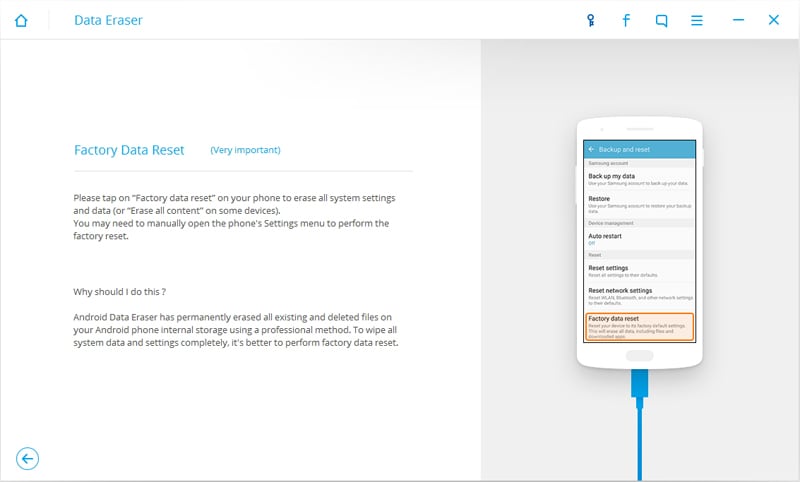
Step 5 Finally, Don't Forget to 'Factory Reset' to Erase Your Settings
After the erasing process is done, you will be confirmed with a message. Also, the toolkit will ask to perform a factory data reset. This is important to delete all the settings from the device.
On completion of the factory data reset, your device is completely wiped and you will get the below notification from the toolkit.
After the wiping has been completed, it is very important to restart the android device. The restart process is required to wipe the settings data as well in order to ensure that the device is completely clean.
So, in this article, we discussed the best possible ways to delete history on Android. The steps are simple enough for anyone to understand and use. If you don’t know how to clear history on Android then this is a must-read for you. And as said earlier, the Android Data Eraser from Wondershare is the most user-friendly toolkit and can be used by even those who have no idea about how to delete history on Android. Hope this helps you in deleting your browsing history from time to time.


Android Erase
- Android Diagnostics
- 1. Fix Android Microphone Issues
- 2. Test NFC on Android Device
- 3. Check Android Device in Minutes
- 4. Apps For Sensor Check Android
- 5. Apps for Testing Device's Hardware
- 6. Tools for Conducting Screen Tests
- 7. Ways to Check Phone's Vibrations
- 8. Check Mobile Signal Strength
- 9.Realme Touch Screen Test Codes
- 10.Android Codes To Test Touch Screen
- 11.Phone Processor Speed Tests
- Erase Android
- 1. Delete Browsing History on Android
- 2. Clear App Data and Cache on Android
- 3. Delete Photos from Android
- 4. Wipe Android When It's Lost
- 5. Wipe Cache Partition on Android
- 6. Delete Text Messages on Android
- 7. Delete WhatsApp Backup
- 8. Wipe Data or Factory Reset
- 9. Erase Android Data Before Selling
- 10. Delete Contacts on Android
- 11.Delete Multiple Contacts on Android
- 12.Wipe Android Phone before Selling
- 13.Delete Photos on Android
- 14.Remove Pre-installed Apps
- 15.Delete Apps on Android
- 16. Access Trash on Android
- Android Reset
- 1. Restart Phone without Power Button
- 2. Reset Phone without Volume Buttons
- 3. Factory Reset Android Phone
- 4. Hard Reset Android Phone Using PC
- 5. Hard Reset Locked Infinix Phone
- 6. Factory Reset Lenovo Phone
- 7. Factory Reset Android Tablets
- 8. Factory Reset Lenovo Tablets
- 9. Format Your Android Phone
- 10. Hard Reset Android Phones
- 11.Reset Android Without Home Button
- 12.Restart Your Android Phone
- 13.Soft Reset Android Devices
- 14.Reset Android without Losing Data
- 15.Ways to Hard Reset Tecno Spark
- 16.Updated Android Factory Reset Code
- Data Erase Apps
- 1. Speed Booster for Android
- 2. Android Cleaners to Boost Device
- 3. Data Erase Apps to Protect Privacy
- 4. Data Eraser Apps to Wipe Android
- 5. 15 Best Cleaning Apps for Android
- Sell Old Android
Alice MJ
staff Editor