Where is the Trash Folder on Android? 4 Ways to Find & Recover Files

Jun 11, 2026 • Filed to: Data Wipe Solutions • Proven solutions
 TL;DR:
Android lacks a system-wide trash folder due to device storage constraints, requiring users to retrieve deleted media from app-specific bins like Google Photos or use dedicated tools for deeper file recovery.
● Newer Android models temporarily hold deleted photos and videos within the Trash section of the native Gallery or Google Photos apps, though exact navigation steps depend on the device manufacturer.
● If files are missing from app bins, the Dr.Fone App provides quick on-device recovery, while the Dr.Fone - Data Recovery (Android) PC software is strictly necessary for large data sets, bricked devices, and unrooted phones running Android 8.0 or later, provided USB debugging is enabled.
● To ensure deleted data is permanently unrecoverable, Dr.Fone - Data Eraser requires connecting the phone to a computer, manually typing a deletion command, and executing a final Factory Data Reset to wipe all settings.
Ask AI for a summary
 ChatGPT
 Perplexity
 Gemini
 Claude
 Grok
Grok
Hi, is there any Android trash folder on my Samsung S8? I accidentally deleted a folder on my device that has important snapshots and documents, but I cannot locate any Samsung trash folder on my device. Is there any possibility to get the deleted files back? Any clue?
We understand how frustrating it can be to lose your important files. That’s why we’ve created this guide to help you recover your lost data and get everything back in place. In this article, we’ll walk you through simple steps to restore your files and explain whether a trash folder on Android phone exists and how you can access it.
Part 1: Is there a Deleted Items Folder on Android?
Unlike computers running Windows or Mac, Android devices do not have a trash folder on Android phone systems. It can be surprising and inconvenient to realize there’s no built-in option to restore deleted files. Since we often delete items by mistake, many users wonder why Android lacks a dedicated trash folder for easy recovery.
The main reason behind the absence of a trash folder on Android phone is limited storage capacity. Unlike computers with vast space, most Android devices offer around 16 GB to 256 GB, which isn’t sufficient to maintain a full trash system. If such a folder existed, it could quickly fill with unnecessary files, leading to reduced performance or even crashes.
Part 2: How to Find Trash on Android Phone with PC?
Although older Android devices lack a trash folder on Android phone, newer models now include this feature in the Google Photos and Gallery apps. Deleted photos or videos are temporarily moved to the recycle bin, allowing you to restore them when needed. Here’s how you can access the trash on your Android device.
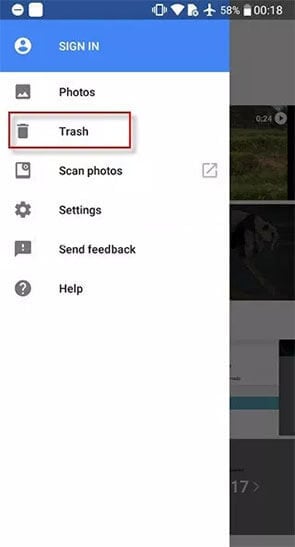
Via Google Photos App
- Grab your Android device and launch the “Photos” app.
- Hit on the “Menu” icon on the top left and opt for the “Trash” bin.
Via Stock Gallery App
- Launch the Android’s stock “Gallery” app and push the “Menu” icon on the top left corner and opt for the “Trash” bin from the side menu panel.
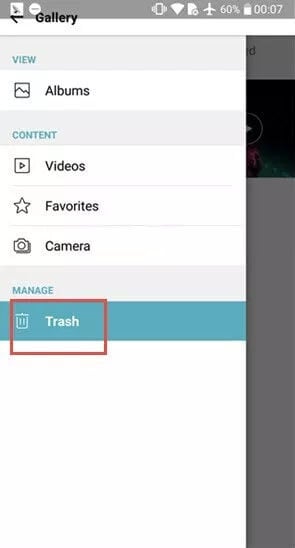
Note: In case, you’re not able to locate the Android trash folder with the above steps. You may have to try to find it yourself in the Gallery App, as the steps may differ depending upon the Android manufacturer and interface. We accessed trash on Android-based LG mobile devices.
Part 3: How to Recover Files in Android Trash?
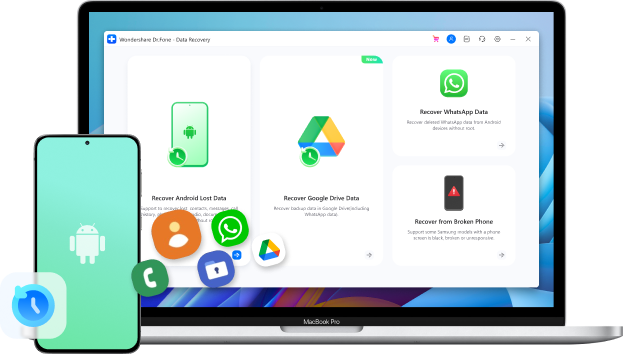
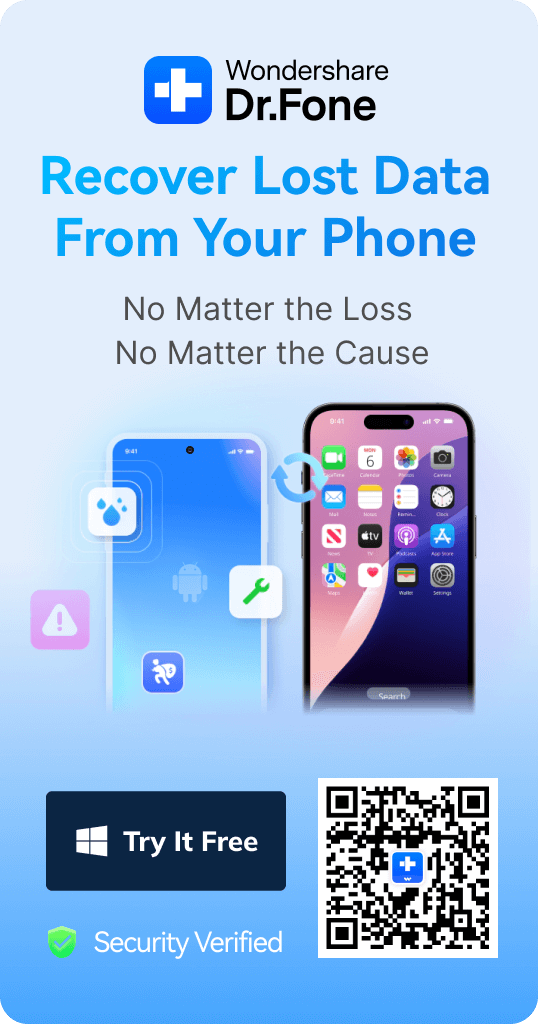
It’s clear that a trash folder on Android phone does not exist by default, making file recovery a challenge after accidental deletion or sudden data loss. To help you retrieve valuable information, we’ll introduce two effective solutions — the Dr. Fone App-Data Recovery (Android) and Dr.Fone - Data Recovery (Android) software. Both tools are designed to detect, scan, and recover deleted files from your device, offering reliable options to restore lost photos, contacts, messages, and more.
Method 1. Dr.Fone App for Android
The Dr.Fone App for Android provides a convenient and reliable way to recover deleted files directly from your smartphone—no computer required. It functions as a practical alternative to a trash folder on Android phone, allowing users to restore photos, videos, contacts, and other data with ease. Here’s how you can use the Dr.Fone app to recover your lost files.Dr.Fone App - Android Data Recovery
Get Back Your Valuable Data from Android Devices with Ease.
- Supports multiple data types: contacts, photos, videos, audios, and files.
- Compatible with over 6000+ Android brands.
- Recovery history available for review.
- High efficiency and success rate.


Steps to Recover Files Using the Dr.Fone App:
- Step 1. Download the Dr.Fone App from the Google Play Store.
- Step 2. Open the app and select the Recovery option from the menu.
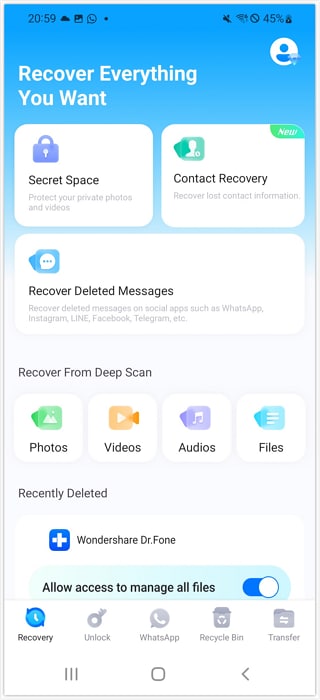
- Step 3. Run a scan to locate deleted files on your device's internal storage and SD card.
- Step 4. The app will present a list of recoverable files. Select the ones you want to restore and tap Recover.
Why Use the Mobile App?
The Dr.Fone App is designed for quick and efficient data recovery, making it an excellent choice when a computer isn’t available. Whether you need to recover deleted photos, restore WhatsApp messages, or retrieve other files, this tool acts as a practical substitute for a trash folder on Android phone. It combines convenience with strong performance, helping you regain access to your important data with minimal effort.
Download the Dr.Fone App to begin rescuing your files now.
Method 2. Dr.Fone - Data Recovery (Android) (Using Computer)
For advanced and comprehensive data recovery, the Dr.Fone - Data Recovery (Android) desktop software offers a powerful solution. It’s especially effective for restoring large data sets or retrieving files from damaged or bricked devices. As a reliable alternative to a trash folder on Android phone, this tool can recover photos, videos, contacts, call logs, and messages with high accuracy and no quality loss. Known as the first dedicated Android data recovery software, Dr.Fone is widely trusted by users worldwide for its proven success rate and efficiency.
Dr.Fone - Data Recovery (Android)
World's 1st data retrieval software for broken Android devices.
- It can also be used to recover data from broken devices or devices that are damaged in any other way such as those stuck in a reboot loop.
- Highest retrieval rate in the industry.
- Recover photos, videos, contacts, messages, call logs, and more.
- Compatible with Samsung, HTC, Motorola, LG, Sony, Google and more devices.
- Supports recovering View Once messages from WhatsApp.
Step-by-step tutorial: how to recover files from the trash of Android devices
Step 1. Establish a Connection b/w Android and PC
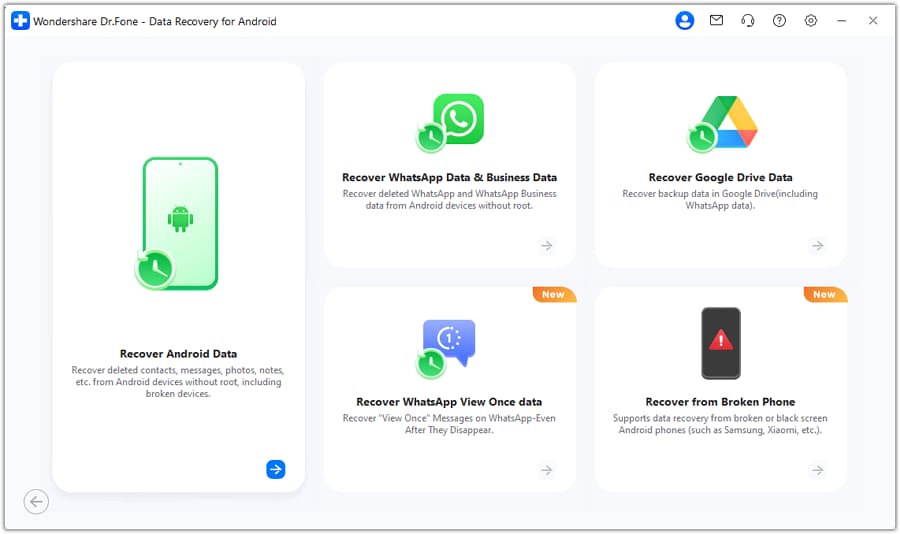
Install the software, after you’ve downloaded the Dr.Fone toolkit on your computer. Launch it and then select “Data Recovery” from the main interface of the software. Meanwhile, you can establish a firm connection between your Android device and your computer using an authentic USB cable.Note: Ensure that the “USB debugging” has been enabled already on your Android device before plugging it into the computer. Enable it, if not already.

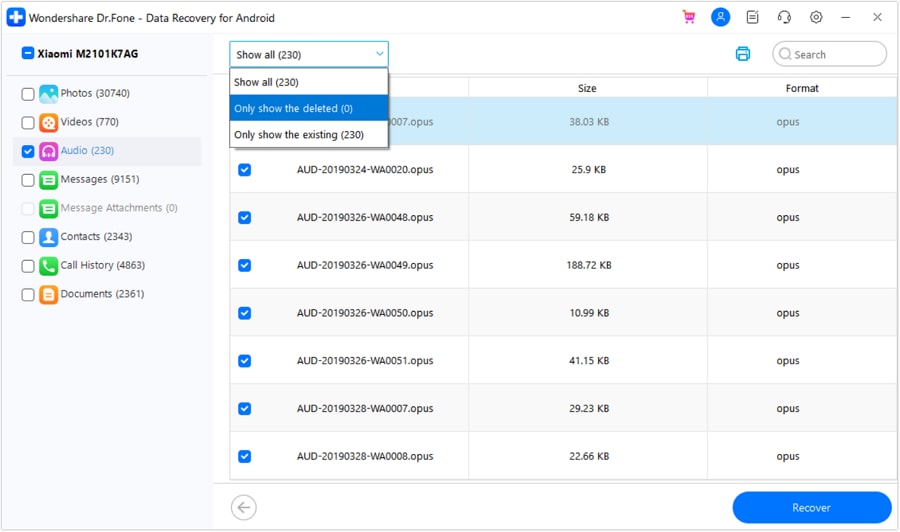
Step 2. Opt for Desired File Types
Once your device is detected by the software, Dr.Fone - Data Recovery (Android) will bring up a checklist of data types to perform recovery.
Note: By default, all the data types are checked. But if you wish to perform recovery of any specific data, you can just opt-in for that particular file type and uncheck all others.
Step 3. Opt for the Scan Types
Click the drop-down button next to “Show all”, you can choose the “Only show the deleted”, the “Only show the existing” or “Show all” option depending upon your needs. If you only want to recover deleted data, you can just select “Only show the deleted”.
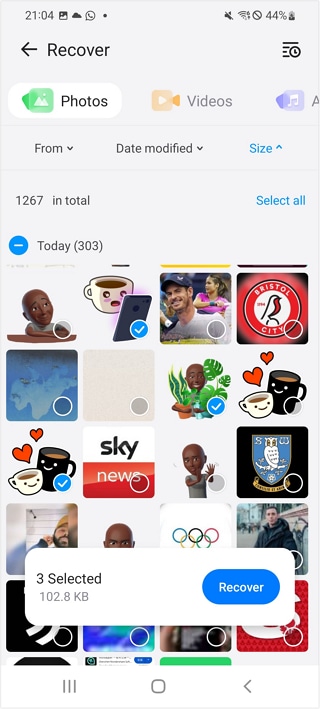
Step 4. Preview and Recover Deleted Android Data
You will be able to preview the recoverable data. Select the files that you require and then push the “Recover” button to initiate the recovery of the selected items.
Pros: The tool supports recovering deleted data without rooting your device running Android 8.0 or later.
Why Choose the Desktop Version?
The desktop version is best suited for complex recovery cases, such as restoring data from bricked Android devices or retrieving large amounts of lost files. Serving as a powerful alternative to a trash folder on Android phone, it offers greater speed, capacity, and precision than mobile recovery apps, especially when handling sizable or critical data.
Do you want to give it a try to recover files in Android trash?
Part 4: How to Permanently Erase Android Trash?
Requirement: Just rewrite this content, make it SEO better, make the new content concise but SEO better Keywords (choose one or two from the list to put into the content): trash folder on Android phone Format requirement: Just put bold font on the keywords, not the whole content Vocabulary requirement: DO NOT USE TOO MUCH ADVERBS LIKE seamlessly, effortlessly, smoothly, etc. which frequently used by AI tools. Prefer to use words more like to official but commonly applied in public context.
Now, if you wish to erase some data permanently from your Android device and make it irrecoverable, you can always look up to Dr.Fone - Data Eraser to serve the purpose. It actively erases all your data permanently and that, too, in just a matter of a couple of clicks. Here’s how to do it.
Step-by-step tutorial: how to radically wipe out Android trash
Step 1. Launch Dr.Fone - Data Eraser
Launch the Dr.Fone toolkit on your computer and then opt for the “Data Erase” option from the main screen of the software. Then, plug your Android device into the computer via a genuine data cable. Ensure to keep “USB debugging” enabled in the first place.
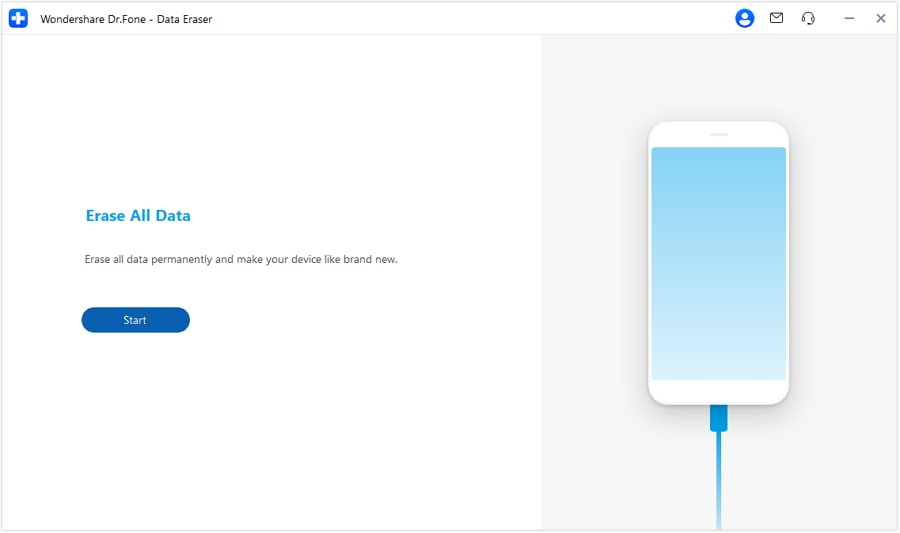
Step 2. Initiate Erasing Data
As soon as your device gets detected, you need to hit on the “Erase All Data” button to initiate the process of erasing all your data over the connected Android device.

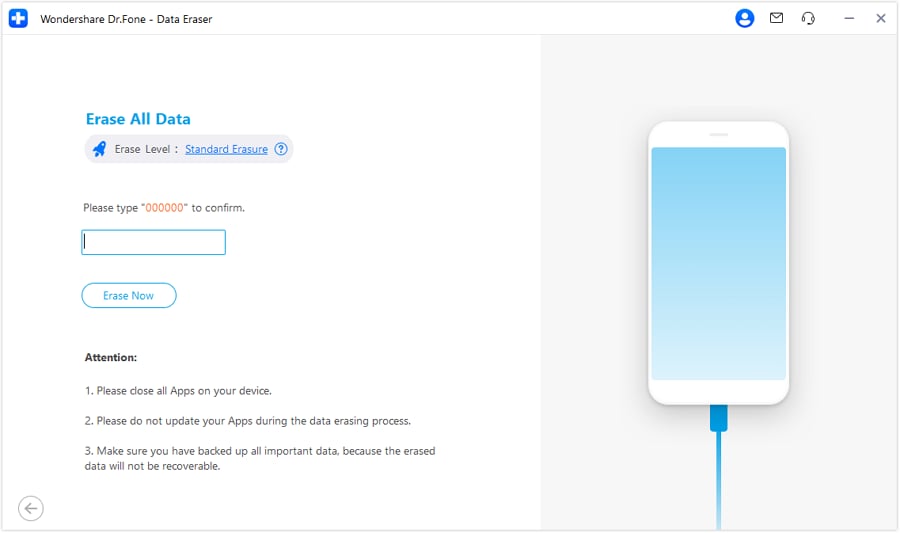
Step 3. Give Your Consent
The data once erased with Dr.Fone - Data Eraser will no longer be recoverable, you need to give in your consent to operate by punching in the “delete” command in the text box available.
Note: Ensure to back up all your required data before proceeding further.
Step 4. Factory Reset Your Android
Once the personal data over your Android device is erased permanently, you will be asked to “Factory Data Reset” to wipe away all the settings as well. Once done, you'll now see a prompt over the screen reading as “Erase Successfully”. That's it, now your device is just like a brand new one.
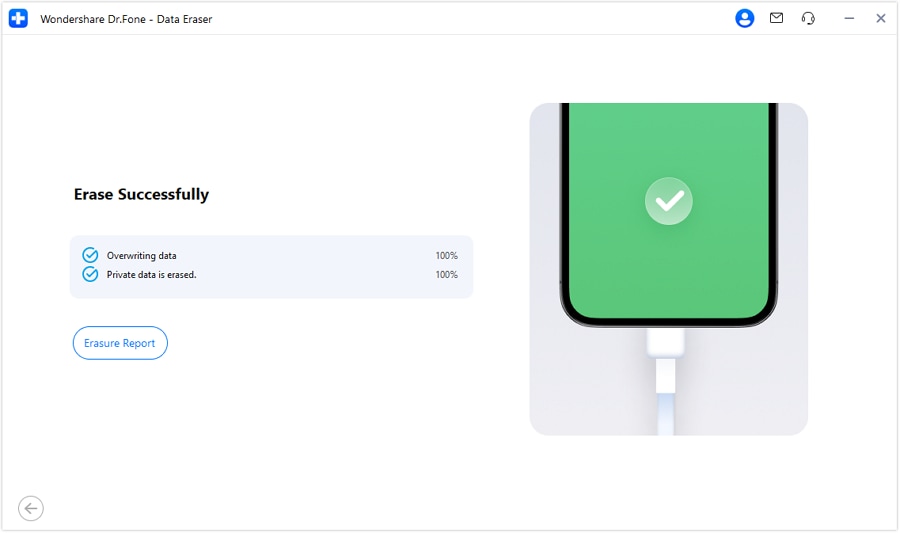
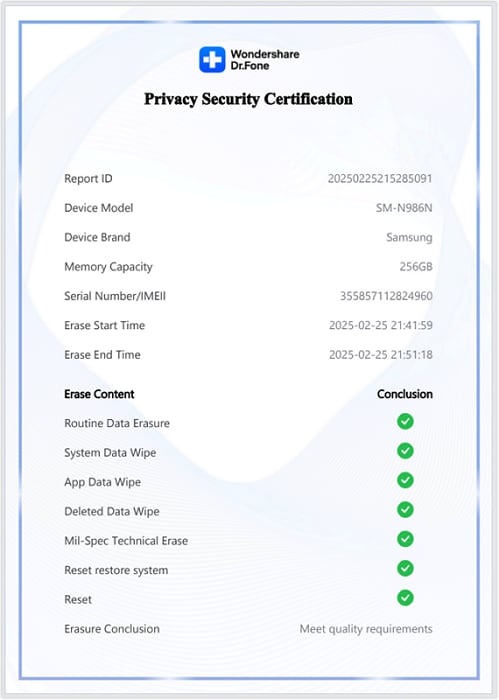
Upon opening the report, you will find all pertinent details regarding the device and the successful erasure of its data.
Conclusion
That covers everything about the trash folder on Android phone and the ways to recover deleted files. You now understand why Android lacks a built-in trash system and how to manage data recovery effectively. With tools like Dr.Fone - Data Recovery (Android), you can restore lost data quickly and reliably, ensuring your important files remain within reach.
Recover erased data from Android phones with just a few clicks


Android Erase
- Android Diagnostics
- 1. Fix Android Microphone Issues
- 2. Test NFC on Android Device
- 3. Check Android Device in Minutes
- 4. Apps For Sensor Check Android
- 5. Apps for Testing Device's Hardware
- 6. Tools for Conducting Screen Tests
- 7. Ways to Check Phone's Vibrations
- 8. Check Mobile Signal Strength
- 9.Realme Touch Screen Test Codes
- 10.Android Codes To Test Touch Screen
- 11.Phone Processor Speed Tests
- Erase Android
- 1. Delete Browsing History on Android
- 2. Clear App Data and Cache on Android
- 3. Delete Photos from Android
- 4. Wipe Android When It's Lost
- 5. Wipe Cache Partition on Android
- 6. Delete Text Messages on Android
- 7. Delete WhatsApp Backup
- 8. Wipe Data or Factory Reset
- 9. Erase Android Data Before Selling
- 10. Delete Contacts on Android
- 11.Delete Multiple Contacts on Android
- 12.Wipe Android Phone before Selling
- 13.Delete Photos on Android
- 14.Remove Pre-installed Apps
- 15.Delete Apps on Android
- 16. Access Trash on Android
- Android Reset
- 1. Restart Phone without Power Button
- 2. Reset Phone without Volume Buttons
- 3. Factory Reset Android Phone
- 4. Hard Reset Android Phone Using PC
- 5. Hard Reset Locked Infinix Phone
- 6. Factory Reset Lenovo Phone
- 7. Factory Reset Android Tablets
- 8. Factory Reset Lenovo Tablets
- 9. Format Your Android Phone
- 10. Hard Reset Android Phones
- 11.Reset Android Without Home Button
- 12.Restart Your Android Phone
- 13.Soft Reset Android Devices
- 14.Reset Android without Losing Data
- 15.Ways to Hard Reset Tecno Spark
- 16.Updated Android Factory Reset Code
- Data Erase Apps
- 1. Speed Booster for Android
- 2. Android Cleaners to Boost Device
- 3. Data Erase Apps to Protect Privacy
- 4. Data Eraser Apps to Wipe Android
- 5. 15 Best Cleaning Apps for Android
- Sell Old Android
- ● Manage/transfer/recover data
- ● Unlock screen/activate/FRP lock
- ● Fix most iOS and Android issues
- Free Download Free Download Free Download

James Davis
staff Editor