Overview of How to Erase Android Phone Data Safely Before Selling

Jul 12, 2024 • Filed to: Data Wipe Solutions • Proven solutions
When you are about to sell your Android device, you always look to confirm a few things before putting it on sale or trading it with another user. The need to erase your data from the Android device is a must-do, which can be done manually or through certain automatic means.
This article is about working on the methods that can be applied to the Android device to erase its content before you put the used Android phones for sale. Whenever you are going to put your device in the sale, make sure to follow these methods properly.
Part 1: Things You Should Do Before Factory Resetting Your Android Phone
There are some pointers that you must take that you should practice before factory resetting your Android device. These things will help you properly set up your Android device before your factory reset and delete everything.
1. Backup your Device
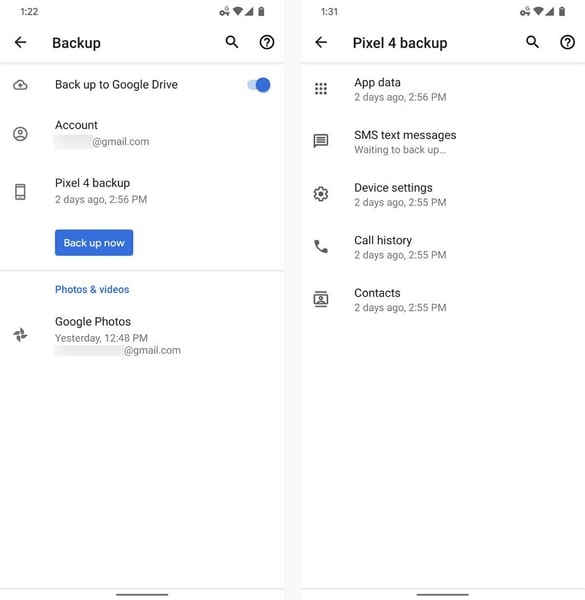
Starting with the first and foremost responsibility, you need to keep a backup of all the data on your Android. The data present in Android can be backed up in many ways. While you can back up the data in your SD Card, you can also save everything from your device to your Google Account that is connected to the device for operations.
From contacts to messages, photos, and videos, everything can be backed up quickly with the help of the appropriate method. Figure out the best technique you can apply for backing up the data from your Android.
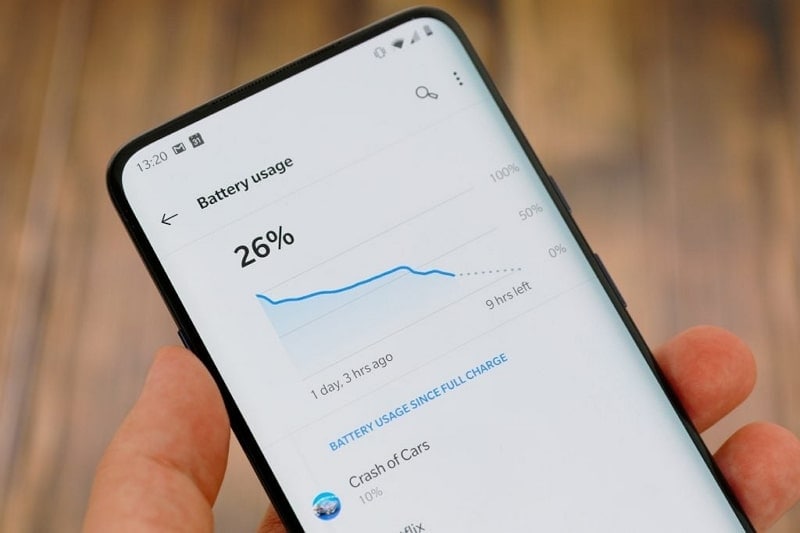
2. Keep Battery Up to the Mark
For factory resetting an Android device, you must ensure that the device's battery levels are above 70% in the indicator. Any percentage under it would not be accepted by the device for formatting, or it might face some technical issue that can damage the device. Thus, if you have an old Android phone for sale that you are factory resetting, connect it with a charger and charge it above the levels of 70% battery.
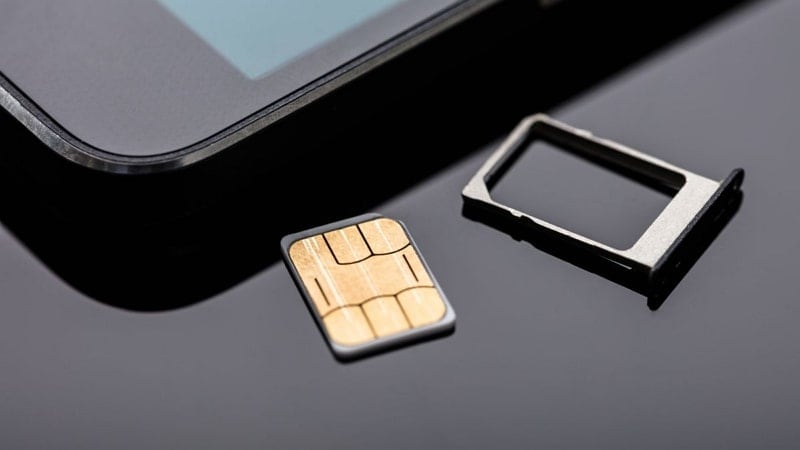
3. Remove SD Card from Android
While using your Android device, you might have inserted different peripherals and add-ons to help make your phone management better. SD Cards is another add-on that is particularly used to increase your device's storage space. Whenever you factory reset your Android device, you should always remove the SD Card from the device as it might damage the content.
Factory resetting devices is a complete and coherent procedure, which may put implications on other things that are attached to the Android device if not removed properly.
4. Disable All Security Locks from the Device
Although you are factory resetting your Android device to sell it out, you can also consider repairing some system issues causing multiple problems to the device. When performing such a task, you should disable all the security locks so that none of the locks cause issues to your Android device after factory resetting the device. It is best to visit the settings of your Android device and remove all the security locks present in it.
5. Copy Data to External Storage
Apart from keeping backups, you can also copy all the content of your Android device to some external device that you have specially bought for this purpose. This can also be referred to as a technique of keeping backups, but it is much more of a conventional technique of holding data.
Using a USB drive, external hard drive, or any appropriate storage device for this purpose will help you copy all the files and folders from your Android to the storage via connectivity through the computer or direct.

6. Make Screenshots of Important Passwords and Application Lists
Whatever the list of applications you have on your Android, you can keep a list of all these apps with the help of screenshots. Keep track of all the essential applications installed on your Android.
This will eliminate the process of thinking over all the applications when you buy a new Android. Thus, if you are putting your used Android phones for sale, make sure to keep track of the passwords and applications list by taking appropriate screenshots.
Part 2: How to Factory Reset Your Android Phone Before You Sell It
We will now see how you can factory reset your old Android phone for sale before you put a price tag on it. This will help you understand the generic approach of factory resetting the Android device:
1. What is a Factory Reset?
The term factory reset is used for electronic devices that hold essential data to be removed with the respective process. Whenever you come to factory reset your smartphone, all the data contained in the device is to be removed. It comprises all the data added by the user, along with the settings they customize while using the device. After a factory reset, the device is almost as good as a new smartphone, with no data left.
2. How to Perform Factory Reset on Android Smartphones?
We will now see how you can factory reset your used Android phones for sale. The details will cover Android devices of different companies that will help you distinguish between their methods that are used to factory reset the data:
For Samsung
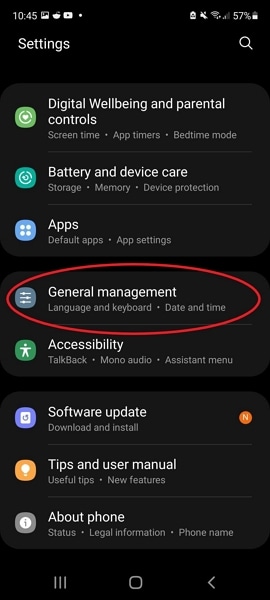
Step 1: Open the "Settings" of your Samsung smartphone and lead on the "General Management" option in the list.
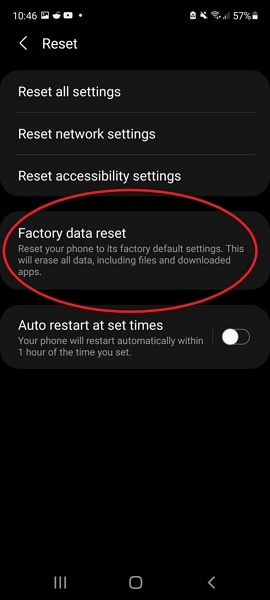
Step 2: Look for the "Reset" option on the next screen and select "Factory data reset" before you review the information that will be removed.
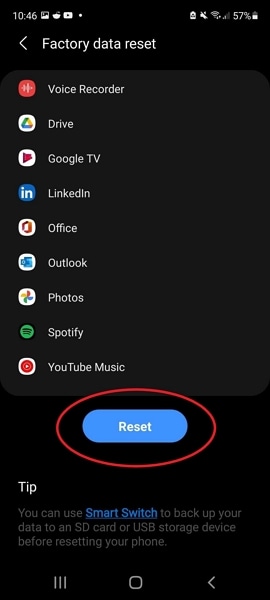
Step 3: Once ready, you must swipe to the option of "Reset" and tap on it. Provide the security lock with the help of your Google Account if connected, and proceed to confirm the process by using the button "Delete All."
For Google Pixel
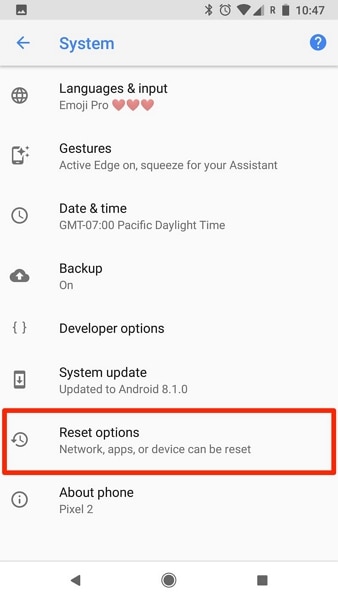
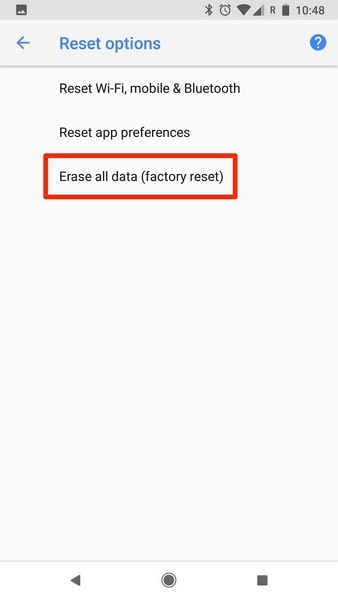
Step 1: You must access the "Settings" of your Google Pixel and proceed to the "System" option provided. On the next screen, find the "Reset options" to proceed towards factory resetting your Google Pixel device.
Step 2: Look for the "Erase all data (factory reset)" option and continue to enter a PIN if required. Once done, tap on the "Erase all data" button to initiate the reset.
For Huawei
Step 1: You need to open the "Settings" app of your Huawei smartphone and find the "System" option.

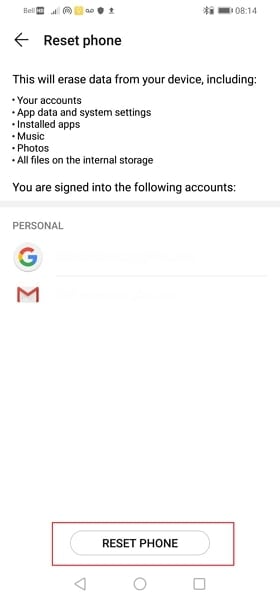
Step 2: Following this, look for the "Reset" button on the next screen and access the "Reset phone" option next to this selection.

Step 3: Confirm the process by tapping on the "Reset phone" option and work through the provided instructions to reset the phone to factory settings.
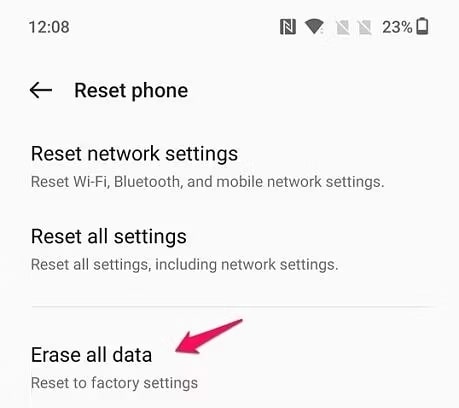
For OnePlus
Step 1: Start by opening the "Settings" of your OnePlus smartphone and lead next to find the "System settings" option by scrolling down the options.
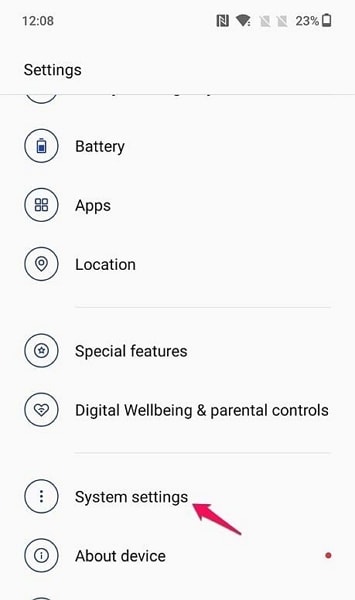
Step 2: As you proceed to the following menu, look for the "Back up and reset" option and open the menu. After this, select "Reset phone" to reset the device.
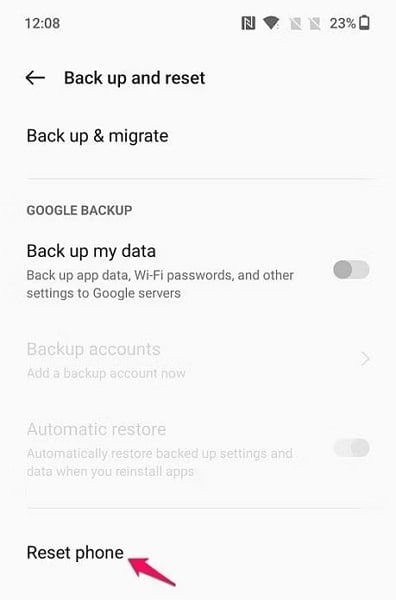
Step 3: On the next page, select the "Erase all data" option and confirm the prompt by selecting "Erase data" to conclude factory resetting the device.
Part 3: Does Resetting an Android Phone Delete Everything?
If you are putting an old Android phone for sale and resetting it to remove all phone data, it does not actually delete everything from it. There is always a way to recover the data, as after resetting it, the indexes of the files remain, which must be overwritten. So, if someone has a special recovery tool, they can definitely recover the data from the Android device.
Part 4: How to Really Wipe Your Android Data?
If you really want to wipe out the data from your Android device, you will have to find a better way. Luckily, we have an option for you in the form of Dr.Fone - Data Eraser (Android). While it is known for removing data, it provides some great features which make its functionality great. It removes all the Android data and does not leave behind anything.
Key Features Provided in Dr.Fone - Data Eraser (Android)
You will find some essential features in Dr.Fone - Data Eraser (Android) that make it a unique tool for erasing data from devices. Let's observe these features and dissect more details based on these facts:
- It erases all photos, contacts, messages, call logs, and private data, including almost everything present in the device.
- The process is exceptionally secure, as it utilizes Military Grade Algorithms to erase all the data from the Android device.
- Its one-click solution makes it a perfect option for erasing the data of a device.
Some Differences To Mark From General Factory Reset
There are potential differences between the efficient Dr.Fone - Data Eraser (Android) and the factory reset feature. The table below gives you a better idea of both methods and helps you decide on the best one:
| Dr.Fone - Data Eraser (Android) | Factory Reset |
| A one-click solution with no complications. | Completely based on devices and requires you to propagate to a lot of settings. |
| Deletes the data from the Android device completely, leaving behind nothing. | If the indexes of the deleted files are not overwritten, they can be recovered even after resetting. |
| Quick, efficient, and result-oriented process. | The process takes a while to complete. |
Steps to Easily Erase All Data From your Android Before Selling It
We will now look into how you can delete all your Android data with the help of Dr.Fone - Data Eraser (Android).
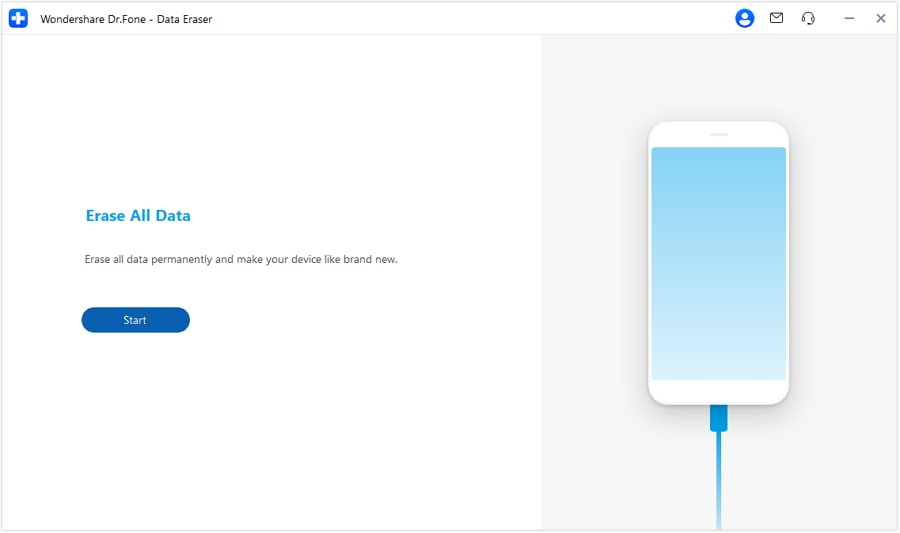
Step 1: Open Dr.Fone and Look for Data Eraser
You need to have Dr.Fone installed on your computer. Launch the tool and find "Data Eraser" from the list of options.

Step 2: Start Erasing Data
Connect your Android device with a wired connection and let the device detect the device. As it is detected, click on "Start" to initiate. Type the confirmation code shown on the screen to begin the process successfully.
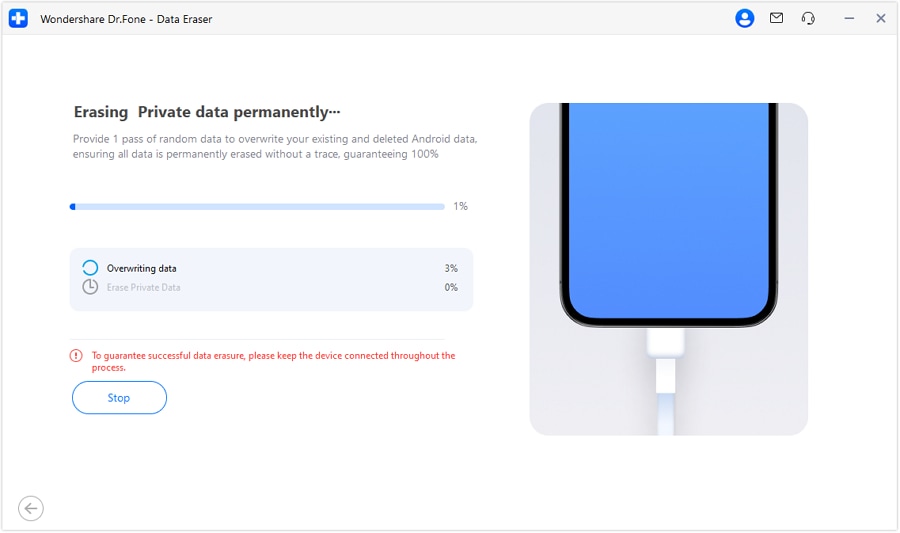
Step 3: Let the Process Complete
Dr.Fone - Data Eraser (Android) will take a few minutes to conclude the complete process and erase all data from your Android.
Conclusion
With all the relevant details, it is clear that you should consider factory resetting your Android before you sell it out. As you know the techniques for different Android devices, you can put your used Android phones for sale without any issue. For better results, try using Dr.Fone - Data Eraser (Android) for effective results. You will easily remove all the data from your device without prior knowledge.


Android Erase
- Android Diagnostics
- 1. Fix Android Microphone Issues
- 2. Test NFC on Android Device
- 3. Check Android Device in Minutes
- 4. Apps For Sensor Check Android
- 5. Apps for Testing Device's Hardware
- 6. Tools for Conducting Screen Tests
- 7. Ways to Check Phone's Vibrations
- 8. Check Mobile Signal Strength
- 9.Realme Touch Screen Test Codes
- 10.Android Codes To Test Touch Screen
- 11.Phone Processor Speed Tests
- Erase Android
- 1. Delete Browsing History on Android
- 2. Clear App Data and Cache on Android
- 3. Delete Photos from Android
- 4. Wipe Android When It's Lost
- 5. Wipe Cache Partition on Android
- 6. Delete Text Messages on Android
- 7. Delete WhatsApp Backup
- 8. Wipe Data or Factory Reset
- 9. Erase Android Data Before Selling
- 10. Delete Contacts on Android
- 11.Delete Multiple Contacts on Android
- 12.Wipe Android Phone before Selling
- 13.Delete Photos on Android
- 14.Remove Pre-installed Apps
- 15.Delete Apps on Android
- 16. Access Trash on Android
- Android Reset
- 1. Restart Phone without Power Button
- 2. Reset Phone without Volume Buttons
- 3. Factory Reset Android Phone
- 4. Hard Reset Android Phone Using PC
- 5. Hard Reset Locked Infinix Phone
- 6. Factory Reset Lenovo Phone
- 7. Factory Reset Android Tablets
- 8. Factory Reset Lenovo Tablets
- 9. Format Your Android Phone
- 10. Hard Reset Android Phones
- 11.Reset Android Without Home Button
- 12.Restart Your Android Phone
- 13.Soft Reset Android Devices
- 14.Reset Android without Losing Data
- 15.Ways to Hard Reset Tecno Spark
- 16.Updated Android Factory Reset Code
- Data Erase Apps
- 1. Speed Booster for Android
- 2. Android Cleaners to Boost Device
- 3. Data Erase Apps to Protect Privacy
- 4. Data Eraser Apps to Wipe Android
- 5. 15 Best Cleaning Apps for Android
- Sell Old Android
Daisy Raines
staff Editor