
How to Reset Android without Losing Data
Android Erase
- Android Diagnostics
- 1. Fix Android Microphone Issues
- 2. Test NFC on Android Device
- 3. Check Android Device in Minutes
- 4. Apps For Sensor Check Android
- 5. Apps for Testing Device's Hardware
- 6. Tools for Conducting Screen Tests
- 7. Ways to Check Phone's Vibrations
- 8. Check Mobile Signal Strength
- 9.Realme Touch Screen Test Codes
- 10.Android Codes To Test Touch Screen
- 11.Phone Processor Speed Tests
- Erase Android
- 1. Delete Browsing History on Android
- 2. Clear App Data and Cache on Android
- 3. Delete Photos from Android
- 4. Wipe Android When It's Lost
- 5. Wipe Cache Partition on Android
- 6. Delete Text Messages on Android
- 7. Delete WhatsApp Backup
- 8. Wipe Data or Factory Reset
- 9. Erase Android Data Before Selling
- 10. Delete Contacts on Android
- 11.Delete Multiple Contacts on Android
- 12.Wipe Android Phone before Selling
- 13.Delete Photos on Android
- 14.Remove Pre-installed Apps
- 15.Delete Apps on Android
- 16. Access Trash on Android
- Android Reset
- 1. Restart Phone without Power Button
- 2. Reset Phone without Volume Buttons
- 3. Factory Reset Android Phone
- 4. Hard Reset Android Phone Using PC
- 5. Hard Reset Locked Infinix Phone
- 6. Factory Reset Lenovo Phone
- 7. Factory Reset Android Tablets
- 8. Factory Reset Lenovo Tablets
- 9. Format Your Android Phone
- 10. Hard Reset Android Phones
- 11.Reset Android Without Home Button
- 12.Restart Your Android Phone
- 13.Soft Reset Android Devices
- 14.Reset Android without Losing Data
- 15.Ways to Hard Reset Tecno Spark
- 16.Updated Android Factory Reset Code
- Data Erase Apps
- 1. Speed Booster for Android
- 2. Android Cleaners to Boost Device
- 3. Data Erase Apps to Protect Privacy
- 4. Data Eraser Apps to Wipe Android
- 5. 15 Best Cleaning Apps for Android
- Sell Old Android
- ● Manage/transfer/recover data
- ● Unlock screen/activate/FRP lock
- ● Fix most iOS and Android issues
- Free Download Free Download Free Download

Jun 30, 2026 • Filed to: Phone Repair Solutions • Proven solutions
 TL;DR:
To securely restore a slow or crashing Android phone to its factory state without permanent data loss, you must create a comprehensive backup using a cloud service or desktop software like Dr.Fone Basic before initiating the wipe.
● You can execute the factory reset through the device Settings menu, via hardware buttons in Recovery Mode, or remotely through Android Device Manager if the device is connected to the internet.
● For devices running Android 5.1 or newer, Factory Reset Protection requires you to input your connected Google account password to authorize the wipe and regain access to the operating system.
● Performing a remote wipe will permanently erase the Android Device Manager application from the local storage, immediately and irreversibly removing your ability to track the hardware.
Ask AI for a summary
 ChatGPT
 Perplexity
 Gemini
 Claude
 Grok
Grok
Dr.Fone Basic:
Better Control for Your Phone
Manage, transfer, back up, restore, and mirror your device
Is your Android phone running slow, crashing, or experiencing poor battery life? A factory reset can often restore it to like-new condition. However, this process erases all your personal data. The key to resetting an Android phone without losing data is to perform a complete backup before you begin. This guide will walk you through backing up your device, performing the reset, and then restoring your important files.
Answer: To reset your Android phone without losing data, you must first create a complete backup of your contacts, photos, apps, and other files. After your data is securely saved, you can proceed with the factory reset. Once the reset is complete, you can restore your data from the backup.
- Step 1: Back Up Your Data: Use a reliable tool like Dr.Fone Basic or a cloud service to save all your important information.
- Step 2: Perform the Factory Reset: Go to Settings > System > Reset options > Erase all data (factory reset).
- Step 3: Restore Your Data: After the reset, sign in to your accounts and use your backup file to retrieve your data.
Key Takeaways:
- A factory reset restores your phone to its original settings, deleting all personal data.
- Always back up your data before a reset using tools like Dr.Fone Basic or cloud services.
- You can reset your phone via the Settings menu, Recovery Mode, or remotely with Android Device Manager.
- After the reset, you can easily retrieve your data from your backup.
Part 1: What is Factory Reset?
There are two types of reset for every Android device, soft and hard resets. A soft reset is just a way to force the Android operating system to shut down in the event of a freeze and you only risk losing any data which wasn't saved prior to the reset.
A hard reset, also known as a factory reset and a master reset, returns the device to the condition it was in when it left the factory. Performing a factory reset will permanently delete any and all personal data you have on your device. This includes any personal settings, apps, pictures, documents, and music stored on your device. A factory reset is irreversible, which means before considering taking this step, it is a good idea to back your data and settings up. A factory reset is a great way to purge buggy updates and other malfunctioning software and can give your phone a new lease of life.
Signs You Need to Reset Phone.
You'll probably already know if your phone needs a reset, but if you're unsure, look for some of the following signs. If you recognize any of the following symptoms then a factory reset is probably a good idea.
- If your phone is running slowly and you've already tried deleting Apps and data, but it hasn't resolved anything.
- If your Apps are crashing or you keep getting 'force close' notifications from your operating system.
- If your Apps are taking longer to load than usual, or your browser is running slow.
- If you find your battery life is worse than usual and you need to charge your phone more often.
- If you are selling, exchanging, or just giving your phone away. If you don’t reset it, the new user can gain access to cached passwords, personal details, and even your pictures and videos.
Remember factory resetting will erase everything on your device, so it's essential that you back up anything you can't afford to lose.
Part 2: Back Up Your Data Before Factory Reset
There are a number of Android data backup software for PC out there. Having a Google account will help you save your contacts and settings, but it won't save your pictures, documents, or music. There are numerous cloud-based systems available like Dropbox and Onedrive where your data is saved onto a cloud-based server, but you'll need a data connection or wi-fi to restore to your device and of course, you are trusting a third party with your data. We recommend Dr.Fone Basic. It's easy to use and will save everything and best of all you know exactly where it is.
Dr.Fone - Phone Backup (Android) enables you to backup all your data, including contacts, messages, call history, calendar, video and audio files, etc. You can choose to individually back up data or everything directly to your computer and then restore it whenever you like.
Back up and restore data from your device to a computer with a single click. It's a tried and tested program and compatible with over 8000+ devices. To use it, click the link, download it and follow these instructions.
Dr.Fone Basic
Backup & Restore Data Turns Flexible
- One-click to back up the whole iOS and Android device to your computer.
- Export what you want from the backup to your computer.
- Your device's data remains intact during the restore process.
- Fully compatible with the latest iOS and Android version.


How to Back Up Android Phone Data with Dr.Fone Basic
- Launch Dr.Fone and Connect Your Phone: Open Dr.Fone on your computer and connect your Android device with a USB cable. From the main toolbox, navigate to My Backup and click the Back Up Now button. You may be prompted to set the Dr.Fone Link app as your default SMS app to ensure messages are backed up.
- Monitor the Backup Process: Dr.Fone will automatically detect the data on your device and begin the backup process. You can monitor the progress on the screen. Do not disconnect your phone during this time.
- Complete and View the Backup: Once the backup is complete, you will receive a confirmation. You can click Open in Folder to see the backup file directly on your PC or select View Backups to see the history of all backups made with Dr.Fone.


Also, you can watch this video to learn more details.
Part 3: How to Factory Reset Android Phone.
After your data is safely tucked away, it's time to tackle the reset itself. There are a few different ways to reset your device and we'll look at them all in turn.
Method 1. Using the Settings Menu To Factory Reset Your Device.
You can factory data reset your Android device via the settings menu by following these steps.
You can factory data reset your Android device via the settings menu by following these steps.
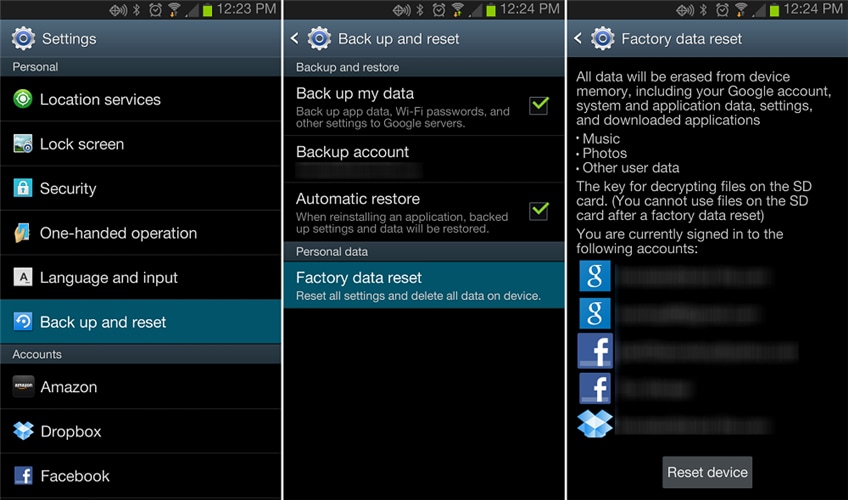
- Open your phone's Settings app. You can usually find this by dragging down the notification shade and tapping the cog icon.
- Scroll down and tap on System, then Reset options. (Note: On some devices like Samsung, this may be under 'General Management' > 'Reset').
- Select Erase all data (factory reset). The system will show you a summary of the data that will be erased.
- Tap Erase all data and enter your PIN or password if prompted. Confirm the action to begin the reset process. An Android robot will appear on your screen as the device resets.
Method 2. Resetting Your Phone in Recovery Mode.
If your phone is misbehaving it might be easier to reset it via Recovery Mode. To do this you must turn your device off first.
Step 1. Press and hold the Volume up button and the Power button at the same time. The phone will now boot in Recovery Mode.
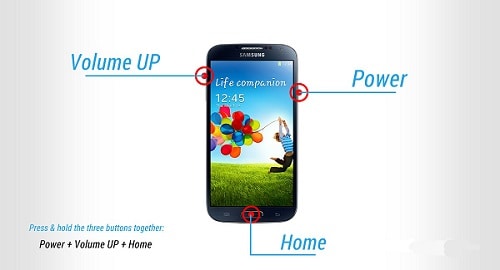
Step 2. Use the Volume down button to choose Recovery Mode. To navigate use the Volume up button to move the arrow and the Volume down button to select.
Step 3. If done correctly. You'll find an image of an Android robot alongside a red exclamation mark and the words 'No command'.
Step 4. Hold down the Power button and press the Volume up button then release it.
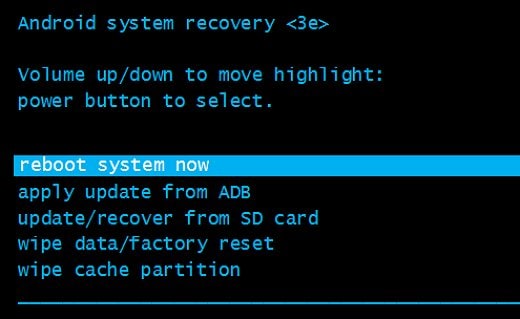
Step 5. Using the volume buttons scroll to 'wipe data/factory reset' and then press the Power button.
Step 6. Scroll to 'Yes - erase all user data' and to complete the process press the Power button.
Please note: Devices running Android 5.1 or above, will still require you to enter your Google Password to complete this reset.
Method 3. Resetting Your Phone Remotely With Android Device Manager
You can also perform a factory reset by using the Android Device manager App. Obviously, you'll need to have Android Device Manager installed on your phone for which you'll need a Google Account.
Step 1. Sign in to the App and locate your device on whatever medium you are currently using. With Android Device Manager it is possible to Factory Reset a device remotely by using a PC or other device, but your phone must be logged into your Google account and have an active internet connection.
Step 2. Select erase all data. This is particularly effective if you have lost or had your phone stolen and your device is running Android 5.1 or higher as whoever has your phone will still need your Google Password to be able to reset the Phone.
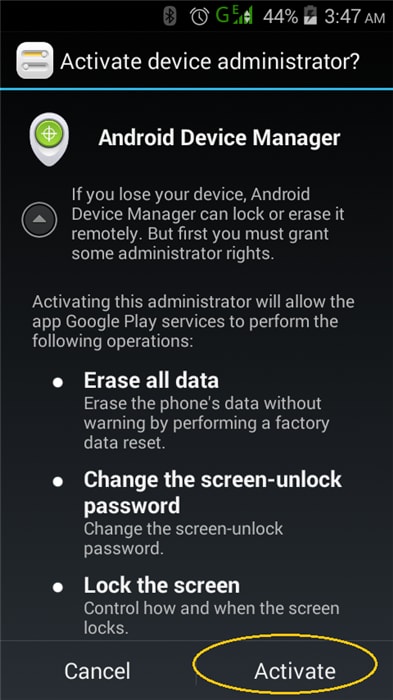
Please note: this reset will also delete Android Device Manager and you will therefore be unable to locate or track your device.
Once you have successfully reset your Android device to its factory settings, all you need to do is restore your original data. After you've completed this step your device should be just like new.
Part 4: Restoring Your Phone After a Reset.
It can be quick and scary seeing your phone return to its original state. But don't panic. Your data is still safely tucked away on your computer. To restore your contacts and Apps just connect your device to the Internet and login into your Google account when prompted.
Once you have restarted your mobile, connect it to your PC and open Dr.Fone on your computer. Select Phone Backup, and click on the Restore button to start restoring the data to your phone.
Dr.Fone will display all the backup files. Select the backup file you would like to restore and click View.
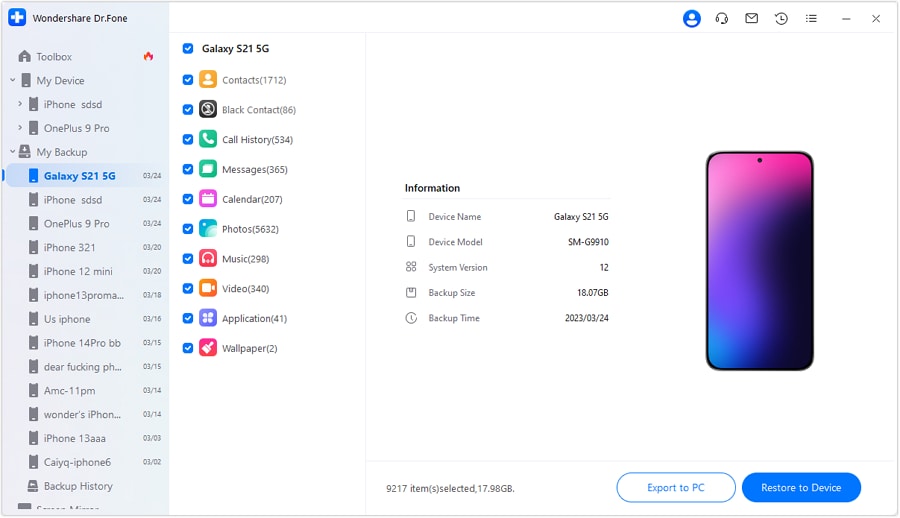
Then you will be able to select what files you want to restore. You can click Restore to Device to restore them all to your phone or just select individual data to restore.
Once you've successfully completed your first reset, you'll realize how simple the whole process is and the next time you need to perform one, you'll be able to do it with your eyes closed.
Bonus Tip: Are You Preparing to Exchange Your Phone?
After factory resetting your Android Phone, your phone should work smoothly. But what should we do if your phone is still not working as before? The App still crashes or your phone is still running slow, which may be caused by an old operating system or the phone is too old. It is time to change to a new phone. In this case, you may want to switch the data from the old phone to the new phone. How do achieve that? Dr.Fone - Phone Transfer is here. It is a dedicated tool to transfer everything from one old device to the new one! You can transfer data without any hassle because of user-friendly instructions.
Dr.Fone - Phone Transfer
Transfer Everything from Old Devices to New Devices in 1 Click!
- Works directly and transfer data between two cross-operating system devices in real-time.
- Works perfectly with Apple, Samsung, HTC, LG, Sony, Google, HUAWEI, Motorola, ZTE, Nokia, and more smartphones and tablets.
- Fully compatible with major providers like AT&T, Verizon, Sprint, and T-Mobile.
- Fully compatible with the latest iOS and Android.
Conclusion
Resetting your Android device can resolve performance issues and prepare it for resale or gifting. However, a factory reset erases all personal data, making it essential to back up your data before proceeding.
Tools like Dr.Fone Basic are recommended for this purpose. You can perform a factory reset using the settings menu, recovery mode, or Android Device Manager. Remember, a factory reset is irreversible, so take every precaution necessary to safeguard your important data.
Thank you for reading and if we've been of some help please take the time to bookmark our page.
Frequently Asked Questions
Will a factory reset remove my Google account?
Yes, a factory reset will remove all accounts from your device, including your Google account. However, if your phone runs Android 5.1 or newer, Factory Reset Protection (FRP) will require you to enter the last known Google account credentials after the reset to prove ownership.
How long does a factory reset take on Android?
The process usually takes only a few minutes, typically between 2 to 10 minutes, depending on your device model and how much data is being erased.
Can I retrieve data after a factory reset without a backup?
Retrieving data after a factory reset without a backup is extremely difficult and often impossible for the average user. The reset process overwrites the data, making it unrecoverable by standard means. This is why creating a backup beforehand is critical.
Dr.Fone Basic:
Better Control for Your Phone
Manage, transfer, back up, restore, and mirror your device


James Davis
staff Editor