Bypass iCloud Activation Lock and Android FRP without password.

 100% Security Verified | No Subscription Required | No Malware

 :
: 
 ChatGPT
 Perplexity
 Gemini
 Claude
 Grok
Grok
Finding yourself stuck on the Google verification screen after a factory reset is a common frustration. This security measure, known as Factory Reset Protection (FRP), is designed to safeguard your data but can easily lock you out of your own device. If you've forgotten your Google account details or purchased a second-hand phone, your Redmi Note 9 can become completely inaccessible.
Fortunately, since most Redmi Note 9 models are equipped with MediaTek processors, specialized methods can safely remove the FRP lock. This guide provides a definitive walkthrough for a complete Redmi Note 9 FRP bypass, covering the Note 9 Pro and 9S variants. You won't need to flash custom ROMs or unlock the bootloader—just a computer and the right tool. For more resources, you can also explore our extensive library of FRP bypass files and APKs.
In this article
Part 1. Understanding the Google FRP Lock on Your Redmi Note 9
Factory Reset Protection (FRP) is a built-in security feature on all modern Android devices, including the Redmi Note 9 series. After a factory reset is performed through an untrusted method (like recovery mode), FRP activates. It requires you to enter the credentials of the last Google account synced to the device, effectively preventing unauthorized access. This security layer affects the Redmi Note 9 FRP, Redmi Note 9S FRP, and Redmi Note 9 Pro FRP models.
1-1. What Triggers the FRP Lock?
FRP is automatically enabled when a Google account is added to your device. It is specifically designed to trigger after a factory data reset is initiated from any environment other than the official Settings menu. This means if you reset your phone because you forgot the passcode, you'll be met with the Google verification screen during setup.
1-2. Common Scenarios Requiring an FRP Bypass
Bypassing the FRP lock becomes necessary to regain control of your device. Here are the most common situations where you'll need a solution:
- Forgotten Credentials: The most frequent reason is simply forgetting the Google ID or password associated with the device.
- Purchased a Used Device: If you buy a second-hand phone and the previous owner did not remove their Google account, you will be locked out after a reset.
- Improper Reset: Performing a hard reset via recovery mode to solve a software issue without first removing the Google account will trigger the lock.
In these instances, a Redmi Note 9 FRP bypass is your only path forward to making the phone usable again.
Part 2. The Easiest One-Click Method for Redmi Note 9 Pro FRP Bypass
While many online tutorials claim to solve FRP issues, most involve complex, time-consuming steps that often fail on newer MIUI versions. For the FRP Redmi Note 9 Pro and its sibling models, you need a solution that is both effective and straightforward.
The most reliable tool for this job is Dr.Fone - Screen Unlock (Android). It provides a simple, one-click process to remove the Google FRP lock, along with any other type of screen lock, without needing a password. It's designed to be user-friendly, requiring no technical expertise.
 Unlock Android phone in seconds.
- Remove PIN, pattern, password, fingerprint.
- Bypass Google FRP lock on Xiaomi, Redmi, Samsung, etc.
- Works on all major Android brands & models.
- No tech skills required – user-friendly.
This powerful tool supports Android versions 6 through 15, ensuring compatibility with both new and older devices. Here's how to bypass the Google lock on your Redmi Note 9 series phone.
Steps to Bypass Google Lock on Redmi Note 9 Series
-
Step 1 Install Dr.Fone and Select Screen Unlock
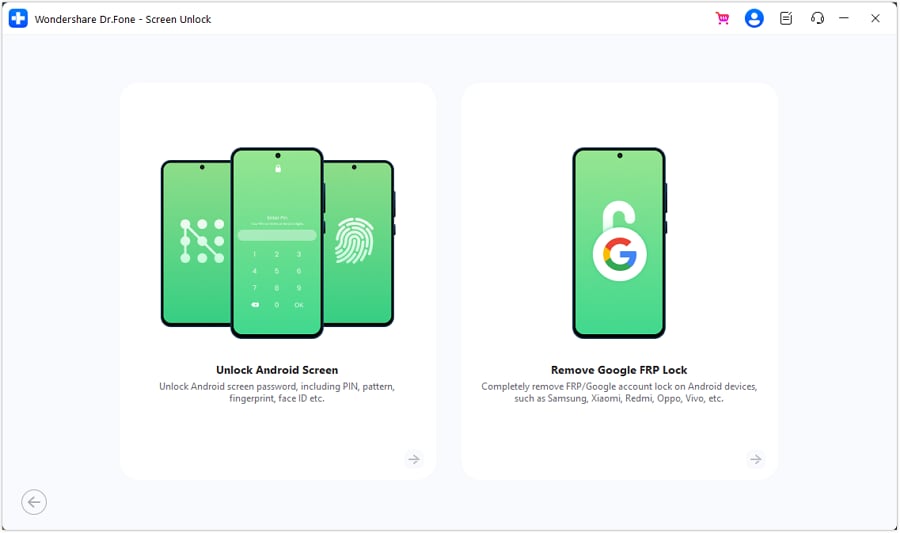
Download and install Wondershare Dr.Fone on your computer. Launch the program, navigate to the Toolbox, and click on "Screen Unlock." On the next screen, choose "Android" to proceed.
-
Step 2 Choose Your Device Brand and Method
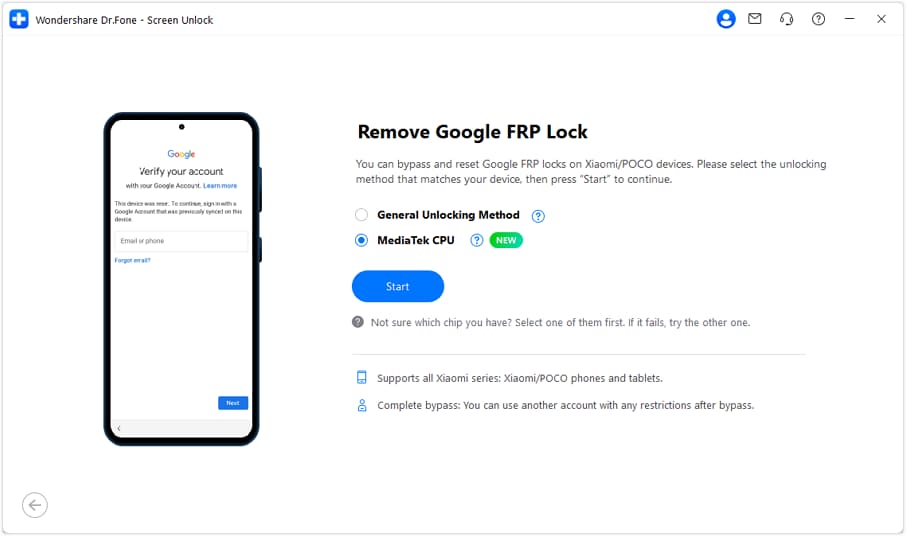
Select "Remove Google FRP Lock." From the list of brands, choose Xiaomi/Redmi. Since the Redmi Note 9 series uses MTK processors, select the MTK option. The tool will then prepare the appropriate unlocking process.
-
Step 3 Connect Your Phone in the Correct Mode
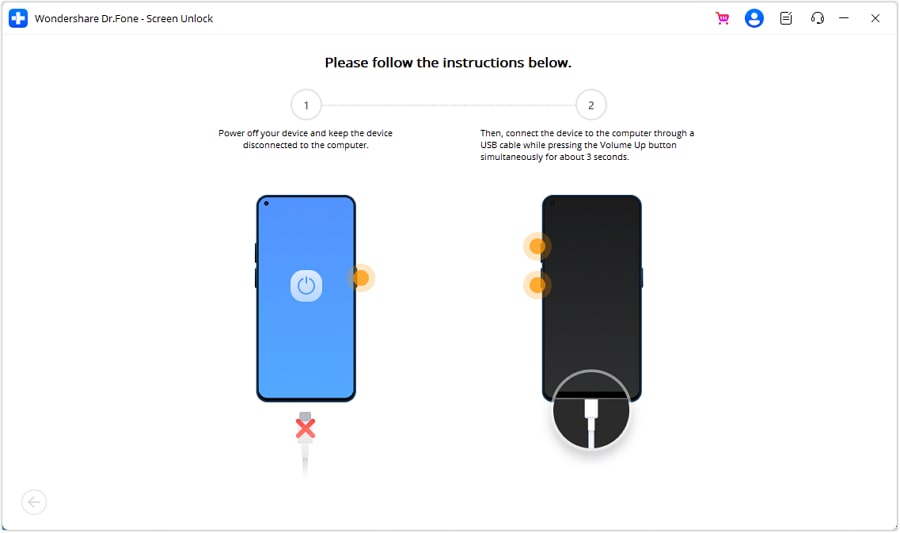
The software will prompt you to connect your device. First, power off your Redmi phone completely. Then, press and hold the Volume Up and Volume Down buttons simultaneously while connecting the phone to your computer with a USB cable.
-
Step 4 Begin the Automated Unlocking Process
Once your phone is correctly connected, Dr.Fone will automatically detect it and begin the FRP removal process. This stage is fully automated and typically completes within a few minutes.
-
Step 5 Complete the Bypass and Restart
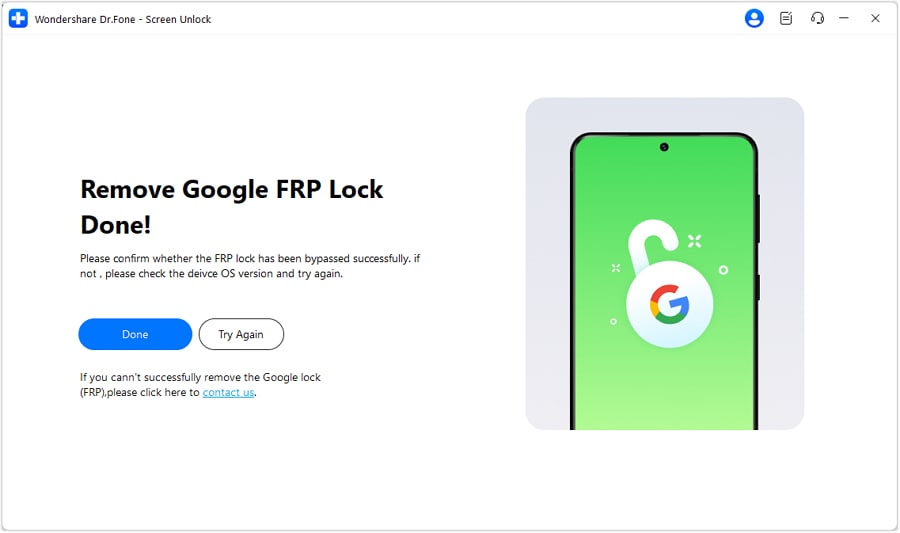
A success message will appear on the screen once the lock has been removed. You can now click "Done" and disconnect your phone. The device will restart, and you can proceed with the setup process without being asked for the old Google account.




Part 3. Two Manual Methods to Bypass FRP on Redmi Note 9 and 9S
If you prefer to try a manual solution first, this section covers two alternative methods. These techniques can be effective but are often more complex and may have a lower success rate, especially on devices with updated security patches. Let's explore how they work.
Method 1: Using a FRP bypass Website to Set a New Screen Lock
This approach involves using a web browser to access a specific website that allows you to set a new screen lock, which can then be used to bypass the Google verification screen. This method works for some Redmi models.
-
Step 1 Access a Web Browser
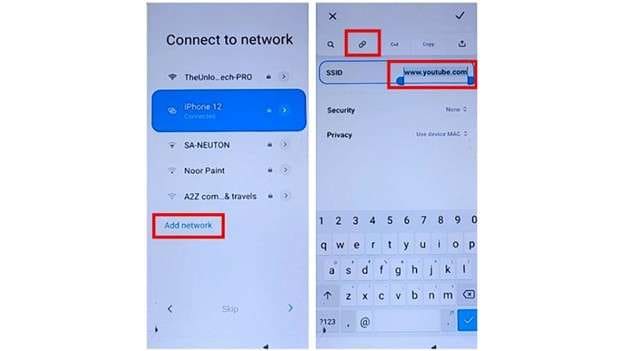
Begin the device setup until you reach the Wi-Fi connection screen. Connect to a network, then tap on "Add network."
-
Step 2 Open YouTube via the SSID Field
In the SSID text box, type www.youtube.com. Long-press the text you just typed and tap the link icon that appears. This will open the link in a browser.
-
Step 3 Navigate to the Bypass Website
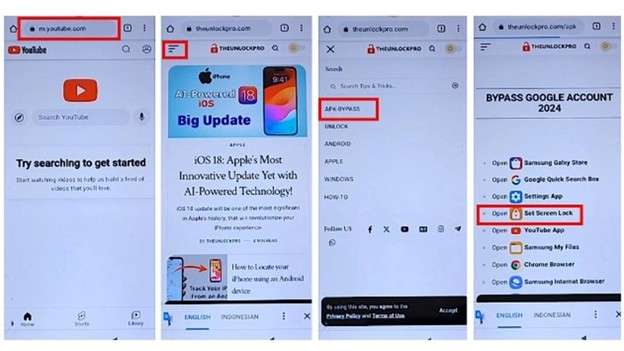
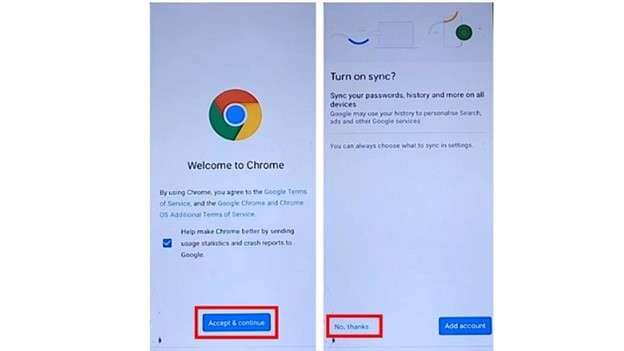
Accept the terms to continue into the Chrome browser. In the address bar at the top, type "theunlockerpro" and navigate to the website.
-
Step 4 Set a New Screen Lock
On the website, locate and tap the menu icon (three bars), then select "Apk bypass." On the next page, tap the "Set Screen Lock" option.
-
Step 5 Unlock Your Device
Choose "Pattern" as your new lock type. Draw and confirm a new pattern. Once set, restart your phone. During the setup process, you will now be able to use the new pattern to bypass the Google account verification.
Method 2: Using the Settings Trick to Unlock Your Device
This method exploits a loophole within the device's settings and accessibility features to get past the FRP screen. It requires a specific sequence of actions to disable Google Play services temporarily.
-
Step 1 Access App Info via Share Menu
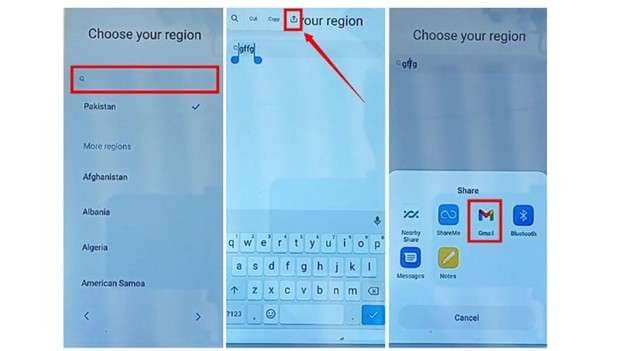
On the "Choose your region" screen during setup, type any text into the search box. Long-press the text and tap "Share." In the share menu, press and hold the Gmail icon to open its App Info screen.
-
Step 2 Navigate to Help & Feedback
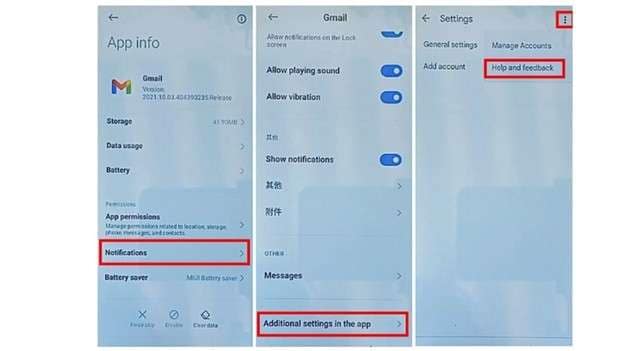
Go to "Notifications," scroll down, and tap "Additional settings in the app." Tap the three-dot menu in the top-right corner and select "Help and feedback."
-
Step 3 Open Application Settings
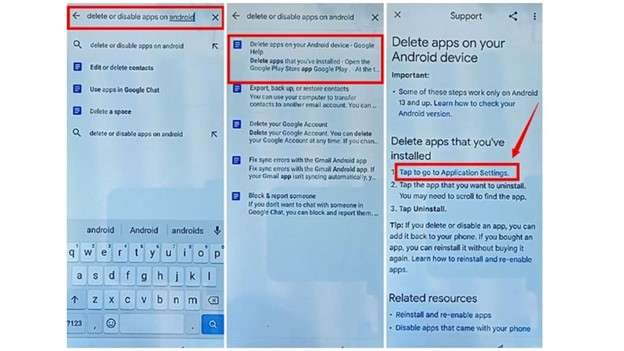
In the search bar, type "delete or disable apps on Android" and choose the first result. On the next page, tap the blue link that says "Tap to go to Application Settings."
-
Step 4 Disable Key System Apps
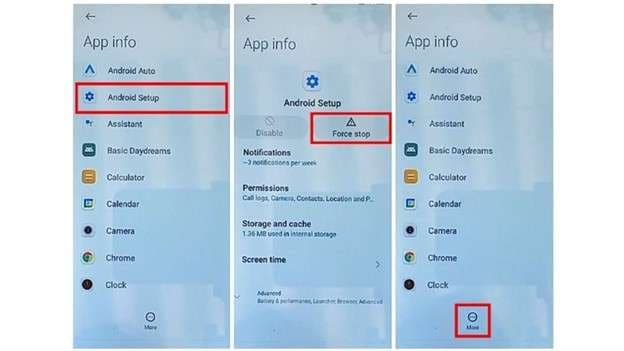
From the App Info list, find and select "Android Setup" and tap "Force Stop." Go back, tap "More," and select "Show system." Now find "Google Play services" and "Force Stop" it as well.
-
Step 5 Enable the Accessibility Menu
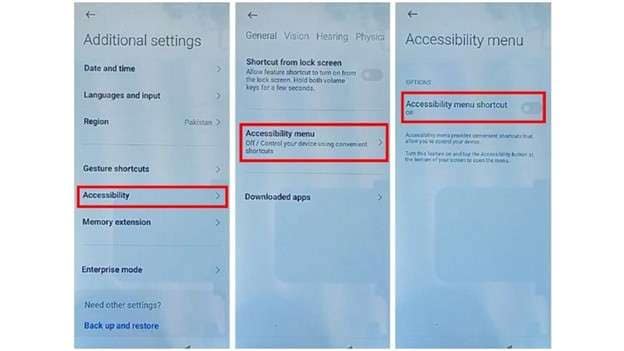
Return to the settings menu and navigate to "Additional settings" > "Accessibility." Open the "Accessibility menu" and turn on the shortcut. This will add a small person icon to your navigation bar.
-
Step 6 Re-enable Google Play Services During Setup
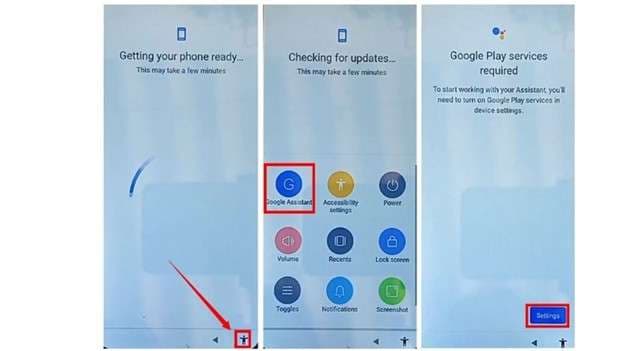
Go back to the very first setup screen and proceed normally. When the setup hangs on the "Checking for updates" screen, tap the accessibility icon, then "Google Assistant," then "Settings." Repeat this quickly until the App Info for Google Play services appears. Tap "Enable."
-
Step 7 Complete the Setup
Go back one step. The setup should now proceed. Skip the password and account setup steps, and continue following the on-screen instructions to reach your home screen.
Part 4. Pro-Tip: How to Prevent FRP Lock on Your Redmi Note 9
The best way to deal with an FRP lock is to prevent it from ever happening. Before you perform a factory reset, sell your device, or give it away, you must manually remove the associated Google account. This simple action deactivates FRP.
Here’s the safe and correct procedure:
-
Step 1 Open Your Device Settings
From your home screen, tap the "Settings" app icon to open it.
-
Step 2 Navigate to Accounts
Scroll down and select "Accounts & sync." On the next screen, tap on "Google" to see the accounts linked to your device.
-
Step 3 Select the Account to Remove
Tap on the Google account you wish to unlink from the phone. Then, tap "More" or the three-dot icon at the bottom.
-
Step 4 Confirm the Removal
Tap "Remove account" and confirm your choice on the pop-up window. The account is now unlinked, and FRP is disabled.
After completing these steps, you can safely perform a factory reset without worrying about the Google verification lock.
Conclusion
This guide has provided effective methods to resolve the Redmi Note 9 FRP bypass challenge. While manual tricks involving device settings or bypass websites can work, their success often depends on your device's specific model and software version, and they can be complicated for non-technical users.
For a guaranteed, hassle-free solution, Dr.Fone - Screen Unlock stands out. It simplifies the entire process into a few clicks, boasts a high success rate across all Redmi Note 9 variants, and works flawlessly even with the latest MIUI updates. By choosing the right tool, you can regain full access to your locked phone quickly and securely.
FAQ
-
1. Why is my Redmi Note 9 asking for a Google account after a reset?
Your phone has activated Factory Reset Protection (FRP). This security feature is triggered when a reset is performed without first removing the primary Google account from the settings, locking the device to prevent unauthorized use. -
2. What should I do to secure my device after an FRP bypass?
After successfully completing the FRP Redmi Note 9 bypass, you should immediately go to the Settings menu. Add your own Google account and set a new, strong screen lock (PIN, pattern, or password). This will re-enable FRP and protect your data. -
3. Is there a reliable alternative if I can't remember my Google account?
Absolutely. If you've forgotten your credentials, Dr.Fone - Screen Unlock (Android) is the most reliable option. It allows you to remove the FRP lock from your Redmi Note 9 in just a few minutes without needing any account details or technical expertise. -
4. Will bypassing the FRP lock on my Redmi Note 9 erase my data?
The FRP lock itself is triggered after a factory reset, which means your personal data (photos, contacts, apps) has already been erased. The bypass process only unlocks the device's setup screen and does not affect data, as it's already gone.
 Add Wondershare Dr.Fone as a preferred source on Google