How To Use A Trusted Redmi Note 8 FRP Unlock Tool Safely

Jun 30, 2026 • Filed to: Screen Lock Removal • Proven solutions
 TL;DR:
To safely bypass the FRP screen on a Redmi Note 8, Note 8 Pro, or Redmi 8, using a dedicated unlock tool like Dr.Fone is the most reliable approach for MediaTek chips because it entirely removes the lock without requiring root access or device flashing.
● Using ADB commands provides a permanent removal of the Google lock but strictly requires USB debugging to have been enabled on the device before the factory reset occurred.
● PC-free methods utilizing the Accessibility Menu or the "Share Me" app with a secondary Android phone provide limited access to the device, but the FRP lock will reactivate if the phone receives a MIUI update or is reset again.
● To completely prevent Factory Reset Protection from triggering in the future, you must manually delete the synced Google account via the Accounts & Sync settings before initiating a hard reset.
Ask AI for a summary
 ChatGPT
 Perplexity
 Gemini
 Claude
 Grok
Grok
Factory Reset Protection (FRP) is built into Android phones to stop unauthorized access. But once triggered, it locks the phone behind the last synced Google account. This becomes a serious issue after a reset, especially for users who bought used phones or forgot their account credentials. The Redmi Note 8 FRP bypass process is often confusing. Many tools don’t work, and outdated tricks get patched fast. MIUI updates make the situation harder. Getting stuck at the verification screen blocks everything. No calls. No data. No settings. For users seeking additional options, our download frp tools page offers various working solutions for different device models.
This guide shares a reliable method to unlock the FRP screen on Redmi Note 8, Note 8 Pro, and Redmi 8. Safe, simple, and based on working 2026 solutions. No risk. No guessing.
- Part 1. What Is FRP and Why Does Your Redmi Phone Get Locked
- Part 2. How To Perform Redmi Note 8 FRP Bypass Safely Using Dr.Fone

- Part 3. Bypass FRP on Redmi Note 8 via Google Assistant and Accessibility Settings
- Part 4. Remove FRP on Redmi Note 8 Using ADB Commands
- Part 5. Complete FRP Bypass on Redmi Note 8 Without Using a PC
- Part 6. How to Prevent FRP Lock from Activating Again on Redmi Note 8
Part 1. What Is FRP and Why Does Your Redmi Phone Get Locked
FRP stands for Factory Reset Protection. This is a Google protective measure that kicks in whenever a device has been hard reset without unlinking the Google account linked to the device. It guarantees that solely the original owner has access to the device post-reset. That sounds good for protection, but it becomes a problem when:
- You forgot the synced Google account
- You buy a second-hand Redmi Note 8 or Redmi 8 and don’t have the account details
- Your device has been reset by someone else without your knowledge
1.1 Signs That Your Redmi Note 8 Is FRP Locked
You’ll know FRP is active if:
- After a factory reset, you see a screen asking for the previously used Google account.
- You can’t skip or move past the screen
- You enter an account, but it says, “This device was reset. Continue with a previously synced account.”
If this happens, your phone is in FRP mode.
1.2 Things To Do Before Attempting Redmi Note 8 FRP Bypass
Before you try any Redmi Note 8 FRP unlock tool, take these steps:
- Completely charge your device (up to 70% is fine).
- Check your internet connection.
- Have a USB cable and a Windows PC ready
- Backup any data if you still have partial access
This helps avoid failures or repeating the steps later.
Part 2. How To Perform Redmi Note 8 FRP Bypass Safely Using Dr.Fone
Dr.Fone - Screen Unlock (Android) is a trusted FRP Redmi Note 8 unlock tool for Android lock issues, including FRP, password, PIN, pattern, and fingerprint locks. It’s built to work with thousands of Android devices, including Xiaomi, Redmi, and Poco models using MediaTek chips. When your Redmi Note 8 or Redmi 8 is locked after a reset, Dr.Fone helps you remove the Google verification screen quickly and safely.
Here’s how it helps:
- Supports a wide range of Android versions and models, including the latest MIUI
- Works without requiring root or flashing your device
- Simple interface makes it easy to follow each step, even for beginners
- Unlocks multiple screen lock types, including FRP, pattern, and password
- Safe process that does not harm system data during the FRP bypass process
Dr.Fone - Screen Unlock (Android)
A Powerful Tool for Removing FRP on Android Devices
- Remove FRP lock on Samsung, Xiaomi, Redmi, Oppo, Realme, Vivo, Motorola, Lenovo, Huawei, Micromax, ZTE, and OnePlus phones without password or Google account.
- Bypass Google FRP account on all Samsung Phones and Tablets.
- 100% success rate for FRP bypass on Samsung Snapdragon devices.

- Bypass Google account verification after factory reset.
- No tech knowledge required, Simple, click-through, process.


Dr.Fone is popular because it removes locks without forcing you to install risky APKs or enter developer codes. If you're stuck at the FRP screen, this tool brings back access with just a few clicks.
Step 1. Open the screen unlock module
Start by installing Dr.Fone on your PC. Open the app and go to Toolbox. Click Screen Unlock. Then choose Android as your device type to begin.

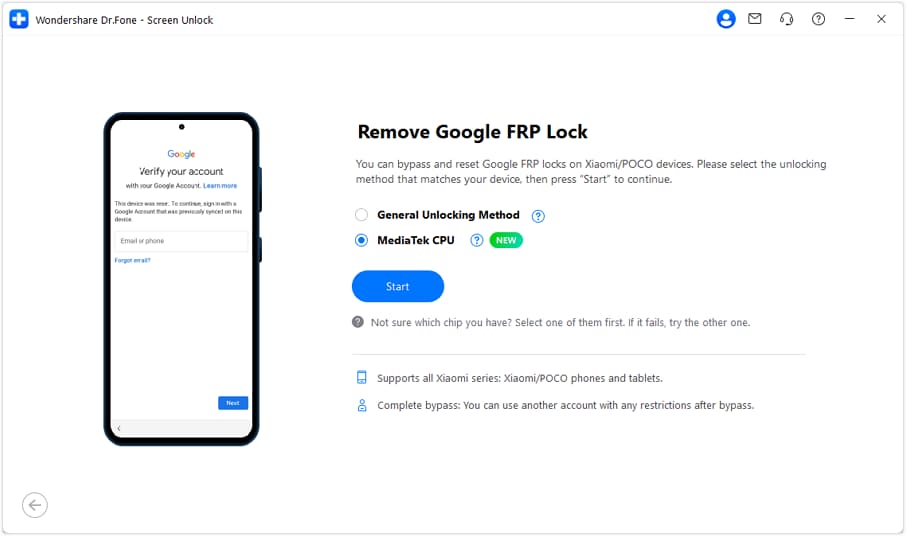
Step 2. Select Redmi and the unlock method
From the list, pick Xiaomi or Redmi. Next, choose the MediaTek CPU method since the Redmi Note 8 and Note 8 Pro use MTK chips. This will load the right process.
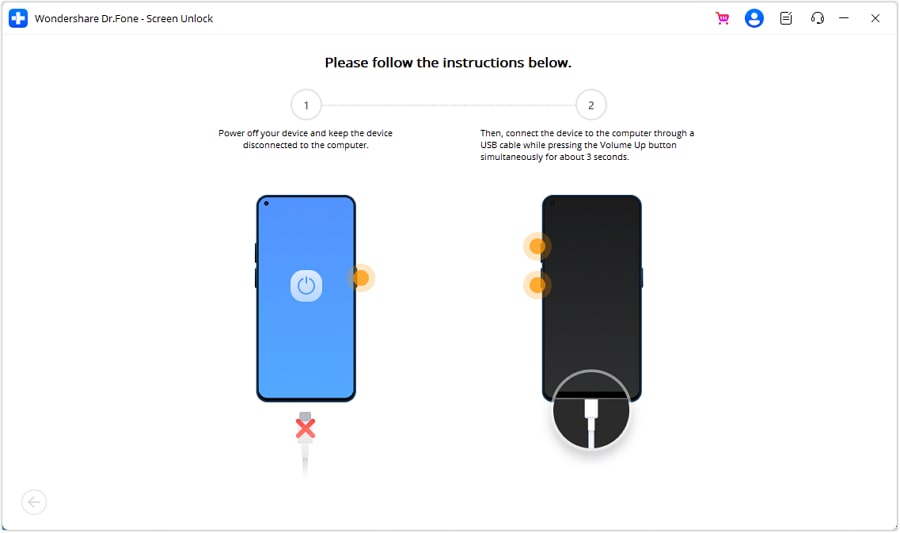
Step 3. Install drivers and connect the phone
Once you pick the phone brand, Dr.Fone will download the correct USB drivers. Now, turn off your phone. Hold the Volume Up and Volume Down buttons together, and plug it into your PC using a cable.
Step 4. Let the unlock process begin
The tool will now start removing the Google lock. No need to press anything. Wait while it runs. It usually takes only a few minutes.
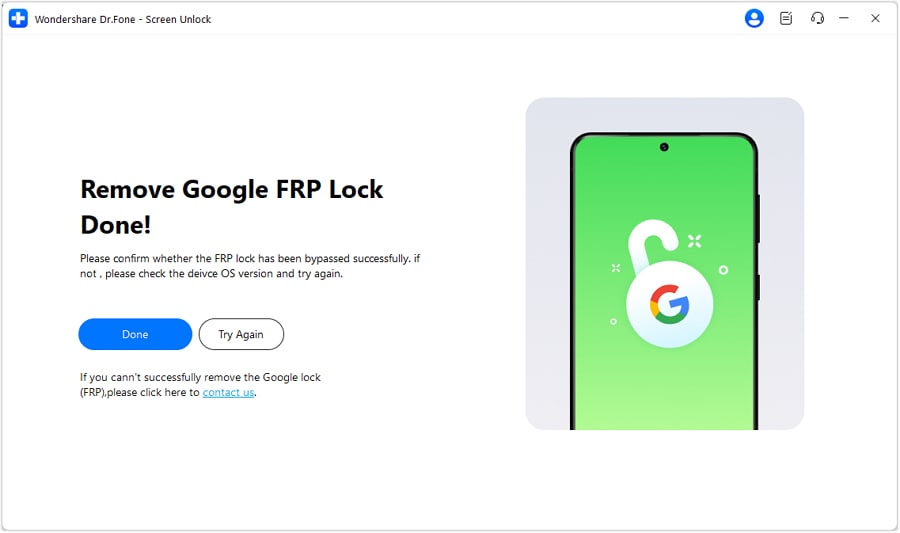
Step 5. Complete the setup and restart your phone
Once done, you’ll see a success message. Tap Done in the tool. Your Redmi Note 8 will restart, now free from the FRP lock and ready to set up again.
4,624,541 people have downloaded it
Part 3. Bypass FRP on Redmi Note 8 via Google Assistant and Accessibility Settings
In case you do not have a computer, you can try bypassing FRP lock using Google Assistant, Accessibility Menu, and app settings of the system. This method does not completely lift the FRP lock, but gives you limited access to the phone. Here is a step-by-step guide on how to do it.
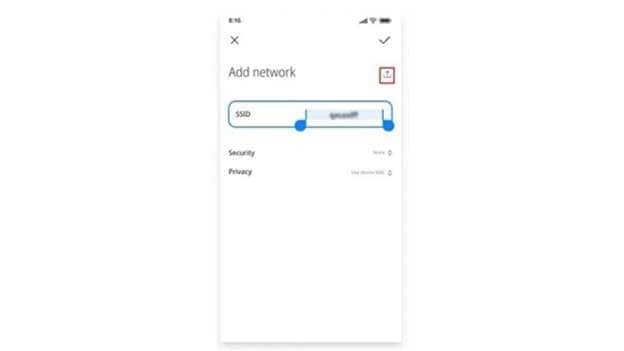
Step 1. Trigger the Gmail Share Option
On the Wi-Fi setup screen, tap “Add Network.” Type random text in the SSID field. Long-press the text until the selection menu shows up. Click on “Share” and choose the Gmail application. This action opens the Gmail interface.
Step 2. Access Help and Feedback via Notifications
Open Gmail and select “Notifications.” Following that, go to “Additional Settings.” Now, go to the upper right-hand corner and click the three dots; from the drop-down, click “Help and Feedback.” Now, search for “Delete or disable apps on Android”. Your selection should be the exact match of the search. Then choose “Tap to go to Application Settings.”
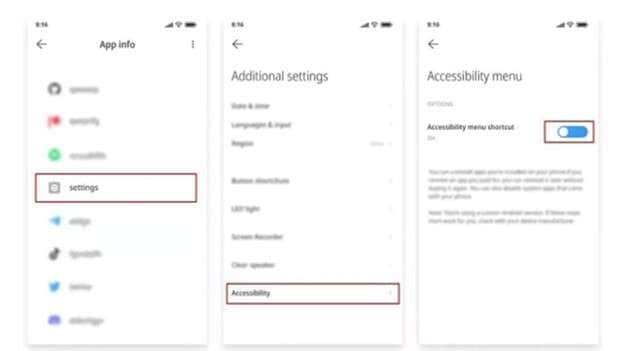
Step 3. Enable the Accessibility Shortcut
Scroll down to “Additional Settings,” then tap “Accessibility.” Find the “Accessibility Menu” and turn on the shortcut. This adds a floating icon for quick access to essential settings.
Step 4. Disable Setup and Carrier Services Apps
Return to the app settings screen by pressing back multiple times. Tap “More” in the top right, then select “Show System.” Scroll through the list and find “Android Setup.” Open it, disable it, then tap “Force Stop” and confirm. Repeat the same for “Carrier Services.”
Step 5. Launch Google Assistant from the Setup Screen
Go back to the Wi-Fi screen. Click on the person icon located in the bottom corner. This will bring up the “Checking for Updates” screen. If Google Assistant appears, open “Settings” inside it. If needed, repeat earlier steps to reaccess Application Settings and enable Google Play Services.
Step 6. Complete Setup Without Google Verification
Once Google Play Services is enabled, return to the update screen. Wait for the setup to finish. When “Setup Complete” appears, tap “More” and then “Accept.” You should now reach the home screen.
Important Note:
This method only disables certain apps to bypass the FRP screen. It does not permanently remove FRP. If the phone is reset again or receives an update, the FRP lock may come back. It also may not work on newer devices or MIUI versions that have patched these steps.
🔓 Xiaomi Account Lock Removal & Free Check
Locked out of your Xiaomi/Redmi/POCO phone? Get 100% remove Mi Account Lock without password or linked number.
Free check • No ads • Professional tech support • Refund guarantee
Part 4. Remove FRP on Redmi Note 8 Using ADB Commands
ADB (Android Debug Bridge) is one of the command tools that allows your computer to communicate with your Android phone. If the USB debugging option is already enabled, the ADB-unlocked Google lock on the phone can be used. ADB is very effective for users who have some technical knowledge.
Step 1. Download and Extract ADB Files
Your first task is to download the ADB Files to your computer. Once the download is complete, extract all the files to a new folder. It is better to save this folder on your desktop or any other place that is easy to access.
Step 2. ADB Driver Installation
Now, locate the folder and double-click on the adb.setup.exe file. You will see a box pop up in the command window. Click on the Y button on your keyboard to install the required ADB drivers. This is important as your computer needs ADB drivers to talk to your phone.
Step 3. Complete Setup and Close Window
After the drivers are installed, you’ll be asked again to confirm. Press Y one more time. The command window will close on its own, and the ADB environment will be ready.
Step 4. Link the Phone with USB Debugging Activated
Pick up your Redmi Note 8 and power it on. Then, link it up to your PC via USB. Remember to enable USB debugging. This method won’t work if debugging is not switched on.
Step 5. Execute ADB Commands to Remove FRP
Press and hold Shift to run ADB commands. Hold it and right-click any empty ADB folder area. Select “Open Command Window Here” or “Open PowerShell Window Here” as desired. Blank command window opens. Enter the commands and hit Enter after each line:
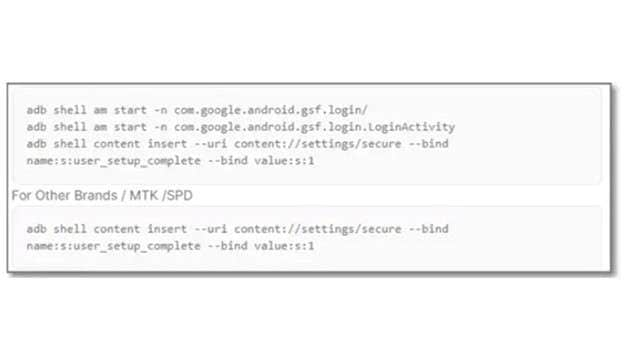
The phone will delete system data and FRP lock with these commands.
Part 5. Complete FRP Bypass on Redmi Note 8 Without Using a PC
If you prefer not to use a computer or third-party tool, there is still a way to bypass the Redmi Note 8 Pro FRP directly on your phone. This method uses built-in apps, sharing features, and hidden shortcuts. It takes more time and patience, but it can work on certain MIUI versions.
Step 1. Start the Device and Connect to Wi-Fi
Switch on your Redmi Note 8 after conducting a factory reset. During setup, connect the phone to a stable Wi-Fi network to continue the setup.
Step 2. Access Privacy Policy Through Keyboard Options
Once you reach the Google Account Verification screen, tap the text input field to bring up the keyboard. Tap “Options” on the keyboard, then select “More.” In the menu that appears, tap “Type Email or Phone,” then choose “Privacy Policy.” This opens a browser-style window.
Step 3. Locate Email in Privacy Policy Section
When the Privacy Policy opens, scroll down to section 13. Tap on the email address mentioned in that section. This triggers the messaging option.
Step 4. Use Messaging App to Launch YouTube
Tap on “Messages,” then select “New Message.” Share any YouTube link from here. When the link opens, go to YouTube’s settings. Tap “YouTube Terms of Service” to launch a browser. Chrome should now open.
Step 5. Download and Install FRP Tools
In Chrome, enter the following URL: https://tiny.cc/frptools. Download the FRP Bypass APK from the page. Once installed, open Google using the app. Use the microphone and say “Share Me” to access the Share Me app.
Step 6. Connect Devices Through QR Code
In Share Me, tap “Receive” and allow it to create a QR code. On another Android phone, download Share Me and Activity Launcher from the Play Store. Launch Share Me on the second phone, tap “Send,” select any Android file, and scan the QR code from the locked phone to connect them.
Step 7. Use Activity Launcher and Link Google Account
On the locked phone, install and open Activity Launcher. In the app, go to “Android Setup” and tap “Copy Google Account.” Now, go to the second phone and use the microphone to say “Open Setup My Device.” This links both devices and pushes the Google account to the locked phone.
Part 6. How to Prevent FRP Lock from Activating Again on Redmi Note 8
FRP unlocking once doesn't mean it can't show up later. If your Google account is still attached, it can reapply the lock after a reset. The only way to circumvent this is to turn off FRP before resetting the phone. Disabling the Google account linked to the phone will do.
Use the following guidelines to turn off FRP lock on Redmi Note 8 for good:
Step 1. Access the Settings Menu
Wake your phone, then go to the home screen. Search for the settings app to access it in your app drawer.
Step 2. Look For the Accounts Section
Open your settings again, this time you have a scroll to Accounts & Sync. Click on the button to view all linked accounts.
Step 3. Remove Google Account
Find the Google account listed under the accounts section. Tap on it. Choose the option to Remove Account and confirm. This will disconnect your Google account from the device.
Conclusion
You’ve now seen what it takes to get past the FRP screen on Redmi phones. Each method, from ADB to no-PC tricks, has its pros and cons. Some may work once, others break after updates. For users needing something reliable, a tool that skips risky steps makes all the difference. That’s where Dr.Fone helps. It performs Redmi Note 8 FRP bypass without any rooting, flashing, or attempts. With a proper strategy and a reliable technique, unlocking is pretty straightforward. Just follow the process, and your device is yours again.
4,624,541 people have downloaded it


Android Screen Unlock
- Unlock Android Screen
- Best Unlock Apps For Android
- Unlock Android Pattern Lock
- Bypass Android lock
- Unlock Android with Broken Screen
- Unlock Android Forgot PIN
- Unlock Without Google Account
- Unlock without Factory Reset
- Unlock Android Tablets
- Reset Locked Android Phone
- SafeUnlocks Review
- Unlock Huawei Phones
- Unlock Google Pixel Phones
- Unlock OnePlus Phones
- Unlock Vivo Phones
- Unlock Sony Xperia
- Unlock LG Phones
- Unlock Mi Pattern Lock
- Unlock OPPO Phones
- Unlock Realme Phones
- Unlock LG Phones
- Unlock Honor Phone
- Unlock Kyocera Phone
- Unlock Samsung Screen
- Bypass Samsung Lock
- Unlock Samsung Password/Pin
- Top Samsung Unlock Softwares
- Samsung Unlock Code Generator
- Get Free Samsung Unlock Codes
- Samsung Galaxy Secret Code List
- Samsung Knox Disable
- Reset Samsung Galaxy A12
- Unlock Samsung S22 Ultra
- Bypass Android FRP
- Top FRP Bypass Tools
- Disable FRP
- Bypass Android FRP
- Bypass FRP with PC
- Bypass FRP with ADB
- Bypass Google Account Verification
- Custom Binary Blocked by FRP Lock
- Bypass Google Pixel FRP
- Bypass Huawei FRP
- Huawei FRP Code
- Bypass Xiaomi/Redmi/Poco FRP
- Bypass OPPO FRP
- Bypass LG FRP
- Bypass Motorola FRP
- Bypass Lenovo FRP
- Bypass Realme FRP
- Bypass ZTE FRP
- Vivo Y15a FRP Bypass
- Moto G Pure FRP Bypass
- Bypass Samsung FRP
- Galaxy Z Fold 7 FRP Bypass
- Bypass Galaxy M01 FRP
- Bypass Samsung M11 FRP
- Bypass Samsung J5 Prime FRP
- Bypass amsung A02/A02 FRP
- Bypass Samsung A10/A10s FRP
- Bypass Samsung A12 FRP
- Bypass SamsungA20/A20S FRP
- Bypass Samsung A21/A21s FRP
- Bypass Samsung Galaxy 50 FRP
- Bypass Samsung Galaxy 51 FRP
- Bypass Samsung S7 FRP
- Bypass Samsung Galaxy S22 FRP
- FRP Bypass Tools
- Test DPC APK
- FRP File Bypass
- ES File Explorer
- Maxroms FRP Bypass
- GSM Aladdin
- Android Novo Tools FRP
- GSMNeo FRP
- Phoenix Service Tool
- MRT Key Review
- XSoft FRP Unlock
- FRPFile FirmwareBD
- ZeroKnox Removal Tool
- Samflash Tool
- Techeligible FRP Unlock
- Riserom FRP Bypass
- Romstage FRP Bypass
- GSM Prime FRP
- ● Manage/transfer/recover data
- ● Unlock screen/activate/FRP lock
- ● Fix most iOS and Android issues
- Free Download Free Download

James Davis
staff Editor